
In this article I will share the steps to boot a RHEL 8 Linux host from LVM snapshot using BOOM. We already have a feature to create a snapshot on a logical volume but now starting with RHEL 7.5 introduced "BOOM" utility for managing LVM snapshot and image boot entries.
Add additional space to Volume Group
You’ll need to have spare storage in your volume group in order to create the LVM snapshots. There should be sufficient space allocated to the snapshot to accommodate the changes applied by the update. A simple rule of thumb that will always yield enough space (but which may require more space than absolutely necessary) is to make the snapshot the same size as the consumed space on the volume, as reported by tools like df . If you need to add storage please see How to extend a logical volume and its file system online in Red Hat Enterprise Linux?
[root@node4 ~]# lsblk
NAME          MAJ:MIN RM  SIZE RO TYPE MOUNTPOINT
sda             8:0    0    8G  0 disk
├─sda1          8:1    0  512M  0 part /boot
└─sda2          8:2    0  7.5G  0 part
  ├─rhel-root 253:0    0 16.1G  0 lvm  /
  └─rhel-swap 253:1    0  956M  0 lvm  [SWAP]
sdb             8:16   0   17G  0 disk
sdc             8:32   0   10G  0 disk
└─sdc1          8:33   0   10G  0 part
  └─rhel-root 253:0    0 16.1G  0 lvm  /
sr0            11:0    1  6.5G  0 rom
sr1            11:1    1 1024M  0 rom
For the sake of this article I have added /dev/sdb on my system and I create a partition /dev/sdb1 with file system type as "8e"
Install BOOM on RHEL 8 Linux
The first step is to install the boom-boot package.
Package installs and updates in this section use dnf command.
[root@node4 ~]# dnf install boom-boot -y
Updating Subscription Management repositories.
Last metadata expiration check: 12:44:30 ago on Thu 20 Jun 2019 12:00:09 AM IST.
Dependencies resolved.
==========================================================================================
 Package                          Arch             Version           Repository
==========================================================================================
Installing:
 boom-boot                        noarch           0.9-5.el8         rhel_dvd_baseos
Installing dependencies:
 boom-boot-conf                   noarch           0.9-5.el8         rhel_dvd_baseos
 python3-boom                     noarch           0.9-5.el8         rhel_dvd_baseos
Installing weak dependencies:
 boom-boot-grub2                  noarch           0.9-5.el8         rhel_dvd_baseos

Transaction Summary
==========================================================================================
Install  4 Packages

Total size: 443 k
Installed size: 2.2 M
Downloading Packages:
Running transaction check
Transaction check succeeded.
Running transaction test
Transaction test succeeded.
Running transaction
  Preparing        :
Installed: boom-boot-conf-0.9-5.el8.noarch
  Installing       : boom-boot-conf-0.9-5.el8.noarch
Installed: boom-boot-conf-0.9-5.el8.noarch
Installed: python3-boom-0.9-5.el8.noarch
  Installing       : python3-boom-0.9-5.el8.noarch
Installed: python3-boom-0.9-5.el8.noarch
Installed: boom-boot-grub2-0.9-5.el8.noarch
  Installing       : boom-boot-grub2-0.9-5.el8.noarch
Installed: boom-boot-grub2-0.9-5.el8.noarch
Installed: boom-boot-0.9-5.el8.noarch
  Installing       : boom-boot-0.9-5.el8.noarch
Installed: boom-boot-0.9-5.el8.noarch
  Running scriptlet: boom-boot-0.9-5.el8.noarch
  Verifying        : boom-boot-0.9-5.el8.noarch
  Verifying        : boom-boot-conf-0.9-5.el8.noarch
  Verifying        : boom-boot-grub2-0.9-5.el8.noarch
  Verifying        : python3-boom-0.9-5.el8.noarch

Installed:
  boom-boot-0.9-5.el8.noarch    boom-boot-grub2-0.9-5.el8.noarch      boom-boot-conf-0.9-5.el8.noarch   python3-b

Complete!
Create LVM Snapshot
Before we create LVM snapshot let use verify some of the contents on our RHEL 8 Linux host. So that later we can verify if our snapshot merge and delete has worked properly.
I have created an important file with below content:
[root@node4 ~]# echo "This is an important file" > importantfile

[root@node4 ~]# cat importantfile
This is an important file
Also I have a testuser available on my RHEL 8 Linux host:
[root@node4 ~]# id testuser
uid=1000(testuser) gid=1000(testuser) groups=1000(testuser),10(wheel)
Since I have extended my volume group with additional drive so now I have enough space to create a snapshot
[root@node4 ~]# vgs
  VG   #PV #LV #SN Attr   VSize   VFree
  rhel   3   2   0 wz--n- <34.49g 17.49g
Below are my existing logical volumes:
[root@node4 ~]# lvs
  LV   VG   Attr       LSize   Pool Origin Data%  Meta%  Move Log Cpy%Sync Convert
  root rhel -wi-ao----  16.06g
  swap rhel -wi-ao---- 956.00m
So let us now create LVM snapshot for our root logical volume using lvcreate command as shown below:
[root@node4 ~]# lvcreate -s rhel/root -n root_snapshot_20062019 -L 16G
  Logical volume "root_snapshot_20062019" created.
Re-validate the available logical volumes:
[root@node4 ~]# lvs
  LV                     VG   Attr       LSize   Pool Origin Data%  Meta%  Move Log Cpy%Sync Convert
  root                   rhel owi-aos---  16.06g
  root_snapshot_20062019 rhel swi-a-s---  16.00g      root   0.16
  swap                   rhel -wi-ao---- 956.00m
Create OS profile
Boom uses a template-driven system for generating boot entries for
different operating systems. Before creating the boot entry, it is
necessary to create an OS Profile with the necessary template
definitions. This can be done using default values obtained from the
running system, or the user can specify command line options to
customize the profile. The uname pattern is a regular expression that
is matched against the system kernel version to determine it the running
system matches a given Os Profile. By setting this to “el8”, it will
automatically detect the correct OS Profile when creating or modifying
boot entries.
[root@node4 ~]# boom profile create --from-host --uname-pattern el8
Created profile with os_id e6f881a:
  OS ID: "e6f881ae3f8a2e010375fb840bb4f386b330db6e",
  Name: "Red Hat Enterprise Linux", Short name: "rhel",
  Version: "8.0 (Ootpa)", Version ID: "8.0",
  UTS release pattern: "el8",
  Kernel pattern: "/vmlinuz-%{version}", Initramfs pattern: "/initramfs-%{version}.img",
  Root options (LVM2): "rd.lvm.lv=%{lvm_root_lv}",
  Root options (BTRFS): "rootflags=%{btrfs_subvolume}",
  Options: "root=%{root_device} ro %{root_opts}"
To list the available OS profile:
[root@node4 ~]# boom profile list
OsID    Name                     OsVersion
e6f881a Red Hat Enterprise Linux 8.0 (Ootpa)
To check the content of the OS profile:
[root@node4 ~]# boom profile show e6f881a
OS Profile (os_id=e6f881a)
  OS ID: "e6f881ae3f8a2e010375fb840bb4f386b330db6e",
  Name: "Red Hat Enterprise Linux", Short name: "rhel",
  Version: "8.0 (Ootpa)", Version ID: "8.0",
  UTS release pattern: "el8",
  Kernel pattern: "/vmlinuz-%{version}", Initramfs pattern: "/initramfs-%{version}.img",
  Root options (LVM2): "rd.lvm.lv=%{lvm_root_lv}",
  Root options (BTRFS): "rootflags=%{btrfs_subvolume}",
  Options: "root=%{root_device} ro %{root_opts}"
Create boot entry for the root logical volume snapshot:
We will create a boot entry for this snapshot by running:
[root@node4 ~]# boom create --title "Root Snapshot - 20/06/2019" --rootlv rhel/root_snapshot_20062019
Created entry with boot_id 3e1b376:
  title Root Snapshot - 20/06/2019
  machine-id 818ab41d69e9442fac4a0eaa1ece0b1f
  version 4.18.0-32.el8.x86_64
  linux /vmlinuz-4.18.0-32.el8.x86_64
  initrd /initramfs-4.18.0-32.el8.x86_64.img
  options root=/dev/rhel/root_snapshot_20062019 ro rd.lvm.lv=rhel/root_snapshot_20062019
# grub2-mkconfig > /boot/grub2/grub.cfgThis step is not needed on RHEL 8 as it uses BLS by default - do not modify the GRUB2 config in RHEL 8.
We can see what snapshots is configured to use by running below command:
[root@node4 ~]# boom list
BootID  Version                  Name                     RootDevice
3e1b376 4.18.0-32.el8.x86_64     Red Hat Enterprise Linux /dev/rhel/root_snapshot_20062019
Next, we will make some changes to our RHEL 8 Linux system, then reboot
from the snapshot. When we boot from the snapshot, any changes made to
the root logical volume after the snapshot was taken should not be
visible. . I will delete my "testuser" and also remove my
"importantfile"
[root@node4 ~]# userdel testuser

[root@node4 ~]# id testuser
id: ‘testuser’: no such user

[root@node4 ~]# rm importantfile
rm: remove regular file 'importantfile'? y
Once completed, the system can be rebooted. On the grub splash screen there should be an entry for "Root Snapshot". Selecting this entry will allow boot to the alternate root.
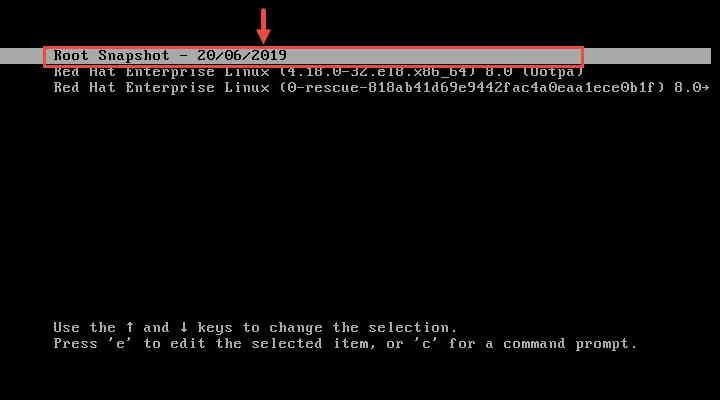
You can verify the content of this menu by pressing "e" to edit
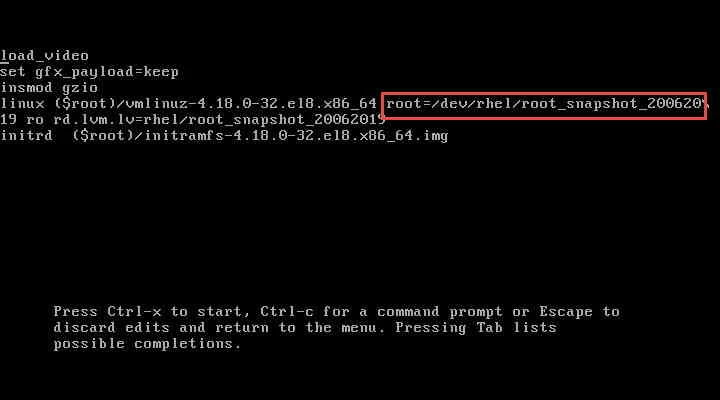
Once we press enter here, the system will boot from this snapshot.
Once logged in to the system, we can see that the changes we made in the root logical volume after the snapshot creation are not present:
[root@node4 ~]# id testuser
uid=1000(testuser) gid=1000(testuser) groups=1000(testuser),10(wheel)
As you see my testuser still exists which if you remember, I had deleted after taking the snapshot. So our changes seems to be working fine.
Verify the GRUB2 option using which the rhel 8 linux host was booted:
[root@node4 ~]# cat /proc/cmdline
BOOT_IMAGE=(hd0,msdos1)/vmlinuz-4.18.0-32.el8.x86_64 root=/dev/rhel/root_snapshot_20062019 ro rd.lvm.lv=rhel/root_snapshot_20062019
Merging the snapshot back into the Original Logical Volume
A common workflow is to make a snapshot before a change, then make the change.
- If the change was successful, usually the snapshot is deleted after some time.
- If the change was not successful, and we need to merge the snapshot in to the original logical volume in order to permanently rollback the unsuccessful changes that were made after the snapshot was created.
So let us assume that our changes were not successful and we wish to roll back to the snapshot state.
Next execute the below command to merge the snapshot.
[root@node4 ~]# lvconvert --merge /dev/rhel/root_snapshot_20062019
  Delaying merge since origin is open.
  Merging of snapshot rhel/root_snapshot_20062019 will occur on next activation of rhel/root.
The lvconvert command reports that it cannot merge the snapshot since
it is open and in use, and that it will be completed on the next
activation.
To delete the snapshot, run the command below, replacing "3e1b376"
with the BootID shown in the earlier command:
[root@node4 ~]# boom entry delete 3e1b376
Deleted 1 entry
To verify the entry was removed:
[root@node4 ~]# boom list
BootID  Version                  Name                     RootDevice
So now since we have merged the LVM snapshot and deleted any BOOM
related entries from GRUB2, we'll go ahead and reboot the server with
the reboot command.
[root@node4 ~]# reboot
Once the RHEL 8 linux host is UP, verify your content. It should be same as before the LVM snapshot was taken.
[root@node4 ~]# id testuser
uid=1000(testuser) gid=1000(testuser) groups=1000(testuser),10(wheel)

[root@node4 ~]# cat importantfile
This is an important file
Now after the merge we don't have our logical volume snapshot file:
[root@node4 ~]# lvs
  LV   VG   Attr       LSize   Pool Origin Data%  Meta%  Move Log Cpy%Sync Convert
  root rhel -wi-ao----  16.06g
  swap rhel -wi-ao---- 956.00m
You can verify the GRUB2 content after the system has booted from primary kernel
[root@node4 ~]# cat /proc/cmdline
BOOT_IMAGE=(hd0,msdos1)/vmlinuz-4.18.0-32.el8.x86_64 root=/dev/mapper/rhel-root ro crashkernel=auto resume=/dev/mapper/rhel-swap rd.lvm.lv=rhel/root rd.lvm.lv=rhel/swap rhgb quiet
Lastly I hope the steps from the article to boot Linux host from LVM snapshot on CentOS / RHEL 8 Linux was helpful. So, let me know your suggestions and feedback using the comment section.
