
In this tutorial we will cover the steps to install and configure OpenLDAP from scratch and then use the OpenLDAP server as a central authentication server which can be used by clients to perform any kind of user lookup and authentication. To demonstrate this we will set up Apache server and create a secure page which can be accessed only with valid login credentials and we will configure our ldap user to access this secure page.
On current RHEL-family Linux, prefer Configure an OpenLDAP client with SSSD for client authentication and Configure Apache LDAP authentication for the web-server pattern shown here. This Ubuntu nslcd walkthrough remains useful when you must understand legacy NSS LDAP clients.
Here is a video version of this tutorial which you can also follow for more detailed explanation.
Lab Environment
We will have two virtual machines running on Oracle VirtualBox. Both VMs are running on Ubuntu 24.10. I have applied two networks on each VMs
Network Configuration
Adapter 1: NAT with Port Forwarding to be able to access the VM using SSH clients such as Putty or in my case Visual Studio Code
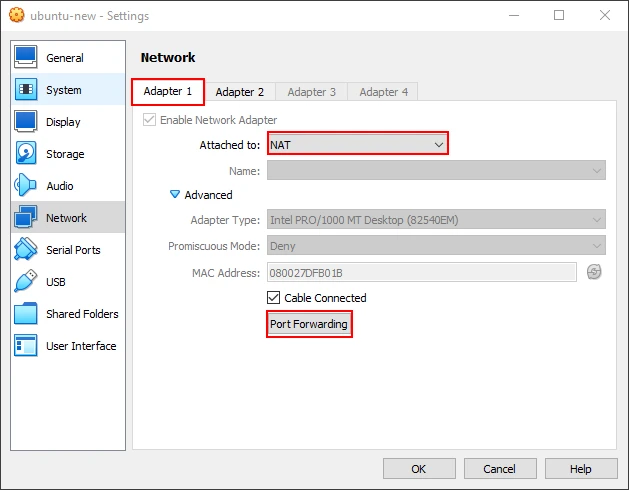

Adapter 2: Host-only network which will be used for inter VM communication
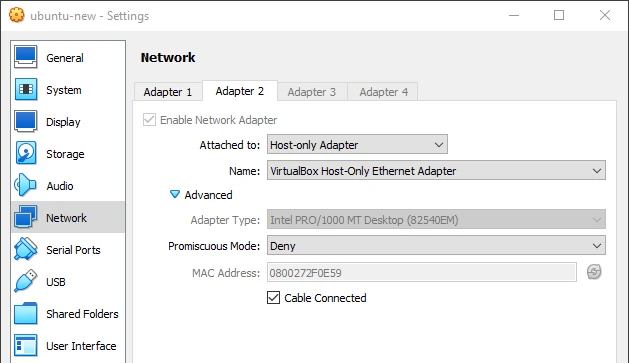
Same network configuration is used for both my VMs
Hostname
My VM1 will act as ldap-server while VM2 will be ldap-client.
I have updated my /etc/hosts file with below entry so that I can directly use my hostname instead of IP Address.
10.10.1.26 ldap-client
10.10.1.27 ldap-server
You can set hostname for your VM using:
Give each VM a stable hostname with hostnamectl before LDAP install; the
hostnamectl command shows
set-hostname syntax.
sudo hostnamectl set-hostname <your-hostname>Next exit and re-connect to your terminal to update your bash prompt.
IP Address
The IP of ldap-server is 10.10.1.27 and IP of ldap-client is 10.10.1.26


Firewall
I have disabled firewall on both my VMs for the demonstration but you can enable the same as per your requirement. On Ubuntu, manage the host firewall with UFW:
sudo ufw disableConfigure OpenLDAP as Centralized Authentication Server
Step-1: Install OpenLDAP
We will start with ldap-server configuration. So connect to ldap-server VM using any remote SSH client and update your repository list
sudo apt updateOnce all the repositories are up to date, install slapd and
ldap-utils package using
apt package manager along with sudo. The slapd package is the main LDAP
package while ldap-utils provides the LDAP utilities packages.
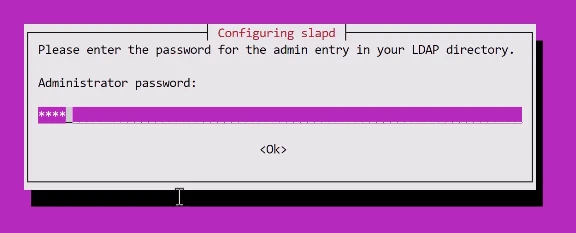
sudo apt install slapd ldap-utils -yDuring the installation, you will get a prompt to provide Administrator password. This password is assigned to the RootDN which is the super user of the LDAP directory. Remember this password as you will need this later to perform any LDAP operation.
Step-2: Configure OpenLDAP
Next let's go ahead and configure our OpenLDAP server. Execute the following command from the terminal:
sudo dpkg-reconfigure slapdThis will prompt with various questions.
- Omit OpenLDAP server configuration: NO
- DNS domain name: glc.example.com
- Organization name: Example
- Provide Administrator password: (Give the same password as given during installation stage)
- Do you want the database to be removed when slapd is purged: NO
- Move old database: YES
That's it, your OpenLDAP server configuration is complete.
We can perform some validation checks to make sure the configuration is successful. Verity your credentials:
ldapwhoami -x -D "cn=admin,dc=glc,dc=example,dc=com" -WHere I am using dc=glc, dc=example, dc=com as I had given my domain as
glc.example.com during slapd configuration. If you have chosen a
different domain then you will have to update all the commands which I
will be using through out this tutorial.
Verify the entries:
ldapsearch -x -b "dc=glc,dc=example,dc=com" -D "cn=admin,dc=glc,dc=example,dc=com" -WThis should print the OpenLDAP content at this stage.
Step-3: Add Required Schema
By default, OpenLDAP comes with several useful schemas located
in/etc/ldap/schema/. When setting up OpenLDAP, there are several
standard schemas that should typically be imported to provide a robust
foundation for your directory services. These schemas
includecore.ldif,cosine.ldif,nis.ldif,
andinetorgperson.ldif. Each schema defines different sets of
attributes and object classes necessary for various directory functions.
- core.ldif: The core schema is essential as it defines the fundamental object classes and attributes that are required by most LDAP directories.
- cosine.ldif: The cosine schema includes additional object classes and attributes used for compatibility with X.500 directories.
- nis.ldif: The NIS schema (Network Information Service) extends the core schema with attributes and object classes used in Unix environments for representing networked information.
- inetorgperson.ldif: The inetOrgPerson schema extends the organizationalPerson object class with attributes that are commonly used for Internet and organizational applications.
You can use this command to show the currently loaded schema:
sudo ldapsearch -Q -LLL -Y EXTERNAL -H ldapi:/// -b cn=schema,cn=config dn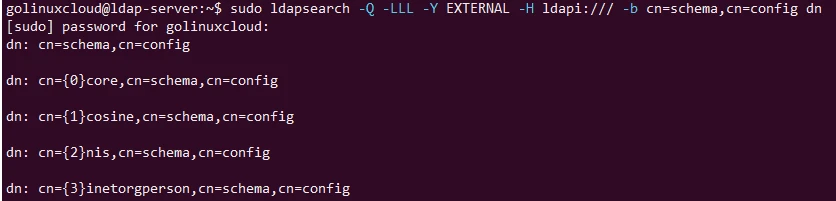
In my case all the required schemas are already loaded by default but if
that is not the case with you then you can load them manually by
selecting appropriate ldif file from /etc/ldap/schema directory.
Once you have located the schema, execute the following command to load them:
sudo ldapadd -Y EXTERNAL -H ldapi:/// -f /etc/ldap/schema/core.ldif
sudo ldapadd -Y EXTERNAL -H ldapi:/// -f /etc/ldap/schema/cosine.ldif
sudo ldapadd -Y EXTERNAL -H ldapi:/// -f /etc/ldap/schema/nis.ldif
sudo ldapadd -Y EXTERNAL -H ldapi:/// -f /etc/ldap/schema/inetorgperson.ldif
Step-4: Create Organizational Units (OUs)
Now we will create OUs for People and Groups. These will serve as
logical containers to keep our users and groups organized. Create a new
file with ou-structure.ldif with following content:
dn: ou=People,dc=glc,dc=example,dc=com
objectClass: organizationalUnit
ou: People

dn: ou=Groups,dc=glc,dc=example,dc=com
objectClass: organizationalUnit
ou: Groups
Add this OU:
ldapadd -x -D "cn=admin,dc=glc,dc=example,dc=com" -W -f ou-structure.ldifStep-5: Create users and groups
Now that our OU is setup, let's create users and groups which we will use in our centralized authentication server. But first we must create encrypted password to be used for the user/
Use slappasswd to create encrypted password"
Password hashes in this section are generated with the slappasswd command.
slappasswdProvide the password on the prompt and it will generate a hashed password.
Create users.ldif file and add entries to create users. In this case I
am creating two users as developer1 and developer2. Replace
userPassword field with the password you generated using slappasswd
command.
dn: uid=developer1,ou=People,dc=glc,dc=example,dc=com
objectClass: inetOrgPerson
objectClass: posixAccount
objectClass: shadowAccount
cn: Developer One
sn: One
uid: developer1
uidNumber: 1001
gidNumber: 1001
homeDirectory: /home/developer1
loginShell: /bin/bash
userPassword: {SSHA}JJag2Yk694DFVGe9GrYSUwz6guwilfpS

dn: uid=developer2,ou=People,dc=glc,dc=example,dc=com
objectClass: inetOrgPerson
objectClass: posixAccount
objectClass: shadowAccount
cn: Developer Two
sn: Two
uid: developer2
uidNumber: 1002
gidNumber: 1002
homeDirectory: /home/developer2
loginShell: /bin/bash
userPassword: {SSHA}JJag2Yk694DFVGe9GrYSUwz6guwilfpS
Execute the following command to create the users:
ldapadd -x -D "cn=admin,dc=glc,dc=example,dc=com" -W -f users.ldifNext let's create some group. I will create a file as groups.ldif and
create two groups as developers and admins.
dn: ou=Groups,dc=glc,dc=example,dc=com
objectClass: organizationalUnit
ou: Groups

dn: cn=developers,ou=Groups,dc=glc,dc=example,dc=com
objectClass: posixGroup
cn: developers
gidNumber: 1001
memberUid: developer1
memberUid: developer2

dn: cn=admins,ou=Groups,dc=glc,dc=example,dc=com
objectClass: posixGroup
cn: admins
gidNumber: 1002
memberUid: developer1
Create the groups:
ldapadd -x -D "cn=admin,dc=glc,dc=example,dc=com" -W -f groups.ldifVerify the entries
ldapsearch -x -b "dc=glc,dc=example,dc=com" -D "cn=admin,dc=glc,dc=example,dc=com" -WThis should show you all the list of users and groups we created earlier.
Integrate OpenLDAP Client with Authentication Server using NSLCD
In this section we will configure our ldap-client to integrate with the
ldap-server which will act as centralized authentication server and
users will be able to login on the ldap-client via NSLCD.
Step-1: Install required packages
Install libpam-ldap and libnss-ldaps which will act as NSS and PAM
module to authenticate LDAP users using the OpenLDAP server. Install
nslcd which will act as a bridge between ldap server and client.
sudo apt install libpam-ldapd libnss-ldapd nslcd -yThis will prompt for LDAP server details, since we have updated our hosts file to map LDAP server's IP with hostname so we will directly use the hostname

Provide LDAP server search base based on your LDAP server configuration

Select the entries which should query LDAP server for user lookup and
authentication. We need passwd, group and shadow

Now the respective configuration files will be updated
Step-2: Verify nsswitch.conf
Make sure ldap is added under passwd, group and shadow section of the /etc/nsswitch.conf file so that LDAP can be used to perform the user lookup and authentication.
golinuxcloud@ldap-client:~$ grep ldap /etc/nsswitch.conf
passwd:         files systemd sss ldap
group:          files systemd sss ldap
shadow:         files systemd sss ldap
Step-3: Verify and update /etc/nslcd.conf
The nscld file will be updated with some of the entries as we added
during the configuration stage earlier, but we need to also add more
things here. You can verify that uri and base entries are updated
with our ldap server details.
# The location at which the LDAP server(s) should be reachable.
uri ldap://ldap-server/

# The search base that will be used for all queries.
base dc=glc,dc=example,dc=com
Next we need to add binddn and bindpw entries:
binddn cn=admin,dc=glc,dc=example,dc=com
bindpw Passw0rd
We will turn off SSL
# SSL options
ssl off
Restart nslcd configuration for the new changes to take affect:
Control the running service with systemctl start, stop, or restart; see the systemctl command for try-restart and dependency behavior.
sudo systemctl restart nslcdVerify the status of the service to make sure it is Running:
sudo systemctl status nslcd
Step-4: Verify integration with LDAP server
We can use getent to fetch the user data from ldap server:
getent passwd developer1`
getent passwd developer2
You should see entries like below:

This would mean that the user lookup integration of NSLCD with OpenLDAP is working properly.
We can also try to authenticate user developer1 using su:
su - developer1
As you can see, we have successfully logged in using developer1. You can ignore the warning for now as the user's home directory is not available. You can manually create the same:
Ownership changes in this section use chown command syntax.
sudo mkdir /home/developer1

sudo chown developer1:developers /home/developer1/
sudo chmod 700 /home/developer1/
Now if we try to login then then the warning will not appear:

I can understand that this procedure can be a pain to create every time manually for every LDAP user so we can automate this using PAM.
Ensure the pam_mkhomedir module is installed
List files shipped by a package with dpkg -L; the dpkg command shows how to locate binaries and configuration paths.
dpkg -l | grep libpam-modulesIf not installed then you can install it manually using below command:
sudo apt install libpam-modulesNext we need to modify /etc/pam.d/common-session and
/etc/pam.d/common-session-noninteractive to add following line in the
end of the file:
session required pam_mkhomedir.so skel=/etc/skel umask=0022Sample:

Now let's try to login using developer2 user:
su - developer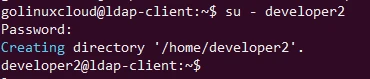
As you can see, this time the user's home directory was automatically created.
Configure Apache2 to use authentication from LDAP Server
Make sure you have apache2 installed, if not it can be installed using following apt command:
sudo apt update
sudo apt install apache2 -y
Once installed, we need to enable following modules to allow authentication using LDAP Server
sudo a2enmod ldap
sudo a2enmod authnz_ldap
Next we will configure virtual hosts to create a simple web page which can be only accessed via LDAP users.
sudo cat /etc/apache2/sites-available/000-default.confRemove everything and add following entries. This is just for my demonstration, you can accordingly plan to modify your existing virtual hosts configuration:
<Directory /var/www/html/secure>
    AuthType Basic
    AuthName "LDAP Authentication"
    AuthBasicProvider ldap
    AuthLDAPURL ldap://ldap-server/dc=glc,dc=example,dc=com?uid?sub?(objectClass=*)
    AuthLDAPBindDN "cn=admin,dc=glc,dc=example,dc=com"
    AuthLDAPBindPassword "Passw0rd"
    Require valid-user
</Directory>
Restart the service to apply the new changes:
sudo systemctl restart apache2Make sure the service is running properly
sudo systemctl status apache2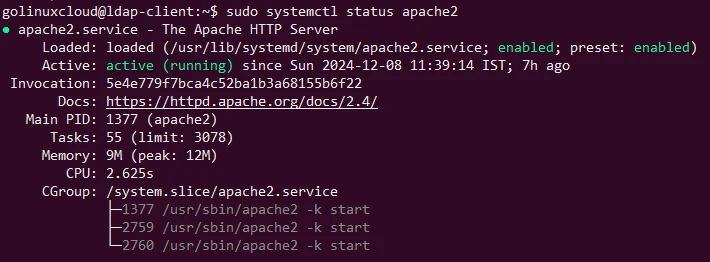
Next head over to your server's GUI to access the secure page we just
created using https://127.0.0.1/secure/. As expected, the page is
prompting for login credentials. Provide the developer1 login details:

and apache2 has allowed us to access the /secure page which means our
centralized authentication server is working perfectly for system as
well as application such as apache2.

This much for today. You can share your feedbacks and questions using comment section and I can try to address them to the best of my knowledge.
