Detecting if a user is online or offline can be useful for a variety of reasons in web applications. For example, it can help you to provide real-time features such as chat or notifications, or to track user activity for analytics purposes. There are several methods you can use to detect a user's online status:
- Session tracking: One common approach is to use server-side session tracking to determine when a user was last active. This can be done by setting a timestamp in the user's session data whenever they perform an action on the site, such as loading a page or submitting a form. You can then compare this timestamp to the current time to determine if the user is currently online or offline.
- Heartbeat monitoring: Another approach is to use client-side heartbeat monitoring to detect when a user is active on the site. This involves periodically sending a small request to the server (known as a "heartbeat") to indicate that the user is still active. You can then use the frequency of these requests to determine if the user is online or offline.
- WebSocket connections: If you need real-time updates, you can use WebSocket connections to establish a persistent connection between the client and the server. This allows the server to push updates to the client in real-time, without the need for periodic polling.
- IP address tracking: Another method is to track the user's IP address and assume that they are online as long as their IP address remains connected to the server. However, this approach can be less accurate, as a user's IP address may remain connected even if they are not actively using the site.
These are just a few examples of the methods you can use to detect a user's online status. The best approach will depend on your specific use case and the requirements of your application.
Here is a screenshot which shows the status ofthe user online or offline on Laravel, let's explore how this can be achieved using Session Tracking.

It is simple. Follow these straightforward steps to achieve the effect.
Step-1: Install a new Laravel app
laravel new user_online
cd user_online
We install a new Laravel 10 app called user_online and cd into the
new project directory.
Step-2: Generate Auth scaffolding
composer require laravel/breeze --dev
php artisan breeze:install
The Breeze package simplifies Laravel authentication. You don't have to create user registration and authentication from scratch. Besides, it is comes with Tailwind CSS and Alpine.js configuration.
Step-3: Track the status in the database
Create database with the name specified in the .env file.
mysql -u root -p
mysql> create database user_online;
mysql> exit;
Next, insert a last_seen record in the database.
// in <date>_000000_create_users_table

<?php

use Illuminate\Database\Migrations\Migration;
use Illuminate\Database\Schema\Blueprint;
use Illuminate\Support\Facades\Schema;

return new class extends Migration
{
    /**
     * Run the migrations.
     */
    public function up(): void
    {
        Schema::create('users', function (Blueprint $table) {
            $table->id();
            $table->string('name');
            $table->string('email')->unique();
            $table->timestamp('email_verified_at')->nullable();
            $table->string('password');
            $table->timestamp('last_seen')->nullable();
            $table->rememberToken();
            $table->timestamps();
        });
    }

    /**
     * Reverse the migrations.
     */
    public function down(): void
    {
        Schema::dropIfExists('users');
    }
};
Migrate the changes.
php artisan migrateStep-4: Create and configure status middleware
A status middleware is a piece of code that can be used to determine if
a user is online or offline in a web application. To create a status
middleware in Laravel, you can use the php artisan make:middleware
command to generate a new middleware class. In this class, you can add
logic to update the user's last activity timestamp and check if the user
is online or offline. To use the middleware, you can add it to the
appropriate route or group of routes in your web.php file. This will
ensure that the middleware is run on every request to that route or
group of routes, allowing you to track the user's online status in
real-time
php artisan make:middleware UserActivity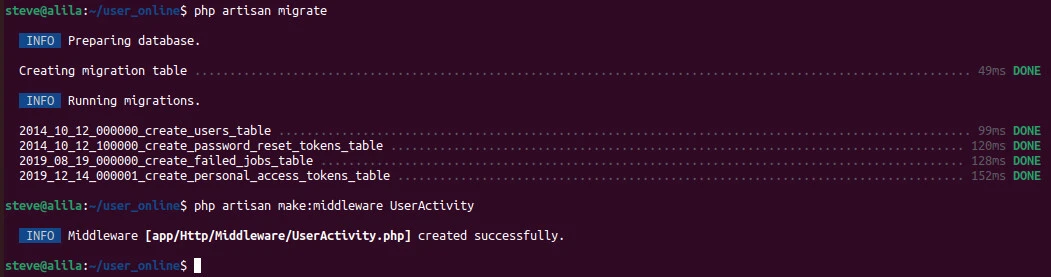
Now tell the
middleware app/Http/Middle/UserActivity file how to
handle the status of the user online or offline on Laravel.
<?php

namespace App\Http\Middleware;
use App\Models\User;
use Illuminate\Support\Facades\Auth;
use Illuminate\Support\Facades\Cache;
use Carbon\Carbon;
use Closure;
use Illuminate\Http\Request;
use Symfony\Component\HttpFoundation\Response;

class UserActivity
{
    /**
     * Handle an incoming request.
     *
     * @param  \Closure(\Illuminate\Http\Request): (\Symfony\Component\HttpFoundation\Response)  $next
     */
    public function handle(Request $request, Closure $next): Response
    {
        if (Auth::check()) {
            $expires_after = Carbon::now()->addSeconds(5);
            Cache::put('user-online' . Auth::user()->id, true, $expires_after);
        }
        return $next($request);
    }
}
Using the Carbon class, we track the amount of time that has elapsed. We use the class to persist the user's online online status even after they have logged out of the dashboard.
Lastly, register the new middleware in the app/Http/Kernel.php file.
<?php

namespace App\Http;

use Illuminate\Foundation\Http\Kernel as HttpKernel;

class Kernel extends HttpKernel
{
    /**
     * The application's global HTTP middleware stack.
     *
     * These middleware are run during every request to your application.
     *
     * @var array<int, class-string|string>
     */
    protected $middleware = [
        // \App\Http\Middleware\TrustHosts::class,
        \App\Http\Middleware\TrustProxies::class,
        \Illuminate\Http\Middleware\HandleCors::class,
        \App\Http\Middleware\PreventRequestsDuringMaintenance::class,
        \Illuminate\Foundation\Http\Middleware\ValidatePostSize::class,
        \App\Http\Middleware\TrimStrings::class,
        \Illuminate\Foundation\Http\Middleware\ConvertEmptyStringsToNull::class,
    ];

    /**
     * The application's route middleware groups.
     *
     * @var array<string, array<int, class-string|string>>
     */
    protected $middlewareGroups = [
        'web' => [
            \App\Http\Middleware\EncryptCookies::class,
            \Illuminate\Cookie\Middleware\AddQueuedCookiesToResponse::class,
            \Illuminate\Session\Middleware\StartSession::class,
            \Illuminate\View\Middleware\ShareErrorsFromSession::class,
            \App\Http\Middleware\VerifyCsrfToken::class,
            \Illuminate\Routing\Middleware\SubstituteBindings::class,
            \App\Http\Middleware\UserActivity::class,
        ],

        'api' => [
            // \Laravel\Sanctum\Http\Middleware\EnsureFrontendRequestsAreStateful::class,
            \Illuminate\Routing\Middleware\ThrottleRequests::class.':api',
            \Illuminate\Routing\Middleware\SubstituteBindings::class,
        ],
    ];

    /**
     * The application's middleware aliases.
     *
     * Aliases may be used to conveniently assign middleware to routes and groups.
     *
     * @var array<string, class-string|string>
     */
    protected $middlewareAliases = [
        'auth' => \App\Http\Middleware\Authenticate::class,
        'auth.basic' => \Illuminate\Auth\Middleware\AuthenticateWithBasicAuth::class,
        'auth.session' => \Illuminate\Session\Middleware\AuthenticateSession::class,
        'cache.headers' => \Illuminate\Http\Middleware\SetCacheHeaders::class,
        'can' => \Illuminate\Auth\Middleware\Authorize::class,
        'guest' => \App\Http\Middleware\RedirectIfAuthenticated::class,
        'password.confirm' => \Illuminate\Auth\Middleware\RequirePassword::class,
        'signed' => \App\Http\Middleware\ValidateSignature::class,
        'throttle' => \Illuminate\Routing\Middleware\ThrottleRequests::class,
        'verified' => \Illuminate\Auth\Middleware\EnsureEmailIsVerified::class,
    ];
}
Step-5: Write the controller
Make the controller.
php artisan make:controller UserControllerThen, tell the controller file how to handle user online or offline on Laravel whenever user status is requested.
<?php
namespace App\Http\Controllers;
use App\Models\User;
use Illuminate\Support\Facades\Cache;
class UserController extends Controller
{
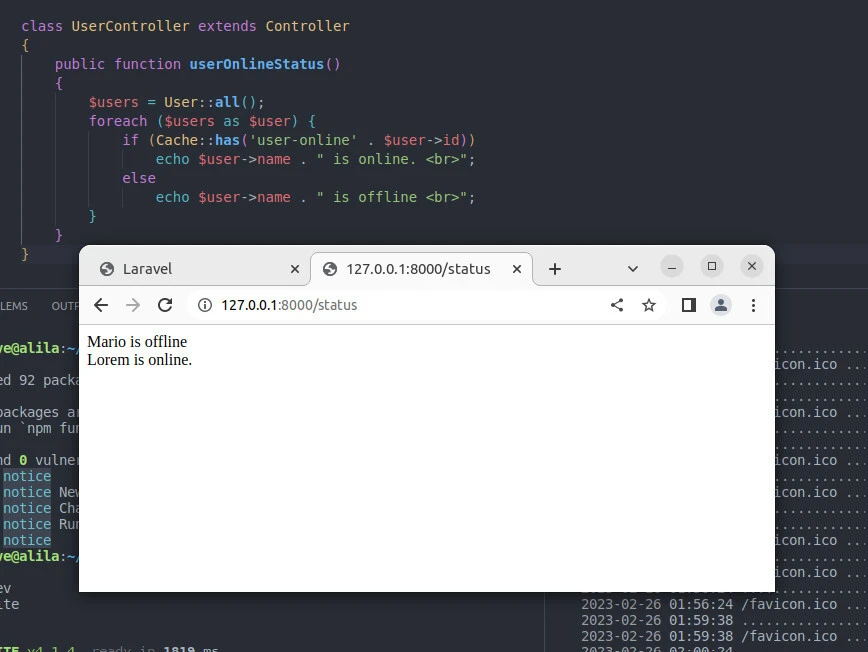
public function userOnlineStatus()
{
$users = User::all();
foreach ($users as $user) {
if (Cache::has('user-online' . $user->id))
echo $user->name . " is online. <br>";
else
echo $user->name . " is offline <br>";
}
}
}Now make the controller accessible through the routes/web.php file.
<?php

use App\Http\Controllers\ProfileController;
use Illuminate\Support\Facades\Route;
use App\Http\Controllers\UserController;

Route::get('/', function () {
    return view('welcome');
});

Route::get('status', [UserController::class, 'userOnlineStatus']);

Route::get('/dashboard', function () {
    return view('dashboard');
})->middleware(['auth', 'verified'])->name('dashboard');

Route::middleware('auth')->group(function () {
    Route::get('/profile', [ProfileController::class, 'edit'])->name('profile.edit');
    Route::patch('/profile', [ProfileController::class, 'update'])->name('profile.update');
    Route::delete('/profile', [ProfileController::class, 'destroy'])->name('profile.destroy');
});

require __DIR__.'/auth.php';
The userOnlineStatus function in the UserController will be invoked
on hitting the status route.
Step-6: Create a view
<!DOCTYPE html>
<html lang="{{ str_replace('_', '-', app()->getLocale()) }}">
    <head>
        <meta charset="utf-8">
        <meta name="viewport" content="width=device-width, initial-scale=1">

        <title>Laravel</title>

        <!-- Fonts -->
        <link rel="preconnect" href="https://fonts.bunny.net">
        <link href="https://fonts.bunny.net/css?family=figtree:400,600&display=swap" rel="stylesheet" />

        <!-- Styles -->
        @vite(['resources/css/app.css', 'resources/js/app.js'])
    </head>
    <body class="antialiased">
        <div class="relative sm:flex sm:justify-center sm:items-center min-h-screen bg-dots-darker bg-center bg-gray-100 dark:bg-dots-lighter dark:bg-gray-900 selection:bg-red-500 selection:text-white">
            @if (Route::has('login'))
                <div class="sm:fixed sm:top-0 sm:right-0 p-6 text-right">
                    @auth
                        <a href="{{ url('/dashboard') }}" class="font-semibold text-gray-600 hover:text-gray-900 dark:text-gray-400 dark:hover:text-white focus:outline focus:outline-2 focus:rounded-sm focus:outline-red-500">Dashboard</a>
                    @else
                        <a href="{{ route('login') }}" class="font-semibold text-gray-600 hover:text-gray-900 dark:text-gray-400 dark:hover:text-white focus:outline focus:outline-2 focus:rounded-sm focus:outline-red-500">Log in</a>

                        @if (Route::has('register'))
                            <a href="{{ route('register') }}" class="ml-4 font-semibold text-gray-600 hover:text-gray-900 dark:text-gray-400 dark:hover:text-white focus:outline focus:outline-2 focus:rounded-sm focus:outline-red-500">Register</a>
                        @endif
                    @endauth
                </div>
            @endif

            <div class="w-4/5 mx-auto my-4 sm:w-1/2">
                <h2 class="text-2xl semi-bold mb-10 text-center">All Users</h2>

                @php $users = DB::table('users')->get(); @endphp
                <table class="border-1 shadow-xl w-full">
                    <tr class="bg-gray-300">
                        <th class="py-2 text-center">Name</th>
                        <th class="py-2 text-center">Email</th>
                        <th class="py-2 text-center">Status</th>

                    </tr>
                    @foreach($users as $user)
                        <tr>
                            <td class="py-2 text-center">{{$user->name}}</td>
                            <td class="py-2 text-center">{{$user->email}}</td>
                            <td class="py-2 text-center">
                                @if(Cache::has('user-online' . $user->id))
                                    <span class="text-green-500">Online</span>
                                @else
                                    <span class="text-gray-500">Offline</span>
                                @endif
                            </td>

                        </tr>
                    @endforeach
                </table>

            </div>

        </div>
    </body>
</html>
We loop through all the users and display them with their online or offline statuses on a table.
Step-7: Start development servers
frontend
npm install
npm run dev
We install frontend assets that came with Breeze and then start the dev server.
backend
php artisan serveSimilarly, we start the Laravel dev server, accessible
via http://127.0.0.1:8000.

Now an logged in user has an online status, whereas a logged out user has an offline status.
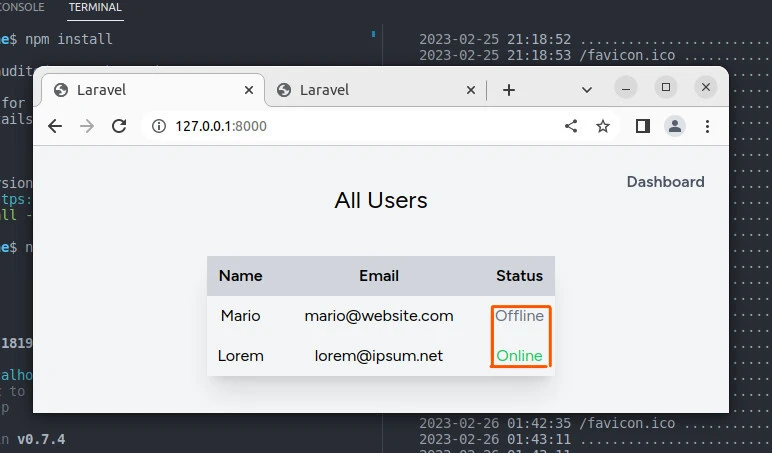
Likewise, the status route reveals all users with online or offline
status message.
Conclusion
In seven steps, you have successfully created and configured an app to handle user online or offline on Laravel. You:
- installed a new Laravel app and scaffolded the auth with Laravel Breeze.
- created a database and inserted user (online or offline) status record into it. You then made the auth middleware before configuring and registering it.
- created the views file to see a table of online and offline users.
Session tracking is a common approach to detect if a user is online or offline in web applications. To implement this approach, you can use server-side session data to store the user's last activity timestamp. When a user logs in, you can store their current timestamp in their session data. Then, create a middleware to update the user's last activity timestamp on every request. Use the last activity timestamp to determine if the user is online or offline. For example, you can create a helper function that checks if the user's last activity timestamp is less than a certain amount of time old. If it is, the function returns true to indicate that the user is online. Otherwise, the function returns false to indicate that the user is offline. You can then use this helper function in your views or controllers to display the user's online status.
Overall, session tracking is a simple and effective way to implement user online/offline detection in web applications. However, keep in mind that this approach requires server-side session data and may not be suitable for applications that require real-time updates or high-precision tracking of user activity. If real-time updates are needed, other methods such as WebSocket connections or client-side heartbeat monitoring may be more suitable.
