
In this article I will share the steps to create anaconda updates.img which is used with inst.updates in GRUB2 menu or in PXE configuration file for boot menu with examples.

What is product.img or updates.img image file?
A product.img or updates.img image file is an archive containing
files which replace existing files or add new ones in the installer
runtime. During boot, Anaconda loads this file from the images/
directory on the boot media. Then, it uses files present inside this
file to replace identically named files in the installer's file system;
this is necessary to customize the installer (for example, for replacing
default images with custom ones).
product.img or updates.img image must contain a directory
structure identical to the installer.
Create anaconda updates.img
If you are working on anaconda or looking at a bug and want to test your
own bug fixes, it's easy to create your own updates.img file. An
updates.img can include more than just files from anaconda, though. It
can also include shared libraries, graphics, other python modules, and
certain data files used by anaconda.
Now before I share the steps to create anaconda updates.img, you must
be familiar with the directory structure so that your changes can be
dumped properly on the host. For the sake of this article I will create
a new udev rule file and add it in my updates.img file
The location fo this udev rule file must be
/usr/lib/udev/rules.d/
Navigate to a working directory such as /tmp, and create the directory
structure similar to as the above rules.d under a temporary folder.
# cd /tmp
Here I will create a temporary directory custom_updates_img where we
will create anaconda updates.img
[root@rhel-7 tmp]# mkdir custom_updates_img

[root@rhel-7 tmp]# cd custom_updates_img
Create the required directory structure
[root@rhel-7 custom_updates_img]# mkdir -p usr/lib/udev/rules.d/
Now place your rule file inside
/tmp/custom_updates_img/usr/lib/udev/rules.d/
[root@rhel-7 custom_updates_img]# cd usr/lib/udev/rules.d/

[root@rhel-7 rules.d]# ls -l
total 4
-rw-r--r--. 1 root root 876 Sep 14 01:05 20-persistent-net.rules
Repeat the above steps (create a directory structure and move modified files into it) for every file you want to add to the installer.
Create a .buildstamp file in the root of the directory which will
become the updates.img file. The .buildstamp file describes the
system version and several other parameters. The following is an example
of a .buildstamp file from Red Hat Enterprise Linux 7.6:
[Main]
Product=Red Hat Enterprise Linux
Version=7.6
BugURL=your distribution provided bug reporting tool
IsFinal=False
UUID=201904040748.x86_64
[Compose]
Lorax=19.6.92-1
IsFinal parameter, which specifies whether the image is for a
release (GA) version of the product (True), or a pre-release such as
Alpha, Beta, or an internal milestone (False). Since this change is for
demonstration, I will use False
The tool used to create such installation media is lorax. Whenever Engineering needs to modify the boot.iso or create an ISO, lorax is used.
Below is our final list for updates.img
[root@rhel-7 custom_updates_img]# ls -la
total 8
drwxr-xr-x.  3 root root   36 Sep 14 01:35 .
drwxrwxrwt. 10 root root 4096 Sep 14 01:15 ..
-rw-r--r--.  1 root root  170 Sep 14 01:35 .buildstamp
drwxr-xr-x.  3 root root   17 Sep 14 01:20 usr
Change into the /tmp/custom_updates_img directory, and create the
updates.img archive:
[root@rhel-7 rules.d]# cd /tmp/custom_updates_img

[root@rhel-7 custom_updates_img]# find . | cpio -c -o | gzip -9cv > ../updates.img
5 blocks
 80.3%
This creates an updates.img file one level above the
custom_updates_img/ directory.
Verify your updates.img file
[root@rhel-7 custom_updates_img]# ls -lh ../updates.img
-rw-r--r--. 1 root root 361 Sep 14 01:15 ../updates.img
Check the content of updates.img image file
[root@rhel-7 custom_updates_img]# lsinitrd /tmp/updates.img
Image: /tmp/updates.img: 4.0K
========================================================================
Version:

Arguments:
dracut modules:
========================================================================
drwxr-xr-x   3 root     root            0 Sep 14 01:05 .
-rw-r--r--   1 root     root          170 Sep 14 01:35 .buildstamp
drwxr-xr-x   3 root     root            0 Sep 14 01:02 usr
drwxr-xr-x   3 root     root            0 Sep 14 01:02 usr/lib
drwxr-xr-x   3 root     root            0 Sep 14 01:02 usr/lib/udev
drwxr-xr-x   2 root     root            0 Sep 14 01:05 usr/lib/udev/rules.d
-rw-r--r--   1 root     root          876 Sep 14 01:05 usr/lib/udev/rules.d/20-persistent-net.rules
========================================================================
Now you can copy your updates.img to the location using which you wish
to mount and share the image file.
How to use or mount updates.img during boot up stage?
Instead of adding the updates.img or product.img file on the boot
media, you can place this file into a different location and use the
inst.updates= boot option at the boot menu to load it.
In that case, the image file can have any name, and it can be placed in any location (USB flash drive, hard disk, HTTP, FTP or NFS server), as long as this location is reachable from the installation system.
inst.updates=
Specifies the location of the updates.img file to be applied to the installation program runtime.
The syntax to be used is shown in below table. In all formats, if you do not specify a file name but only a directory, the installation program will look for a file named updates.img
| Installation Source | Option Format |
|---|---|
| Any CD/DVD drive | inst.updates=cdrom |
| Specific CD/DVD drive | inst.updates=cdrom:device |
| Hard Drive | inst.updates=hd:device:/path |
| HMC | inst.updates=hmc |
| HTTP Server | inst.updates=http://host/path |
| HTTPS Server | inst.updates=https://host/path |
| FTP Server | inst.updates=ftp://username:password@host/path |
| NFS Server | inst.updates=nfs:server:/path,nfsvers=3 (For NFSv3) inst.updates=nfs:server:/path,nfsvers=4 (For NFSv4) |
Mount updates.img with PXE based installation
Here I am using NFS protocol to mount the updates.img at the initial
stage of PXE based installation. Below is my sample PXE boot file
default autoinst
label autoinst
        IPAPPEND 2
        kernel rhel7_64/vmlinuz
        append initrd=rhel7_64/initrd.img ramdisk_size=65536 vga=no ksdevice=bootif ks=nfs:10.10.10.20:/home/custom_install/kickstart.conf,nfsvers=4 inst.updates=nfs:10.10.10.20:/tmp/custom_initrd/updates.img,nfsvers=3
Mount updates.img with DVD based installation
Here I will boot my vm running on Oracle VirtualBox installed on my Linux Server with RHEL 7.6 ISO DVD.
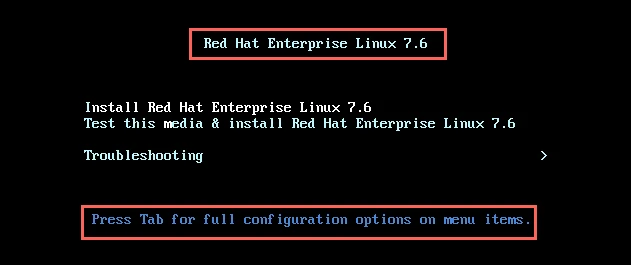
You will get this screen to start the installation here press TAB to bring the boot menu
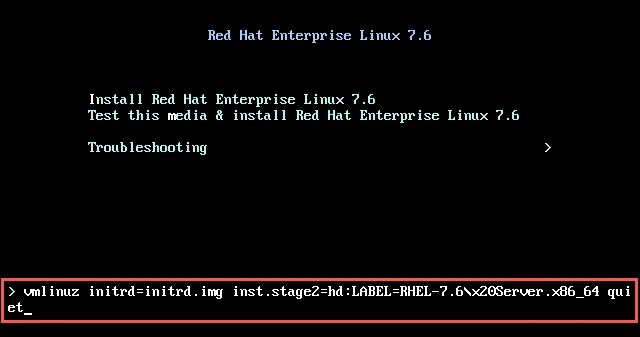
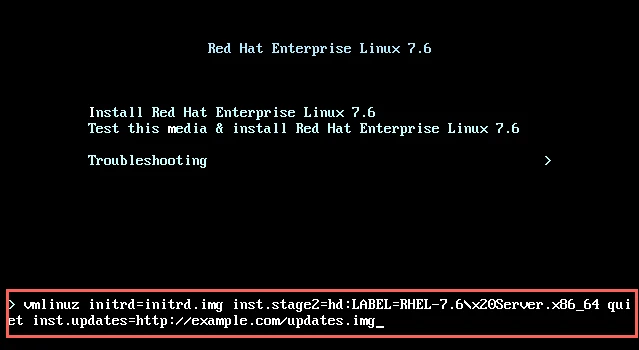
Here append the additional content to mount updates.img using
inst.updates as shown below (I have used HTTP as example but you can use
any other supported protocol)
Extract updates.img image file
Now after you create anaconda updates.img, you can also extract the
updates.img image file for further modification. Again create a
temporary directory and extract the updates.img file using below
command
[root@rhel-7 custom_updates_img]# gunzip -dc /tmp/updates.img | cpio -id
4 blocks
Check the content of your updates.img
[root@rhel-7 custom_updates_img]# ls -l
total 0
drwxr-xr-x. 3 root root 17 Sep 14 01:20 usr
Lastly I hope the steps from the article to create anaconda updates.img on RHEL 7 and 8 Linux was helpful. So, let me know your suggestions and feedback using the comment section.

![What are GRUB Files in Linux? [In-Depth Tutorial]](/what-are-grub-files/what-are-grub-files_hu_821fea5cc5252f8b.webp)


![Setup IPv4 UEFI PXE Boot Server Ubuntu 20.04 [cloud-init]](/uefi-pxe-boot-server-ubuntu-20-04-cloud-init/ipv4_uefi_pxe_ubuntu_hu_1ff85f490e484a8e.webp)

![Configure IPv6 UEFI PXE Boot with Kickstart [RHEL/CentOS 8]](/ipv6-uefi-pxe-boot-kickstart-rhel-centos-8/ipv6_uefi_hu_c138fd3d6c0bb695.webp)