
I personally use Rufus to create bootable USB from ISO on a Windows environment. But currently Rufus can be installed only on Windows environment and not on Linux nodes. So we must find some alternatives to Rufus to create bootable USB from ISO Linux command line or GUI. In this article I will share 5 different tools which you can use to burn ISO to USB drive with examples.
Create bootable USB from ISO Linux Command Line or GUI
Method 1: Unetbootin
UNetbootin allows you to create bootable USB from ISO linux for Ubuntu and other Linux distributions without burning a CD. The best part is that you don't need to install this software although you may need to handle few dependencies based on your environment. But Unetbootin is used in binary form to burn ISO to USB..
Now I had faced few dependency errors on my RHEL/CentOS 8 node while installing Unetbootin. If you also get the same then you can install these rpms manually.
You will need EPEL release repo to handle some of the dependencies.
[root@rhel-8 ~]# rpm -Uvh https://dl.fedoraproject.org/pub/epel/epel-release-latest-8.noarch.rpm
Next you can install p7zip and p7zip-plugins using dnf or yum
[root@rhel-8 ~]# dnf install p7zip p7zip-plugins
We are all done with the dependencies, now you can download unetbootin binary from their official page using wget
[root@rhel-8 ~]# wget https://github.com/unetbootin/unetbootin/releases/download/677/unetbootin-linux64-677.bin
Next provide execute permission to the downloaded binary
[root@rhel-8 ~]# chmod u+x unetbootin-linux64-677.bin
Format the USB with FAT32 filesystem. You can check the existing filesystem type of your USB drive using various methods in Linux:
# mkdosfs -I /dev/sdb1 -F 32
mkfs.fat 4.1 (2017-01-24)
You can use vnc server to connect to the graphical console of your Linux node and execute the binary to convert ISO to bootable USB.
[root@rhel-8 ~]# ./unetbootin-linux64-677.bin
This will open a new window where you must provide below information
- Select "Disk image" and browse the path of the ISO for which you wish to create bootable usb from iso linux
- Select "USB Drive" and provide the path of the USB

Click on "OK" to start the process to burn ISO to USB. The second stage will take some time depending upon your system's resources and ISO size
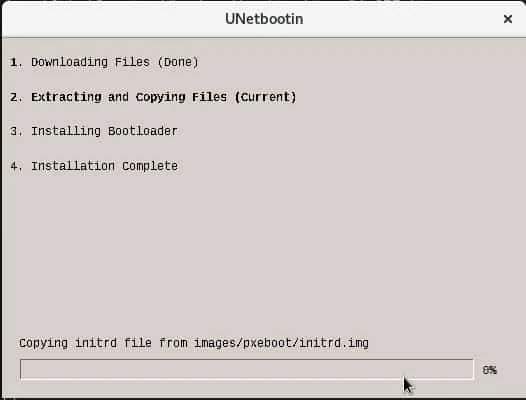
Once you have ISO to bootable USB ready click on Exit.
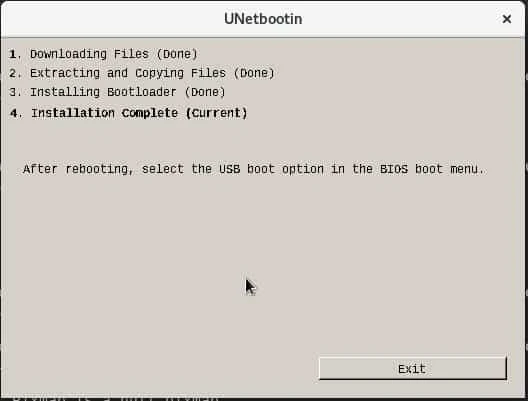
Next you can verify the bootable USB.
Method 2: balenaEtcher
balenaEtcher is a free and open-source image burner with support for Windows, OS X and GNU/Linux to convert ISO to bootable USB. It makes USB and SD card image burning as simple and fast as possible.
You can download balenaEtcher based on your Linux distribution from the official page
Since I am using RHEL/CentOS 7, I will use yum to install balenaEtcher from the official github page
Download the yum repo using the below command and store it under
/etc/yum.repos.d/. The etcher-rpm.repo file will be created with
this step.
[root@centos-7 ~]# wget https://balena.io/etcher/static/etcher-rpm.repo -O /etc/yum.repos.d/etcher-rpm.repo
Install balenaEtcher rpm using yum command
[root@centos-7 ~]# yum install -y balena-etcher-electron
Format the USB with FAT32 filesystem. You can check the existing filesystem type of your USB drive using various methods in Linux:
# mkdosfs -I /dev/sdb1 -F 32
mkfs.fat 4.1 (2017-01-24)
You can use vnc server to connect to the graphical console of your Linux node and
execute "balena-etcher-electron" binary which is available
"/usr/local/bin/balena-etcher-electron". This will open a new window,
next follow the screenshots.
[root@centos-7 ~]# balena-etcher-electron
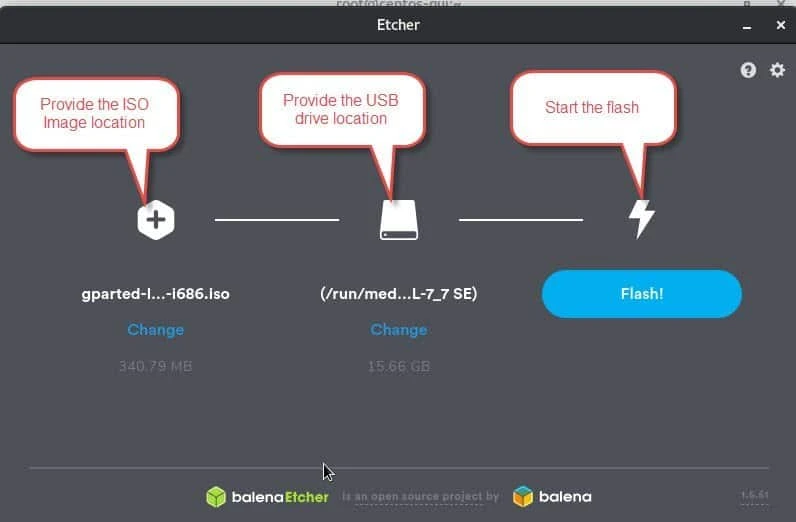
Click on Flash to convert ISO to bootable USB.
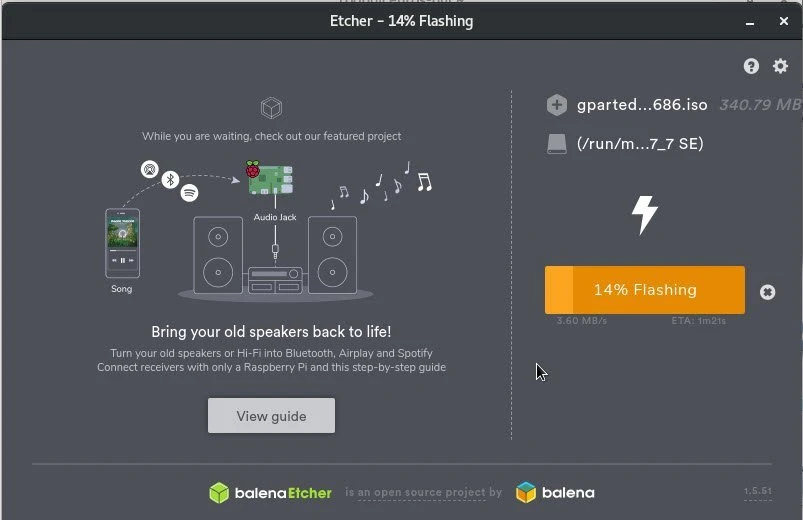
Once the tool burn ISO to USB, it will show below screen with success message.
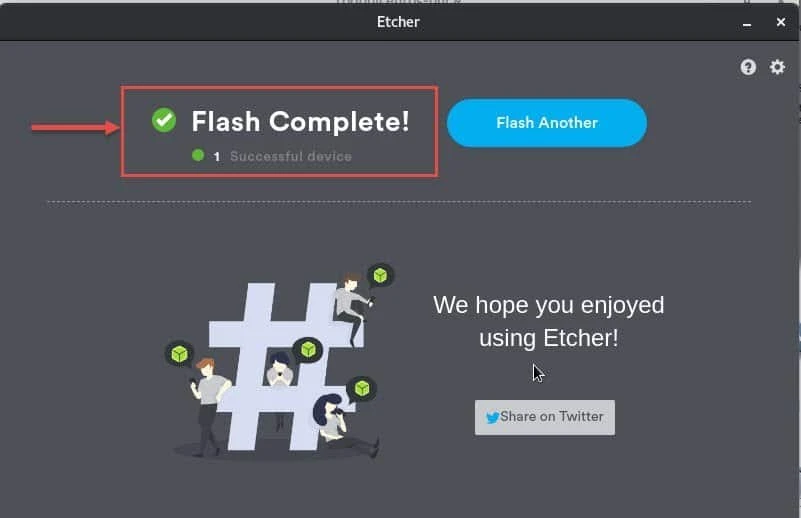
Now you can use this bootable USB to boot your node.
Method 3: SuSE Studio Imagewriter
SuSE Studio is another tool to create bootable usb from iso linux using graphical interface. This tool is by default available with SuSE distribution but for other distribution you can download the respective rpm from the official page
Since we are using RHEL/CentOS 7 node, we will download the compatible imagewriter rpm from the official source using wget
[root@centos-7 ~]# wget https://download.opensuse.org/repositories/home:/billypuzaras:/branches:/SUSE:/SUSEStudio/CentOS_7/x86_64/imagewriter-1.10.1420800585.134a9b3-5.1.x86_64.rpm
Once downloaded, you can install the imagewriter rpm as shown below:
[root@centos-7 ~]# rpm -Uvh imagewriter-1.10.1420800585.134a9b3-5.1.x86_64.rpm
You can also check the content of imagewriter rpm
[root@centos-7 ~]# rpm -ql imagewriter
/usr/bin/imagewriter
/usr/share/applications/imagewriter.desktop
/usr/share/doc/imagewriter-1.10.1420800585.134a9b3
/usr/share/doc/imagewriter-1.10.1420800585.134a9b3/COPYING
/usr/share/icons/hicolor/128x128/apps/imagewriter.png
/usr/share/icons/hicolor/32x32/apps/imagewriter.png
/usr/share/icons/hicolor/64x64/apps/imagewriter.png
/usr/share/man/man1/imagewriter.1.gz
Format the USB with FAT32 filesystem. You can check the existing filesystem type of your USB drive using various methods in Linux:
[root@centos-7 ~]# mkdosfs -I /dev/sdb1 -F 32
mkfs.fat 4.1 (2017-01-24)
You can use vnc server to connect to the graphical console of your Linux node and
execute "/usr/bin/imagewriter" binary which will open a new window as
shown below. Follow the screenshots.
[root@centos-7 ~]# imagewriter
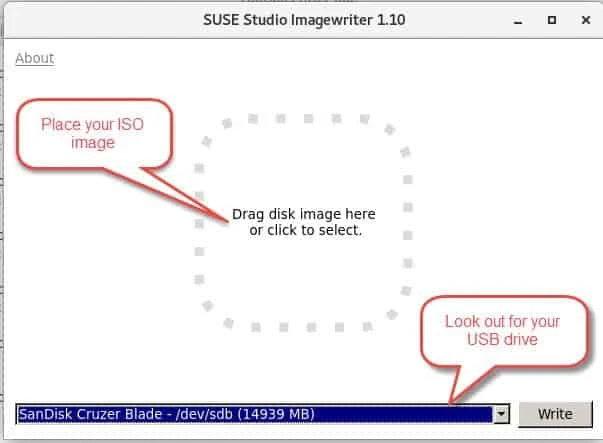
Here I have placed my ISO Image and USB drive to convert ISO to bootable USB. Click on Write to start the conversion.
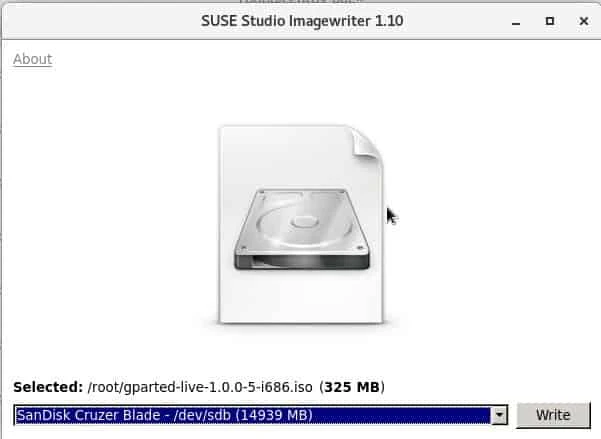
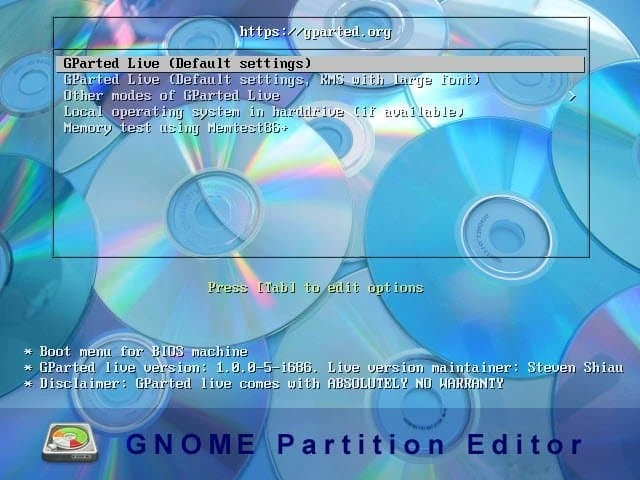
Now you won't get any screen which shows completed but you will return to the above screen post successful conversion. Next you can use this bootable USB to boot your server. For example I have got the below gparted boot menu from the USB so we know the steps worked.
Method 4: Rosa Imagewriter
ROSA ImageWriter is a program for writing ROSA installation image to a flash disk to burn ISO to USB drive. The good thing here again is that you don't need to install any tool on your Linux environment, you can just download the binary and start using it.
We will download Rosa Imagewriter from the official Rosa Imagewriter page using wget
[root@centos-7 ~]# wget http://wiki.rosalab.ru/en/images/7/7f/RosaImageWriter-2.6.2-lin-x86_64.tar.xz
Use tar command
to extract the archive. This will create a directory RosaImageWriter
and extract all the content under this directory
[root@centos-7 ~]# tar -xvf RosaImageWriter-2.6.2-lin-x86_64.tar.xz
RosaImageWriter/
RosaImageWriter/RosaImageWriter
RosaImageWriter/lang/
RosaImageWriter/lang/qtbase_fr.qm
RosaImageWriter/lang/qtbase_de.qm
RosaImageWriter/lang/fr_FR.qm
RosaImageWriter/lang/qtbase_ru.qm
RosaImageWriter/lang/de_DE.qm
RosaImageWriter/lang/ru_RU.qm
RosaImageWriter/LICENSE.html
RosaImageWriter/README.html
Format the USB with FAT32 filesystem. You can check the existing filesystem type of your USB drive using various methods in Linux:
[root@centos-7 ~]# mkdosfs -I /dev/sdb1 -F 32
mkfs.fat 4.1 (2017-01-24)
You can use vnc server to connect to the graphical console of your Linux node and navigate inside RosaImageWriter directory
[root@centos-7 ~]# cd RosaImageWriter/
Next execute "RosaImageWriter" binary which will open a new window as
shown below.
[root@centos-7 RosaImageWriter]# ./RosaImageWriter
Next follow the screenshots. Add the ISO Image and USB device location as shown below:
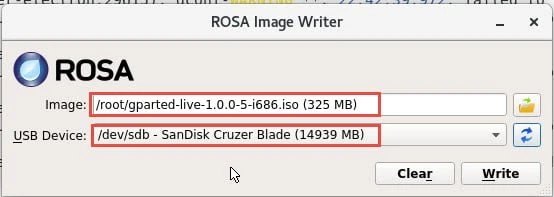
Click on Write to start the conversion from ISO to bootable USB drive.
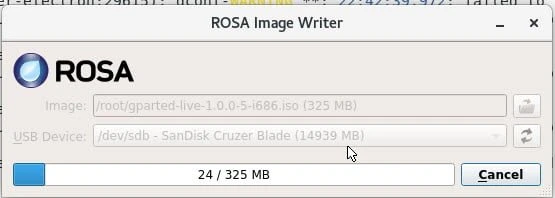
Next you can see the conversion has started to burn ISO to USB Drive.
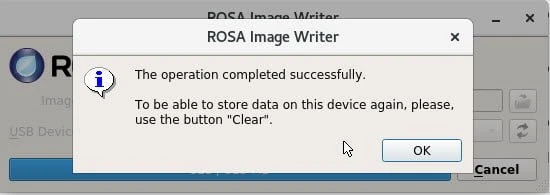
Once the operation is successful, you will see the below image:
Method 5: Use dd ISO to USB
Using dd ISO to USB command you can create bootable USB from ISO linux command line without download any third party tools. You do not need graphical environment to use dd ISO to USB command for creating bootable USB drives.
You can check the mount point of your USB drive using different commands and methods.
[root@rhel-8 ~]# lsscsi
[0:0:0:0]    cd/dvd  VBOX     CD-ROM           1.0   /dev/sr0
[1:0:0:0]    disk    ATA      VBOX HARDDISK    1.0   /dev/sda
[2:0:0:0]    cd/dvd  VBOX     CD-ROM           1.0   /dev/sr1
[3:0:0:0]    disk    SanDisk  Cruzer Blade     1.00  /dev/sdb
Format the USB with FAT32 filesystem. You can check the existing filesystem type of your USB drive using various methods in Linux:
[root@rhel-8 ~]# mkdosfs -v -I /dev/sdb1 -F 32
mkfs.fat 4.1 (2017-01-24)
/dev/sdb1 has 64 heads and 32 sectors per track,
hidden sectors 0x0000;
logical sector size is 512,
using 0xf8 media descriptor, with 8792064 sectors;
drive number 0x80;
filesystem has 2 32-bit FATs and 8 sectors per cluster.
FAT size is 8576 sectors, and provides 1096860 clusters.
There are 32 reserved sectors.
Volume ID is d3edde43, no volume label.
Now you can execute dd command using the source location with
if="/source/path/iso" and of="/destination/path". This command may
take some time depending upon the size of the ISO and system resources
[root@rhel-8 ~]# dd if=/root/rhel-server-7.7-x86_64-dvd.iso of=/dev/sdb bs=4k
1099008+0 records in
1099008+0 records out
4501536768 bytes (4.5 GB, 4.2 GiB) copied, 1323.54 s, 3.4 MB/s
Once completed you will have a bootable USB drive using dd iso to usb.
Lastly I hope the steps from the article to create bootable USB from ISO Linux COmmand Line or GUI on Linux was helpful. So, let me know your suggestions and feedback using the comment section.
Related Searches: dd iso to usb. linux iso to usb tool. iso to bootable usb. burn iso to usb.

![Convert Decimal to Fraction [7 Programming Languages]](/convert-decimal-to-fraction/convert-decimal-to-fraction_hu_e9014f91c5b79b23.webp)


![Linux File Descriptors [In-Depth Tutorial]](/linux-file-descriptors/file-descriptors-1_hu_4f270b08d7bdafb.webp)
![How to Edit a File in Linux? [SOLVED]](/linux-how-to-edit-a-file/linux-edit-file_hu_cb0d51fc1cfd0419.webp)