Customizing the authentication routes in Laravel 8 is a common task for developers who want to build web applications with unique authentication flows. Laravel 8 provides an out-of-the-box authentication system that includes pre-built authentication routes for user registration, login, and password reset. However, these default routes may not always meet the specific needs of your application.
In this article, we will explore how to customize the authentication routes in Laravel 8. By using the built-in authentication scaffolding and modifying the routes, you can create a customized authentication system that meets your specific requirements.
We will start by explaining how to generate the authentication scaffolding in Laravel 8 and where to find the default authentication routes. Then, we will explore how to modify these routes to customize their behavior and add new authentication routes to your application.
By following this tutorial on how to customize auth route Laravel 8, you will have a clear understanding of how to modify the authentication routes in Laravel 8 and create a unique authentication system for your application. This tutorial is suitable for Laravel developers of all levels who want to customize their application's authentication system.
It would help to understand Laravel authentication before proceeding with this tutorial.
Let's get started.
Laravel 8 default authentication scaffolding
In Laravel 8, there are a few options for setting up authentication scaffolding, which provide a pre-built structure for handling user authentication, including registration, login, password reset, and email verification. Here are the three most popular options:
Laravel Breeze
Laravel Breeze is a minimal and simple authentication scaffolding built using Blade templates and Tailwind CSS. It offers a great starting point for smaller projects or applications that require a simple authentication system. To install Laravel Breeze, you can use the following command:
composer require laravel/breeze --dev
php artisan breeze:install
npm install
npm run dev
Laravel UI
Laravel UI is a package that provides a simple way to scaffold basic
authentication views and routes in a Laravel application. It supports
both Bootstrap and Vue.js, as well as React for the frontend. To
install Laravel UI, use the following command:
composer require laravel/ui
After installing Laravel UI, you can choose your preferred frontend stack (Bootstrap, Vue, or React) and generate the authentication scaffolding with one of the following commands:
php artisan ui bootstrap --auth
php artisan ui vue --auth
php artisan ui react --auth
Remember to install the necessary npm packages and compile the assets:
npm install
npm run dev
Laravel Jetstream
Laravel Jetstream is a more advanced and feature-rich authentication scaffolding option. It offers a complete starting point for projects that require more advanced features such as team management, two-factor authentication, profile management, and API support. Jetstream uses Livewire or Inertia.js for the frontend, depending on your preference. To install Laravel Jetstream, use the following command:
composer require laravel/jetstream
php artisan jetstream:install livewire # or inertia
npm install
npm run dev
Regardless of the chosen scaffolding option, Laravel will generate the
necessary routes, controllers, views, and other files required for
authentication. You can find the default authentication routes in the
routes/web.php file, and the controllers will be located in the
app/Http/Controllers/Auth directory. The views can be found in the
resources/views/auth directory.
Origin and configuration files of auth routes
The authentication configurations are found in the config/auth.php
file. The logic is housed in controllers App\Http\Controllers\Auth.
You can configure the authentication manually or use starter kits like
Breeze, Fortify or Jetstream. The starter kits present robust
scaffolding of the authentication layer. The resulting auth scaffolds
the routes and views (resources/views/auth) to ease authentication.
Additionally, you get layout, registration and login views with routes
for authentication endpoints. The starter kits create
resources/views/layouts directory housing the application's base
layout.
An authenticated user is redirected to the dashboard. Otherwise, the
auth middleware redirects the user to a named route called login. You
can modify the default behavior by customizing the redirectTo()
function in the app/Http/Middleware/Authenticate.php file.
<?php
...
    protected function redirectTo($request)
    {
        if (! $request->expectsJson()) {
            return route('login');
        }
    }
...
You can list all route methods, endpoints, names, and actions using the
php artisan route:list command.
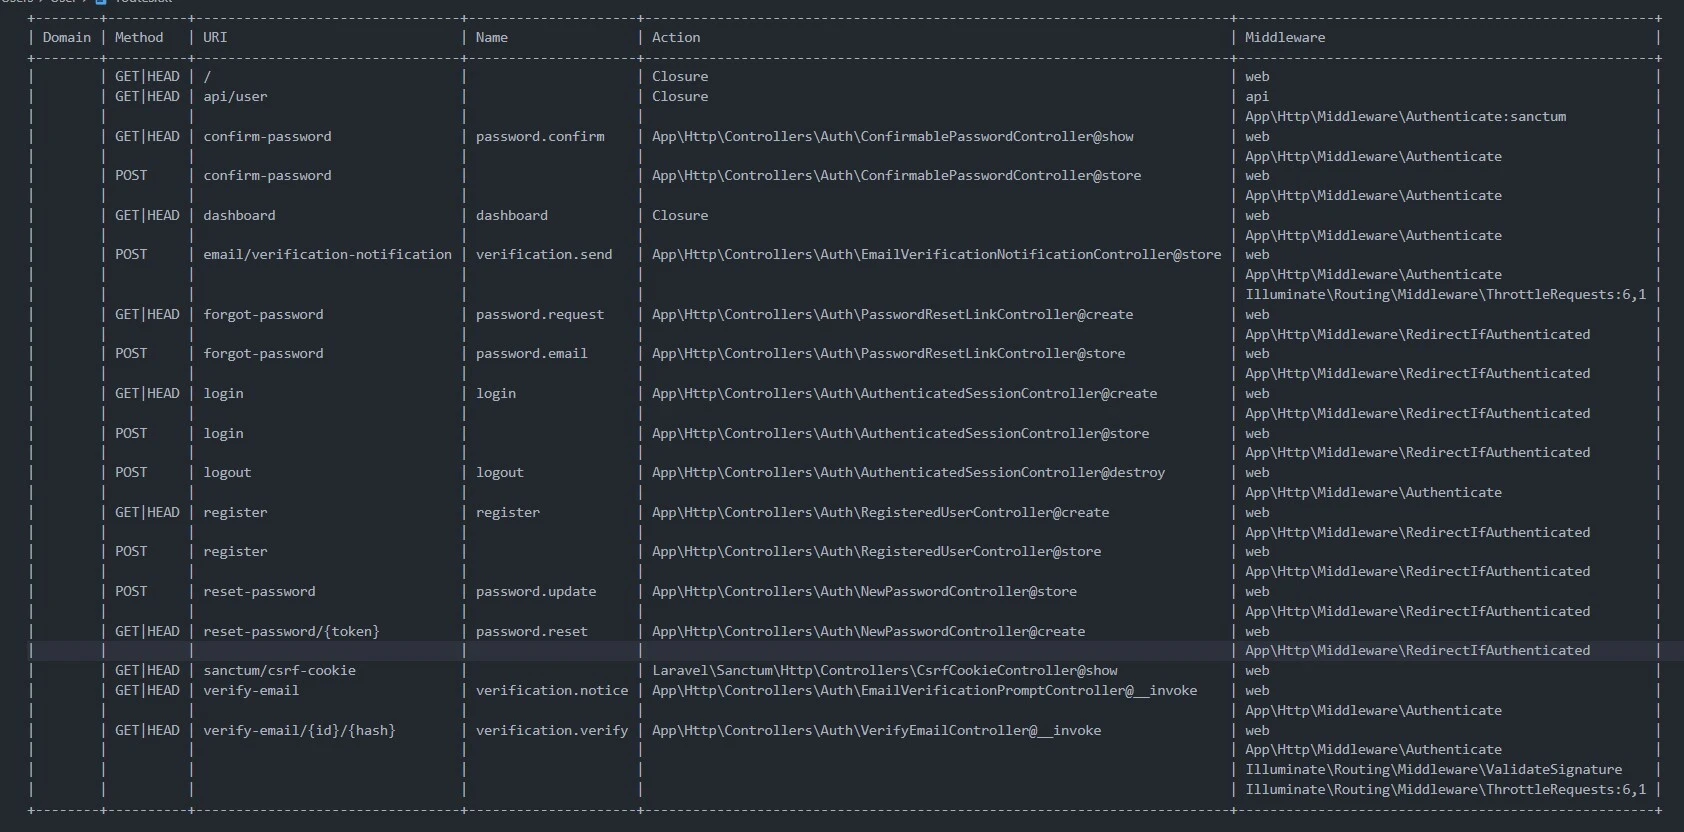
For example, you can GET to the login page through a named route called
login and the action is defined in the create method of the
AuthenticatedSessionController controller
App\Http\Controllers\Auth\AuthenticatedSessionController@create.
<?php
...
    public function create()
    {
        return view('auth.login');
    }
...
Similarly, you POST to the login page through the store method.
<?php
...
    public function store(LoginRequest $request)
    {
        $request->authenticate();
        $request->session()->regenerate();
        return redirect()->intended(RouteServiceProvider::HOME);
    }
...
An authenticated user is directed to the RouteServiceProvider class'
HOME property which references the /dashboard route. The
RouteServiceProvider class is defined in the
app/Providers/RouteServiceProvider.php file.
<?php
...
class RouteServiceProvider extends ServiceProvider
{
    /**
     * The path to the "home" route for your application.
     *
     * This is used by Laravel authentication to redirect users after login.
     *
     * @var string
     */
    public const HOME = '/dashboard';
  ...
}
Now that you understand the origin and configuration files of auth routes, you can comfortably customize auth route Laravel 8.
Customize Auth Route
1. Adding a prefix to authentication routes
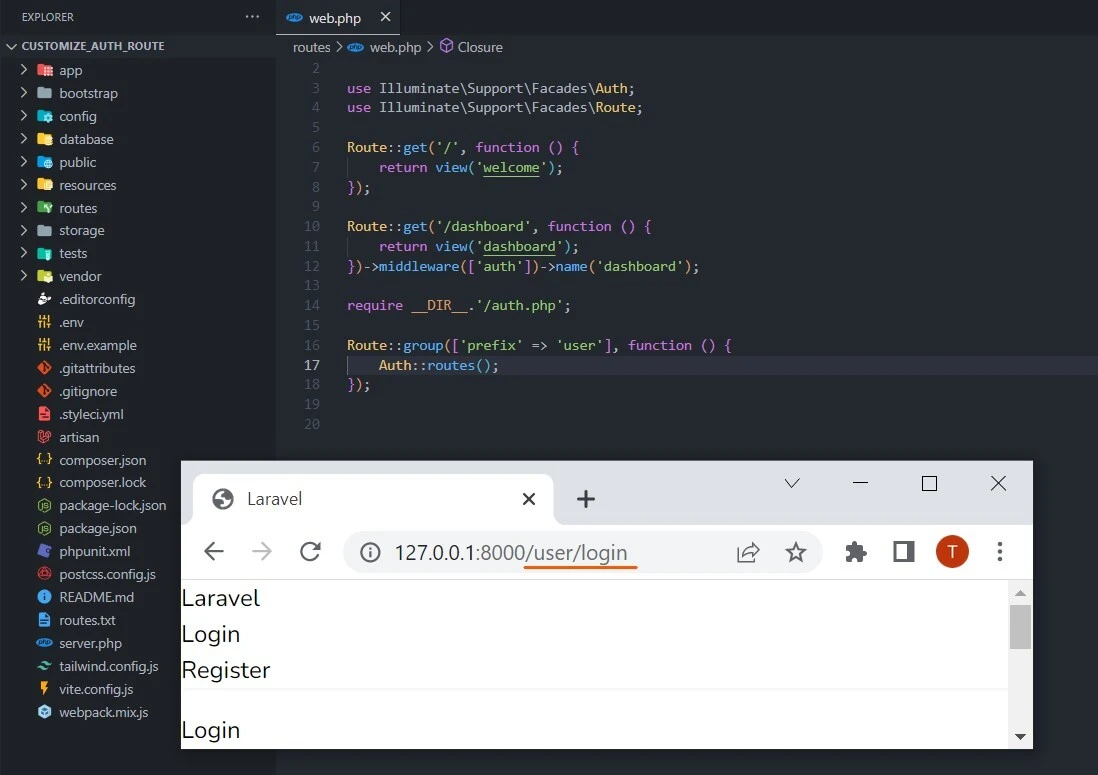
To add a prefix to all authentication routes, you can use the
Route::group() method along with the prefix attribute. This will apply
the given prefix to all the routes defined within the closure. For
example, if you want to prefix all authentication routes with 'user',
you can modify the routes/web.php file as follows:
<?php

use Illuminate\Support\Facades\Auth;
use Illuminate\Support\Facades\Route;

// Other routes...

Route::group(['prefix' => 'user'], function () {
    Auth::routes();
});
Now, all the authentication routes, such as login, register, and password reset, will have the 'user' prefix, like 'user/login', 'user/register', etc.
2. Changing the route names
You can also change the default names of the authentication routes by
using the name attribute within the Auth::routes() method. For
instance, if you want to change the login route's name to 'signin', you
can modify the routes/web.php file like this:
Auth::routes([
    'login' => 'signin'
]);
3. Customizing redirection after authentication
By default, Laravel redirects users to the /home route after
successful authentication. You can change this behavior by modifying the
HOME constant in the App\Providers\RouteServiceProvider class. For
example, if you want to redirect users to the /dashboard route
instead, update the HOME constant like this:
class RouteServiceProvider extends ServiceProvider
{
    //...

    public const HOME = '/dashboard';

    //...
}
4. Dynamic redirection based on user roles or other conditions
If you want to customize the post-authentication redirection path
dynamically, you can override the redirectTo() method in the
app/Http/Controllers/Auth/LoginController.php file. For example, if
you want to redirect admins and regular users to different routes, you
can do the following:
protected function redirectTo()
{
    if (auth()->user()->is_admin) {
        return '/admin/dashboard';
    }

    return '/user/dashboard';
}
Remember to add the is_admin attribute or any other attribute you need
for your specific use case.
5. Changing URLs
To change the URL of a route, simply update the URI in the Route
method within the routes/web.php or routes/api.php file. For
example, if you want to change the URL of a login route from /login to
/signin, modify the route definition like this:
Route::get('/signin', 'Auth\LoginController@showLoginForm')->name('login');6. Modifying route names
Route names can be changed to make them more descriptive or to follow a
specific naming convention. To modify a route's name, update the
name() method associated with the route. For example, if you want to
change the name of the login route from 'login' to 'auth.signin', do the
following:
Route::get('/login', 'Auth\LoginController@showLoginForm')->name('auth.signin');7. Adding middleware
Middleware are classes that can handle HTTP requests before they reach
the actual controller methods. Middleware can be used for tasks like
authentication, authorization, or input validation. To add middleware to
a route, use the middleware() method. You can either use built-in
middleware provided by Laravel or create your own custom middleware.
For example, if you want to add the 'auth' middleware to a route that requires authentication, update the route definition like this:
Route::get('/dashboard', 'DashboardController@index')->middleware('auth');8. Grouping routes with common attributes
If you have multiple routes that share common attributes like prefixes,
namespaces, or middleware, you can group them together using the
Route::group() method. This allows you to apply the shared attributes
to all routes within the closure. For example, if you want to add a
'user' prefix and 'auth' middleware to several routes, do the following:
Route::group(['prefix' => 'user', 'middleware' => 'auth'], function () {
    Route::get('/dashboard', 'DashboardController@index');
    Route::get('/profile', 'ProfileController@index');
    // ... other routes
});
9. Customizing route parameters
Laravel allows you to define route parameters, which are placeholders
for values in the URL. You can customize route parameters by applying
constraints or adding default values. For example, if you want to ensure
that a route parameter is an integer, you can use the where() method:
Route::get('/post/{id}', 'PostController@show')->where('id', '[0-9]+');10. Password reset routes
n Laravel, the password reset functionality is provided out of the box when using authentication scaffolding like Laravel Breeze, Laravel UI, or Laravel Jetstream. Laravel creates a set of routes to handle the password reset process, which includes displaying the password reset request form, submitting the reset request, and updating the user's password.
Here is an overview of the password reset routes and their corresponding controllers:
// Password Reset Request Form
Route::get('/password/reset', 'Auth\ForgotPasswordController@showLinkRequestForm')->name('password.request');

// Password Reset Request Submission
Route::post('/password/email', 'Auth\ForgotPasswordController@sendResetLinkEmail')->name('password.email');

// Password Reset Form
Route::get('/password/reset/{token}', 'Auth\ResetPasswordController@showResetForm')->name('password.reset');

// Password Reset Submission
Route::post('/password/reset', 'Auth\ResetPasswordController@reset')->name('password.update');
Example:
The group() method of the Route facade runs a closure on all routes
of the Auth facade. The auth routes, like login, are prefixed with the
user name.
It may be necessary to install<a href="https://github.com/laravel/ui/blob/3.x/README.md" class="editor-rtfLink" target="_blank" rel="noopener"
Laravel UI before using the
routes()method of theAuthfacade.
Summary
In this Laravel 8 guide, we discussed customizing authentication routes to fit an application's requirements. We covered the default authentication scaffolding options: Laravel Breeze, Laravel UI, and Laravel Jetstream, which provide varying levels of complexity and features. We also explained the origin and configuration files for auth routes, controllers, and views generated by these scaffolding packages.
To customize authentication routes, we explored several techniques:
- Adding a prefix to routes using
Route::group()andprefixattribute. - Changing route names and URLs directly in the route definitions.
- Customizing redirection after authentication by modifying the
HOMEconstant or overriding theredirectTo()method in theLoginController. - Dynamic redirection based on user roles or conditions.
- Adding or modifying middleware to enhance route functionality or security.
- Grouping routes with common attributes like prefixes, namespaces, or middleware.
- Customizing route parameters using constraints or default values.
Lastly, we examined the password reset routes, which are automatically
registered using the Auth::routes() method, and can be manually
customized if needed.
