
In this article I will share the steps to install and configure Fail2ban SSHD Jail in Ubuntu 18.04 and RHEL/CentOS 7/8 Linux. We will go through the below topics
- Brief overview
- Install on Ubuntu 18 and RHEL/CentOS 7/8
- Configure Fail2ban SSHD Jail
- Create new Action
- Configure log rotation
- Cheat sheet and Examples
How Fail2ban works?
- Fail2Ban consists of a client, server and configuration files to limit brute force authentication attempts.
- The server program fail2ban-server is responsible for monitoring log files and issuing ban/unban commands.
- It gets configured through a simple protocol by fail2ban-client, which can also read configuration files and issue corresponding configuration commands to the server.
- It scans log files and bans IPs that show the malicious signs -- too many password failures, seeking for exploits, etc.
- Generally it is then used to update firewall rules to reject the IP addresses for a specified amount of time, although any arbitrary other action (e.g. sending an email) could also be configured.
- Out of the box it comes with filters for various services (apache, courier, ssh, etc).
- For more details refer man page of different fail2ban tools
Step 1: Install Fail2ban
In RHEL/CentOS 7/8
Fail2ban is not available in the default RHEL/CentOS 7/8 repository so we will first install the EPEL repository:
Package installs and updates in this section use dnf command.
[root@centos-8 ~]# dnf install epel-release
Search for any fail2ban package on the available repositories
[root@centos-8 ~]# dnf search fail2ban
Extra Packages for Enterprise Linux Modular 8 - x86_64 24 kB/s | 117 kB 00:04
Extra Packages for Enterprise Linux 8 - x86_64 490 kB/s | 6.1 MB 00:12
=========================================== Name Exactly Matched: fail2ban ===========================================
fail2ban.noarch : Daemon to ban hosts that cause multiple authentication errors
========================================== Summary & Name Matched: fail2ban ==========================================
Then we need to install it withRsyslog, since it scans the log output taken from Rsyslog:
[root@centos-8 ~]# dnf install fail2ban -y
On Ubuntu 18.04
To install on Ubuntu 18, we will use apt as shown below:
root@Ubuntu:~# apt install fail2ban -y
List of fail2ban config files
- The default configuration file is
/etc/fail2ban/jail.conf - The problem with this file is that it can be overwritten when you install security updates
- Every
.conffile can be overridden with a file named.local - The
.conffile is read first, then.local, with later settings overriding earlier ones. Thus, a.localfile doesn't have to include everything in the corresponding.conffile, only those settings that you wish to override. - In
.localfiles specify only the settings you would like to change and the rest of the configuration will then come from the corresponding.conffile which is parsed first. - In addition to
.local, forjail.conforfail2ban.conffile there can be a corresponding.d/directory containing additional .conf files. - The order e.g. for jail configuration would be:
jail.confjail.d/*.conf(in alphabetical order)jail.localjail.d/*.local(in alphabetical order)
- All
.localfiles are parsed after.conffiles in the original configuration file and files under.ddirectory.
Step 2: Configure Fail2ban SSH Jail
To configure SSH Jail we need to create/modify the configuration file.
Since here we only aim to secure SSHD, we will create 00-sshd.conf
file.
[root@centos-8 ~]# touch /etc/fail2ban/jail.d/00-sshd.conf
jail.conf to collect the default values. Below is the
content of my ssh jail file - 00-sshd.conf
[DEFAULT]
ignoreip = 127.0.0.1/8 ::1 192.168.43.168
bantime  = 1m
findtime = 1m
maxretry = 2

[sshd]
enabled  = true
ignoreip"Since I am using these values for
demonstration purpose, the bantime and other values are very less. You
can adjust those based on your environment.
Here,
findtime:The amount of time a user has when attempting to log in<strong>bantime:</strong>The total number of seconds a host will be blocked from accessing the server if they are found to be in violation of the rules<strong>port:</strong>If you are using a different port for SSHD. Since I am using default port 22, I have not used this.<strong>ignoreip:</strong>The additional networks that you don't want to be blocked<strong>maxretry:</strong>The number of failures that need to occur before Fail2ban takes action. The IP will be blocked for the number of minutes included in the bantime option.
Step 3: Enable and Start Service
Next we will enable the fail2ban to automatically start the service post reboot
Enable or disable the unit at boot with systemctl enable; the systemctl command documents enable --now, symlinks under /etc/systemd/system, and masks.
[root@centos-8 ~]# systemctl enable fail2ban
Start the service and make sure the service is started successfully
[root@centos-8 ~]# systemctl start fail2ban

[root@centos-8 ~]# systemctl status fail2ban
● fail2ban.service - Fail2Ban Service
   Loaded: loaded (/usr/lib/systemd/system/fail2ban.service; disabled; vendor preset: disabled)
   Active: active (running) since Tue 2020-03-24 18:21:20 IST; 3min 9s ago
     Docs: man:fail2ban(1)
  Process: 6633 ExecStop=/usr/bin/fail2ban-client stop (code=exited, status=0/SUCCESS)
  Process: 6634 ExecStartPre=/bin/mkdir -p /run/fail2ban (code=exited, status=0/SUCCESS)
 Main PID: 6636 (f2b/server)
    Tasks: 3 (limit: 26213)
   Memory: 11.6M
   CGroup: /system.slice/fail2ban.service
           └─6636 /usr/bin/python3.6 -s /usr/bin/fail2ban-server -xf start

Mar 24 18:21:20 centos-8.example.com systemd[1]: Stopped Fail2Ban Service.
Mar 24 18:21:20 centos-8.example.com systemd[1]: Starting Fail2Ban Service...
Mar 24 18:21:20 centos-8.example.com systemd[1]: Started Fail2Ban Service.
Also check fail2ban log file /var/log/fail2ban.log for any more
possible errors.
Step 4: Check SSH Jail Status
You can use fail2ban-client to check the existing Jail configurations
[root@centos-8 ~]# fail2ban-client status
Status
|- Number of jail:      1
`- Jail list:   sshd
As you see currently we only have enabled sshd jail, we can check more details of this jail using below command:
[root@centos-8 ~]# fail2ban-client status sshd
Status for the jail: sshd
|- Filter
|  |- Currently failed: 0
|  |- Total failed:     0
|  `- Journal matches:  _SYSTEMD_UNIT=sshd.service + _COMM=sshd
`- Actions
   |- Currently banned: 0
   |- Total banned:     0
   `- Banned IP list:
Run ssh as in the example below; the ssh command is a quick reference for syntax, flags, and troubleshooting.
Step 5: Verify the SSH Jail
Currently there are no failed events so ssh banned list of IPs and other variables are empty. I will perform some failed SSH to verify our jail configuration.
[root@centos-8 ~]# fail2ban-client status sshd
Status for the jail: sshd
|- Filter
|  |- Currently failed: 1
|  |- Total failed:     3
|  `- Journal matches:  _SYSTEMD_UNIT=sshd.service + _COMM=sshd
`- Actions
   |- Currently banned: 1
   |- Total banned:     1
   `- Banned IP list:   192.168.43.10
As expected our SSH configuration has successfully banned an IP Address which was trying to attempt failed login multiple times.
Fail2ban Actions
By default SSH (Fail2Ban v0.10.5) uses iptables to block the port
SSH. You can verify this using:
[root@centos-8 ~]# fail2ban-client get sshd actions
The jail sshd has the following actions:
iptables-multiport
Here actions list iptables-multiport for sshd jail.You can check more
about this task using
[root@centos-8 ~]# fail2ban-client get sshd action iptables-multiport actionstart
 -N f2b-sshd
 -A f2b-sshd -j RETURN
 -I INPUT -p tcp -m multiport --dports ssh -j f2b-sshd
These actions are defined under /etc/fail2ban/action.d
[root@centos-8 ~]# ls -l /etc/fail2ban/action.d/iptables-multiport.conf
-rw-r--r-- 1 root root 1508 Jan 21 09:41 /etc/fail2ban/action.d/iptables-multiport.conf
If SSH was in action then you should see below iptables rule. You can
also use "iptables -L" to list all the rules on your Linux node:
[root@centos-8 jail.d]# iptables --list-rules f2b-sshd
-N f2b-sshd
-A f2b-sshd -s 192.168.43.10/32 -j REJECT --reject-with icmp-port-unreachable
-A f2b-sshd -j RETURN
Create new action for sshd jail
We can also create and add a new action to the jail. For example: if
we want to use firewalld to block port 22 for SSHD instead of default
iptables, I will create a new action configuration file under
/etc/fail2ban/action.d
[root@centos-8 ~]# touch /etc/fail2ban/action.d/firewallcmd-sshd.conf
You can refer existing action files to get some sample template, I have added below content to configure fail2ban action file
[root@centos-8 ~]# cat /etc/fail2ban/action.d/firewallcmd-sshd.conf
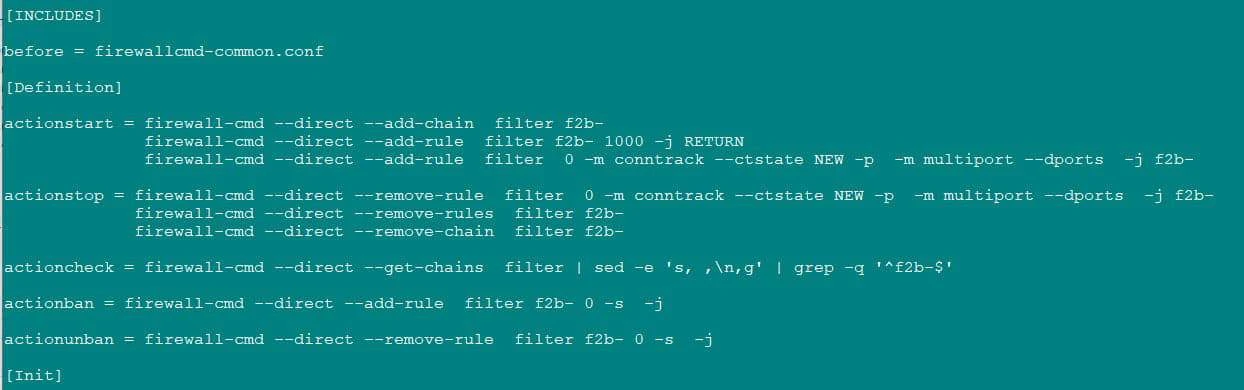
Fail2ban Action File
firewallcmd-common.conf
to get the variables for my action file with some modification to use
port 22.
Apply new action configuration file
Next add the below highlighted content in your jail configuration file:
[root@centos-8 ~]# cat /etc/fail2ban/jail.d/00-sshd.conf
[DEFAULT]
ignoreip = 127.0.0.1/8 ::1 192.168.43.168
bantime  = 1m
findtime = 1m
maxretry = 2

[sshd]
enabled  = true
action = firewallcmd-sshd
Restart the fail2ban service for the changes to take affect
[root@centos-8 ~]# systemctl restart fail2ban
Make sure the service was started successfully
[root@centos-8 ~]# systemctl status fail2ban
For more details on the service status you can refer log file
/var/log/fail2ban.log
Verify new action configuration file
Next again we will perform some failed SSH login to this Linux host and then check the status of sshd jail
[root@centos-8 ~]# fail2ban-client status sshd
Status for the jail: sshd
|- Filter
|  |- Currently failed: 0
|  |- Total failed:     6
|  `- Journal matches:  _SYSTEMD_UNIT=sshd.service + _COMM=sshd
`- Actions
   |- Currently banned: 1
   |- Total banned:     1
   `- Banned IP list:   192.168.43.10
Check fail2ban log file /var/log/fail2ban.log for more details
As soon as the fail2ban ssh action is kicked in, we can see below firewalld rule is added on the server to block any more failed SSH attempts
[root@centos-8 ~]# firewall-cmd  --direct --get-all-rules
ipv4 filter f2b-sshd 1000 -j RETURN
ipv4 filter f2b-sshd 0 -s 192.168.43.10 -j REJECT --reject-with icmp-port-unreachable
ipv4 filter INPUT_direct 0 -m conntrack --ctstate NEW -p tcp -m multiport --dports ssh -j f2b-sshd
Based on the bantime value, the reject rule will automatically be
removed as you can see below:
[root@centos-8 ~]# firewall-cmd  --direct --get-all-rules
ipv4 filter f2b-sshd 1000 -j RETURN
ipv4 filter INPUT_direct 0 -m conntrack --ctstate NEW -p tcp -m multiport --dports ssh -j f2b-sshd
Configure log rotation
Log rotation is configured by default after installation.
fail2ban-server is responsible to configure log rotation
Find which RPM owns a file with rpm -qf; the rpm command covers reverse lookups for libraries and binaries.
[root@centos-8 ~]# rpm -qf /etc/logrotate.d/fail2ban
fail2ban-server-0.10.5-2.el8.noarch
Below is the logrotate configuration file:
[root@centos-8 ~]# cat /etc/logrotate.d/fail2ban

/var/log/fail2ban.log {
    missingok
    notifempty
    postrotate
      /usr/bin/fail2ban-client flushlogs >/dev/null || true
    endscript
}
You can add more options to the log rotation file as per your requirement. Follow man page of logrotate to get supported list of options
Some more fail2ban-client commands (cheatsheet)
fail2ban-client are temporary
for the current session and if you restart or reload the fail2ban
service then all the changes will be cleared from the database. In the
below examples I will use existing "sshd" jail.
Fail2ban Dump configuration
To print the configuration of the Jail:
# fail2ban-client --dp   <-- dump the configuration using more human readable representation
# fail2ban-client -d     <-- dump configuration
Get database name and location
To get the database name:
# fail2ban-client get dbfile
Current database file is:
`- /var/lib/fail2ban/fail2ban.sqlite3
List Banned IPs
You can check the status of the jail with fail2ban-client to get the
list of banned IPs
# fail2ban-client status sshd
Status for the jail: sshd
|- Filter
|  |- Currently failed: 0
|  |- Total failed:     6
|  `- Journal matches:  _SYSTEMD_UNIT=sshd.service + _COMM=sshd
`- Actions
   |- Currently banned: 1
   |- Total banned:     2
   `- Banned IP list:   192.168.10.0/24
In this case we get the list of banned IPs as you see above,
alternatively you can also refer log file /var/log/fail2ban.log to
list banned IPs and other details.
Ban IP Address or Network
Using fail2ban-client you can ban IP address or network
Syntax:
fail2ban-client set <JAIL> banip <IP> ... <IP>
Example:
# fail2ban-client set sshd banip 192.168.10.0/24
1
To list the banned IPs for sshd jail:
[root@centos-8 ~]# fail2ban-client status sshd
Status for the jail: sshd
|- Filter
|  |- Currently failed: 0
|  |- Total failed:     6
|  `- Journal matches:  _SYSTEMD_UNIT=sshd.service + _COMM=sshd
`- Actions
   |- Currently banned: 1
   |- Total banned:     2
   `- Banned IP list:   192.168.10.0/24
Unban IP address or network
To manually unban IP Address or Network from Jail
Syntax:
fail2ban-client set <JAIL> unbanip [--report-absent] <IP> ... <IP>
Example:
# fail2ban-client set sshd unbanip 192.168.10.0/24
1
To list the banned IPs for sshd jail:
# fail2ban-client status sshd
Status for the jail: sshd
|- Filter
|  |- Currently failed: 0
|  |- Total failed:     6
|  `- Journal matches:  _SYSTEMD_UNIT=sshd.service + _COMM=sshd
`- Actions
   |- Currently banned: 0
   |- Total banned:     4
   `- Banned IP list:
Fail2ban actions list
To get actions list assigned for the jail
# fail2ban-client get sshd actions
The jail sshd has the following actions:
firewallcmd-sshd
Action command for the Jail
To get the commands under different actions such as:
For actionstart:
# fail2ban-client get sshd action firewallcmd-sshd actionstart
firewall-cmd --direct --add-chain  filter f2b-sshd
firewall-cmd --direct --add-rule  filter f2b-sshd 1000 -j RETURN
firewall-cmd --direct --add-rule  filter INPUT_direct 0 -m conntrack --ctstate NEW -p tcp -m multiport --dports ssh -j f2b-sshd
For actioncheck:
# fail2ban-client get sshd action firewallcmd-sshd actioncheck
firewall-cmd --direct --get-chains  filter | sed -e 's, ,\n,g' | grep -q '^f2b-sshd$'
For actionstop:
# fail2ban-client get sshd action firewallcmd-sshd actionstop
firewall-cmd --direct --remove-rule  filter INPUT_direct 0 -m conntrack --ctstate NEW -p tcp -m multiport --dports ssh -j f2b-sshd
firewall-cmd --direct --remove-rules  filter f2b-sshd
firewall-cmd --direct --remove-chain  filter f2b-sshd
Fail2ban ignoreip
To get the existing ignoreip details and network list using
fail2ban-client:
# fail2ban-client get sshd ignoreip
These IP addresses/networks are ignored:
|- 127.0.0.0/8
|- ::1
`- 192.168.43.168
To assign new ignoreip details and networks:
# fail2ban-client set sshd addignoreip 192.168.11.12 192.168.10.0/24
These IP addresses/networks are ignored:
|- 127.0.0.0/8
|- ::1
|- 192.168.43.168
|- 192.168.11.12
`- 192.168.10.0/24
Start, Stop, Reload Jail
To stop a jail configuration
# fail2ban-client stop sshd
Jail stopped
To start a jail configuration
# fail2ban-client start sshd
Jail started
To reload the configuration of a jail
# fail2ban-client reload sshd
OK
Logpath details
You can define the logfile to be monitored for the jail configuration.
To get logpath detail for a respective jail:
# fail2ban-client get sshd logpath
No file is currently monitored
Since we are using journalmatch, we don't have logpath, to add a
logpath:
# fail2ban-client set sshd addlogpath /var/log/secure
Conclusion
Fail2ban is a very useful open source tool to enhance security in Linux server. I explained about different possible configuration to harden SSHD with fail2ban config. You can also harden other services of your Linux server using different Jail options.
Lastly I hope the steps from the article to install and configure fail2ban SSH Jail to secure SSH with iptables and firewalld on Ubuntu 18.04 and (RHEL/CentOS 7/8 was helpful. So, let me know your suggestions and feedback using the comment section.
References
I have used below external references for this tutorial guide
man page for logrotate
man page for fail2ban
tools
