
Introduction to FreeRADIUS: LDAP Authentication and Authorization
In this article, we will create a scenario in which there will be two user groups who have different privileges for managing the network. When one of the users login to the router (NAS), a RADIUS request will be created and sent to the FreeRADIUS server. Then the RADIUS server will query the LDAP (Lightweight Directory Access Protocol) server if this user is existed and has the right credentials.
These are the summarized steps. I will cover the details later in this article with packet capture by Wireshark. Following shows the network topology.
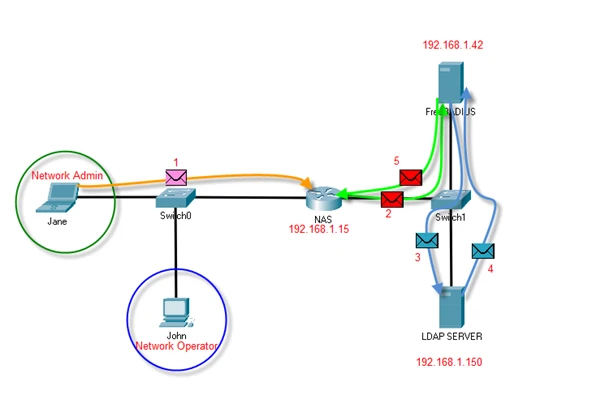
I assume you have already installed FreeRADIUS server with the default configuration and its utility packages. If not please visit here (FreeRADIUS PART 1). Since I configured NAS for authentication and authorization before in this article (https://www.golinuxcloud.com/aaa-network-policy-server/), I will not include the configuration here.
Configure FreeRADIUS for LDAP
Step-1: FreeRADIUS comes with a lot of modules and configuration
files. We will not use all the files and modules. Fore sake of learning,
I will use couple of them. Let’s continue with virtual server files
which are stored under "/etc/freeradius/3.0/sites-enabled" directory.
Two virtual servers are configured in default when you install a
FreeRADIUS server. Following shows the path and the list of the servers.
root@freeradius:/home/celal# ls -l /etc/freeradius/3.0/sites-enabled/
total 0
lrwxrwxrwx 1 freerad freerad 26 Şub 16 14:36 default -> ../sites-available/default
lrwxrwxrwx 1 freerad freerad 31 Şub 16 14:36 inner-tunnel -> ../sites-available/inner-tunnel
root@freeradius:/home/celal#
Notice that when I list the files under the directory, it points to
another directory. It is called a symbolic link. "default" and
"inner-tunnel" servers are not present in
"/etc/freeradius/3.0/sites-enabled" directory. Instead, they are
stored in "/etc/freeradius/3.0/sites-available". It is a concept
borrowed from Apache server. It will make no difference if you store
them in "sites-enabled" directory or
create a symbolic link to another folder. I will go for creating the server
under "sites-enabled".
Step-2: Since the default servers contain a tone of configuration, I will back them up, then remove them from the folder.
root@freeradius:/home/celal# mkdir backup
root@freeradius:/home/celal# cp /etc/freeradius/3.0/sites-enabled/default /home/celal/backup/
root@freeradius:/home/celal# cp /etc/freeradius/3.0/sites-enabled/inner-tunnel /home/celal/backup/
Step-3: Remove the default virtual servers.
root@freeradius:/home/celal# rm /etc/freeradius/3.0/sites-enabled/default
root@freeradius:/home/celal# rm /etc/freeradius/3.0/sites-enabled/inner-tunnel
Step-4: Create a new virtual server with your preferred text editor. I will use nano.
root@freeradius:/home/celal# nano /etc/freeradius/3.0/sites-enabled/my_server
Then add the lines below.
server my_server {
listen {
        type = auth
        ipaddr = *
        port = 1812
}
authorize {
        ldap
        if (ok || updated)  {
        update control {
        Auth-Type := ldap
        }
        }
}
authenticate {
        Auth-Type LDAP {
                ldap
        }
}
}
I will use ldap module in the the "Authorization" block to search for users and groups in the LDAP database. It is similar to "files" module which uses the local "users" file as source of the credentials. Since there is no authentication type set in the lines below "ldap" module, we need to set the "Auth-Type" in the "if" block. When a module is executed (in this case "ldap"), it returns a code. I will use that code as condition for setting the authentication type. Following shows the list of available return codes.
| Module return code | Description |
|---|---|
| notfound | Information was not found |
| noop | The module did nothing |
| ok | The module succeeded |
| updated | The module updated the request |
| fail | The module failed |
| reject | The module rejected the request |
| userlock | The user was locked out |
With "Authentication" module, LDAP database will be used for confirming the user’s credentials.
Step-5: FreeRADIUS runs the modules in
"/etc/freeradius/3.0/mods-enabled/" directory. We need to copy ldap
module to that directory. Do it as below.
root@freeradius:/home/celal# cp /etc/freeradius/3.0/mods-available/ldap /etc/freeradius/3.0/mods-enabled/
Step-6: Open ldap module with your preferred text editor an modify it as it suits you.
ldap {
   server = 'mydomain.com'
   base_dn = 'CN=Users,DC=mydomain,DC=com'
   identity = 'CN=celal,CN=Users,DC=mydomain,DC=com'
   password = ' PassWord123'

   user {
      filter = "(sAMAccountName=%{%{Stripped-User-Name}:-%{User-Name}})"
   }

}
Before a client sends a ldap search request to the ldap server, it needs
to bind, which is almost equivalent of authentication. Because of that,
I need to define a ldap sever, a user for binding and a base_dn where
to search users. Since I will use a Windows LDAP, I will specify
"sAMAccountName" in the user section which is a user object attribute
that holds username.
Step-7: In this step, I will define a RADIUS client with IP address
and shared secret. Open "client" file.
root@freeradius:/home/celal# nano /etc/freeradius/3.0/clients.conf
And add the lines below, modifying for yourself.
client cisco_router {
   ipaddr = 192.168.1.15
   secret = celaldogan
}
Step-8: Run FreeRADIUS in debug mode with "freeradius -X"
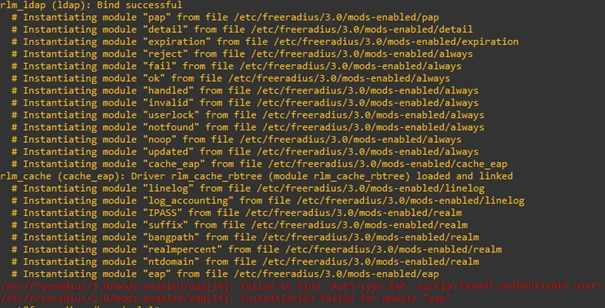
As you see I got an error about eap module, because I deleted default virtual servers in the beginning. I do not need eap module, thus I will delete that module and launch it again.
root@freeradius:/home/celal# rm /etc/freeradius/3.0/mods-enabled/eap
Testing FreeRADIUS for LDAP Authentication and Authorization
There are two ways to test the FreeRADIUS server, with ssh loging to the router or using "radtest" tool. I prefer the second one this time.
Step-1: Apply the command below for testing.
root@freeradius:/home/celal# radtest jane PassWord123 127.0.0.1 1812 testing123
Sent Access-Request Id 240 from 0.0.0.0:53470 to 127.0.0.1:1812 length 74
        User-Name = "jane"
        User-Password = "PassWord123"
        NAS-IP-Address = 127.0.1.1
        NAS-Port = 1812
        Message-Authenticator = 0x00
        Cleartext-Password = "PassWord123"
Received Access-Accept Id 240 from 127.0.0.1:1812 to 127.0.0.1:53470 length 20
root@freeradius:/home/celal#
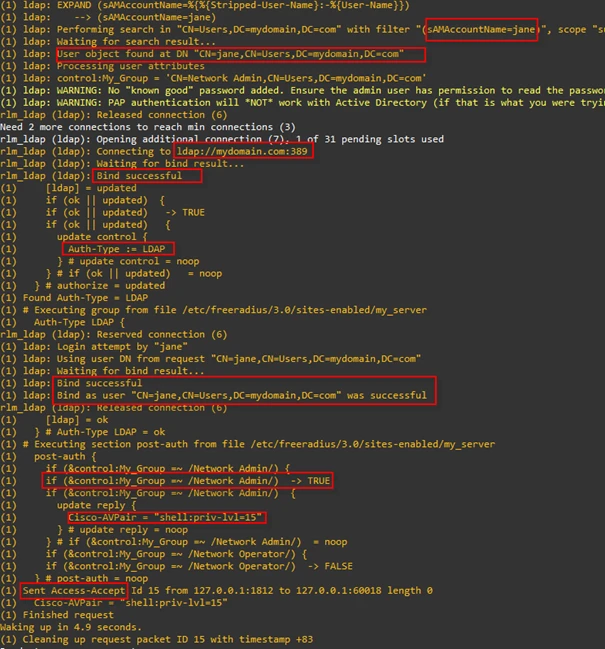
Following screenshot shows debug output from the FreeRADIUS server when it receives the request.
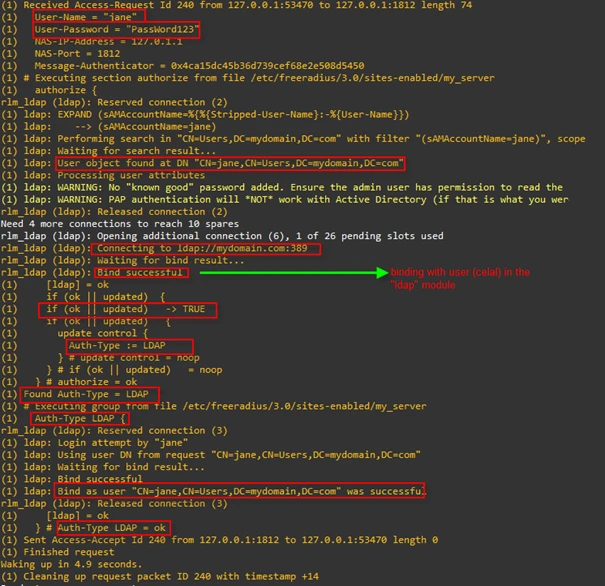
The authentication for jane is working, but notice that there is not anything related to authorization in the screenshot above. We need to add some configuration for that.
Step-2: First we need to pull the group information from the ldap server.
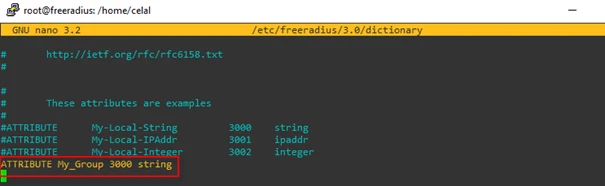
Open "dictionary" file and define an attribute for ldap group.
root@freeradius:/home/celal# nano /etc/freeradius/3.0/dictionary
And add "ATTRIBUTE My_Group 3000 string" line to the file as below.
Open ldap module.
root@freeradius:/home/celal# nano /etc/freeradius/3.0/mods-enabled/ldap
and add the line below and save the module.
control:My_Group ='memberOf'
Step-3: Configure the virtual server to check the group information and send authorization information accordingly.
post-auth {
if (&control:My_Group =~ /Network Admin/) {
        update reply {
                Cisco-AVPair = "shell:priv-lvl=15"
    }
}
if (&control:My_Group =~ /Network Operator/) {
        update reply {
                Cisco-AVPair = "shell:priv-lvl=7"
    }
}
}
"post-auth" module is executed after a successful authentication. I am setting the privilege level based on the user’s group. I am checking the groups in the "if" condition with a regex.
Step-4: Capture the packets while testing with
"radtest jane PassWord123 127.0.0.1 1812 testing123" command.
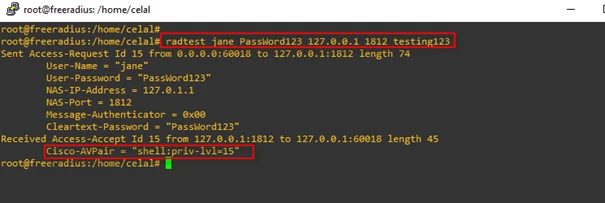
The debug output from FreeRADIUS is below.
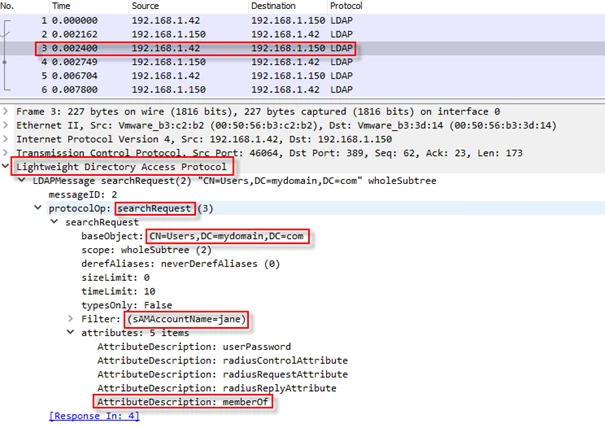
Analyzing the packets between the FreeRADIUS and the LDAP server
Packet Number 1: Before we query the ldap server, we need to bind (authenticate).
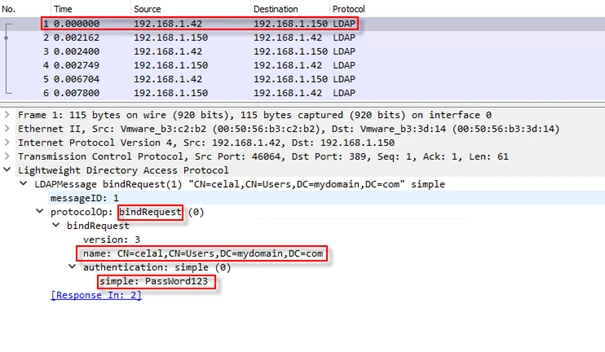
We specify that we would like to use "simple binding", which carry the credentials in clear text.
Packet Number 2: It is a "bindResponse" packet, which informs that the binding has been successful.

Packet Number 3: It is a "searchRequest" packet. We are asking ldap server to send us the user information in the attributes. Now we only need "memberOf" attribute. The other ones are the default attributes FreeRADIUS adds.
Packet Number 4: The ldap server sends the user information to the radius server in this packet.
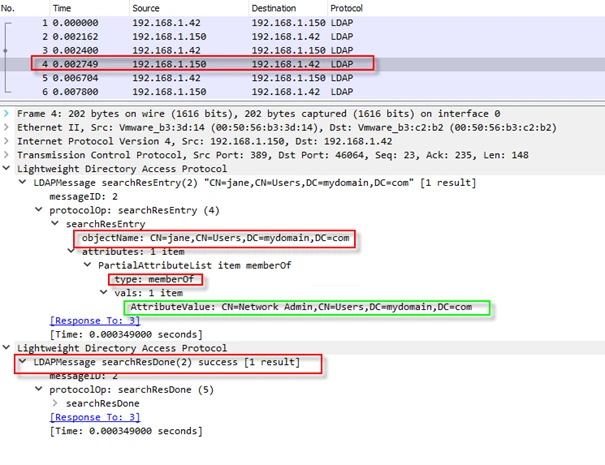
Packet Number 5: After gathering the user’s information, we bind (authenticate) with the user (jane) in this packet.

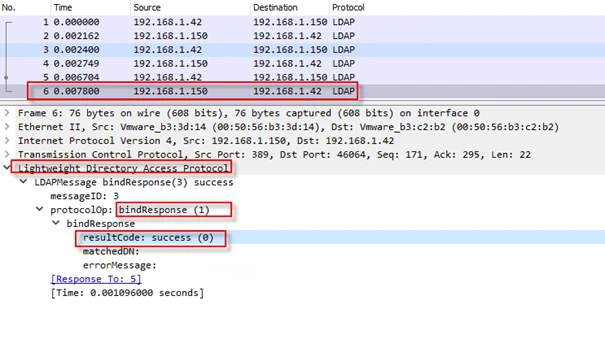
Packet Number 6: The provided credentials are verified with this packet.
Final thoughts
LDAP database can be used for authentication and authorization. We kept the configuration files as simple as we can for learning purpose in this article.


![15 Top Wireshark IP Filters with Examples [Cheat Sheet]](/wireshark-ip-filters-cheat-sheet/wireshark-ip-filters_hu_4ae5bc960793095e.webp)


![[SOLVED] Find Duplicate IP Address with Wireshark](/find-duplicate-ip-address-arp-wireshark/detect_duplicate_ip_hu_9efb2308a940cf60.webp)
![L3MON - Hack Android Mobile Remotely [Step-by-Step]](/l3mon-hack-android-mobile-remotely/l3mon_hu_1ed11b8ecb7a84e4.webp)