After integrating code repositories and automated builds in the previous tutorial AWS CodeCommit and CodeBuild Tutorial, the next step in a CI/CD workflow is automating application deployments using services like AWS CodeDeploy and CodePipeline., the next step in a CI/CD workflow is automating application deployments. AWS provides powerful services like AWS CodeDeploy and AWS CodePipeline that allow developers to deploy applications reliably across environments.
In this tutorial, we will focus on AWS CodeDeploy, which automates application deployments to Amazon EC2 instances and other compute platforms. You will learn how to configure deployment groups, install deployment agents, and implement different deployment strategies.
AWS CodeDeploy Overview
AWS CodeDeploy is a deployment automation service that simplifies the process of releasing application updates to cloud infrastructure. It enables developers to deploy code consistently across environments such as development, testing, and production without manually copying files or executing scripts on servers.
What is AWS CodeDeploy
AWS CodeDeploy is a fully managed deployment service that automates application deployments to Amazon EC2 instances, AWS Lambda functions, and Amazon ECS services. It helps organizations deliver application updates quickly while minimizing downtime during deployments.
CodeDeploy also integrates with other AWS DevOps tools such as CodeCommit, CodeBuild, and CodePipeline, making it a core component of CI/CD pipelines.
Key Features of CodeDeploy
AWS CodeDeploy offers several features that help streamline application deployments:
- Automated application deployments
- Support for EC2, Lambda, and ECS workloads
- Blue/Green and In-place deployment strategies
- Automatic rollback on deployment failures
- Integration with AWS DevOps services
- Monitoring and logging through CloudWatch
These capabilities allow teams to manage deployments safely and efficiently.
Deployment Types Supported by CodeDeploy
AWS CodeDeploy supports different deployment platforms:
| Deployment Platform | Description |
|---|---|
| Amazon EC2 / On-Premises | Deploy applications to EC2 instances or on-premise servers |
| AWS Lambda | Deploy new versions of serverless functions |
| Amazon ECS | Deploy container-based applications |
Each platform uses deployment strategies tailored to the specific compute environment.
CodeDeploy vs Manual Deployment
Manual deployments often involve logging into servers and copying application files, which can introduce human errors and downtime. CodeDeploy automates this process and ensures deployments follow a consistent workflow.
| Feature | Manual Deployment | CodeDeploy |
|---|---|---|
| Automation | Limited | Fully automated |
| Error handling | Manual troubleshooting | Automatic rollback |
| Deployment consistency | Depends on operator | Consistent process |
| Scalability | Difficult to manage | Easily scalable |
Using CodeDeploy reduces operational overhead and improves deployment reliability.
When to Use AWS CodeDeploy
AWS CodeDeploy is ideal when organizations want to automate application releases and minimize downtime during deployments. It is particularly useful when applications are deployed across multiple EC2 instances or environments.
It also integrates seamlessly with CI/CD pipelines, enabling automated deployments whenever new code changes are pushed to repositories.
Deploy Applications to EC2 Using AWS CodeDeploy
In this scenario, we will deploy an application to EC2 instances using AWS CodeDeploy. This process involves creating a CodeDeploy application, defining a deployment group, configuring target instances, and executing a deployment.
Create an Application in CodeDeploy
To start using CodeDeploy, you must first create an application container that holds deployment configurations.
Steps:
- Open the AWS Management Console.
- Navigate to AWS CodeDeploy.
- Click Create application.
- Provide an application name.
- Select EC2/On-Premises as the compute platform.
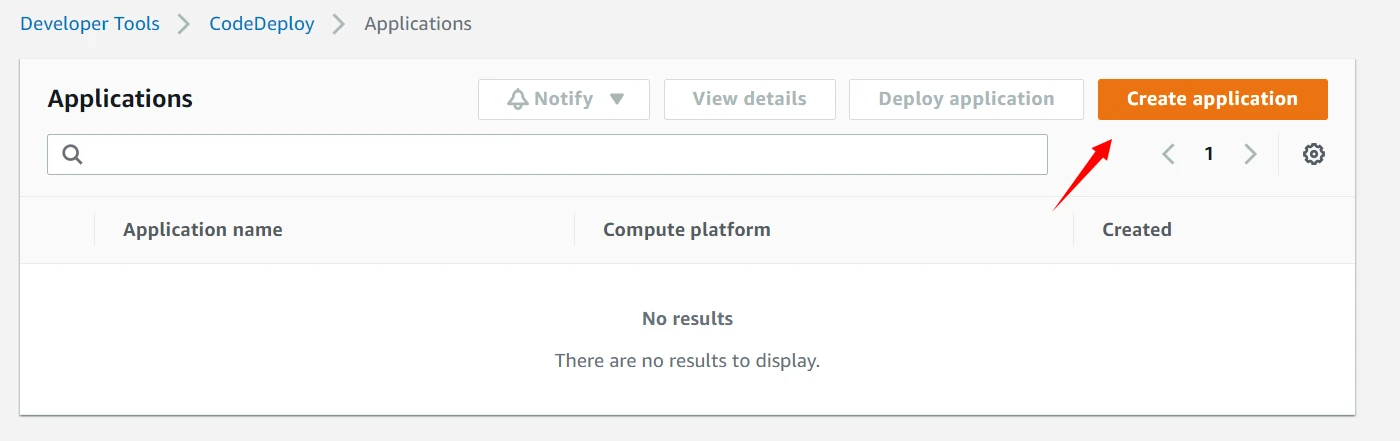
This application will serve as the base configuration for deployments.
Create a Deployment Group
A deployment group defines which instances will receive application updates.
While creating a deployment group, you must specify:
- Deployment group name
- Service role with deployment permissions
- Target EC2 instances
- Deployment configuration
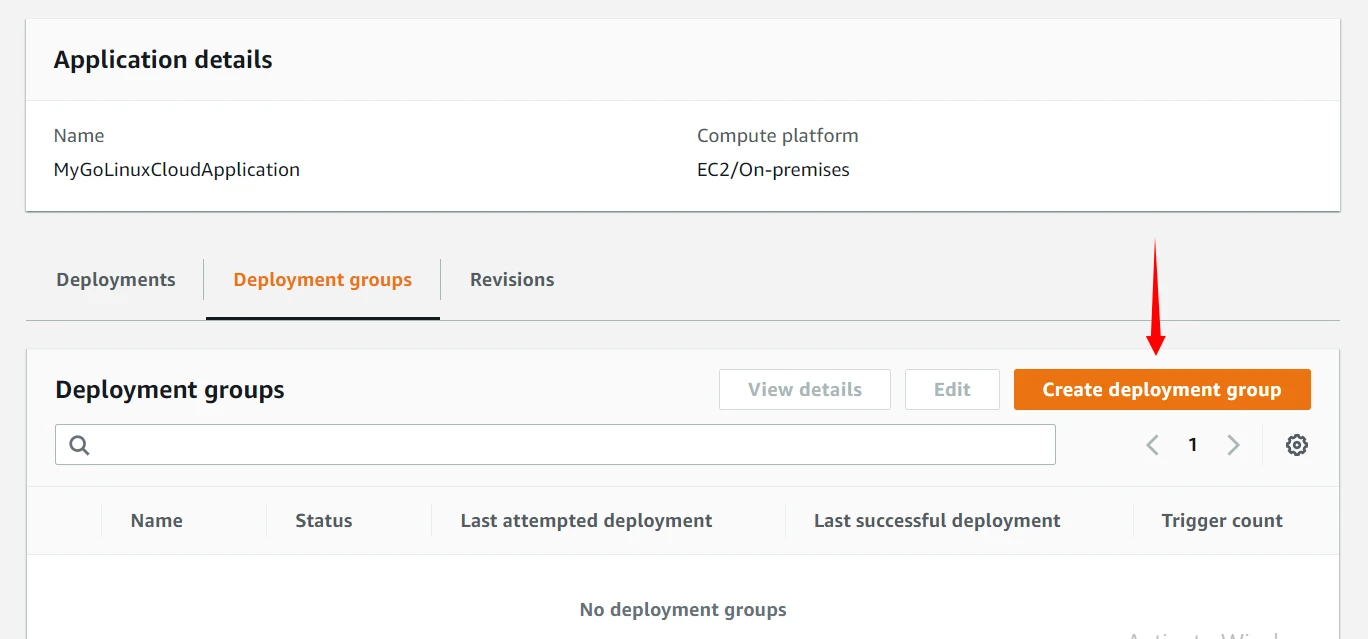
Deployment groups allow you to control how and where deployments occur.
Configure EC2 instances for CodeDeploy
Before deploying applications, EC2 instances must be configured to work with CodeDeploy.
Important requirements include:
- Installing the CodeDeploy agent
- Assigning IAM roles with required permissions
- Allowing network access for deployment services
These steps ensure that EC2 instances can receive and execute deployment instructions.
Install CodeDeploy agent on EC2
The CodeDeploy agent is responsible for receiving deployment instructions and executing them on EC2 instances.
Example installation commands:
sudo yum update -y
sudo yum install ruby -y
sudo wget https://aws-codedeploy-region.s3.amazonaws.com/latest/install
sudo chmod +x install
sudo ./install auto
Once installed, the agent communicates with CodeDeploy to perform deployments.
Deploy application revision to EC2 instances
After configuring the application and deployment group, you can initiate a deployment.
The deployment process typically involves:
- Uploading application code
- Running lifecycle hooks defined in
appspec.yml - Copying files to target instances
- Executing deployment scripts
Successful deployment updates the application across all targeted EC2 instances.
Configure Deployment Strategies in CodeDeploy
AWS CodeDeploy provides multiple deployment strategies to control how application updates are released across servers.
In-place deployment strategy explained
In-place deployments update the application on the same instances where it is currently running. Instances are updated sequentially or in batches depending on deployment configuration.
During this process:
- The application is stopped
- New files are installed
- The application is restarted
This approach is simple but may cause temporary downtime.
Blue/Green deployment in CodeDeploy
Blue/Green deployment reduces downtime by creating a new environment (green) while the current environment (blue) continues running.
Deployment steps include:
- Launch new instances with the updated application
- Test the new environment
- Redirect traffic from old instances to new instances
This method provides safer deployments and quick rollback options.
Advantages of Blue/Green deployments
Blue/Green deployments provide several benefits:
- Reduced downtime
- Faster rollback in case of errors
- Ability to test new versions before switching traffic
- Improved reliability during production releases
These advantages make Blue/Green deployments a preferred strategy for production systems.
Configure traffic shifting during deployment
Traffic shifting allows gradual redirection of user traffic to the new deployment environment.
CodeDeploy supports multiple traffic shifting strategies:
- All-at-once
- Linear deployment
- Canary deployment
Gradual traffic shifting reduces risk by monitoring application performance during rollout.
Create and Manage Deployment Groups
Configure deployment group settings
Deployment groups define key configuration settings including:
- Deployment type
- Target instances
- Load balancer integration
- Deployment strategy
These settings control the behavior of application deployments.
Use EC2 instance tags for deployment targets
Instead of manually selecting instances, CodeDeploy allows targeting instances using EC2 tags.
Example:
Key: Environment
Value: Production
All instances with matching tags will automatically receive deployments.
Configure load balancer integration
CodeDeploy can integrate with Elastic Load Balancers to manage traffic during deployments.
During deployment:
- Instances are temporarily removed from the load balancer
- Application updates are applied
- Instances are re-registered with the load balancer
This ensures minimal service disruption.
Configure automatic rollback options
Automatic rollback allows deployments to revert to the previous version if errors occur.
Rollback can be triggered by:
- Deployment failures
- CloudWatch alarms
- Manual rollback actions
This feature helps maintain application stability during deployment failures.
Prepare Application Deployment Package
Before deploying applications using AWS CodeDeploy, you must prepare a deployment package that contains your application files and configuration instructions. This package typically includes application source code along with an appspec.yml file that tells CodeDeploy how to deploy the application on target servers.
Understanding appspec.yml structure
The appspec.yml file is the configuration file used by AWS CodeDeploy to define deployment instructions. It specifies which files should be copied to the server and which scripts should be executed during different stages of deployment.
A typical appspec.yml file includes:
- Version of the appspec format
- Files to copy during deployment
- Lifecycle hooks
- Script execution instructions
Example structure:
version: 0.0
os: linux

files:
  - source: /
    destination: /var/www/html

hooks:
  BeforeInstall:
    - location: scripts/install_dependencies.sh
      timeout: 300

  AfterInstall:
    - location: scripts/start_application.sh
      timeout: 300
This configuration allows CodeDeploy to automate application installation and configuration.
Define lifecycle hooks in appspec.yml
Lifecycle hooks allow developers to run scripts at different stages of the deployment process. These hooks help automate tasks such as installing dependencies, stopping services, or starting applications.
Common lifecycle events include:
| Hook | Purpose |
|---|---|
| BeforeInstall | Prepare system before installing application |
| AfterInstall | Configure application after files are copied |
| ApplicationStart | Start application services |
| ValidateService | Verify deployment success |
Using lifecycle hooks ensures deployments follow a consistent automated workflow.
Configure BeforeInstall and AfterInstall hooks
The BeforeInstall hook runs before application files are copied to the server. It is typically used to prepare the system environment.
Example tasks include:
- Installing system dependencies
- Stopping running services
- Cleaning previous deployments
The AfterInstall hook runs after files are copied. This stage is often used to configure application settings and start services.
Example tasks include:
- Updating configuration files
- Setting permissions
- Restarting application services
Run custom scripts during deployment
CodeDeploy allows developers to execute custom scripts during deployment. These scripts can automate complex setup tasks required for application installation.
Examples of custom scripts include:
- Installing required software packages
- Configuring application environment variables
- Running database migrations
- Restarting application services
By combining lifecycle hooks and custom scripts, CodeDeploy can fully automate application deployment workflows.
Automate CI/CD Pipeline Using AWS CodePipeline
After preparing application deployments with CodeDeploy, the next step is automating the entire CI/CD workflow. AWS CodePipeline orchestrates the process of retrieving source code, building applications, and deploying them automatically.
What is AWS CodePipeline
AWS CodePipeline is a continuous delivery service that automates software release workflows. It connects different AWS services to create a complete CI/CD pipeline.
When developers push code to a repository, CodePipeline automatically triggers the pipeline and runs the configured stages such as build and deployment.
Components of CodePipeline
A CodePipeline workflow consists of several components that define how the pipeline operates.
| Component | Description |
|---|---|
| Pipeline | The overall workflow definition |
| Stage | Logical phase in the pipeline |
| Action | Task performed within a stage |
| Artifact | Output generated from a stage |
These components allow developers to define automated workflows for building and deploying applications.
Pipeline stages explained
A typical CI/CD pipeline contains multiple stages such as:
- Source stage – Retrieves code from repositories
- Build stage – Compiles and tests application code
- Deploy stage – Deploys the application to target infrastructure
Each stage can contain one or more actions that perform specific tasks.
Integrating CodeCommit, CodeBuild and CodeDeploy
AWS CodePipeline integrates easily with other AWS DevOps services.
Typical workflow:
- Developer pushes code to AWS CodeCommit
- CodePipeline triggers AWS CodeBuild to compile and test code
- CodeDeploy automatically deploys the application to EC2 instances
This integration creates a fully automated CI/CD pipeline.
Create a CI/CD Pipeline in AWS CodePipeline
Create a new pipeline in AWS Console
Steps to create a pipeline:
- Open AWS CodePipeline from the AWS Management Console
- Click Create pipeline
- Enter a pipeline name
- Select or create a service role
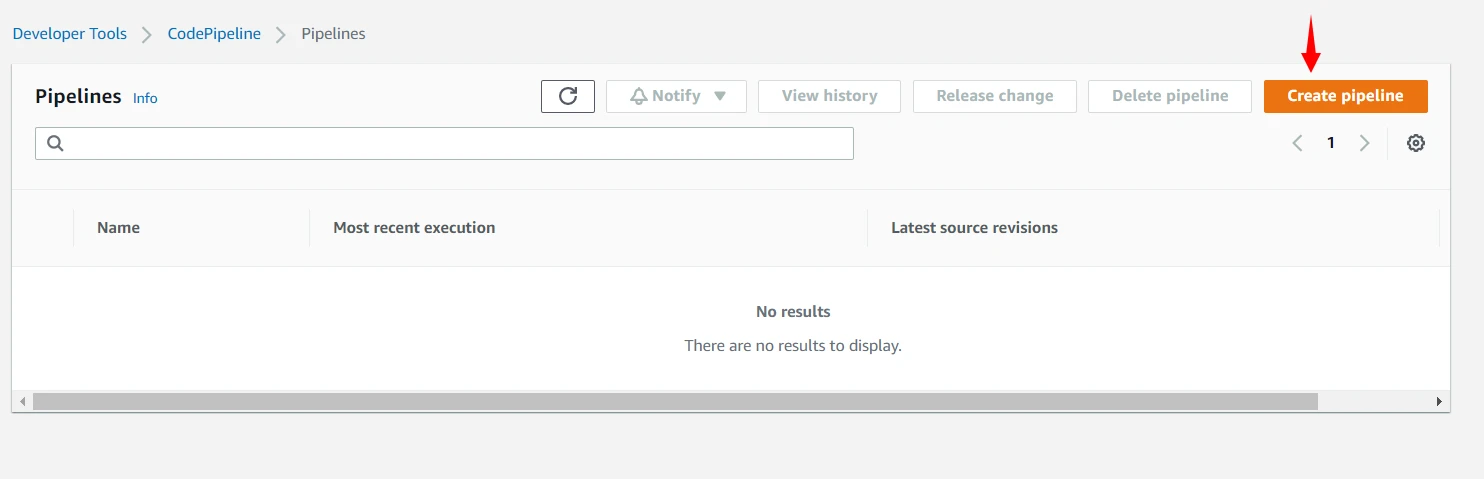
The service role allows CodePipeline to interact with other AWS services.
Configure source stage using CodeCommit
The source stage retrieves application code from a repository.
Configuration steps:
- Select AWS CodeCommit as the source provider
- Choose the repository
- Select the branch to monitor for changes
Whenever new code is pushed to the branch, the pipeline is triggered.
Configure build stage using CodeBuild
The build stage compiles and validates application code.
Steps:
- Select AWS CodeBuild as the build provider
- Choose an existing build project
- Configure build artifacts
CodeBuild executes commands defined in the buildspec.yml file.
Configure deployment stage using CodeDeploy
The deployment stage automatically releases the built application to servers.
Configuration includes:
- Selecting CodeDeploy as the deployment provider
- Choosing the CodeDeploy application
- Selecting the deployment group
Once configured, CodeDeploy will deploy the application to EC2 instances.
Execute pipeline after code commit
After the pipeline is configured, pushing code to the repository automatically triggers pipeline execution.
Pipeline workflow:
- CodeCommit receives new code
- CodePipeline starts execution
- CodeBuild compiles and validates code
- CodeDeploy deploys application to EC2
This completes a fully automated CI/CD workflow.
Add Manual Approval Stage in CI/CD Pipeline
In production environments, it is often necessary to manually approve deployments before releasing them to users. CodePipeline supports manual approval stages that allow teams to review changes before deployment.
Configure approval action in CodePipeline
To add an approval stage:
- Edit the existing pipeline
- Add a new stage before production deployment
- Select Manual approval as the action type
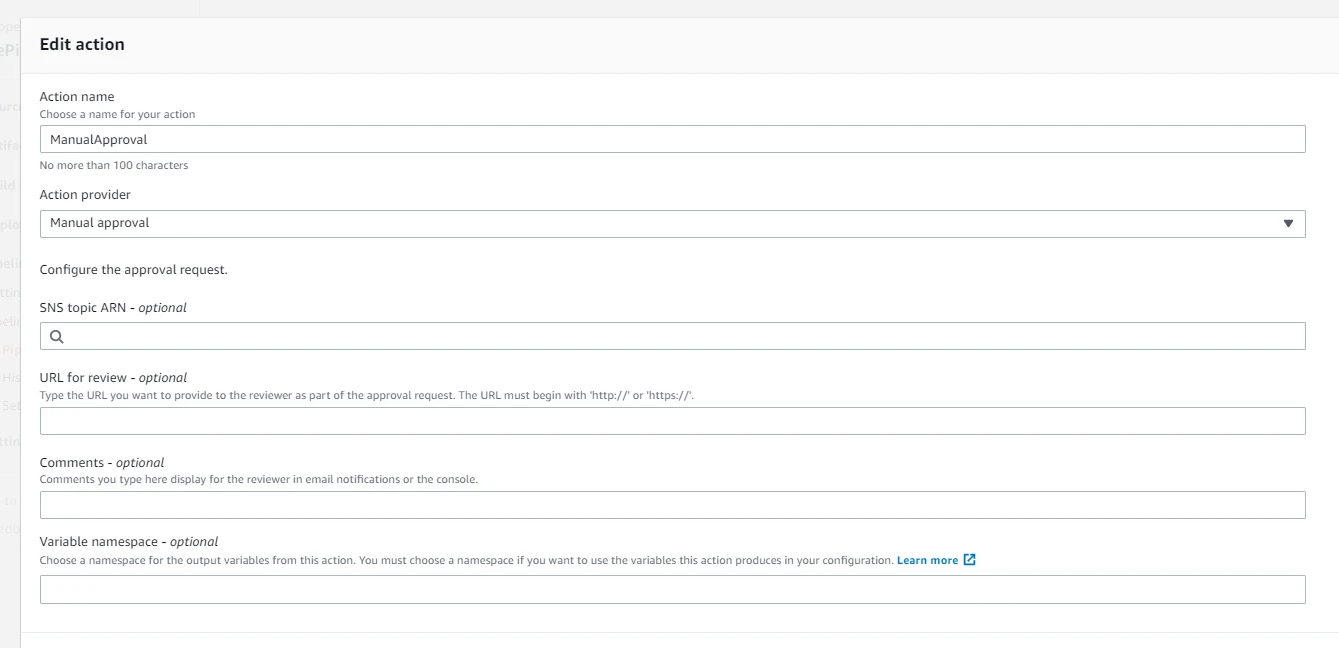
This stage pauses pipeline execution until approval is granted.
When to use manual approvals
Manual approvals are commonly used when deploying applications to production environments where additional verification is required.
Examples include:
- Security reviews
- Quality assurance validation
- Business approval before release
Approve or reject pipeline execution
When a pipeline reaches the approval stage, authorized users can either approve or reject the deployment.
If approved, the pipeline continues execution.
If rejected, the pipeline stops and deployment is canceled.
Implement production deployment approval workflow
Organizations often implement a workflow where:
- Code is deployed automatically to staging
- Tests and validation are performed
- A manual approval is required before production deployment
This approach ensures better control over production releases.
Deploy Applications Automatically to EC2
Configure deployment automation in pipeline
Deployment automation is achieved by connecting CodePipeline with CodeDeploy.
Whenever the build stage completes successfully, CodeDeploy automatically starts deployment to target instances.
Trigger deployments after successful build
The pipeline ensures deployments only occur after the build stage completes successfully.
This helps prevent deploying broken or untested code to production environments.
Monitor deployment status
You can monitor deployment progress through:
- AWS CodeDeploy dashboard
- AWS CodePipeline execution history
- Amazon CloudWatch logs
These tools provide visibility into deployment activities.
Validate deployment on EC2 instance
After deployment completes, you can validate the application by connecting to the EC2 instance and verifying that the application is running correctly.
Typical validation steps include:
- Checking application services
- Verifying logs
- Accessing the application through the browser or API endpoint
Monitor and Troubleshoot CodeDeploy Deployments
After deploying applications using AWS CodeDeploy, it is important to monitor deployment progress and troubleshoot issues if deployments fail. AWS provides several tools and logs that help diagnose problems during the deployment lifecycle.
View deployment history in CodeDeploy
AWS CodeDeploy maintains a detailed history of all deployments. This history allows you to track when deployments were executed, which instances were targeted, and whether the deployment succeeded or failed.
Steps to view deployment history:
- Open the AWS Management Console
- Navigate to AWS CodeDeploy
- Select the application
- Click on Deployments
You will see a list of deployments along with their status, deployment IDs, and timestamps.
Analyze deployment logs
Deployment logs provide detailed insights into what happened during each deployment step. These logs help identify errors or misconfigurations.
Logs can be accessed from:
- CodeDeploy console
- EC2 instance log files
- Amazon CloudWatch logs
Common log locations on EC2 instances include:
/opt/codedeploy-agent/deployment-root/deployment-logs/codedeploy-agent-deployments.logReviewing these logs helps determine whether deployment scripts executed successfully.
Troubleshoot failed deployments
Deployments may fail for several reasons such as configuration errors, permission issues, or script failures.
Common causes of deployment failures include:
- Incorrect file paths in
appspec.yml - Missing application files
- Permission issues on target directories
- Errors in lifecycle scripts
To troubleshoot failures:
- Review deployment logs
- Verify appspec.yml configuration
- Check EC2 instance connectivity
- Confirm IAM role permissions
Identifying these issues early helps maintain stable deployments.
Debug lifecycle hook errors
Lifecycle hooks execute scripts during deployment phases such as BeforeInstall, AfterInstall, and ApplicationStart.
If these scripts fail, the deployment will fail as well.
To debug lifecycle hook errors:
- Verify script permissions
- Ensure scripts are executable
- Review script output logs
- Validate command syntax
Proper debugging ensures that deployment scripts execute correctly during application updates.
Monitor CodePipeline Execution
Monitoring CI/CD pipelines helps ensure that application updates move smoothly from source code to production deployment. AWS CodePipeline provides tools to track pipeline executions and identify failures.
View pipeline execution history
AWS CodePipeline maintains execution history for each pipeline run. This history shows the status of each stage and action within the pipeline.
Steps to view pipeline execution history:
- Open AWS CodePipeline
- Select your pipeline
- View the execution timeline
The timeline shows which stage succeeded or failed and how long each stage took to complete.
Analyze pipeline stage failures
If a pipeline stage fails, CodePipeline highlights the failing stage and provides detailed error information.
Common causes of stage failures include:
- Source repository connection issues
- Build failures in CodeBuild
- Deployment failures in CodeDeploy
- Incorrect pipeline configuration
Reviewing stage logs helps identify the root cause of pipeline failures.
Debug pipeline integration issues
CI/CD pipelines often integrate multiple services such as CodeCommit, CodeBuild, and CodeDeploy. Integration problems may occur if permissions or configurations are incorrect.
To debug integration issues:
- Verify IAM role permissions
- Confirm service integrations are configured correctly
- Check artifact storage configuration
- Ensure pipeline stages reference the correct resources
Resolving integration issues ensures smooth pipeline execution.
Monitor pipeline using CloudWatch
Amazon CloudWatch provides monitoring and logging capabilities for CI/CD pipelines.
Using CloudWatch you can:
- Track pipeline execution metrics
- Monitor deployment success and failure rates
- Configure alarms for pipeline failures
- Analyze logs generated by pipeline stages
CloudWatch monitoring helps maintain reliable and observable CI/CD workflows.
Frequently Asked Questions
1. What is AWS CodeDeploy?
2. What is AWS CodePipeline?
3. How does CodeDeploy work with CodePipeline?
4. Can AWS CodePipeline deploy applications automatically?
Summary
In this tutorial, we explored how to automate application deployments using AWS CodeDeploy and AWS CodePipeline. We learned how to configure deployment groups, prepare deployment packages using appspec.yml, and deploy applications to EC2 instances automatically.
We also implemented a CI/CD pipeline that integrates CodeCommit, CodeBuild, and CodeDeploy, enabling automated build and deployment workflows. Finally, we discussed how to monitor deployments and troubleshoot pipeline failures using deployment logs and CloudWatch monitoring tools.
Official Documentation
For more information, refer to the official AWS documentation: