
This is a multi-part article where in a series of article we will learn about Gluster File System in Linux, below are the topics we will cover:
- What is GlusterFS?
- Types of Volumes supported with GlusterFS
- Install and Configure GlusterFS Distributed Volume with RHEL/CentOS 8
- Install and Configure GlusterFS Replicated Volume with RHEL/CentOS 8
- Install and Configure GlusterFS Distributed Replicated Volume with RHEL/CentOS 8
Lab Environment
I have created four Virtual Machines using Oracle VirtualBox which is installed on a Linux Server. All of these four VMs are installed with CentOS 8. Below are the configuration spec of these virtual machines:
| Configuration | Node 1 | Node 2 |
|---|---|---|
| Hostname/FQDN | glusterfs-1.example.com | glusterfs-2.example.com |
| OS | CentOS 8 | CentOS 8 |
| IP Address | 10.10.10.6 | 10.10.10.12 |
| Storage 1 (/dev/sda) | 20GB | 20GB |
| Storage 2 (/dev/sdb) | 10GB | 10GB |
Name Resolution
You must configure DNS to resolve hostname or alternatively use /etc/hosts
file. I have updated /etc/hosts file with the IPs of my GlusterFS
nodes
# cat /etc/hosts
127.0.0.1   localhost localhost.localdomain localhost4 localhost4.localdomain4
::1         localhost localhost.localdomain localhost6 localhost6.localdomain6
10.10.10.6    glusterfs-1     glusterfs-1.example.com
10.10.10.12   glusterfs-2     glusterfs-2.example.com
Install Gluster File system
Install GlusterFS on CentOS 8
Depending upon your environment you can download the repo file of glusterfs from the official page. I am using internal network on my CentOS 8 virtual machine so there is no internet connectivity in my VM which is why I downloaded the glusterfs repo on one of my RHEL 8 node and then created an offline repo by downloading the entire repository
To download and update the repo file you will need wget rpm, so install wget rpm
first
# yum -y install wget
Next download and install centos-release-gluster packageto
install GlusterFS on both the cluster
nodes
[root@glusterfs-1 ~]# yum install centos-release-gluster
Enable PowerTools repo
You must also enable PowerTools repo or
else you will get below error while installing glusterfs-server
python3-pyxattr is needed by glusterfs-srver which is provded by powertools repo from centOS 8 so this also needs to be enabled
To enable powertools you can manually enable the repo using
"enabled=1" param in /etc/yum.repos.d/CentOS-PowerTools.repo or you
can install yum-utils first
[root@glusterfs-1 ~]# yum -y install yum-utils
and then later using yum-config-manager you can enable the PowerTools
repo
[root@glusterfs-1 ~]# yum-config-manager --enable PowerTools
To list the available repos
[root@glusterfs-1 ~]# yum repolist
CentOS-8 - AppStream                                             5.1 kB/s | 4.3 kB     00:00
CentOS-8 - Base                                                  6.1 kB/s | 3.8 kB     00:00
CentOS-8 - Extras                                                256  B/s | 1.5 kB     00:06
CentOS-8 - PowerTools                                            815 kB/s | 2.0 MB     00:02
Extra Packages for Enterprise Linux 8 - x86_64                   6.1 kB/s | 7.7 kB     00:01
GlusterFS clustered file-system                                  2.9 MB/s | 3.0 kB     00:00
repo id                   repo name                                                   status
AppStream                 CentOS-8 - AppStream                                         5,001
BaseOS                    CentOS-8 - Base                                              1,784
PowerTools                CentOS-8 - PowerTools                                        1,499
epel                      Extra Packages for Enterprise Linux 8 - x86_64               4,541
extras                    CentOS-8 - Extras                                                3
glusterfs-rhel8           GlusterFS clustered file-system                                 29
Next install glusterfs-server to install GlusterFS
[root@glusterfs-1 ~]# yum install -y glusterfs-server
Install GlusterFS on Red Hat 8 (RHEL 8)
There are various source and methods to install GlusterFS in RHEL 8
- To install Red Hat Gluster Storage 3.4 using ISO
- To install Red Hat Gluster Storage 3.4 using Subscription Manager
Next to install Red Hat Gluster Storage using redhat-storage-server
rpm
# yum install redhat-storage-server
Start glusterd service
Next start the glusterd service on both the cluster nodes
[root@glusterfs-1 ~]# systemctl start glusterd
Verify the status of the service and make sure it is in active running state:
[root@glusterfs-1 ~]# systemctl status glusterd
● glusterd.service - GlusterFS, a clustered file-system server
   Loaded: loaded (/usr/lib/systemd/system/glusterd.service; disabled; vendor preset: disabled)
   Active: active (running) since Sun 2020-01-26 02:19:31 IST; 4s ago
     Docs: man:glusterd(8)
  Process: 2855 ExecStart=/usr/sbin/glusterd -p /var/run/glusterd.pid --log-level $LOG_LEVEL $GLUSTERD_OPTIONS (code=exited, status=0/SUCCESS)
 Main PID: 2856 (glusterd)
    Tasks: 9 (limit: 26213)
   Memory: 3.9M
   CGroup: /system.slice/glusterd.service
           └─2856 /usr/sbin/glusterd -p /var/run/glusterd.pid --log-level INFO

Jan 26 02:19:31 glusterfs-1.example.com systemd[1]: Starting GlusterFS, a clustered file-system server...
Jan 26 02:19:31 glusterfs-1.example.com systemd[1]: Started GlusterFS, a clustered file-system server.
Enable the service so that the service comes up automatically
[root@glusterfs-1 ~]# systemctl enable glusterd
Create Partition
If you already have an additional logical volume for Gluster File
System then you can ignore these steps.
We will create a new logical volume on both our CentOS 8 nodes to create
a GlusterFS distributed volume. Now since I have already explained the steps required to create a partition, I won't explain these commands again here.
On Glusterfs-1 Node
[root@glusterfs-1 ~]# pvcreate /dev/sdb  <-- To create physical volume
[root@glusterfs-1 ~]# vgextend rhel /dev/sdb   <-- Extend my existing volume group
[root@glusterfs-1 ~]# lvcreate -L 2G -n brick1 rhel   <-- Create logical volume named "brick1" with size 2GB using rhel VG
[root@glusterfs-1 ~]# mkfs.xfs /dev/mapper/rhel-brick1  <-- Format the logical volume using XFS File System
Create a mount point for this new logical volume
[root@glusterfs-1 ~]# mkdir -p /bricks/brick1
Mount the logical volume on this mount point
[root@glusterfs-1 ~]# mount /dev/mapper/rhel-brick1 /bricks/brick1/
Verify the same
[root@glusterfs-1 ~]# df -Th /bricks/brick1/
Filesystem              Type  Size  Used Avail Use% Mounted on
/dev/mapper/rhel-brick1 xfs   2.0G   47M  2.0G   3% /bricks/brick1
Generate UUID for the new logical volume. We will use this UUID in
/etc/fstab
# blkid /dev/mapper/rhel-brick1
/dev/mapper/rhel-brick1: UUID="ed50e6dc-89a4-46e1-8802-89ef8d866c0b" TYPE="xfs"
Update /etc/fstab to make sure this logical volume is mounted after
reboot
UUID=ed50e6dc-89a4-46e1-8802-89ef8d866c0b /bricks/brick1 xfs defaults 0 0
On Glusterfs-2 Node
[root@glusterfs-2 ~]# pvcreate /dev/sdb   <-- To create physical volume
[root@glusterfs-2 ~]# vgextend rhel /dev/sdb   <-- Extend my existing volume group
[root@glusterfs-2 ~]# lvcreate -L 2G -n brick2 rhel   <-- Create logical volume named "brick2" with size 2GB using rhel VG
[root@glusterfs-2 ~]# mkfs.xfs /dev/mapper/rhel-brick2  <-- Format the logical volume using XFS File System
Create mount point for this new logical volume
[root@glusterfs-2 ~]# mkdir -p /bricks/brick2
Mount the logical volume on this mount point
[root@glusterfs-2 ~]# mount /dev/mapper/rhel-brick2 /bricks/brick2
Verify the same
[root@glusterfs-2 ~]# df -Th /bricks/brick2/
Filesystem              Type  Size  Used Avail Use% Mounted on
/dev/mapper/rhel-brick2 xfs   2.0G   47M  2.0G   3% /bricks/brick2
Generate UUID for the new logical volume. We will use this UUID in
/etc/fstab
# blkid /dev/mapper/rhel-brick1
/dev/mapper/rhel-brick1: UUID="b7e51212-40f9-4d93-b47d-676b7ca04b08" TYPE="xfs"
Update /etc/fstab to make sure this logical volume is mounted after
reboot
UUID=b7e51212-40f9-4d93-b47d-676b7ca04b08 /bricks/brick2 xfs defaults 0 0
Configure Firewall
Enable port for glusterd service to use GlusterFS Distributed Volume on both the cluster nodes
# firewall-cmd --permanent --add-service=glusterfs
# firewall-cmd --reload
Add your nodes to the Trusted Storage Pool (TSP)
Let’s select one host (it doesn’t matter which one); we are going to
start our cluster.
We are going to do the following from this one server:
- Add peers to our cluster
- Create a distributed volume
To add our peers to the cluster, we issue the following:
[root@glusterfs-1 ~]# gluster peer probe glusterfs-2.example.com
peer probe: success.
We can check the connected peers on individual cluster nodes
[root@glusterfs-1 ~]# gluster peer status
Number of Peers: 1

Hostname: glusterfs-2.example.com
Uuid: 17dd8f27-c595-462b-b62c-71bbebce66ce
State: Peer in Cluster (Connected)

[root@glusterfs-2 ~]# gluster peer status
Number of Peers: 1

Hostname: glusterfs-1
Uuid: 869c0eb3-5c21-457b-a0f0-1431ffe84d70
State: Peer in Cluster (Connected)
To list the hosts in the Gluster Cluster
[root@glusterfs-1 ~]# gluster pool list
UUID                                    Hostname                State
17dd8f27-c595-462b-b62c-71bbebce66ce    glusterfs-2.example.com Connected
869c0eb3-5c21-457b-a0f0-1431ffe84d70    localhost               Connected
Each peer has been given a UUID, and you can see the hostname and current state. Only peers in this list can probe new peers.
Set up GlusterFS Distributed Volume
Below is the syntax used to create glusterfs distributed volume
# gluster volume create NEW-VOLNAME [transport [tcp | rdma | tcp,rdma]] NEW-BRICK...
For example here I am creating a new glusterfs distributed volume
"distributed_volume" on both my cluster nodes i.e. glusterfs-1 and
glusterfs-2.
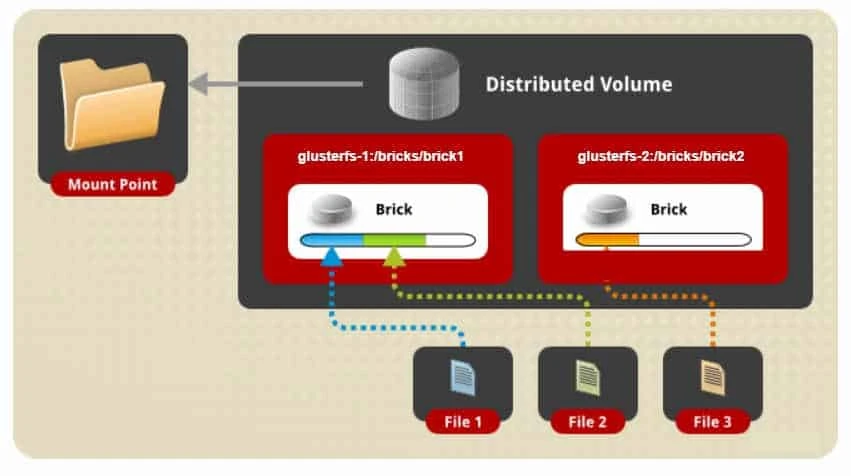
It is going to distribute the files over the three bricks under the new
directory dist_vol which will be created by the below command:
[root@glusterfs-1 ~]# gluster volume create distributed_volume transport tcp glusterfs-1.example.com:/bricks/brick1/dist_vol glusterfs-2.example.com:/bricks/brick2/dist_vol
volume create: distributed_volume: success: please start the volume to access data
Next start the volume you created
[root@glusterfs-1 ~]# gluster volume start distributed_volume
volume start: distributed_volume: success
To get more info on the volume
[root@glusterfs-1 ~]# gluster volume info distributed_volume

Volume Name: distributed_volume
Type: Distribute
Volume ID: c5b6e303-83d6-48dc-885f-38f6d3ef9117
Status: Started
Snapshot Count: 0
Number of Bricks: 2
Transport-type: tcp
Bricks:
Brick1: glusterfs-1.example.com:/bricks/brick1/dist_vol
Brick2: glusterfs-2.example.com:/bricks/brick2/dist_vol
Options Reconfigured:
transport.address-family: inet
storage.fips-mode-rchecksum: on
nfs.disable: on
Started", the files under
/var/log/glusterfs/glusterd.log should be checked in order to debug
and diagnose the situation. These logs can be looked at on one or, all
the servers configured.
To check the status of the glusterfs distributed volume
[root@glusterfs-1 ~]# gluster volume status distributed_volume
Status of volume: distributed_volume
Gluster process                             TCP Port  RDMA Port  Online  Pid
------------------------------------------------------------------------------
Brick glusterfs-1.example.com:/bricks/brick
1/dist_vol                                  49152     0          Y       2032
Brick glusterfs-2.example.com:/bricks/brick
2/dist_vol                                  49152     0          Y       11281

Task Status of Volume distributed_volume
------------------------------------------------------------------------------
There are no active volume tasks
Testing the GlusterFS Distributed Volume
For this step, we will use one of the servers to mount the volume.
Typically, you would do this from an external machine, known as a
"client". Since using this method would require additional packages to
be installed on the client machine, we will use one of the servers as a
simple place to test first , as if it were that "client".
On client gluster-fuse rpm must be installed manually
# yum -y install glusterfs-fuse
Since I am using one of the gluster cluster nodes, the client package is already installed here
[root@glusterfs-1 ~]# rpm -q glusterfs-fuse
glusterfs-fuse-7.2-1.el8.x86_64
Create a mount point
[root@glusterfs-1 ~]# mkdir /my_distvol
Mount the GlusterFS Distributed Volume as shown below:
[root@glusterfs-1 ~]# mount -t glusterfs glusterfs-1:/distributed_volume /my_distvol
Verify the same
[root@glusterfs-1 ~]# df -Th /my_distvol
Filesystem                      Type            Size  Used Avail Use% Mounted on
glusterfs-1:/distributed_volume fuse.glusterfs  4.0G  135M  3.9G   4% /my_distvol
Next I will create 10 files on the distributed volume
[root@glusterfs-1 ~]# touch /my_distvol/file{1..10}
Now check the GlusterFS brick mount points on each server:
[root@glusterfs-1 ~]# ls -l /bricks/brick1/dist_vol/
total 0
-rw-r--r-- 2 root root 0 Jan 26 19:40 file10
-rw-r--r-- 2 root root 0 Jan 26 19:40 file3
-rw-r--r-- 2 root root 0 Jan 26 19:40 file4
-rw-r--r-- 2 root root 0 Jan 26 19:40 file7
-rw-r--r-- 2 root root 0 Jan 26 19:40 file9

[root@glusterfs-2 ~]# ls -l /bricks/brick2/dist_vol/
total 0
-rw-r--r-- 2 root root 0 Jan 26 19:40 file1
-rw-r--r-- 2 root root 0 Jan 26 19:40 file2
-rw-r--r-- 2 root root 0 Jan 26 19:40 file5
-rw-r--r-- 2 root root 0 Jan 26 19:40 file6
-rw-r--r-- 2 root root 0 Jan 26 19:40 file8
As you see the 10 files are equally distributed to both the gluster nodes.
Lastly I hope the steps from the article to install and configure GlusterFS Distributed Volume in RHEL/CentOS 8 Linux was helpful. So, let me know your suggestions and feedback using the comment section.


![Steps to format SD Card in Linux [100% Working]](/steps-to-format-sd-card-in-linux/format_sd_card_hu_80a310be71a376c4.webp)

![Create & Manage Striped Logical Volume Linux [Step-by-Step]](/striped-logical-volume-linux/striped_lvm_hu_b23744ccd3f89165.webp)
![Create Mirrored Logical Volume in Linux [Step-by-Step]](/create-mirrored-logical-volume-in-linux/mirrored_lvm_hu_48bfddbf1654b6bc.webp)