![Golang cobra Tutorial [With Examples]](/golang-cobra/golang-init-function-1-800w.webp)
Golang is a perfect programming language for creating CLI applications. In today's post, I will introduce you Cobra - a library for creating powerful modern CLI applications in Golang. Cobra is used in many Go projects such asKubernetes,Hugo, andGitHub CLIto name a few.This listcontains a more extensive list of projects using Cobra.
Golang cobra features
Cobra is a library providing a simple interface to create powerful
modern CLI interfaces similar to git & go tools.
Cobra provides some features:
- Easy subcommand-based CLIs:
app server,app fetch, etc. - Fully POSIX-compliant flags (including short & long versions)
- Nested subcommands
- Global, local and cascading flags
- Intelligent suggestions (
app srver... did you meanapp server?) - Automatic help generation for commands and flags
- Grouping help for subcommands
- Automatic help flag recognition of
-h,--help, etc.
Understanding the concept
Cobra is composed of a command, argument, and flag structure. Args are
items, Flags are modifiers for those things, and Commands represent
actions. Users have an innate understanding of how to interact with the
best applications because they read like sentences while they are being
used.
In the example below, 'run' is a command and 'port' is a flag:
go run test.go --port=1123Commands
The primary focus of the application is the Command. A Command will
include every interaction that the application supports. A command can
run an activity and potentially have offspring commands. In the example
above, 'run' is the
command.
Flags
Flag allows you to change how a command behaves. Both the Go
flag
package and fully POSIX-compliant flags are supported by Cobra. A
Cobra command can provide flags that are exclusive to that command and
flags that are carried over to offspring commands. The
pflag library, a derivative of the flag standard
library that keeps the same interface while introducing POSIX
compliance, offers flag functionality.
The flag in the below case is "port."
Installing
You need to install the package before using it in your application:
go get -u github.com/spf13/cobraNow, you need to import this package to use it from your application:
import "github.com/spf13/cobra"Cobra Generator: Cobra-cli command
The command line tool cobra-cli creates cobra apps and command files.
Your application scaffolding will be bootstrapped so you may create a
Cobra-based application quickly. The simplest approach to include Cobra
in your program is this method.
It can be installed by running the below command line:
go install github.com/spf13/cobra-cli@latestYour initial application code will be generated for you using the
cobra-cli init [app] command. It is a really potent application that
will add the proper framework to your program so you can start reaping
the rewards of Cobra right now. The license you specify may also be
applied to your application.
Initializing a Cobra CLI application
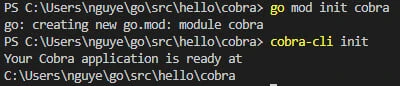
If you want to initialize a new Go module:
- Create a new directory
cdinto that directory- run
go mod init <MODNAME>
Next step you have to create a new cobra application by cobra-cli init
command. cobra-cli init should be executed from a Go module. By doing
this, a fresh, empty project will be created for you to edit. Your new
application ought to be immediately usable.
You can run the main.go by the command "go run main.go" and the output will be:
A longer description that spans multiple lines and likely contains
examples and usage of using your application. For example:

Cobra is a CLI library for Go that empowers applications.
This application is a tool to generate the needed files
to quickly create a Cobra application.
Cobra-based application structure
Although you are free to provide your own structure, a Cobra-based application will typically adhere to the following structure:
  ▾ appName/
    ▾ cmd/
        add.go
        your.go
        commands.go
        here.go
      main.go
Using the Cobra Library
The first step in manually implementing Cobra is to set up a bare main.go and a rootCmd.go file. Any extra commands you want to give are optional.
Create rootCmd
Cobra doesn't require any special constructors. Simply create your commands. root.go file:
var rootCmd = &cobra.Command{
    Use:   "hello",
    Short: "This is the first command",
    Long: `A longer description
    for the first command`,

    Run: func(cmd *cobra.Command, args []string) {
        fmt.Println("This is the first cobra example")
    },
}

func Execute() {
    err := rootCmd.Execute()
    if err != nil {
        os.Exit(1)
    }
}
Run the main.go file
We must execute the root command from the main.go. The code below should be added to main.go:
package main

import "cobra/cmd"

func main() {
    cmd.Execute()
}
We can use this command go run main.go --help to give more information
from our CLI example:
A longer description
        for the first command

Usage:
  hello [flags]

Flags:
  -h, --help     help for hello
  -t, --toggle   Help message for toggle
Run the first command: " go run main.go hello". Output:
This is the first cobra exampleAdding Sub-Commands with Cobra
Adding the business-logic
For the sake of this article, the real business logic of our CLI is irrelevant. Just a few functions should be added to helper/helper.go, so that we can have something to interact with. We will write toy functions to reverse, uppercase, and modify a string:
// reverse a string
func Reverse(s string) string {
    rns := []rune(s) // convert to rune
    for i, j := 0, len(rns)-1; i < j; i, j = i+1, j-1 {
        rns[i], rns[j] = rns[j], rns[i]
    }

    // return the reversed string.
    return string(rns)
}

// uppcase a stirng
func Uppcase(s string) string {
    return strings.ToUpper(s)
}

func Modify(s string, opt bool) string {
    if opt == true {
        return s + "_MODIFIED"
    } else {
        return s + "_modified"
    }

}
Adding Sub-Commands with Cobra
We can add as many sub-commands as necessary and nest them at different
depths, as was already explained. For demonstration purposes, we will
only add a few instructions to help you understand the concept. First,
let’s implement thereverse command. This command will allow users to
reverse any string provided as an argument. Add the reverseCmd command
to the root.go file:
var reverseCmd = &cobra.Command{
    Use:     "reverse",
    Short:   "Reverses a string",
    Aliases: []string{"rev"},
    Args:    cobra.ExactArgs(1),
    Run: func(cmd *cobra.Command, args []string) {
        res := helper.Reverse(args[0])
        fmt.Println(res)
    },
}

func init() {
    rootCmd.AddCommand(reverseCmd)
}
First, we want to make it possible for CLI users to run the command by using the alias rev. Since it is a portion of a string, we are able to give any number of aliases to a given command. Second, we make sure users may only supply one argument when using this command by using the Args field. ExactArgs is just one of many utility functions offered by Cobra; for a complete list of functions for managing command-line arguments, refer to the package description. Finally, we use Run to activate our business logic.
We can do the same thing with the uppercaseCmd and modifyCmd:
var uppercaseCmd = &cobra.Command{
    Use:     "uppercase",
    Short:   "Uppercase a string",
    Aliases: []string{"upper"},
    Args:    cobra.ExactArgs(1),
    Run: func(cmd *cobra.Command, args []string) {
        res := helper.Uppcase(args[0])
        fmt.Println(res)
    },
}var uppercaseCmd = &cobra.Command{
Use: "uppercase",
Short: "Uppercase a string",
Aliases: []string{"upper"},
Args: cobra.ExactArgs(1),
Run: func(cmd *cobra.Command, args []string) {
res := helper.Uppcase(args[0])
fmt.Println(res)
},
}
func init() {
rootCmd.AddCommand(reverseCmd)
rootCmd.AddCommand(uppercaseCmd)
}And now we can get all our CLIP commands by running go run main.go --help:
Available Commands:
  completion  Generate the autocompletion script for the specified shell
  help        Help about any command
  modify      Modify a string
  reverse     Reverses a string
  uppercase   Uppercase a string
Now we can test our very first CLI application:
Adding flags to commands with Cobra
The idea of flags will be recognizable to you if you are familiar with command-line tools. We can change how a command behaves by using flags. Cobra has built-in support for flags, and there are two different kinds of flags we can employ:
- Local flagsare assigned to a single command
- Persistent flags are assigned to the command and all its sub-commands
Now, we will add a local flag to the modifyCmd, which is a boolean
value. By specifying the—option flag, users can instruct the command
to modify or the modifyCmd. To specify the optioflag, let’s
update theroot.gofile:
var option bool
var modifyCmd = &cobra.Command{
    Use:     "modify",
    Short:   "Modify a string",
    Aliases: []string{"modif"},
    Args:    cobra.ExactArgs(1),
    Run: func(cmd *cobra.Command, args []string) {
        res := helper.Modify(args[0], option)
        fmt.Println(res)
    },
}

func init() {
    modifyCmd.Flags().BoolVarP(&option, "option", "o", false, "Modify option")
    rootCmd.AddCommand(reverseCmd)
    rootCmd.AddCommand(uppercaseCmd)
    rootCmd.AddCommand(modifyCmd)
}
First, we introduce a new variable called option. It has an implicit
default value offalse. Second, we use
modifyCmd.``Flags().BoolVarP()to add theoptyion flag (locally) to
our modifyCmdas part of theinit() function. Finally, we pass
optionto Modify``() as the second argument to ensure business logic
is called correctly.
Now we can test our CLI application again:
The Version Flag
Users can use the global flag —version that Cobra automatically
creates to find out what version of a specific CLI program is currently
installed. Let's modify our root.go to specify our application
version:
var version = "0.0.1"
var rootCmd = &cobra.Command{
    Use:     "hello",
    Version: version,
    Short:   "This is the first command",
    Long: `A longer description
    for the first command`,

    Run: func(cmd *cobra.Command, args []string) {
        fmt.Println("This is the first cobra example")
    },
}
By using go run main, we can quickly test the —version flag. go —version to display the version's default value in a pretty printout on the terminal:
hello version 0.0.1We can override the versionvariable at build-time usingldflags:
go build -o ./dist/hello -ldflags="-X 'root.version=0.0.2'" main.goSummary
Currently, Go and Cobra is the most effective and productive tools for creating CLI applications. The feature set of Cobra is fantastic. especially when Viper and Cobra are combined (another awesome Go module created by Steve Francia that addresses common configuration requirements). In order to construct CLIs even faster, you can use Cobra Generator to automatically produce substantial portions of your CLI application.
References
https://github.com/spf13/cobra
https://github.com/spf13/viper


![GO Bytes to String Conversion Best Practices [5 Methods]](/go-bytes-to-string/golang-byte-to-string_hu_e77d43b219043453.webp)