![Install and Configure OpenLDAP on Ubuntu [Step-By-Step]](/install-and-configure-openldap-on-ubuntu-step-by-step/install-and-configure-openldap-on-ubuntu-step-by-step.webp)
OpenLDAP is an open-source implementation of the Lightweight Directory Access Protocol (LDAP). It's widely used for managing directory information, providing centralized authentication, and more. In this tutorial we will cover the installation, basic configuration, and several administrative tasks for OpenLDAP on Ubuntu 22.04 and 20.04, including managing schemas, user accounts, changing domains, and handling passwords.
For current RHEL-family deployments, use the OpenLDAP install guide for Rocky Linux and AlmaLinux and LDAP and OpenLDAP basics alongside this Ubuntu walkthrough.
Prerequisites
Ensure your system is up-to-date:
sudo apt updateInstalling OpenLDAP
To install the OpenLDAP server and utilities, run:
sudo apt install slapd ldap-utils -yThis may prompt for Administrator password so provide the admin password on the prompt.
Configure OpenLDAP
After installation, configure OpenLDAP:
Post-install tuning uses dpkg-reconfigure slapd; the
dpkg command covers list, install,
and reconfigure workflows on Debian.
sudo dpkg-reconfigure slapd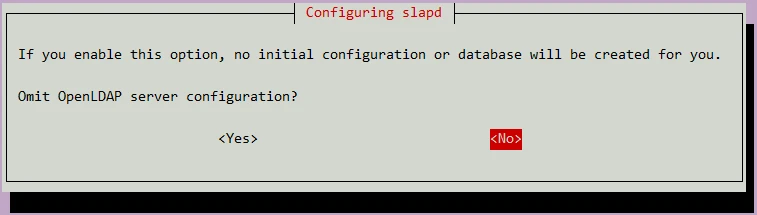
When prompted with "Omit OpenLDAP server configuration?" during the installation of the OpenLDAP server, you should typically select "No" unless you have a specific reason to handle the configuration manually later. Selecting "No" will allow the configuration script to guide you through setting up essential parameters like the domain name, organization name, and admin password, as well as creating the initial database and necessary configuration files.
- DNS Domain Name: Enter your domain components, e.g.,
example.combecomesdc=example,dc=com. - Organization Name: Your organization’s name.
- Admin Password: Set a strong password.
- Database Backend: Select
MDB. - Remove Database When Slapd Is Purged: No.
- Move Old Database: Yes.

After running sudo dpkg-reconfigure slapd, it is important to check
the status of the OpenLDAP service to ensure it is running correctly.
Confirm the unit state with systemctl status or is-active; the systemctl command shows exit codes and recent journal lines in one view.
sudo systemctl status slapd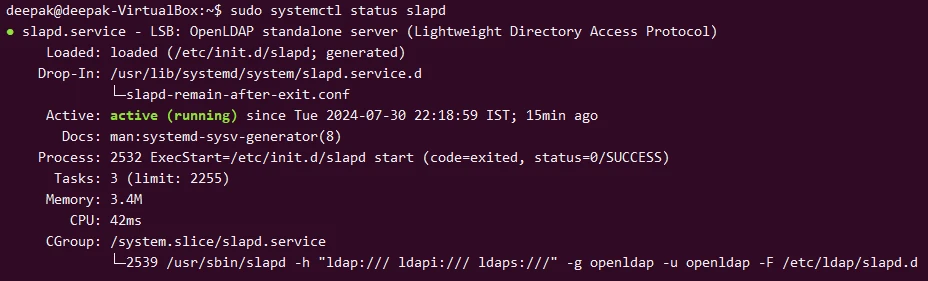
You should see output indicating that the service is active (running).
If the service is not running, start it with:
sudo systemctl start slapdTo restart the service (which can be useful after configuration changes):
sudo systemctl restart slapdOpenLDAP stores its configuration in the cn=config database. You can
query this database to see the current backend configuration.
Directory queries in this section use the ldapsearch command.
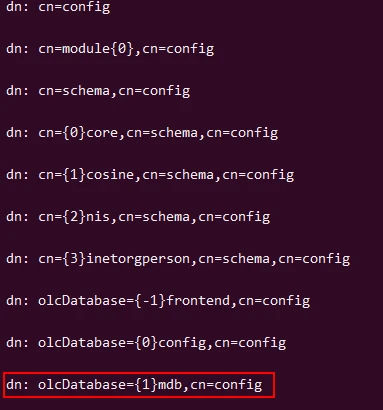
sudo ldapsearch -Q -LLL -Y EXTERNAL -H ldapi:/// -b cn=config dnThis command should list the DNs of all configurations under
cn=config. Look for entries like olcDatabase={1}mdb,cn=config which
indicate the use of MDB as the backend.
Import Additional Schemas
OpenLDAP configuration files are found in /etc/ldap/, and the database
files are stored in /var/lib/ldap/. The main configuration database is
under /etc/ldap/slapd.d/.
By default, OpenLDAP comes with several useful schemas located in
/etc/ldap/schema/. When setting up OpenLDAP, there are several
standard schemas that should typically be imported to provide a robust
foundation for your directory services. These schemas include
core.ldif, cosine.ldif, nis.ldif, and inetorgperson.ldif. Each
schema defines different sets of attributes and object classes necessary
for various directory functions.
- core.ldif: The core schema is essential as it defines the fundamental object classes and attributes that are required by most LDAP directories.
- cosine.ldif: The cosine schema includes additional object classes and attributes used for compatibility with X.500 directories.
- nis.ldif: The NIS schema (Network Information Service) extends the core schema with attributes and object classes used in Unix environments for representing networked information.
- inetorgperson.ldif: The inetOrgPerson schema extends the organizationalPerson object class with attributes that are commonly used for Internet and organizational applications.
Use the ldapadd command to import each schema:
New entries in this section are added with the ldapadd command.
sudo ldapadd -Y EXTERNAL -H ldapi:/// -f /etc/ldap/schema/core.ldif
sudo ldapadd -Y EXTERNAL -H ldapi:/// -f /etc/ldap/schema/cosine.ldif
sudo ldapadd -Y EXTERNAL -H ldapi:/// -f /etc/ldap/schema/nis.ldif
sudo ldapadd -Y EXTERNAL -H ldapi:/// -f /etc/ldap/schema/inetorgperson.ldif
After importing the schemas, you can verify that they have been correctly loaded into your OpenLDAP server by performing a search for the schema entries:
sudo ldapsearch -Q -LLL -Y EXTERNAL -H ldapi:/// -b cn=schema,cn=config dn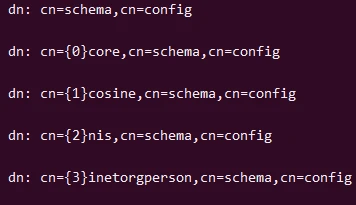
This command should return the distinguished names (DNs) of all loaded
schemas, including core, cosine, nis, and inetOrgPerson.
Add Base Schema and Entries
Create an LDIF file named base.ldif with the following content:
dn: ou=People,dc=example,dc=com
objectClass: organizationalUnit
ou: People

dn: ou=Groups,dc=example,dc=com
objectClass: organizationalUnit
ou: Groups
It creates organizational units (OUs) where user and group entries will be stored. Without this structure, you won't have a defined place to add users and groups, which is essential for managing directory entries effectively.
Replace example.com with your domain. Then, add the entries to the
LDAP directory:
sudo ldapadd -x -D cn=admin,dc=example,dc=com -W -f base.ldifVerify the entries:
sudo ldapsearch -x -LLL -b dc=example,dc=com 'ou=People' dn
sudo ldapsearch -x -LLL -b dc=example,dc=com 'ou=Groups' dn
Basic Administrative Tasks performed on OpenLDAP
1. Change LDAP Administrator Password
Verifying the LDAP Administrator DN
Before attempting to change the LDAP administrator password, it is crucial to verify how the administrator DN is configured. First, check how the administrator DN is configured. Use the following command to search the LDAP configuration database:
sudo ldapsearch -Q -LLL -Y EXTERNAL -H ldapi:/// -b cn=config "(olcRootDN=*)" olcRootDNThe output will show the DNs for all configured databases. For example:
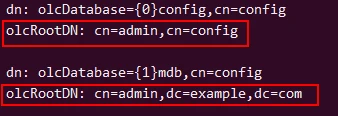
In this example, the administrator DN for the main database is
cn=admin,dc=example,dc=com.
Scenario-1: Changing the Administrator Password in the Configuration Database
If the administrator DN is defined in the configuration database (e.g.,
cn=config), follow these steps to change the password.
LDAP stores passwords in a hashed format. Use the slappasswd utility
to generate a new hashed password:
Password hashes in this section are generated with the slappasswd command.
sudo slappasswd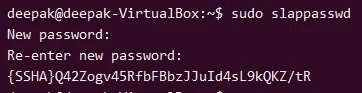
Enter your desired new password when prompted. The utility will output
an encrypted password string, something like {SSHA}5d2e19393e.... Copy
this string as you will need it in the LDIF files.
Create an LDIF file named change_password.ldif with the following
content, replacing new_hashed_password with your generated hash:
dn: olcDatabase={1}mdb,cn=config
changetype: modify
replace: olcRootPW
olcRootPW: new_hashed_password
Apply the LDIF file to change the password:
Entry updates in this section use the ldapmodify command.
sudo ldapmodify -Q -Y EXTERNAL -H ldapi:/// -f change_password.ldifScenario-2: Changing the Administrator Password in the Directory Entries
If the administrator DN is part of the directory entries (e.g., under
ou=People), follow these steps to change the password.
Search the directory to find the administrator DN:
sudo ldapsearch -x -LLL -b dc=example,dc=com 'cn=admin' dnGenerate a new password hash using the slappasswd utility:
sudo slappasswdEnter and confirm the new password when prompted. Note the hashed password, for example:
{SSHA}5EN5xG8mRxuRQhGImH5j4nF7zX8P3lJHCreate an LDIF file named change_password.ldif with the following
content, replacing new_hashed_password with your generated hash:
dn: cn=admin,dc=example,dc=com
changetype: modify
replace: userPassword
userPassword: {SSHA}5EN5xG8mRxuRQhGImH5j4nF7zX8P3lJH
Apply the LDIF file to change the password:
sudo ldapmodify -x -D "cn=admin,dc=example,dc=com" -W -f change_password.ldifYou will be prompted to enter the current password for the administrator DN.
2. Adding Entries
Adding Organizational Units (OUs)
To add new organizational units, create an LDIF file and use the
ldapadd command.
dn: ou=Engineering,dc=example,dc=com
objectClass: organizationalUnit
ou: Engineering
Command to add the OU:
ldapadd -x -D "cn=admin,dc=example,dc=com" -W -f add_ou.ldifVerify the OU has been added:
ldapsearch -x -LLL -b "dc=example,dc=com" "(ou=Engineering)" dn
Adding Users
To add a new user to the Engineering OU:, create an LDIF file with the
necessary attributes and use the ldapadd command.
dn: uid=jdoe,ou=Engineering,dc=example,dc=com
objectClass: inetOrgPerson
objectClass: posixAccount
cn: John Doe
sn: Doe
givenName: John
displayName: John Doe
uid: jdoe
uidNumber: 1001
gidNumber: 5000
homeDirectory: /home/jdoe
loginShell: /bin/bash
userPassword: {SSHA}yourhashedpassword
mail: [email protected]
Command to add the user to the Engineering OU:
ldapadd -x -D "cn=admin,dc=example,dc=com" -W -f add_user_to_engineering.ldifVerify the user has been added to the Engineering OU:
ldapsearch -x -LLL -b "dc=example,dc=com" "(uid=jdoe)" dn
3. Modifying Entries
Modifying User Attributes
To modify existing user attributes, create an LDIF file specifying the
changes and use the ldapmodify command. Let's modify user John Doe's
email address from [email protected] to [email protected].
dn: uid=jdoe,ou=People,dc=example,dc=com
changetype: modify
replace: mail
mail: [email protected]
Command to modify the user:
ldapmodify -x -D "cn=admin,dc=example,dc=com" -W -f modify_user.ldifVerify the modification:
ldapsearch -x -LLL -b "dc=example,dc=com" "(uid=jdoe)" mail
4. Searching Entries
To search for entries in the directory, use the ldapsearch command.
This is useful for verifying the existence and attributes of entries.
Example command to search for all users:
ldapsearch -x -LLL -b "dc=example,dc=com" "(objectClass=inetOrgPerson)"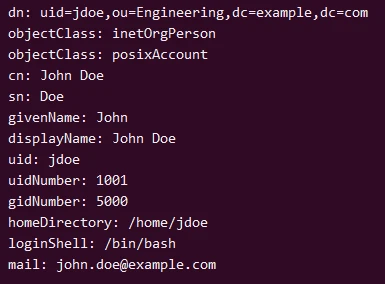
Example command to search for a specific user:
ldapsearch -x -LLL -b "dc=example,dc=com" "uid=jdoe"5. Changing Passwords
To change a user's password, you can create an LDIF file and use the
ldapmodify command.
dn: uid=jdoe,ou=Enginering,dc=example,dc=com
changetype: modify
replace: userPassword
userPassword: {SSHA}newhashedpassword
Command to change the password:
ldapmodify -x -D "cn=admin,dc=example,dc=com" -W -f change_password.ldif6. Backup and Restore
Backup the LDAP Database
To backup the LDAP database, use the slapcat command. This will output
the entire database in LDIF format.
LDIF exports in this section use the slapcat command.
sudo slapcat -n 1 -l backup.ldifRestore the LDAP Database
To restore the LDAP database from a backup, use the slapadd command.
Ensure that the slapd service is stopped before restoring.
sudo systemctl stop slapdCommand to restore the database:
Offline imports in this section use the slapadd command.
sudo slapadd -n 1 -l backup.ldifCommand to start the LDAP service:
sudo systemctl start slapdVerify the restoration:
ldapsearch -x -LLL -b "dc=example,dc=com" "(objectClass=*)"7. Configuring Access Controls
Access Control Lists (ACLs) in OpenLDAP allow fine-grained control over who can read, write, and manage directory entries and attributes. ACLs are critical for securing your LDAP directory and ensuring that only authorized users can access or modify sensitive information.
ACLs are defined in the OpenLDAP configuration files and are structured in the following way:
olcAccess: to <target>
  by <access control rule>
  by <access control rule>
...- Target: Specifies the directory entries or attributes the ACL applies to.
- Access Control Rule: Defines who can perform what actions on the target.
Here’s an example of an ACL entry:
olcAccess: to dn.subtree="ou=users,dc=example,dc=com"
  by self write
  by dn.base="cn=admin,dc=example,dc=com" write
  by * read
Add this ACL using an LDIF file:
ldapmodify -Q -Y EXTERNAL -H ldapi:/// -f acl.ldif8. Deleting Entries
Deleting Users or OUs
To delete an entry, use the ldapdelete command with the DN of the
entry you want to remove.
Command to delete a user:
Removals in this section use the ldapdelete command.
ldapdelete -x -D "cn=admin,dc=example,dc=com" -W "uid=jdoe,ou=Engineering,dc=example,dc=com"Verify the user has been deleted:
ldapsearch -x -LLL -b "dc=example,dc=com" "(uid=jdoe)" dnCommand to delete an OU:
ldapdelete -x -D "cn=admin,dc=example,dc=com" -W "ou=Engineering,dc=example,dc=com"Verify the OU has been deleted:
ldapsearch -x -LLL -b "dc=example,dc=com" "(ou=Engineering)" dn
For broader uninstall and orphan-cleanup patterns, see Ubuntu software removal guide.
