
In this tutorial we will learn how to install and FreeIPA server on CentOS 7 Linux node.
Overview on FreeIPA
FreeIPA like Microsoft's Active Directory, is an open source project, sponsored by Red Hat, which makes it easy to manage the identity, policy, and audit for Linux-based servers. IPA stands for Identity, Policy and Authentication.
- IPA is a collection of very useful services that make IPA the Linux equivalent for Active Directory in a Microsoft environment.
- It includes LDAP, the Lightweight Directory Access Protocol, which allows users to be stored in a hierarchical or replicated database.
- It includes Kerberos, which allows for advanced authentication tickets that make sure that no passwords need to be sent in plain text to the LDAP server.
- It includes DNS, as well, which helps storing all the information that Kerberos needs in the DNS database.
- And it includes a Certificate Authority. A Certificate Authority that helps you generating PKI certificates for use with, for example, AODV mail server or an Apache web server.
- Overall, it has Tomcat. Tomcat, which is offering web access in an efficient way to manage all of these.
If you look at Linux without IPA, managing LDAP and Kerberos and DNS and CA can be very challenging. If you are running IPA on top of Linux, you just get an easy to use web interface.

Client-server architecture
IPA follows the client-server-based model. This means that in each of
the servers, there is an IPA client that is installed and connected to
the IPA server.
Whenever a user wants to access the server, the IPA client connects to
the IPA server to check if the user has the required permissions to do
so. If proper permissions are present, the access is given; otherwise,
it is denied.
My Setup
For the demonstration of this article I am using CentOS 7.4. Below are
the node details I will be using for demonstrating this article
| node1 | node2 | node3 | |
|---|---|---|---|
| OS | CentOS 7 | CentOS 7 | CentOS 7 |
| IP | 10.0.2.30 | 10.0.2.31 | 10.0.2.32 |
| FQDN | node1.example.com | node2.example.com | node3.example.com |
| FreeIPA | IPA Server | IPA Client | IPA Client |
Install FreeIPA Server CentOS 7
First of all let us search the package name required for configuring FreeIPA server.
Package installs and updates in this section use dnf command.
[root@node1 ~]# yum search ipa-server
Loaded plugins: fastestmirror, langpacks
Loading mirror speeds from cached hostfile
 * base: ftp.iitm.ac.in
 * extras: centos.mirrors.estointernet.in
 * updates: centos.mirrors.estointernet.in
================================================= N/S matched: ipa-server =================================================
ipa-server.x86_64 : The IPA authentication server
ipa-server-common.noarch : Common files used by IPA server
ipa-server-dns.noarch : IPA integrated DNS server with support for automatic DNSSEC signing
ipa-server-trust-ad.x86_64 : Virtual package to install packages required for Active Directory trusts

  Name and summary matches only, use "search all" for everything.
So now we know we need ipa-server and ipa-server-dns rpm to set up
our FreeIPA server.
[root@node1 ~]# yum install ipa-server.x86_64 ipa-server-dns.noarch -y
Once installed, update your hosts file with the FQDN names of all the nodes in your setup. Without this the FreeIPA server configuration will not work.
[root@node1 ~]# cat /etc/hosts
127.0.0.1   localhost localhost.localdomain localhost4 localhost4.localdomain4
::1         localhost localhost.localdomain localhost6 localhost6.localdomain6
10.0.2.31       node2.example.com node2
10.0.2.30       node1.example.com node1
10.0.2.32       node3.example.com node3
Configure FreeIPA Server
Execute the below command to start the FreeIPA central identity server configuration. This command will also setup DNS server along with IPA server.
[root@node1 ~]# ipa-server-install --setup-dns --allow-zone-overlap

The log file for this installation can be found in /var/log/ipaserver-install.log
==============================================================================
This program will set up the IPA Server.

This includes:
  * Configure a stand-alone CA (dogtag) for certificate management
  * Configure the Network Time Daemon (ntpd)
  * Create and configure an instance of Directory Server
  * Create and configure a Kerberos Key Distribution Center (KDC)
  * Configure Apache (httpd)
  * Configure DNS (bind)
  * Configure the KDC to enable PKINIT

To accept the default shown in brackets, press the Enter key.

WARNING: conflicting time&date synchronization service 'chronyd' will be disabled
in favor of ntpd

Enter the fully qualified domain name of the computer
on which you're setting up server software. Using the form
.
Example: master.example.com.

Server host name [node1.example.com]:

Warning: skipping DNS resolution of host node1.example.com
The domain name has been determined based on the host name.

Please confirm the domain name [example.com]:

The kerberos protocol requires a Realm name to be defined.
This is typically the domain name converted to uppercase.

Please provide a realm name [EXAMPLE.COM]:
Certain directory server operations require an administrative user.
This user is referred to as the Directory Manager and has full access
to the Directory for system management tasks and will be added to the
instance of directory server created for IPA.
The password must be at least 8 characters long.

Directory Manager password:
Password (confirm):

The IPA server requires an administrative user, named 'admin'.
This user is a regular system account used for IPA server administration.

IPA admin password:
Password (confirm):

Checking DNS domain example.com., please wait ...
Do you want to configure DNS forwarders? [yes]: yes
Following DNS servers are configured in /etc/resolv.conf: 192.168.0.1, 8.8.8.8
Do you want to configure these servers as DNS forwarders? [yes]: yes
All DNS servers from /etc/resolv.conf were added. You can enter additional addresses now:
Enter an IP address for a DNS forwarder, or press Enter to skip:
Checking DNS forwarders, please wait ...
Do you want to search for missing reverse zones? [yes]:
Do you want to create reverse zone for IP 10.0.2.30 [yes]:
Please specify the reverse zone name [2.0.10.in-addr.arpa.]:
Using reverse zone(s) 2.0.10.in-addr.arpa.

The IPA Master Server will be configured with:
Hostname:       node1.example.com
IP address(es): 10.0.2.30
Domain name:    example.com
Realm name:     EXAMPLE.COM

BIND DNS server will be configured to serve IPA domain with:
Forwarders:       192.168.0.1, 8.8.8.8
Forward policy:   only
Reverse zone(s):  2.0.10.in-addr.arpa.

Continue to configure the system with these values? [no]: yes

The following operations may take some minutes to complete.
Please wait until the prompt is returned.

Configuring NTP daemon (ntpd)
  [1/4]: stopping ntpd
  [2/4]: writing configuration
  [3/4]: configuring ntpd to start on boot
  [4/4]: starting ntpd
Done configuring NTP daemon (ntpd).

<Output trimmed>

The ipa-client-install command was successful

==============================================================================
Setup complete

Next steps:
        1. You must make sure these network ports are open:
                TCP Ports:
                  * 80, 443: HTTP/HTTPS
                  * 389, 636: LDAP/LDAPS
                  * 88, 464: kerberos
                  * 53: bind
                UDP Ports:
                  * 88, 464: kerberos
                  * 53: bind
                  * 123: ntp

        2. You can now obtain a kerberos ticket using the command: 'kinit admin'
           This ticket will allow you to use the IPA tools (e.g., ipa user-add)
           and the web user interface.

Be sure to back up the CA certificates stored in /root/cacert.p12
These files are required to create replicas. The password for these
files is the Directory Manager password
So looks like our FreeIPA central Identity Server configuration has completed successfully. As you see the service expects to open some of the required firewall ports which we will open in next steps.
Generate a Kerberos ticket
Now obtain a kerberos ticket using the command "kinit admin". This
ticket will allow us to use the IPA tools. So getting a kerberos ticket
means that we will authenticate as administrator.
[root@node1 ~]# kinit admin
Password for [email protected]:
After providing the password for admin user nothing changes, but at least we can use some of the IPA utilities.
Managing Users and Groups in FreeIPA
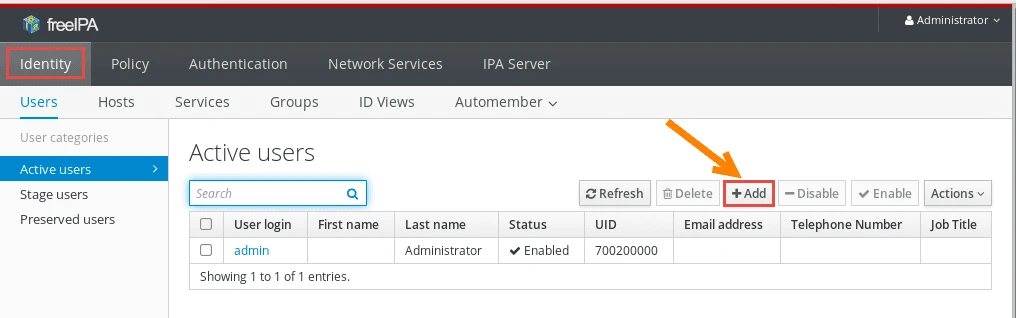
After we configure FreeIPA server, the IPA server is about identity, policy, and authentication. One important part of the IPA server are the users and groups. That's one of the main reasons why companies start using IPA because they don't want to manage their users on individual Linux servers. They want to create an LDAP server, which is the IPA server, to centrally manage user and group accounts.
Open the browser on node1 and navigate to node1.example.com to
open the FreeIPA portal.
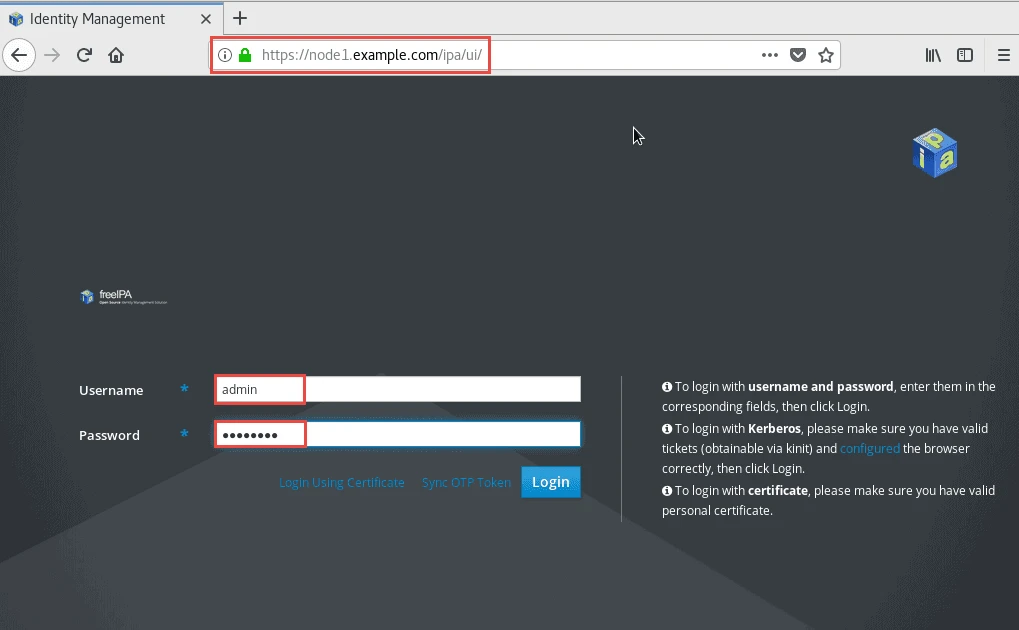
Next this is providing the login interface where we can login as user admin with a password that you have provided when you installed the IPA server. This is the main management interface of the IPA server.To start it, I want to create some users. We have this category users in order to add a user. Click on "Add" as shown below.
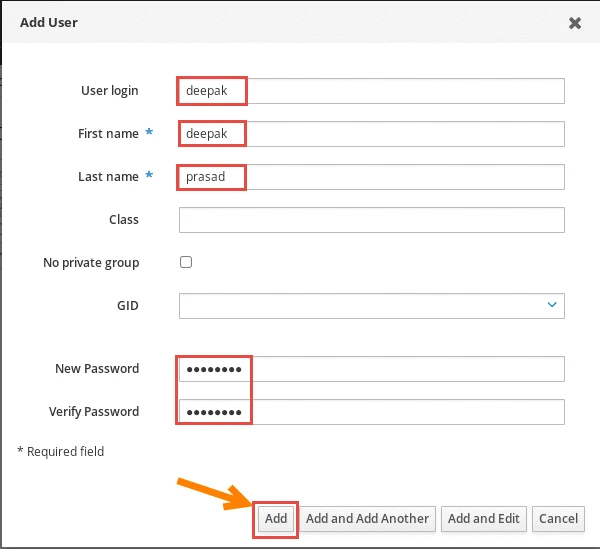
Provide the user details as shown in the below snippet and click on "Add"
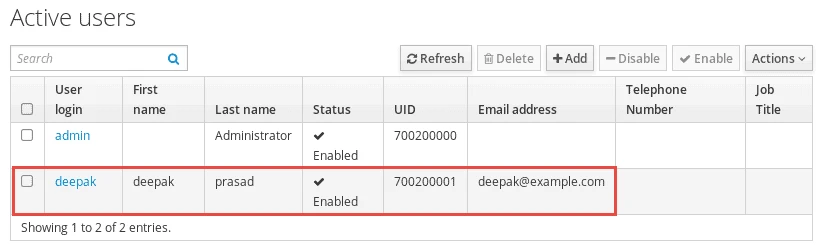
Next verify if the user 'deepak' is properly created.
You can also create a user using the command line ipa tool. Execute the below command and follow the prompts to create the user.
[root@node1 ~]# ipa user-add
First name: rahul
Last name: raj
User login [rraj]: rahul
------------------
Added user "rahul"
------------------
  User login: rahul
  First name: rahul
  Last name: raj
  Full name: rahul raj
  Display name: rahul raj
  Initials: rr
  Home directory: /home/rahul
  GECOS: rahul raj
  Login shell: /bin/sh
  Principal name: [email protected]
  Principal alias: [email protected]
  Email address: [email protected]
  UID: 700200003
  GID: 700200003
  Password: False
  Member of groups: ipausers
  Kerberos keys available: False
Here we have created two users, deepak is created using the FreeIPA
GUI and rahul is created using ipa cli tool.
Opening the Firewall for IPA traffic
In firewall D, we have this notion of services. If we use firewall-cmd--get-services, then we get a list of all services that are available. There are some services that involve IPA, and that is freeipa-ldap and freeipa-ldaps. These services have a backing XML file, and you will find it in /usr/lib/firewalld/services.
[root@node1 services]# cd /usr/lib/firewalld/services

[root@node1 services]# ls freeipa-*
freeipa-ldaps.xml  freeipa-ldap.xml  freeipa-replication.xml  freeipa-trust.xml
So if you look at the contents of freeipa-ldap.xml, now we can see
that it is opening this list of ports. If you compare that to the list
of ports we were asked to open while installing the IPA server, then you
can see that most of the ports are already in there.
Below are the list of ports which must be opened for FreeIPA server
                TCP Ports:
                  * 80, 443: HTTP/HTTPS
                  * 389, 636: LDAP/LDAPS
                  * 88, 464: kerberos
                  * 53: bind
                UDP Ports:
                  * 88, 464: kerberos
                  * 53: bind
                  * 123: ntp
Let us add all the required service in the firewalld to open the ports needed by FreeIPA
[root@node1 services]# firewall-cmd --permanent --add-service freeipa-ldap
success

[root@node1 services]# firewall-cmd --permanent --add-service freeipa-ldaps
success

[root@node1 services]# firewall-cmd --permanent --add-service dns
success
Now let us make our changes persistent
[root@node1 services]# firewall-cmd --reload
success
Verify the firewall rules which we have just added.
[root@node1 services]# firewall-cmd --list-all
public (active)
  target: default
  icmp-block-inversion: no
  interfaces: eth0 eth1
  sources:
  services: ssh dhcpv6-client freeipa-ldap freeipa-ldaps dns
  ports:
  protocols:
  masquerade: no
  forward-ports:
  source-ports:
  icmp-blocks:
  rich rules:
Joining client to IPA domain
Next we are going to join a server (ipa client) to the IPA domain. Before joining the server to the IPA domain, there are certain pre-requisites to be taken care on the ipa client.
Update hosts file
Make sure /etc/hosts has the FQDN details of your IPA server and
localhost.
[root@node2 ~]# cat /etc/hosts
127.0.0.1   localhost localhost.localdomain localhost4 localhost4.localdomain4
::1         localhost localhost.localdomain localhost6 localhost6.localdomain6
10.0.2.31       node2.example.com node2
10.0.2.30       node1.example.com node1
10.0.2.32       node3.example.com node3
Update DNS on IPA client
Next update the DNS record on your ipa client to use IPA server as your DNS. Because the ipa client must be able to reach the IPA server for authentication and communication. Hence we have added DNS entry in my primary interface configuration file on the ipa client as shown below
[root@node2 ~]# cat /etc/sysconfig/network-scripts/ifcfg-Wired_connection_1
HWADDR=08:00:27:DF:87:41
TYPE=Ethernet
PROXY_METHOD=none
BROWSER_ONLY=no
BOOTPROTO=none
IPADDR=10.0.2.31
PREFIX=8
GATEWAY=10.0.2.2
DEFROUTE=yes
IPV4_FAILURE_FATAL=no
IPV6INIT=no
NAME="Wired connection 1"
UUID=415ba198-453b-38f2-99cd-3281f4aec264
ONBOOT=yes
AUTOCONNECT_PRIORITY=-999
DNS1=10.0.2.30
Next restart your network services
Control the running service with systemctl start, stop, or restart; see the systemctl command for try-restart and dependency behavior.
[root@node2 ~]# systemctl restart network
[root@node2 ~]# systemctl restart NetworkManager
Next validate the resolv.conf, it should point to your IPA server IP
as a nameserver.
[root@node2 ~]# cat /etc/resolv.conf
# Generated by NetworkManager
nameserver 10.0.2.30
Next check and make sure you are still able to connect to the internet.
Confirm the host resolves and answers ICMP before chasing DNS records; the ping command shows quick ping checks by name and IP.
[root@node2 ~]# ping google.com
PING google.com (172.217.160.142) 56(84) bytes of data.
64 bytes from 172.217.160.142 (172.217.160.142): icmp_seq=1 ttl=53 time=55.4 ms
^C
--- google.com ping statistics ---
1 packets transmitted, 1 received, 0% packet loss, time 0ms
rtt min/avg/max/mdev = 55.414/55.414/55.414/0.000 ms
So all looks good and we can now configure our client to connect to the IPA server.
Configure IPA client
To set up your ipa client and for the ipa client to be able to join your
IPA server domain, install ipa-client rpm as shown below.
[root@node2 ~]# yum install ipa-client -y
Next run the below command to setup your ipa client. This will prompt
you with a series of questions, follow the snippet below and accordingly
set up your client.
[root@node2 ~]# ipa-client-install
WARNING: ntpd time&date synchronization service will not be configured as
conflicting service (chronyd) is enabled
Use --force-ntpd option to disable it and force configuration of ntpd

Discovery was successful!
Client hostname: node2.example.com
Realm: EXAMPLE.COM
DNS Domain: example.com
IPA Server: node1.example.com
BaseDN: dc=example,dc=com

Continue to configure the system with these values? [no]: yes
Skipping synchronizing time with NTP server.
User authorized to enroll computers: admin
Password for [email protected]:
Successfully retrieved CA cert
    Subject:     CN=Certificate Authority,O=EXAMPLE.COM
    Issuer:      CN=Certificate Authority,O=EXAMPLE.COM
    Valid From:  2019-04-09 12:26:00
    Valid Until: 2039-04-09 12:26:00

Enrolled in IPA realm EXAMPLE.COM
Created /etc/ipa/default.conf
New SSSD config will be created
Configured sudoers in /etc/nsswitch.conf
Configured /etc/sssd/sssd.conf
Configured /etc/krb5.conf for IPA realm EXAMPLE.COM
trying https://node1.example.com/ipa/json
[try 1]: Forwarding 'schema' to json server 'https://node1.example.com/ipa/json'
trying https://node1.example.com/ipa/session/json
[try 1]: Forwarding 'ping' to json server 'https://node1.example.com/ipa/session/json'
[try 1]: Forwarding 'ca_is_enabled' to json server 'https://node1.example.com/ipa/session/json'
Systemwide CA database updated.
Hostname (node2.example.com) does not have A/AAAA record.
Missing reverse record(s) for address(es): 10.0.2.31.
Adding SSH public key from /etc/ssh/ssh_host_ecdsa_key.pub
Adding SSH public key from /etc/ssh/ssh_host_rsa_key.pub
Adding SSH public key from /etc/ssh/ssh_host_ed25519_key.pub
[try 1]: Forwarding 'host_mod' to json server 'https://node1.example.com/ipa/session/json'
SSSD enabled
Configured /etc/openldap/ldap.conf
Configured /etc/ssh/ssh_config
Configured /etc/ssh/sshd_config
Configuring example.com as NIS domain.
Client configuration complete.
The ipa-client-install command was successful
If everything is correct and proper then your client will successfully join the IPA server domain. next generate a kerberos ticket for your ipa client using the below command
[root@node2 ~]# kinit admin
Password for [email protected]:
If there are no error messages on the screen it means you have successfully generated a kerberos token on your ipa client which you can validate using the below command.
[root@node2 ~]# klist
Ticket cache: KEYRING:persistent:0:0
Default principal: [email protected]

Valid starting       Expires              Service principal
04/09/2019 18:35:23  04/10/2019 18:35:20  krbtgt/[email protected]
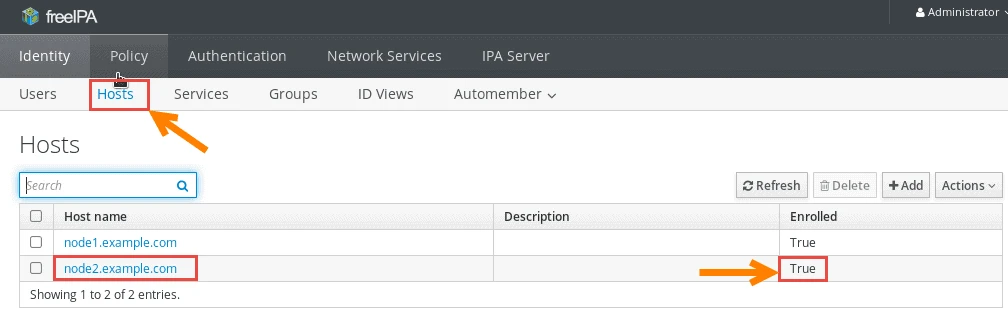
With this we have successfully setup our IPA client. You can validate the ipa client by logging on the IPA server GUI on node1.example.com
Conclusion
In this tutorial we learned about FreeIPA Server and the steps to install and configure FreeIPA server in CentOS 7. We now know that this can be used as alternate to Microsoft Active Directory based on Linux which uses LDAP as your backend.
Lastly I hope the steps from the article to configure Central Identity Server (FreeIPA) and ipa client on Linux was helpful. So, let me know your suggestions and feedback using the comment section.
