You must be asking a question "How do I setup Kubernetes Cluster?" and you may end up getting different answers from different search results and it can be overwhelming for beginners. Kubernetes is a sophisticated system, and getting it installed and managing it well isn't an easy task.
However, as the Kubernetes community has expanded and matured, more and more user-friendly tools have emerged. As of today, based on your requirements, there are a lot of options to choose from:
- If you are using physical (bare-metal) servers orvirtual machines(VMs), Kubeadm is a good fit.
- If you're running on cloud environments, kops and Kubespray can ease Kubernetes installation, as well as integration with the cloud providers.
- If you want to drop the burden of managing the Kubernetes control plane, almost all cloud providers have their Kubernetes managed services, such as Google Kubernetes Engine(GKE),Amazon Elastic Kubernetes Service(EKS),Azure Kubernetes Service(AKS), andIBM Kubernetes Service(IKS).
- If you just want a playground to study Kubernetes , Minikube and Kind can help you spin up a Kubernetes cluster in minutes.
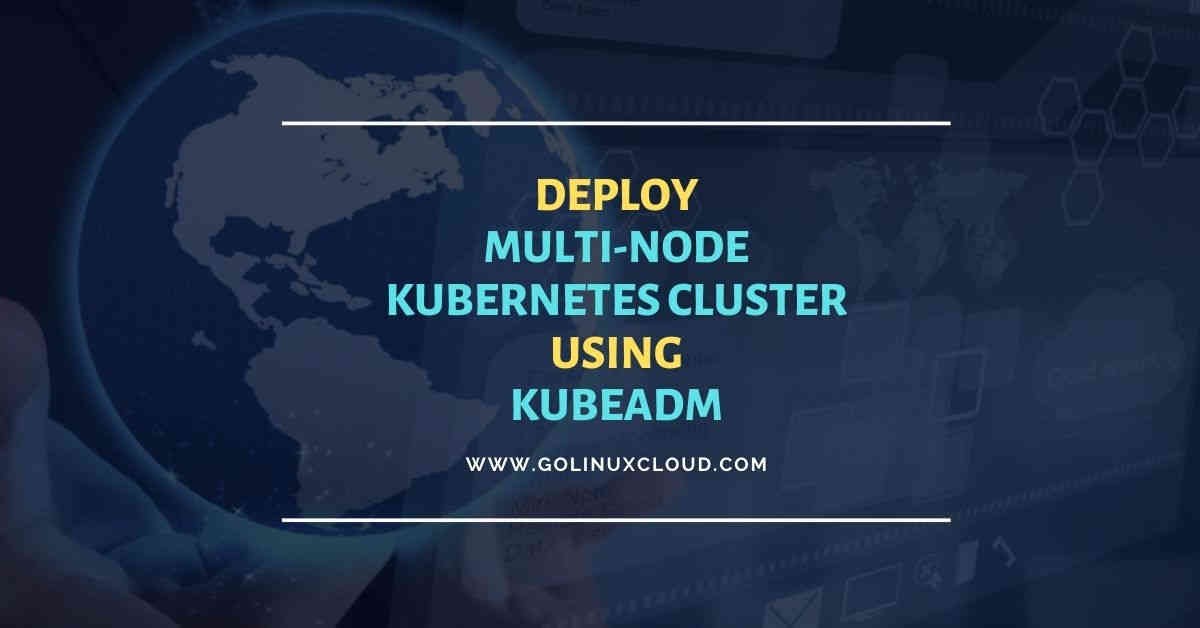
So, as you see you have a bunch of options to choose from to deploy your first Kubernetes Cluster. I will cover the steps to install Kubernetes CLuster on CentOS 8 server using kubeadm.
Build multi-node Kubernetes cluster using kubeadm
In this section we will install a Kubernetes cluster with multiple
nodes. I will run the nodes inside virtual machines through Oracle
VirtualBox, but you can also use a different virtualization tool or
bare-metal machines. To set up both the master and the worker nodes, we
will use the kubeadm tool.
What we plan to do
Before we go ahead with the installation, let me give you a brief overview of what exactly we will do in this section so you have a basic idea of the next steps. If you have read my previous tutorial then you must be familiar with the architecture of a Kubernetes cluster, I will place the image again for your reference:
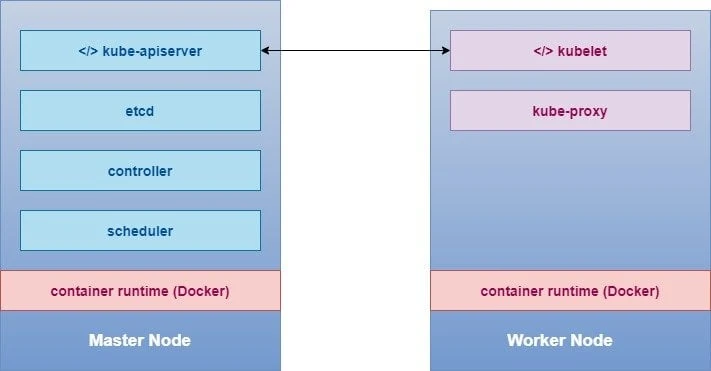
You can see there are different components which are installed on the
master and worker node, now installing these components manually,
modifying the configuration file etc can be a very tedious task. This is
the reason we use kubeadm as it will simplify the who process of
building our Kubernetes cluster and bringing up all the components on
respective nodes.
Following are the steps involved in brief (bottom to top in the figure):
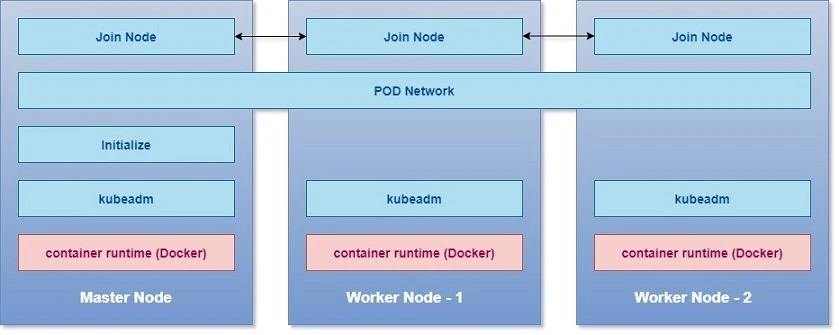
- Create VM or arrange bare metal servers to setup your cluster
- Install Operating System on all the hosts
- Install container runtime on all the hosts so that we can run container on all the hosts, we will use Docker
- Install kubeadm on all the nodes
- Initialize master server, during this process all the required components are installed and configured on master server
- Kubernetes requires a special network between master and worker nodes i.e. Pod network or cluster network
- Join master node to the worker node
Lab Environment
I will have single controller or master node and two worker nodes.
| Resources | controller | worker-1 | worker-2 |
|---|---|---|---|
| OS | CentOS 8 | CentOS 8 | CentOS 8 |
| hostname | controller | worker-1 | worker-2 |
| FQDN | controller.example.com | worker-1.example.com | worker-2.example.com |
| Storage | 20GB | 20GB | 20GB |
| vCPU | 2 | 2 | 2 |
| RAM | 6GB | 6GB | 6GB |
| Adapter-1 (Bridged) | 192.168.43.48 | 192.168.43.49 | 192.168.43.50 |
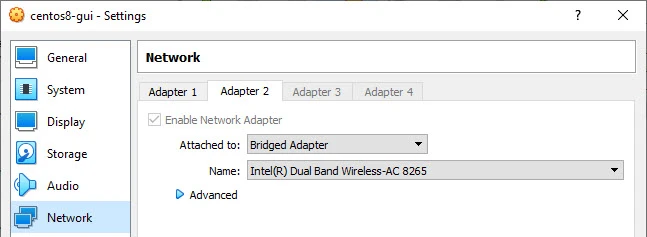
I am using two different interfaces in my environment which is not the requirement. I have Adapter-1 as NAT which I use for SSH port forwarding (you may ignore this). We will be only using Adapter-2 in this tutorial which is configured with Bridged Adapter. You can learn more about different network options in Oracle VirtualBox for more details.
Here is a snippet from one of my VM's Network Settings
Pre-requisites
Install Oracle VirtualBox
You can download VirtualBox software from their official repository. I have written another article to install Oracle Virtual Box, which is quiet straight forward on Windows. Just double click the downloaded software and follow the instructions, leave all the settings to default.
Install CentOS 8
I will use CentOS 8 to setup my Kubernetes cluster, you can follow step by step instructions to install CentOS on your VM. If you are not familiar with CentOS 8 installation steps and want to choose the easy way then you can download CentOS 8 image from https://www.osboxes.org/centos/ where you just need to deploy the downloaded file in the VirtualBox and you will have a pre-install virtual machine up and running without any manual steps.
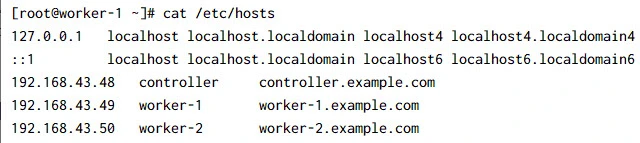
Update /etc/hosts
If you do not have a DNS server to resolve the hostname then you must update your /etc/hosts file with the hostname and IP information of all the cluster nodes on all the nodes, below is a sample output from one of my cluster node:
Disable Swap
It is mandatory to
disable swap memory for kubelet to work properly. Follow these steps
on all the cluster nodes.
First check the availability of swap memory on your Linux server:
[root@controller ~]# free -m
              total        used        free      shared  buff/cache   available
Mem:           6144         454        5207           9         472        3100
Swap:          2046           0        2046
So we have a swap of 2 GB, to disable swap we will use swapoff command
[root@controller ~]# swapoff -a
Next re-verify the allotted swap memory:
[root@controller ~]# free -m
              total        used        free      shared  buff/cache   available
Mem:           3781         454        2855           9         471        3101
Swap:             0           0           0
Once done, we also need to make sure swap is not re-assigned after node
reboot so comment out the swap filesystem entry from /etc/fstab.
Following is a sample from my setup:
#/dev/mapper/rhel-swap swap swap defaults 0 0
Repeat the same steps on all the cluster nodes.
Disable SELinux
You must
disable selinux or change it to Permissive mode on all the cluster nodes. This is
required to allow containers to access the host filesystem, which is
needed by pod networks. You have to do this until SELinux support is
improved in the kubelet.
[root@controller ~]# setenforce 0
Check the status of SELinux
[root@controller ~]# getenforce
Permissive
To make the changes persistent across reboot execute the following command:
[root@controller ~]# sed -i --follow-symlinks 's/SELINUX=enforcing/SELINUX=disabled/g' /etc/sysconfig/selinux
Repeat the same steps on all the cluster nodes.
Enable Firewall
Next we need to enable certain pre-defined ports on the Master and
Worker nodes. Following ports are required to be opened on Master node,
we will use firewalld to open these ports
| Port range | Purpose |
|---|---|
| 6443 | These ports are used for Kubernetes API access. |
| 2379-2380 | These ports are used for etcd server client API. |
| 10250 | This port is used for Kubelet API |
| 10251 | This port is used for kube-scheduler |
| 10252 | This port is used for kube-controller-manager |
Enable respective firewall ports on the controller node:
[root@controller ~]# firewall-cmd --add-port 6443/tcp --add-port 2379-2380/tcp --add-port 10250-10252/tcp --permanent
[root@controller ~]# firewall-cmd --reload
[root@controller ~]# firewall-cmd --list-ports
6443/tcp 2379-2380/tcp 10250-10252/tcp
Following ports are required to be allowed on all the worker nodes:
| Port range | Purpose |
|---|---|
| 10250 | This port is used for Kubelet API |
| 30000-32767 | NodePort Services |
Enable respective firewall ports on all the worker nodes:
[root@worker-1 ~]# firewall-cmd --add-port 10250/tcp --add-port 30000-32767/tcp --permanent
[root@worker-1 ~]# firewall-cmd --reload
[root@worker-1 ~]# firewall-cmd --list-ports
10250/tcp 30000-32767/tcp

[root@worker-2 ~]# firewall-cmd --add-port 10250/tcp --add-port 30000-32767/tcp --permanent
[root@worker-2 ~]# firewall-cmd --reload
[root@worker-2 ~]# firewall-cmd --list-ports
10250/tcp 30000-32767/tcp
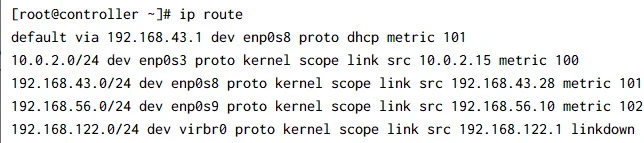
Configure Networking
If you have more than one network adapter, and your Kubernetes components are not reachable on the default route, we recommend you add IP route(s) so Kubernetes cluster addresses go via the appropriate adapter.
In my setup the default route is configured for the bridged network while the host-only network will be used only for internal routing:
Make sure that the br_netfilter module is loaded. This can be done by
running
# lsmod | grep br_netfilter
Since br_netfilter is not in loaded state, I will load this module
manually:
[root@controller ~]# modprobe br_netfilter
Now re-verify the module status:
[root@controller ~]# lsmod | grep br_netfilter
br_netfilter           24576  0
bridge                188416  1 br_netfilter
As a requirement for your Linux Node's iptables to correctly see bridged
traffic, you should ensure net.bridge.bridge-nf-call-iptables is set
to 1 in your sysctl config
[root@controller ~]# sysctl -a | grep net.bridge.bridge-nf-call-iptables
net.bridge.bridge-nf-call-iptables = 1
It is enabled by-default but to be on the safe side we will also create
a sysctl configuration file and add this for both IPv4 and IPv6:
[root@controller ~]# cat <<EOF | sudo tee /etc/sysctl.d/k8s.conf
net.bridge.bridge-nf-call-ip6tables = 1
net.bridge.bridge-nf-call-iptables = 1
EOF
Activate the newly added changes:
[root@controller ~]# sysctl --system
Install container runtime (Docker CE)
You need to install a container runtime into each node in the cluster so that Pods can run there. There are multiple container runtime such as:
- Docker:
/var/run/docker.sock - containerd:
/run/containerd/containerd.sock - CRI-O:
/var/run/crio/crio.sock
If both Docker and containerd are detected, Docker takes
precedence.In this tutorial we will use Docker as our runtime on all
the nodes. First we need to install some dependent packages:
~]# dnf install -y yum-utils device-mapper-persistent-data lvm2
Add the docker repository to be able to install docker on all the nodes:
 ~]# yum-config-manager --add-repo https://download.docker.com/linux/centos/docker-ce.repo
Adding repo from: https://download.docker.com/linux/centos/docker-ce.repo
Install Docker CE package on all the nodes:
~]# dnf install containerd.io docker-ce docker-ce-cli -y
Create a new directory on all the nodes:
[root@controller ~]# mkdir -p /etc/docker
Set up the Docker daemon on all the nodes by creating a new file
/etc/docker/daemon.json and adding following content in this file:
[root@controller ~]# cat /etc/docker/daemon.json
{
  "exec-opts": ["native.cgroupdriver=systemd"],
  "log-driver": "json-file",
  "log-opts": {
    "max-size": "100m"
  },
  "storage-driver": "overlay2",
  "storage-opts": [
    "overlay2.override_kernel_check=true"
  ]
}
We are all done with the configuration, time to start (restart) our docker daemon on all the nodes:
[root@controller ~]# systemctl daemon-reload
[root@controller ~]# systemctl enable docker --now

[root@worker-1 ~]# systemctl daemon-reload
[root@worker-1 ~]# systemctl enable docker --now

[root@worker-2 ~]# systemctl daemon-reload
[root@worker-2 ~]# systemctl enable docker --now
containerd: symbol lookup error: /usr/bin/containerd: undefined symbol: seccomp_api_se"
error, to fix this we need to update libseccomp rpm using
"dnf update libseccomp -y"
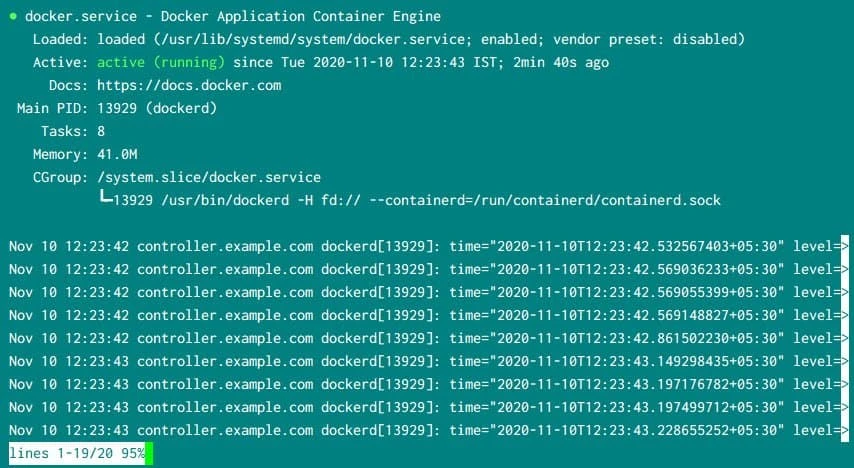
Check the status of docker service using systemctl status docker on
all the nodes to make sure docker is UP and running properly:
Install Kubernetes components (kubelet, kubectl and kubeadm)
You will install these packages on all of your machines:
- kubeadm: the command to bootstrap the cluster.
- kubelet: the component that runs on all of the machines in your cluster and does things like starting pods and containers.
- kubectl: the command line util to talk to your cluster.
kubeadm will not install or manage kubelet or kubectl for you, so
you will need to ensure they match the version of the Kubernetes control
plane you want kubeadm to install for you.
Create the kubernetes repository file on all the nodes which will be used to download the packages:
~]# cat <<EOF | sudo tee /etc/yum.repos.d/kubernetes.repo
[kubernetes]
name=Kubernetes
baseurl=https://packages.cloud.google.com/yum/repos/kubernetes-el7-\$basearch
enabled=1
gpgcheck=1
repo_gpgcheck=1
gpgkey=https://packages.cloud.google.com/yum/doc/yum-key.gpg https://packages.cloud.google.com/yum/doc/rpm-package-key.gpg
exclude=kubelet kubeadm kubectl
EOF
Install the Kubernetes component packages using package manager on all the nodes:
~]# dnf install -y kubelet kubeadm kubectl --disableexcludes=kubernetes
At this stage we will not start kubelet service, as this will be done
automatically
- on controller node when we initialize the control node
- on the master node and when we join the worker node to master node
Initialize control node
The control-plane node is the machine where the control plane components
run, including etcd (the cluster database) and the API Server (which
the kubectl command line tool communicates with).
kubeadm uses the network interface associated with the default gateway
to set the advertise address for this particular control-plane node's
API server. Alternatively you can specify the
--apiserver-advertise-address= argument to kubeadm init.
[root@controller ~]# kubeadm init
W1127 23:05:26.412480    7525 configset.go:348] WARNING: kubeadm cannot validate component configs for API groups [kubelet.config.k8s.io kubeproxy.config.k8s.io]
[init] Using Kubernetes version: v1.19.4
[preflight] Running pre-flight checks
        [WARNING Firewalld]: firewalld is active, please ensure ports [6443 10250] are open or your cluster may not function correctly
[preflight] Pulling images required for setting up a Kubernetes cluster
[preflight] This might take a minute or two, depending on the speed of your internet connection
[preflight] You can also perform this action in beforehand using 'kubeadm config images pull'
[certs] Using certificateDir folder "/etc/kubernetes/pki"
[certs] Generating "ca" certificate and key
[certs] Generating "apiserver" certificate and key
[certs] apiserver serving cert is signed for DNS names [controller.example.com kubernetes kubernetes.default kubernetes.default.svc kubernetes.default.svc.cluster.local] and IPs [10.96.0.1 192.168.43.48]
[certs] Generating "apiserver-kubelet-client" certificate and key
[certs] Generating "front-proxy-ca" certificate and key
[certs] Generating "front-proxy-client" certificate and key
[certs] Generating "etcd/ca" certificate and key
[certs] Generating "etcd/server" certificate and key
[certs] etcd/server serving cert is signed for DNS names [controller.example.com localhost] and IPs [192.168.43.48 127.0.0.1 ::1]
[certs] Generating "etcd/peer" certificate and key
[certs] etcd/peer serving cert is signed for DNS names [controller.example.com localhost] and IPs [192.168.43.48 127.0.0.1 ::1]
[certs] Generating "etcd/healthcheck-client" certificate and key
[certs] Generating "apiserver-etcd-client" certificate and key
[certs] Generating "sa" key and public key
[kubeconfig] Using kubeconfig folder "/etc/kubernetes"
[kubeconfig] Writing "admin.conf" kubeconfig file
[kubeconfig] Writing "kubelet.conf" kubeconfig file
[kubeconfig] Writing "controller-manager.conf" kubeconfig file
[kubeconfig] Writing "scheduler.conf" kubeconfig file
[kubelet-start] Writing kubelet environment file with flags to file "/var/lib/kubelet/kubeadm-flags.env"
[kubelet-start] Writing kubelet configuration to file "/var/lib/kubelet/config.yaml"
[kubelet-start] Starting the kubelet
[control-plane] Using manifest folder "/etc/kubernetes/manifests"
[control-plane] Creating static Pod manifest for "kube-apiserver"
[control-plane] Creating static Pod manifest for "kube-controller-manager"
[control-plane] Creating static Pod manifest for "kube-scheduler"
[etcd] Creating static Pod manifest for local etcd in "/etc/kubernetes/manifests"
[wait-control-plane] Waiting for the kubelet to boot up the control plane as static Pods from directory "/etc/kubernetes/manifests". This can take up to 4m0s
[apiclient] All control plane components are healthy after 18.507221 seconds
[upload-config] Storing the configuration used in ConfigMap "kubeadm-config" in the "kube-system" Namespace
[kubelet] Creating a ConfigMap "kubelet-config-1.19" in namespace kube-system with the configuration for the kubelets in the cluster
[upload-certs] Skipping phase. Please see --upload-certs
[mark-control-plane] Marking the node controller.example.com as control-plane by adding the label "node-role.kubernetes.io/master=''"
[mark-control-plane] Marking the node controller.example.com as control-plane by adding the taints [node-role.kubernetes.io/master:NoSchedule]
[bootstrap-token] Using token: rdet9b.4pugjes5hwq3aynk
[bootstrap-token] Configuring bootstrap tokens, cluster-info ConfigMap, RBAC Roles
[bootstrap-token] configured RBAC rules to allow Node Bootstrap tokens to get nodes
[bootstrap-token] configured RBAC rules to allow Node Bootstrap tokens to post CSRs in order for nodes to get long term certificate credentials
[bootstrap-token] configured RBAC rules to allow the csrapprover controller automatically approve CSRs from a Node Bootstrap Token
[bootstrap-token] configured RBAC rules to allow certificate rotation for all node client certificates in the cluster
[bootstrap-token] Creating the "cluster-info" ConfigMap in the "kube-public" namespace
[kubelet-finalize] Updating "/etc/kubernetes/kubelet.conf" to point to a rotatable kubelet client certificate and key
[addons] Applied essential addon: CoreDNS
[addons] Applied essential addon: kube-proxy

Your Kubernetes control-plane has initialized successfully!

To start using your cluster, you need to run the following as a regular user:

  mkdir -p $HOME/.kube
  sudo cp -i /etc/kubernetes/admin.conf $HOME/.kube/config
  sudo chown $(id -u):$(id -g) $HOME/.kube/config

You should now deploy a pod network to the cluster.
Run "kubectl apply -f [podnetwork].yaml" with one of the options listed at:
  https://kubernetes.io/docs/concepts/cluster-administration/addons/

Then you can join any number of worker nodes by running the following on each as root:

kubeadm join 192.168.43.48:6443 --token rdet9b.4pugjes5hwq3aynk \
    --discovery-token-ca-cert-hash sha256:d2408f85e478b5a9927f1fafd89630fb71a1ce07d5e26e0cf4c7ff4320d433a2
kubeadm join command from the above
output as you would need this later to join your worker nodes.
The initialization has completed successfully. If you notice the highlighted output from previous command, there are certain steps which you must perform if you have executed the above command as regular user. But since we are using root user, we have to execute following command:
export KUBECONFIG=/etc/kubernetes/admin.conf
and also add this to your /etc/profile
[root@controller ~]# echo "export KUBECONFIG=/etc/kubernetes/admin.conf" >> ~/.bash_profile
Check the status of kubelet service using systemctl status kubelet:
Check the cluster info:
[root@controller ~]# kubectl cluster-info
Kubernetes master is running at https://192.168.43.48:6443
KubeDNS is running at https://192.168.43.48:6443/api/v1/namespaces/kube-system/services/kube-dns:dns/proxy
To further debug and diagnose cluster problems, use 'kubectl cluster-info dump'.
Get the list of nodes in your cluster
[root@controller ~]# kubectl get nodes
NAME                     STATUS     ROLES    AGE   VERSION
controller.example.com   NotReady   master   63m   v1.19.3
At this stage we have single node and that is also in NotReady state which we will fix in the next chapter.
Install Pod network add-on plugin (weave-net)
You must deploy a Container Network Interface (CNI) based Pod network add-on so that your Pods can communicate with each other. Cluster DNS (CoreDNS) will not start up before a network is installed.
Different project exists for offering Kubernetes network support, which requires support for the following types of networking:
- container-to-container
- pod-to-pod
- pod-to-service
- external-to-service
Common Pod networking add-on plugins:
- Flannel: This is a layer 3 IPv4 network between cluster nodes that can use several backend mechanisms such as VXLAN
- Weave: A common add-on for CNI enabled Kubernetes cluster
- Calico: A layer 3 network solution that uses IP encapsulation and is used in Kubernetes, Docker, OpenStack, OpenShift and others
- AWS VPC: A networking plugin that is commonly used for AWS environment
We will use weave-net networking plugin for our Kubernetes Cluster. You must permit traffic to flow through TCP 6783 and UDP 6783/6784 on all the nodes, which are Weave’s control and data ports.
[root@controller ~]# firewall-cmd --add-port 6783/tcp --add-port 6783/udp --add-port 6784/udp --permanent
[root@controller ~]# firewall-cmd --reload
[root@controller ~]# firewall-cmd --list-ports
6443/tcp 2379-2380/tcp 10250-10252/tcp 6783/tcp 6783/udp 6784/udp

[root@worker-1 ~]# firewall-cmd --list-ports
10250/tcp 30000-32767/tcp 6783/tcp 6783/udp 6784/udp

[root@worker-2 ~]# firewall-cmd --list-ports
10250/tcp 30000-32767/tcp 6783/tcp 6783/udp 6784/udp
The daemon also uses TCP 6781/6782 for metrics, but you would only need to open up this port if you wish to collect metrics from another host.
You can install a Pod network add-on with the following command on the control-plane node from the official guide:
[root@controller ~]# kubectl apply -f "https://cloud.weave.works/k8s/net?k8s-version=$(kubectl version | base64 | tr -d '\n')"
serviceaccount/weave-net created
clusterrole.rbac.authorization.k8s.io/weave-net created
clusterrolebinding.rbac.authorization.k8s.io/weave-net created
role.rbac.authorization.k8s.io/weave-net created
rolebinding.rbac.authorization.k8s.io/weave-net created
daemonset.apps/weave-net created
You can install only one Pod network per cluster.
Once a Pod network has been installed, you can confirm that it is
working by checking that the CoreDNS Pod is Running in the output of
kubectl get pods --all-namespaces. Currently the weave-net is
creating containers so the status is ContainerCreating while the
status for CoreDNS is Pending:
[root@controller ~]# kubectl get pods --all-namespaces
NAMESPACE     NAME                                             READY   STATUS              RESTARTS   AGE
kube-system   coredns-f9fd979d6-4bdhv                          0/1     Pending             0          3m37s
kube-system   coredns-f9fd979d6-nd44t                          0/1     Pending             0          3m37s
kube-system   etcd-controller.example.com                      1/1     Running             0          3m34s
kube-system   kube-apiserver-controller.example.com            1/1     Running             0          3m34s
kube-system   kube-controller-manager-controller.example.com   1/1     Running             0          3m34s
kube-system   kube-proxy-gcgj4                                 1/1     Running             0          3m37s
kube-system   kube-scheduler-controller.example.com            1/1     Running             0          3m34s
kube-system   weave-net-kgzwc                                  0/2     ContainerCreating   0          2s
We can also use the same command with -o wide which will give much
more details about each namespace. Check the status again in few minutes
and all the namespaces should be in Running state:
[root@controller ~]# kubectl get pods --all-namespaces -o wide
NAMESPACE     NAME                                             READY   STATUS    RESTARTS   AGE     IP              NODE                     NOMINATED NODE   READINESS GATES
kube-system   coredns-f9fd979d6-4bdhv                          1/1     Running   0          5m19s   10.32.0.3       controller.example.com   <none>           <none>
kube-system   coredns-f9fd979d6-nd44t                          1/1     Running   0          5m19s   10.32.0.2       controller.example.com   <none>           <none>
kube-system   etcd-controller.example.com                      1/1     Running   0          5m16s   192.168.43.48   controller.example.com   <none>           <none>
kube-system   kube-apiserver-controller.example.com            1/1     Running   0          5m16s   192.168.43.48   controller.example.com   <none>           <none>
kube-system   kube-controller-manager-controller.example.com   1/1     Running   0          5m16s   192.168.43.48   controller.example.com   <none>           <none>
kube-system   kube-proxy-gcgj4                                 1/1     Running   0          5m19s   192.168.43.48   controller.example.com   <none>           <none>
kube-system   kube-scheduler-controller.example.com            1/1     Running   0          5m16s   192.168.43.48   controller.example.com   <none>           <none>
kube-system   weave-net-kgzwc                                  2/2     Running   0          104s    192.168.43.48   controller.example.com
Next check the status of cluster, if you recall this was in NotReady
state before installing the pod networking plugin but now the cluster is
in Ready state.
[root@controller ~]# kubectl get nodes
NAME                     STATUS   ROLES    AGE   VERSION
controller.example.com   Ready    master   85m   v1.19.3
Join worker nodes
To add new nodes to your cluster, SSH to all the worker nodes and as
root user execute the kubeadm join command which you had saved from
the kubeadm init command output:
~]# kubeadm join 192.168.43.48:6443 --token rdet9b.4pugjes5hwq3aynk --discovery-token-ca-cert-hash sha256:d2408f85e478b5a9927f1fafd89630fb71a1ce07d5e26e0cf4c7ff4320d433a2
Sample output from one of my worker nodes:
Next check the status of nodes, it should be in Ready state, if the
status is shown as NotReady then you can check the status of pods as I
have shown in the next command:
[root@controller ~]# kubectl get nodes
NAME                     STATUS     ROLES    AGE    VERSION
controller.example.com   Ready      master   161m   v1.19.3
worker-2.example.com     NotReady      17m    v1.19.3
Check the status of pods in all the available namespaces to make sure newly created pods are running, currently containers are getting created for individual pods on the worker node where we have initiated the join command:
[root@controller ~]# kubectl get pods --all-namespaces -o wide
NAMESPACE     NAME                                             READY   STATUS    RESTARTS   AGE   IP              NODE                     NOMINATED NODE   READINESS GATES
kube-system   coredns-f9fd979d6-4bdhv                          1/1     Running   0          27m   10.32.0.2       controller.example.com   <none>           <none>
kube-system   coredns-f9fd979d6-nd44t                          1/1     Running   0          27m   10.32.0.3       controller.example.com   <none>           <none>
kube-system   etcd-controller.example.com                      1/1     Running   0          27m   192.168.43.48   controller.example.com   <none>           <none>
kube-system   kube-apiserver-controller.example.com            1/1     Running   0          27m   192.168.43.48   controller.example.com   <none>           <none>
kube-system   kube-controller-manager-controller.example.com   1/1     Running   0          27m   192.168.43.48   controller.example.com   <none>           <none>
kube-system   kube-proxy-ffxx6                                 0/1     ContainerCreating   0          102s    192.168.43.50   worker-2.example.com     <none>           <none>
kube-system   kube-proxy-gcgj4                                 1/1     Running   0          27m   192.168.43.48   controller.example.com   <none>           <none>
kube-system   kube-scheduler-controller.example.com            1/1     Running   0          27m   192.168.43.48   controller.example.com   <none>           <none>
kube-system   weave-net-kgzwc                                  2/2     Running   0          22m   192.168.43.48   controller.example.com   <none>           <none>
kube-system   weave-net-wjzb7                                  0/2     ContainerCreating   0          102s    192.168.43.50   worker-2.example.com         <none>           <none>
Similarly add worker-1.example.com to the cluster:
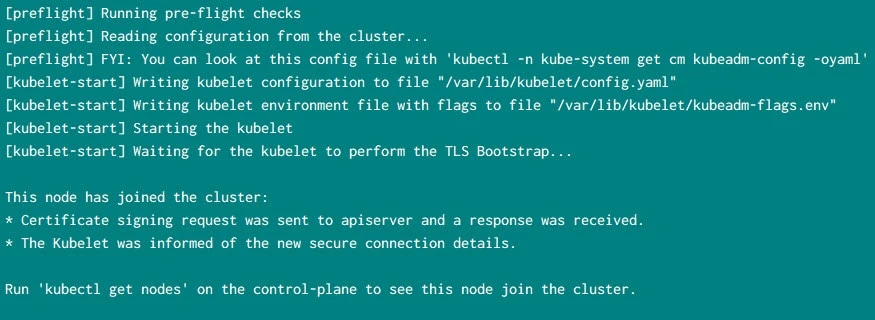
[root@worker-1 ~]# kubeadm join 192.168.43.48:6443 --token rdet9b.4pugjes5hwq3aynk --discovery-token-ca-cert-hash sha256:d2408f85e478b5a9927f1fafd89630fb71a1ce07d5e26e0cf4c7ff4320d433a2
[preflight] Running pre-flight checks
[preflight] Reading configuration from the cluster...
[preflight] FYI: You can look at this config file with 'kubectl -n kube-system get cm kubeadm-config -oyaml'
[kubelet-start] Writing kubelet configuration to file "/var/lib/kubelet/config.yaml"
[kubelet-start] Writing kubelet environment file with flags to file "/var/lib/kubelet/kubeadm-flags.env"
[kubelet-start] Starting the kubelet
[kubelet-start] Waiting for the kubelet to perform the TLS Bootstrap...

This node has joined the cluster:
* Certificate signing request was sent to apiserver and a response was received.
* The Kubelet was informed of the new secure connection details.

Run 'kubectl get nodes' on the control-plane to see this node join the cluster.
Once both the worker nodes are added, all the pods should in running state:
[root@controller ~]# kubectl get pods --all-namespaces -o wide
NAMESPACE     NAME                                             READY   STATUS    RESTARTS   AGE   IP              NODE                     NOMINATED NODE   READINESS GATES
kube-system   coredns-f9fd979d6-4bdhv                          1/1     Running   0          27m   10.32.0.2       controller.example.com   <none>           <none>
kube-system   coredns-f9fd979d6-nd44t                          1/1     Running   0          27m   10.32.0.3       controller.example.com   <none>           <none>
kube-system   etcd-controller.example.com                      1/1     Running   0          27m   192.168.43.48   controller.example.com   <none>           <none>
kube-system   kube-apiserver-controller.example.com            1/1     Running   0          27m   192.168.43.48   controller.example.com   <none>           <none>
kube-system   kube-controller-manager-controller.example.com   1/1     Running   0          27m   192.168.43.48   controller.example.com   <none>           <none>
kube-system   kube-proxy-ffxx6                                 1/1     Running   0          17m   192.168.43.50   worker-2.example.com     <none>           <none>
kube-system   kube-proxy-gcgj4                                 1/1     Running   0          27m   192.168.43.48   controller.example.com   <none>           <none>
kube-system   kube-proxy-xfzl7                                 1/1     Running   0          13m   192.168.43.49   worker-1.example.com     <none>           <none>
kube-system   kube-scheduler-controller.example.com            1/1     Running   0          27m   192.168.43.48   controller.example.com   <none>           <none>
kube-system   weave-net-62bq8                                  1/2     Running   3          13m   192.168.43.49   worker-1.example.com     <none>           <none>
kube-system   weave-net-kgzwc                                  2/2     Running   0          22m   192.168.43.48   controller.example.com   <none>           <none>
kube-system   weave-net-wjzb7                                  2/2     Running   1          17m   192.168.43.50   worker-2.example.com     <none>           <none>
Also verify the node status on controller node:
[root@controller ~]# kubectl get nodes
NAME                     STATUS   ROLES    AGE     VERSION
controller.example.com   Ready    master   53m   v1.19.3
worker-1.example.com     Ready       38m   v1.19.3
worker-2.example.com     Ready       42m   v1.19.3
So now the status of all the nodes are in Ready state.
Troubleshooting
In this section I will share the issues which I faced while setting up my kubeadm cluster and their solution:
Error: failed: open /run/systemd/resolve/resolv.conf: no such file or directory"
I was getting this error on the worker node where this directory
"/run/systemd/resolve" was missing. Following is the complete error
snippet from the logs:
Error syncing pod 502bb214-5a88-4e72-b30b-7332e51642e3 ("weave-net-zkdbq_kube-system(502bb214-5a88-4e72-b30b-7332e51642e3)"), skipping: failed to "CreatePodSandbox" for "weave-net-zkdbq_kube-system(502bb214-5a88-4e72-b30b-7332e51642e3)" with CreatePodSandboxError: "GeneratePodSandboxConfig for pod \"weave-net-zkdbq_kube-system(502bb214-5a88-4e72-b30b-7332e51642e3)\" failed: open /run/systemd/resolve/resolv.conf: no such file or directory"
Some Linux distributions (e.g. Ubuntu) use a local DNS resolver by
default (systemd-resolved). Systemd-resolved moves and replaces
/etc/resolv.conf with a stub file that can cause a fatal forwarding
loop when resolving names in upstream servers. This can be fixed
manually by using kubelet's --resolv-conf flag to point to the correct
resolv.conf (With systemd-resolved, this is
/run/systemd/resolve/resolv.conf). kubeadm automatically detects
systemd-resolved, and adjusts the kubelet flags accordingly.
To fix this make sure systemd-resolved is running on the respective
node:
[root@worker-2 ~]# systemctl status systemd-resolved
● systemd-resolved.service - Network Name Resolution
   Loaded: loaded (/usr/lib/systemd/system/systemd-resolved.service; disabled; vendor preset: disabled)
   Active: active (running) since Wed 2020-11-11 11:18:08 IST; 1s ago
     Docs: man:systemd-resolved.service(8)
           https://www.freedesktop.org/wiki/Software/systemd/resolved
           https://www.freedesktop.org/wiki/Software/systemd/writing-network-configuration-managers
           https://www.freedesktop.org/wiki/Software/systemd/writing-resolver-clients
 Main PID: 16964 (systemd-resolve)
   Status: "Processing requests..."
    Tasks: 1 (limit: 18135)
   Memory: 2.8M
   CGroup: /system.slice/systemd-resolved.service
           └─16964 /usr/lib/systemd/systemd-resolved

Nov 11 11:18:08 worker-2.example.com systemd[1]: Starting Network Name Resolution...
If it is not in running state then manually start the service:
[root@worker-2 ~]# systemctl start systemd-resolved
And enable to start this service automatically:
[root@worker-2 ~]# systemctl enable systemd-resolved
Created symlink /etc/systemd/system/dbus-org.freedesktop.resolve1.service → /usr/lib/systemd/system/systemd-resolved.service.
Created symlink /etc/systemd/system/multi-user.target.wants/systemd-resolved.service → /usr/lib/systemd/system/systemd-resolved.service.
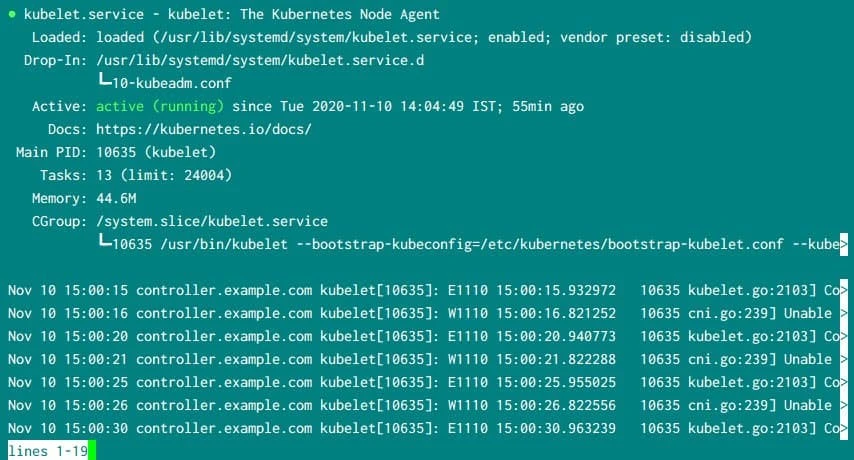
Error: worker node shows CrashLoopBackOff as the status
Following are the logs from worker node:
Nov 11 11:26:05 worker-2.example.com kubelet[17992]: W1111 11:26:05.368907   17992 cni.go:239] Unable to update cni config: no networks found in /etc/cni/net.d
Nov 11 11:26:07 worker-2.example.com kubelet[17992]: E1111 11:26:07.827786   17992 kubelet.go:2103] Container runtime network not ready: NetworkReady=false reason:NetworkPluginNotReady message:docker: network plugin is not ready: cni config uninitialized
These can be generic message and may mean difference issue, first of all make sure the default route used on your Linux server is used to communicate with the Kubernetes Cluster nodes, for example here my default network is routed via 192.168.43.0 subnet while my cluster nodes are also reachable over the same network.
~]# ip route
default via 192.168.43.1 dev eth1 proto static metric 101
10.0.2.0/24 dev eth0 proto kernel scope link src 10.0.2.15 metric 100
10.32.0.0/12 dev weave proto kernel scope link src 10.36.0.0
172.17.0.0/16 dev docker0 proto kernel scope link src 172.17.0.1 linkdown
192.168.43.0/24 dev eth1 proto kernel scope link src 192.168.43.49 metric 101
192.168.122.0/24 dev virbr0 proto kernel scope link src 192.168.122.1 linkdown
In case you have more than one default routes configured (sample output
below), then you must specify the address to be used during the
kubernetes control node initialization stage.
 ~]# ip route
default via 10.0.2.2 dev eth0 proto dhcp metric 100
default via 192.168.43.1 dev eth1 proto static metric 101
10.0.2.0/24 dev eth0 proto kernel scope link src 10.0.2.15 metric 100
172.17.0.0/16 dev docker0 proto kernel scope link src 172.17.0.1 linkdown
...
During one of my attempts I was using Host-Only network in Oracle VirtualBox for my Kubernetes Cluster. So at the control node initialization stage I used:
kubeadm init --apiserver-advertise-address=<control_node_ip>
Since kubeadm uses the network interface associated with the default
gateway to set the advertise address for this particular control-plane
node's API server. So if we are using a different network for internal
communication, we have to specify the
--apiserver-advertise-address=<ip-address>
With this configuration the initialisation was successful but later I
was getting the same error after joining the worker node to the
Kubernetes cluster. Later after a lot of debugging I found this github page where
this problem was addressed. It turns out the default subnet 10.96.0.1
used by kubernetes service was not allowed in the iptables (may be
this will be fixed in newer release).
[root@controller ~]# kubectl get services --all-namespaces
NAMESPACE     NAME         TYPE        CLUSTER-IP   EXTERNAL-IP   PORT(S)                  AGE
default       kubernetes   ClusterIP   10.96.0.1            443/TCP                  4h23m
kube-system   kube-dns     ClusterIP   10.96.0.10           53/UDP,53/TCP,9153/TCP   4h23m
So to enable this we have to add following rule on all the nodes.
But this rule should be added
only after a worker node is added to the cluster and Containers are
created which can be verified using
"kubectl get pods --all-namespaces -o wide" or else you will get
"iptables: Index of insertion too big."
[root@controller ~]# iptables -t nat -I KUBE-SERVICES -d 10.96.0.1/32 -p tcp -m comment --comment "default/kubernetes:https cluster IP" -m tcp --dport 443 -j KUBE-MARK-MASQ
Followed by restart of kubelet service to immediately activate the
changes or you can also wait for kubelet to automatically detect the new
changes
~]# systemctl restart kubelet
. Now the node should be added properly, which you can verify using:
[root@controller ~]# kubectl get nodes
NAME                     STATUS   ROLES    AGE     VERSION
controller.example.com   Ready    master   4h28m   v1.19.3
worker-2.example.com     Ready       4h22m   v1.19.3
If these changes are working for your issue then only follow with the next steps to make these changes permanent.
Now these changes won't be persistent across reboot so we will save the
existing iptables rules to a new file. I am using
/etc/my-iptables-rules, but you can choose any other location and name
for this file:
~]# iptables-save > /etc/my-iptables-rules
Next create a systemd unit file which will perform the restore of the iptables rule after reboot:
~]# cat /etc/systemd/system/my-iptables.service
[Unit]
Description=my-iptables - custom iptables daemon
Before=network-pre.target
Wants=network-pre.target
After=kubelet.service
Conflicts=iptables.service firewalld.service ip6tables.service ebtables.service ipset.service

[Service]
Type=oneshot
ExecStart=/usr/sbin/iptables-restore -n  /etc/my-iptables-rules
RemainAfterExit=yes

[Install]
WantedBy=multi-user.target
Load the changes:
~]# systemctl daemon-reload
Here we are performing restore of the saved iptables rules using systemd service file. Enable the service to make it run after every reboot:
~]# systemctl enable my-iptables
Created symlink /etc/systemd/system/multi-user.target.wants/my-iptables.service → /etc/systemd/system/my-iptables.service.
Next start the service and check the status to make sure it is started properly:
 ~]# systemctl start my-iptables

 ~]# systemctl status my-iptables
● my-iptables.service - my-iptables - custom iptables daemon
   Loaded: loaded (/etc/systemd/system/my-iptables.service; disabled; vendor preset: disabled)
   Active: active (exited) since Thu 2020-11-26 11:41:50 IST; 1s ago
  Process: 11105 ExecStart=/usr/sbin/iptables-restore -n /etc/my-iptables-rules (code=exited, status=0/SUCCESS)
 Main PID: 11105 (code=exited, status=0/SUCCESS)

Nov 26 11:41:50 worker-2.example.com systemd[1]: Starting my-iptables - custom iptables daemon...
Nov 26 11:41:50 worker-2.example.com systemd[1]: Started my-iptables - custom iptables daemon.
So our service has started properly. Now the newly added iptables rule will be added automatically after every reboot.
Repeat the steps on all the cluster nodes and restart the kubelet service
Error: CoreDNS is stuck in Pending/Failed state
Normally CoreDNS is in pending state after the control node
initialization step. Later once we install the kubernetes networking
plugin, the CoreDNS namespace status should change to Running but if
it is still in Pending/Failed state then few things to be checked:
Use the kubectl get pods command to verify that the DNS pod is running.
[root@controller ~]# kubectl get pods --namespace=kube-system -l k8s-app=kube-dns
NAME                      READY   STATUS    RESTARTS   AGE
coredns-f9fd979d6-4bdhv   1/1     Running   0          4h53m
coredns-f9fd979d6-nd44t   1/1     Running   0          4h53m
Check for errors logs for the DNS containers.
kubectl logs --namespace=kube-system -l k8s-app=kube-dns
Verify the DNS service is UP and running or you can follow the official troubleshooting guide to debug services
[root@controller ~]# kubectl get svc --namespace=kube-system
NAME       TYPE        CLUSTER-IP   EXTERNAL-IP   PORT(S)                  AGE
kube-dns   ClusterIP   10.96.0.10           53/UDP,53/TCP,9153/TCP   4h54m
Log file location
There are two types of system components: those that run in a container and those that do not run in a container. For example:
- The Kubernetes scheduler and kube-proxy run in a container.
- The kubelet and container runtime, for example Docker, do not run in containers.
On machines with systemd, the kubelet and container runtime write to journald.
Otherwise, they write to .log files in the /var/log directory.
System components inside containers always write to .log files in the
/var/log directory, bypassing the default logging mechanism.
Enable shell auto-completion (Optional)
Now this is not a mandatory step but it is useful to get the list of supported options with kubectl just by pressing the TAB key on the keyboard. kubectl provides autocompletion support for Bash and Zsh, which can save you a lot of typing. To enable auto-completion we must first install bash-completion on the respective node. Since we would be using our master node most of the time, so we will install this package only on controller node:
[root@controller ~]# dnf -y install bash-completion
Next execute kubectl completion bash to get the script which would perform the auto completion for kubectl, this would give a long output on the console
[root@controller ~]# kubectl completion bash
We will save the output from this command to our ~/.bashrc for root user.
[root@controller ~]# kubectl completion bash >> ~/.bashrc
If you want this to be available for all other users then you can create a new file inside /etc/bash_completion.d/ and save the content:
[root@controller ~]# kubectl completion bash >> /etc/bash_completion.d/kubectl
Next reload your shell and now you can enter kubectl and just press
TAB which should give you a list of supported options:
[root@controller ~]# kubectl <press TAB on the keyboard>
alpha          attach         completion     create         edit           kustomize      plugin         run            uncordon
annotate       auth           config         delete         exec           label          port-forward   scale          version
api-resources  autoscale      convert        describe       explain        logs           proxy          set            wait
api-versions   certificate    cordon         diff           expose         options        replace        taint
apply          cluster-info   cp             drain          get            patch          rollout        top
Conclusion
In this Kubernetes tutorial we learned the steps to deploy multi-node Kubernetes Cluster using Kubeadm. There are different options to choose for Container Runtime and Networking add-on, in this article we have used Docker CE as our runtime but if you plan to select any other software then additional configuration may be required. Similarly for the networking add-on we have used weave-net plugin but you may choose to use other plugins but the steps of configuration may again vary for which you will have to refer respective official documentation.