![Install Kubernetes on Ubuntu 24.10 [Step-by-Step]](/install-kubernetes-on-ubuntu/install-kubernetes-on-ubuntu.webp)
In this tutorial we will share step by step instructions to install Kubernetes on Ubuntu 24.10 using containerd container runtime and Calico CNI. We will be installing a multi-node kubectl cluster with 1 master and 2 worker nodes.
Here is a video representation of this article, you can also follow all the steps in this video tutorial:
1. My Lab Environment
I am using Oracle VirtualBox to setup my Kubernetes Cluster where I have created 3 virtual machines with Ubuntu 24.10. Following are the specs of each VM:
| Resources | controller | worker-1 | worker-2 |
|---|---|---|---|
| OS | Ubuntu 24.10 | Ubuntu 24.10 | Ubuntu 24.10 |
| Hostname | kmaster | kworker1 | kworker2 |
| Storage | 25GB | 25GB | 25GB |
| vCPU | 2 | 2 | 2 |
| RAM | 3GB | 3GB | 3GB |
| Adapter-1 (NAT) | Yes | Yes | Yes |
| Adapter-2 (Host-Only) | DHCP | DHCP | DHCP |
2. Kubernetes Prerequisites
2.1 Disable Swap
The kubelet service (which runs on both master and worker nodes)
will fail to start or function correctly if swap is enabled—unless
explicitly configured with advanced options (e.g.,
failSwapOn: false, NodeSwap feature gate), which are not recommended
for beginners or production setups.
Run the following on all nodes (master and workers):
sudo swapoff -a
sudo sed -i '/ swap / s/^/#/' /etc/fstab
This will disable the swap for current session and will also disable in /etc/fstab to make sure it doesn't accidently gets enabled as part of reboot.
2.2 Enable Firewall (UFW)
For local lab environment, you can disable UFW to avoid connectivity issues:
Enable or disable the unit at boot with systemctl enable; the systemctl command documents enable --now, symlinks under /etc/systemd/system, and masks.
sudo systemctl disable --now ufwor if you prefer to keep the firewall active, following ports needs to be enabled:
On Control Plane (kmaster):
sudo ufw allow 6443/tcp        # Kubernetes API server
sudo ufw allow 2379:2380/tcp   # etcd
sudo ufw allow 10250/tcp       # kubelet API
sudo ufw allow 10251/tcp       # kube-scheduler
sudo ufw allow 10252/tcp       # kube-controller-manager
On Worker Nodes (kworker1, kworker2):
sudo ufw allow 10250/tcp
sudo ufw allow 30000:32767/tcp # NodePort range
Then reload:
sudo ufw reload2.3 Firewall Bridging (Required for CNI)
Run this on all nodes:
cat <<EOF | sudo tee /etc/modules-load.d/k8s.conf
overlay
br_netfilter
EOF
Next execute:
sudo modprobe overlay
sudo modprobe br_netfilter
Similarly apply the following sysctl rules:
cat <<EOF | sudo tee /etc/sysctl.d/k8s.conf
net.bridge.bridge-nf-call-ip6tables = 1
net.bridge.bridge-nf-call-iptables = 1
net.ipv4.ip_forward = 1
EOF
Execute to apply the changes:
sudo sysctl --system3. Install Container Runtime (containerd)
Kubernetes needs a container runtime to run your applications. Think of it as the ‘engine’ that runs your app containers. Two popular choices are Docker and containerd
| Feature | Docker | containerd |
|---|---|---|
| Full CLI & UX | ✅ Yes | ❌ No CLI (uses ctr or API) |
| Used for local development | ✅ Very common | ❌ Less beginner-friendly |
| Used internally by Kubernetes | ❌ Was removed after v1.24 | ✅ Official runtime since v1.24 |
| Lightweight & fast | ❌ Slightly heavier | ✅ Yes |
| Production-ready | ✅ Still valid | ✅ Preferred for production |
| Need extra config? | ✅ Uses dockershim (deprecated) | ✅ Needs initial config (/etc/containerd/config.toml) |
As of Kubernetes v1.24+, Docker support was removed from the core. That means Kubernetes now recommends using containerd because it's lightweight and purpose-built for Kubernetes. For our demo, we will use containerd as container runtime
Install this on all master and worker nodes:
Install pre-requisite packages (install cURL on Ubuntu if the image ships without it):
sudo apt update && sudo apt install -y curl gnupg2 software-properties-common apt-transport-https ca-certificatesInstall containerd from Ubuntu repo
sudo apt install -y containerdGenerate and edit containerd config
sudo mkdir -p /etc/containerd
containerd config default | sudo tee /etc/containerd/config.toml > /dev/null
Restart containerd
sudo systemctl restart containerd
sudo systemctl enable containerd
Verify containerd is working
sudo ctr version
4. Install kubelet, kubeadm and kubectl
If you are facing error
The repository 'https://apt.kubernetes.io kubernetes-xenial Release' does not have a Release file,
then as of September 13, 2023, the legacy APT repositories
(apt.kubernetes.io) have been deprecated and frozen. To install
Kubernetes components on Ubuntu 24.10, we need to switch to the new
community-owned repositories hosted at pkgs.k8s.io
Install this on all master and worker nodes:
Remove Existing Kubernetes APT Source (if present):
sudo rm -f /etc/apt/sources.list.d/kubernetes.listCreate Keyrings Directory:
sudo mkdir -p /etc/apt/keyringsAdd the Kubernetes GPG Key. Replace v1.33 with your desired Kubernetes
version if needed.
Import the signing key over HTTPS with curl; see the curl command for piping into gpg and common header flags.
curl -fsSL https://pkgs.k8s.io/core:/stable:/v1.33/deb/Release.key | sudo gpg --dearmor -o /etc/apt/keyrings/kubernetes-apt-keyring.gpgAdd the Kubernetes APT Repository:
echo "deb [signed-by=/etc/apt/keyrings/kubernetes-apt-keyring.gpg] https://pkgs.k8s.io/core:/stable:/v1.33/deb/ /" | sudo tee /etc/apt/sources.list.d/kubernetes.listUpdate Package Lists and Install Kubernetes Components:
sudo apt update
sudo apt install -y kubelet kubeadm kubectl
sudo apt-mark hold kubelet kubeadm kubectl
This will install the latest available version (e.g., 1.33.x).
Verify Installation:
kubeadm version
kubectl version --client
5. Initialize the Kubernetes Cluster
Check the IP Address which you want to publish to your worker nodes. In my case since my first adapter is NAT which has a static IP of 10.0.2.15, so I want to use my secondary Host-Only network adapter for all internal communication within cluster.
To get the IP address, we can use ip a or ifconfig command. In my
case, this is the interface which I intend to use with IP Address
192.168.56.105:
enp0s8: flags=4163<UP,BROADCAST,RUNNING,MULTICAST>  mtu 1500
        inet 192.168.56.105  netmask 255.255.255.0  broadcast 192.168.56.255
        inet6 fe80::3ea0:3d4f:bbaf:9b41  prefixlen 64  scopeid 0x20<link>
        ether 08:00:27:78:0b:5b  txqueuelen 1000  (Ethernet)
        RX packets 31071  bytes 3677613 (3.6 MB)
        RX errors 0  dropped 0  overruns 0  frame 0
        TX packets 18208  bytes 8486623 (8.4 MB)
        TX errors 0  dropped 0 overruns 0  carrier 0  collisions 0
Execute the following command on master only. Calico CNI expects
--pod-network-cidr=192.168.0.0/16
sudo kubeadm init --apiserver-advertise-address=192.168.56.105 --pod-network-cidr=192.168.0.0/16If the above command execution is successful then towards the end, you may see this output which contains kubeadm join command:
Alternatively, if you are the root user, you can run:

  export KUBECONFIG=/etc/kubernetes/admin.conf

You should now deploy a pod network to the cluster.
Run "kubectl apply -f [podnetwork].yaml" with one of the options listed at:
  https://kubernetes.io/docs/concepts/cluster-administration/addons/

Then you can join any number of worker nodes by running the following on each as root:

kubeadm join 192.168.56.105:6443 --token ggm1j4.n0diiqe2j4wvkh57 \
        --discovery-token-ca-cert-hash sha256:3c455b38ffd671a154b327e8a9a3b21cfb07103c06712b0c523baf44ad50b748
We will using this kubeadm join command later to add worker nodes to the Kubernetes Cluster.
Next let's set Up kubectl for our regular user on the master node:
Ownership changes in this section use chown command syntax.
mkdir -p $HOME/.kube
sudo cp /etc/kubernetes/admin.conf $HOME/.kube/config


sudo chown $(id -u):$(id -g) $HOME/.kube/config
Verify Cluster is Ready:
kubectl get nodes
At this stage since we have not installed Calico CNI so the kmaster node
is master as NotReady.
6. Choosing and Installing CNI
Kubernetes doesn’t create the network itself. Instead, it uses something called a CNI plugin to handle pod-to-pod communication, DNS resolution, and optionally network policies. You can think of it like CNI = The network cables and switches between your Kubernetes pods.
Here the some popular CNI options and their usecases:
| CNI Plugin | Best For | Features | Use When |
|---|---|---|---|
| Calico | Production | NetworkPolicy, IPv4/IPv6, BGP, Egress | You want fine-grained network security policies |
| Flannel | Simplicity | VXLAN overlay | You’re learning or using a small cluster |
| Cilium | Advanced features | eBPF, NetworkPolicy, observability | You need high performance and deep visibility |
| Weave | Easy install | Encryption, simple UI | You want encryption between pods out-of-the-box |
| Canal | Hybrid (Calico + Flannel) | Combo of policy + simple networking | You want Calico policies with Flannel’s simplicity |
For our demo, we will use Calico CNI.
Once the master node is initialized and kubectl is configured, run:
kubectl apply -f https://raw.githubusercontent.com/projectcalico/calico/v3.29.0/manifests/calico.yamlYou can replace the version (v3.29.0) with the latest available if
needed: Calico Releases
Sample Output:
poddisruptionbudget.policy/calico-kube-controllers created
serviceaccount/calico-kube-controllers created
serviceaccount/calico-node created
serviceaccount/calico-cni-plugin created
configmap/calico-config created
customresourcedefinition.apiextensions.k8s.io/bgpconfigurations.crd.projectcalico.org created
customresourcedefinition.apiextensions.k8s.io/bgpfilters.crd.projectcalico.org created
customresourcedefinition.apiextensions.k8s.io/bgppeers.crd.projectcalico.org created
customresourcedefinition.apiextensions.k8s.io/blockaffinities.crd.projectcalico.org created
customresourcedefinition.apiextensions.k8s.io/caliconodestatuses.crd.projectcalico.org created
customresourcedefinition.apiextensions.k8s.io/clusterinformations.crd.projectcalico.org created
customresourcedefinition.apiextensions.k8s.io/felixconfigurations.crd.projectcalico.org created
customresourcedefinition.apiextensions.k8s.io/globalnetworkpolicies.crd.projectcalico.org created
customresourcedefinition.apiextensions.k8s.io/globalnetworksets.crd.projectcalico.org created
customresourcedefinition.apiextensions.k8s.io/hostendpoints.crd.projectcalico.org created
customresourcedefinition.apiextensions.k8s.io/ipamblocks.crd.projectcalico.org created
customresourcedefinition.apiextensions.k8s.io/ipamconfigs.crd.projectcalico.org created
customresourcedefinition.apiextensions.k8s.io/ipamhandles.crd.projectcalico.org created
customresourcedefinition.apiextensions.k8s.io/ippools.crd.projectcalico.org created
customresourcedefinition.apiextensions.k8s.io/ipreservations.crd.projectcalico.org created
customresourcedefinition.apiextensions.k8s.io/kubecontrollersconfigurations.crd.projectcalico.org created
customresourcedefinition.apiextensions.k8s.io/networkpolicies.crd.projectcalico.org created
customresourcedefinition.apiextensions.k8s.io/networksets.crd.projectcalico.org created
customresourcedefinition.apiextensions.k8s.io/tiers.crd.projectcalico.org created
customresourcedefinition.apiextensions.k8s.io/adminnetworkpolicies.policy.networking.k8s.io created
clusterrole.rbac.authorization.k8s.io/calico-kube-controllers created
clusterrole.rbac.authorization.k8s.io/calico-node created
clusterrole.rbac.authorization.k8s.io/calico-cni-plugin created
clusterrolebinding.rbac.authorization.k8s.io/calico-kube-controllers created
clusterrolebinding.rbac.authorization.k8s.io/calico-node created
clusterrolebinding.rbac.authorization.k8s.io/calico-cni-plugin created
daemonset.apps/calico-node created
deployment.apps/calico-kube-controllers created
After applying, verify node status:

As you can see, now our control place node is marked as Ready,
7. Join worker nodes with master node
Now that our master node is Ready, we can join the available worker
nodes with the master to form a Kubernetes Cluster. At this stage, we
can execute kubeadm join command which we had saved from earlier
kubeadm init command:
Executing from both worker nodes:
golinuxcloud@kworker1:~$ sudo kubeadm join 192.168.56.105:6443 --token ggm1j4.n0diiqe2j4wvkh57      --discovery-token-ca-cert-hash sha256:3c455b38ffd671a154b327e8a9a3b21cfb07103c06712b0c523baf44ad50b748

golinuxcloud@kworker2:~$ sudo kubeadm join 192.168.56.105:6443 --token ggm1j4.n0diiqe2j4wvkh57   --discovery-token-ca-cert-hash sha256:3c455b38ffd671a154b327e8a9a3b21cfb07103c06712b0c523baf44ad50b748
Once these commands are successfully executed, verify node status on control plane node:
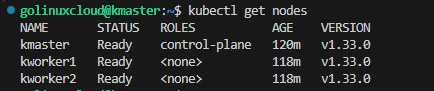
Here, we have successfully created a multi node Kubernetes cluster with 1 master and 2 worker nodes.
8. Troubleshooting Tip and Tricks
8.1 Token lost used to join worker nodes
In case you lost the token which is used with kubeadm join command to add worker nodes to the Kubernetes Cluster, then you can recreate the same using:
kubeadm token createIn case you loose the entire kubeadm join command, you can regenrate the same using:
kubeadm token create --print-join-commandThis should output like:
kubeadm join 192.168.56.105:6443 --token ktx9lt.o0k0zmd7m2rbqc7m --discovery-token-ca-cert-hash sha256:3c455b38ffd671a154b327e8a9a3b21cfb07103c06712b0c523baf44ad50b7488.2 Re-Initialize the Cluster
In case there are issues in initializing the control plane node, you can reset and re-init the master node:
sudo kubeadm reset -f
sudo rm -rf ~/.kube /etc/kubernetes/pki /etc/kubernetes/admin.conf
Now re-run init with the correct IP
sudo kubeadm init --apiserver-advertise-address=192.168.56.105 --pod-network-cidr=192.168.0.0/16Then re-run the kubectl setup:
mkdir -p $HOME/.kube
sudo cp /etc/kubernetes/admin.conf $HOME/.kube/config
sudo chown $(id -u):$(id -g) $HOME/.kube/config
9. Uninstall kubelet, kubeadm and kubectl properly
To properly uninstall a Kubernetes cluster created using kubeadm
(along with containerd and networking), follow this step-by-step cleanup
process on each node (master and workers):
Reset all worker and master node with kubeadm:
sudo kubeadm reset -fThis:
- Removes control plane and kubelet configs
- Cleans up certificates and tokens
Remove Kubernetes Configuration Files
sudo rm -rf /etc/cni /etc/kubernetes /var/lib/etcd /var/lib/kubelet /var/lib/cni /var/lib/containerd /opt/cni /etc/systemd/system/kubelet.service.d ~/.kubeAlso clear network plugins (e.g., Calico):
sudo rm -rf /etc/calicoStop and disable Kubernetes services on both master and worker nodes:
sudo systemctl stop kubelet
sudo systemctl disable kubelet
Remove Kubernetes Packages (Optional) on both master and worker nodes:
sudo apt-get purge -y kubeadm kubectl kubelet kubernetes-cni kube*
sudo apt-get autoremove -y
Remove containerd (Optional) on both master and worker nodes:
sudo systemctl stop containerd
sudo apt-get purge -y containerd
sudo apt-get autoremove -y
sudo rm -rf /etc/containerd /var/lib/containerd
Clean firewall rules (Network Reset), to do so List all UFW rules (numbered format)
sudo ufw status numberedSample Output:
Status: active

     To                         Action      From
     --                         ------      ----
[ 1] 6443/tcp                   ALLOW IN    Anywhere
[ 2] 2379:2380/tcp              ALLOW IN    Anywhere
[ 3] 10250/tcp                  ALLOW IN    Anywhere
[ 4] 10251/tcp                  ALLOW IN    Anywhere
[ 5] 10252/tcp                  ALLOW IN    Anywhere
[ 6] 30000:32767/tcp            ALLOW IN    Anywhere
[ 7] 22/tcp                     ALLOW IN    Anywhere
[ 8] 2379:2380,6443,10250,10251,10252/tcp ALLOW IN    Anywhere
[ 9] 6443/tcp (v6)              ALLOW IN    Anywhere (v6)
[10] 2379:2380/tcp (v6)         ALLOW IN    Anywhere (v6)
[11] 10250/tcp (v6)             ALLOW IN    Anywhere (v6)
[12] 10251/tcp (v6)             ALLOW IN    Anywhere (v6)
[13] 10252/tcp (v6)             ALLOW IN    Anywhere (v6)
[14] 30000:32767/tcp (v6)       ALLOW IN    Anywhere (v6)
[15] 22/tcp (v6)                ALLOW IN    Anywhere (v6)
[16] 2379:2380,6443,10250,10251,10252/tcp (v6) ALLOW IN    Anywhere (v6)
Delete the rules:
sudo ufw delete allow 6443
sudo ufw delete allow 2379:2380/tcp
sudo ufw delete allow 10250
sudo ufw delete allow 10251
sudo ufw delete allow 10252
sudo ufw delete allow 10255
sudo ufw delete allow 8472/udp
Repeat sudo ufw status numbered after each deletion to ensure rule
numbers shift correctly.
See also removing software on Ubuntu for Snap vs apt vs manual cleanup paths.
10. Summary
In this tutorial, we have covered step by step process of installing a multi node Kubernetes Cluster on Ubuntu 24.10 using containerd as the container runtime and Calico as the CNI plugin. We have used Oracle VirtualBox as our setup to configure the cluster but you can use the same steps on any other kind of environment. Only the infra related steps may vary in such case such as networking, CPU etc but all other steps would remain the same.
Let me know any feedback or concerns related to the steps shared via comment section.
Related Searches: install kubelet, install kubernetes cluster, install kubectl on ubuntu, install kubernetes on ubuntu 24.10, install multi node kubernetes cluster
