This tutorial guides you through step by step instructions to install Nvidia drivers on Ubuntu, covering different methods like GUI, command line, and PPA repository. It includes compatibility checks, manual installation, post-installation steps, troubleshooting, and uninstallation instructions.
Enhancing your Ubuntu system's graphics performance, especially for tasks like gaming, video editing, and 3D rendering, largely depends on having the right drivers for your Nvidia graphics card. Nvidia drivers are crucial as they unlock the full potential of the GPU, offering optimized compatibility, improved speed, and stability. This introduction to installing Nvidia drivers on Ubuntu will guide you through the seamless integration of Nvidia's powerful graphics processing capabilities with Ubuntu's versatile and user-friendly platform.
Checking GPU and Driver Compatibility
To check GPU and driver compatibility on an Ubuntu system with an Nvidia
graphics card, the ubuntu-drivers devices command is used. This
command scans your system and lists Nvidia GPUs along with compatible
drivers. Here's an example output that you can include in your article:
These steps were tested on recent Ubuntu releases; use check Ubuntu version if you are not sure which codename apt should use.
$ ubuntu-drivers devices

== /sys/devices/pci0000:00/0000:00:01.0/0000:01:00.0 ==
modalias : pci:v000010DEd00001F95sv00001028sd0000097Dbc03sc02i00
vendor   : NVIDIA Corporation
model    : TU117M [GeForce GTX 1650 Ti Mobile]
driver   : nvidia-driver-440 - distro non-free recommended
driver   : xserver-xorg-video-nouveau - distro free builtin
In this output:
- The system has a GeForce GTX 1650 Ti Mobile GPU.
- The recommended proprietary driver for this GPU is
nvidia-driver-440. - The open-source
xserver-xorg-video-nouveaudriver is also available.
Different methods to install Nvidia Drivers on Ubuntu
Method 1: Installing Nvidia Drivers Using GUI
This method involves using the graphical user interface (GUI) of Ubuntu to install Nvidia drivers. It's user-friendly and recommended for those who prefer working with a graphical interface rather than the command line.
- Press
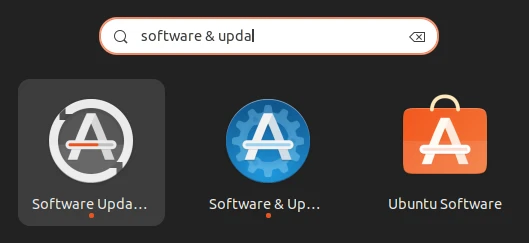
Ctrl + Alt + Tto open the terminal. - Type
software-properties-gtkand press Enter. This command will open the "Software & Updates" application. - Alternatively, you can find and open 'Software & Updates' from the applications menu or dashboard, depending on your Ubuntu version.
- In the 'Software & Updates' window, go to the 'Additional Drivers' tab.
- The system will search for available drivers for your hardware. This process might take a few moments.

- You'll see a list of available drivers for your Nvidia graphics card. This list includes both open-source (nouveau) and proprietary drivers.
- Look for the recommended proprietary Nvidia driver, which is usually marked as '(proprietary, tested)'.
- Select the radio button next to the recommended driver.
- Click on the 'Apply Changes' button to start the installation of the selected driver.
- You might be prompted to enter your password for authentication.
- The installation process will begin; wait until it's completed.
- After the installation is complete, it's important to restart your computer for the changes to take effect.
- Close any open applications and save your work.
- Restart your computer either through the GUI or by typing
sudo rebootin the terminal. - Once your computer restarts, you can verify the installation of the Nvidia driver.
- Open the terminal and type
nvidia-smito check the status of the Nvidia drivers.
Method 2: Installing Nvidia Drivers via Command Line
Installing Nvidia drivers via the command line is a preferred method for advanced users or for those who are working on systems without a graphical interface. This method gives you more control and visibility into the installation process.
- Press
Ctrl + Alt + Tto open the terminal. - To list available drivers and see the system's recommendations, use
ubuntu-drivers devicescommand. This command will display the drivers compatible with your Nvidia graphics card, including a recommendation for your specific system setup.
$ ubuntu-drivers devices

== /sys/devices/pci0000:00/0000:00:02.0 ==
modalias : pci:v000010DEd00001D10sv00001028sd000007D1bc03sc02i00
vendor   : NVIDIA Corporation
model    : GP108M [GeForce MX150]
driver   : nvidia-driver-525 - third-party free recommended
driver   : nvidia-driver-515-server - distro non-free
driver   : nvidia-driver-470 - distro non-free
driver   : nvidia-driver-470-server - distro non-free
driver   : nvidia-driver-515 - distro non-free
driver : nvidia-driver-450-server - distro non-free- The recommended driver is indicated in the output (e.g.,
nvidia-driver-525 - third-party free recommended), which corresponds to the GUI's indication of the recommended driver. - Following the example above, to install the recommended driver, we
would use apt package manager using
sudo privilege (add user to sudo group) to run
sudo apt install nvidia-driver-525 - After installing the driver,
reboot your system to apply the
changes using
sudo reboot. - After rebooting, you can verify the driver installation by running
nvidia-smi
+-----------------------------------------------------------------------------+
| NVIDIA-SMI 525.60.11    Driver Version: 525.60.11    CUDA Version: 11.4     |
|-------------------------------+----------------------+----------------------+
| GPU  Name        Persistence-M| Bus-Id        Disp.A | Volatile Uncorr. ECC |
| Fan  Temp  Perf  Pwr:Usage/Cap|         Memory-Usage | GPU-Util  Compute M. |
|                               |                      |               MIG M. |
|===============================+======================+======================|
|   0  GeForce MX150       Off  | 00000000:01:00.0 Off |                  N/A |
| N/A   55C    P8    N/A /  N/A |    250MiB /  4046MiB |      5%      Default |
+-------------------------------+----------------------+----------------------+

+-----------------------------------------------------------------------------+
| Processes:                                                                  |
|  GPU   GI   CI        PID   Type   Process name                  GPU Memory |
|        ID   ID                                                   Usage      |
|=============================================================================|
|    0   N/A  N/A      1234      G   /usr/lib/xorg/Xorg                150MiB |
|    0   N/A  N/A      4321      G   /usr/bin/gnome-shell               95MiB |
+-----------------------------------------------------------------------------+
Method 3: Installing Nvidia Beta Drivers via PPA Repository
Using a Personal Package Archive (PPA) allows you to install beta drivers that may not yet be available in the official Ubuntu repositories. These drivers are often cutting-edge releases that may offer new features and support for the very latest Nvidia GPUs, but they might also be less stable than the official releases.
- Access the terminal by pressing
Ctrl + Alt + Tor by searching for 'Terminal' in the applications menu. - To add the Nvidia beta drivers PPA to your system, execute the following command:
sudo add-apt-repository ppa:graphics-drivers/ppaThis PPA is maintained by Ubuntu developers and contains the latest proprietary GPU drivers.
- After adding the new PPA, update the package list to include the new
repository's packages with the command
sudo apt update - You can now list the available drivers, including beta versions, using
ubuntu-drivers devices. Look for the beta driver entries in the output. Beta drivers might be indicated by a higher version number or a 'beta' tag. - Once you've identified the beta driver, install it using the
aptcommand. For example, ifnvidia-driver-530is the beta version, you would runsudo apt install nvidia-driver-530 - After the installation is complete, reboot your system to activate the
new driver using
sudo reboot - When your system restarts, verify the driver installation by running
nvidia-smi
Method 4: Manual Driver Installation
For advanced users or those needing specific driver versions not available through the standard repositories or PPA, the manual installation method involves downloading the driver directly from Nvidia's official website and installing it manually.
- Open the terminal with
Ctrl + Alt + T. - Use the following command to identify your GPU model:
$ lspci | grep -i nvidia
01:00.0 VGA compatible controller: NVIDIA Corporation GP107 [GeForce GTX 1050 Ti] (rev a1)- Navigate to Nvidia's official driver downloads page.
- Enter your GPU details and select the appropriate driver version to
download the
.runfile. - Download the run file using wget or install cURL on Ubuntu:
wget https://us.download.nvidia.com/XFree86/Linux-x86_64/525.89.02/NVIDIA-Linux-x86_64-525.89.02.run- Before installing the new driver, you need to disable the Nouveau open-source driver that comes with Ubuntu. Run:
sudo bash -c "echo blacklist nouveau > /etc/modprobe.d/blacklist-nvidia-nouveau.conf"
sudo bash -c "echo options nouveau modeset=0 >> /etc/modprobe.d/blacklist-nvidia-nouveau.conf"- Generate the new kernel initramfs:
sudo update-initramfs -u- To install the Nvidia driver, you must stop the display manager. You
can do this by switching to a virtual terminal using
Ctrl + Alt + F3and then stopping the display manager service with:
Control the running service with systemctl start, stop, or restart; see the systemctl command for try-restart and dependency behavior.
sudo systemctl stop gdm # Replace 'gdm' with your display manager, e.g., 'lightdm', 'sddm', etc.To find out which display manager your Ubuntu system is using, you can
check for the default display manager file
cat /etc/X11/default-display-manager
Alternatively, you can check the status of the known display manager services one by one:
systemctl status gdm3 # For gdm or gdm3 (GNOME Display Manager)
systemctl status lightdm # For lightdm (Light Display Manager)
systemctl status sddm # For sddm (Simple Desktop Display Manager)
systemctl status xdm # For xdm (X Display Manager)- Navigate to the directory where you downloaded the Nvidia driver.
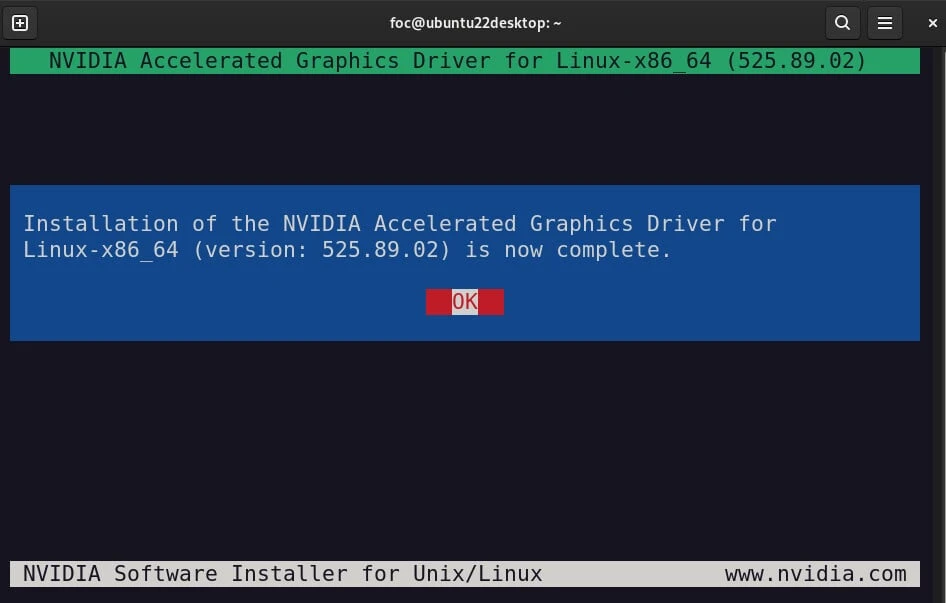
- Make the
.runfile executablechmod +x NVIDIA-Linux-x86_64-*.run - Run the installer
sudo ./NVIDIA-Linux-x86_64-*.runand Follow the on-screen instructions to complete the installation. - Once the installation is complete, reboot your system using
sudo reboot - After rebooting, verify the driver installation using
nvidia-smi
Tips and Considerations
- Manual installation bypasses Ubuntu's package management system, which can complicate future updates or removals.
- Always choose the correct driver for your specific GPU model and operating system version.
- Keep in mind that you might need to repeat this process when updating to a new driver version.
How to Uninstall Nvidia Drivers on Ubuntu
Uninstalling Nvidia drivers on Ubuntu can be necessary if you're troubleshooting issues, need to revert to an earlier version, or want to switch to a different driver
- Press
Ctrl + Alt + Tto open the terminal. - Type
software-properties-gtkand press Enter. This command will open the "Software & Updates" application. - Switch to the 'Additional Drivers' tab.
- Select the open-source 'xserver-xorg-video-nouveau' from the list.
- Click 'Apply Changes' to revert to the open-source driver.
- Close 'Software & Updates' and run
sudo apt-get remove --purge '^nvidia-.*'in the terminal to remove the proprietary driver - Execute
sudo apt autoremoveto remove any unused dependent packages (remove unused packages on Ubuntu) - If you also want to remove the PPA, use
sudo add-apt-repository --remove ppa:graphics-drivers/ppa - If you've installed the driver manually using a
.runfile, you can usually uninstall it withsudo /usr/bin/nvidia-uninstall - If the above doesn't work, you may need to run the
.runfile again with the--uninstallflag - Re-enable the Nouveau driver if it was blacklisted during the Nvidia driver installation
sudo rm /etc/modprobe.d/blacklist-nvidia-nouveau.conf
sudo update-initramfs -u- Reboot your system for the changes to take effect using
sudo reboot
See the general removing packages on Ubuntu when you are unsure which package manager installed the app.
Troubleshooting common issues
During the installation of Nvidia drivers on Ubuntu, you may encounter some common issues that can cause problems with the installation or the performance of your system. Here are a few tips for troubleshooting these issues:
- Black screen on boot: If your system displays a black screen on
boot after installing Nvidia drivers, try adding the "nomodeset"
parameter to your boot options. This can be done by editing the
"grub" configuration file located in the "
/etc/default" directory. - Low resolution or no 3D acceleration: If you experience low
resolution or no 3D acceleration after installing Nvidia drivers,
try running the "
nvidia-settings" command and configuring the display settings from there. You may also need to install additional packages, such as "nvidia-cuda-toolkit", to enable 3D acceleration. - Driver conflicts: If you have previously installed other graphics drivers on your system, you may encounter conflicts when installing Nvidia drivers. To resolve this issue, remove any existing graphics drivers and dependencies before installing the Nvidia drivers.
By following these tips and taking the time to properly configure your system, you can ensure a smooth and trouble-free installation of Nvidia drivers on Ubuntu.
Summary
In summary, we have covered four different methods for Nvidia driver installation on Ubuntu: GUI-based installation, command-line installation from official repositories, adding a PPA for beta drivers, and manual installation using Nvidia's website. Each method caters to different user preferences and requirements, ranging from straightforward GUI interactions to more advanced manual installations.
You can see the latest Nvidia driver versions from the Nvidia Linux Driver Official Page.
