![Configure IPv6 UEFI PXE Boot with Kickstart [RHEL/CentOS 8]](/ipv6-uefi-pxe-boot-kickstart-rhel-centos-8/ipv6_uefi.jpg)
In this tutorial I will be sharing step by step instructions to configure IPv6 UEFI PXE Boot with Kickstart using RHEL/CentOS 8 Linux server.
Sequential order to configure IPv6 UEFI PXE Boot with Kickstart
- Setup Installation Repo
- Install and Configure TFTP
- Install and Configure DHCPv6
- Install and Configure HTTP
- Prepare kickstart file
- Perform UEFI PXE Boot
Lab Environment
I have two physical hardware running on HPE Proliant blades with UEFI BIOS. Now the source server can be any Linux server actually, although the steps to configure DHCPv6, TFTP and other services would vary if you choose to use any other Linux variant such as Ubuntu, Debian. In my case, the source server is running on Legacy BIOS while the target server where I intend to do the automated installation is with UEFI BIOS.
Here are my server details:
**Hostname:**server.example.com
**Release:**CentOS Linux release 8.2.2004 (Core)
IP Address: 10.43.138.7/27, 2001:1:1:1442::407/122
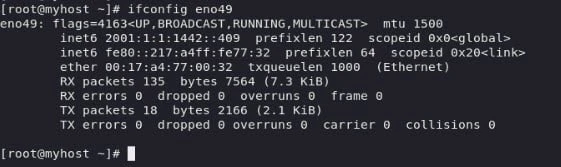
Below is the output of my primary interface. I have a dual stack server so I have configured both IPv4 and IPv6 but I will be using IPv6 for the network boot.
[root@server ~]# ip a
1: lo: <LOOPBACK,UP,LOWER_UP> mtu 65536 qdisc noqueue state UNKNOWN group default qlen 1000
    link/loopback 00:00:00:00:00:00 brd 00:00:00:00:00:00
    inet 127.0.0.1/8 scope host lo
       valid_lft forever preferred_lft forever
    inet6 ::1/128 scope host
       valid_lft forever preferred_lft forever
2: eno49: <BROADCAST,MULTICAST,UP,LOWER_UP> mtu 1500 qdisc mq state UP group default qlen 1000
    link/ether 00:17:a4:77:00:26 brd ff:ff:ff:ff:ff:ff
    inet 10.43.138.7/27 brd 10.43.138.31 scope global noprefixroute eno49
       valid_lft forever preferred_lft forever
    inet6 2001:1:1:1442::407/122 scope global noprefixroute
       valid_lft forever preferred_lft forever
    inet6 fe80::d478:91c3:ecd7:4ff9/64 scope link noprefixroute
       valid_lft forever preferred_lft forever

[root@server ~]# ip -6 route
::1 dev lo proto kernel metric 256 pref medium
2001:1:1:1442::400/122 dev eno49 proto kernel metric 100 pref medium
fe80::/64 dev eno49 proto kernel metric 100 pref medium
default via 2001:1:1:1442::43f dev eno49 proto static metric 100 pref medium
Pre-requisite
- You must have RHEL/CentOS 8 installed OS on a server. Now this server may or may not have UEFI BIOS.
- The interface used for PXE must have an IPv6 address
- If you are using RHEL 8 then you must have anactive RHN subscription
- If you are using CentOS 8 then you must have anactive internet connectionto download and install package. Although you may alsoconfigure offline repositoryif your server doesn't have active internet connection
- It is recommended to have umask set as 022 as the kickstart installation over network would need world readable access for all required files and directories
Steps to configure IPv6 UEFI PXE Boot Server using Kickstart
Step-1: Setup Installation Repository
We would need an installation repository with all the rpms from the
RHEL/CentOS 8 image which will be used to install our target server. I
have downloaded the CentOS 8.2 image which I will mount on /mnt and
then copy the content to my local directory.
# mount /tmp/CentOS-8.2.2004-x86_64-dvd1.iso /mnt
# cd /mnt
# mkdir -p /home/images/centos82
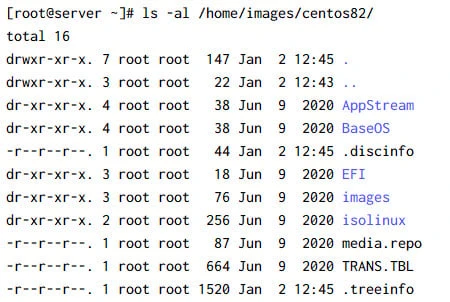
I have created /home/images/centos82 directory where I will copy all
the files from /mnt:
# cp -rvf /mnt* /home/images/centos82/
In some cases thee hidden file from the base image i.e. .treeinfo and
.discinfo is not copied by default so copy them manually
.treeinfo and .discinfo from the image or
else your installation is expected to fail. These are referred during
the installation over the network using PXE to validate the integrity of
the repository.
cp /mnt/.discinfo /home/images/centos82/
cp /mnt/.treeinfo /home/images/centos82/
After copying all the files:
Step-2: Install and Configure TFTP Server
Next we will use TFTP server to transfer the UEFI PXE Boot files required for installing the target nodes over network. Use the following command to install tftp packages:
~]# dnf install tftp-server -y
Once the package is installed, you can check for the path of systemd unit file using following command:
~]# rpm -ql tftp-server | grep -E "service|socket"

Next you can check the content of the service unit file:
~]# cat /usr/lib/systemd/system/tftp.service
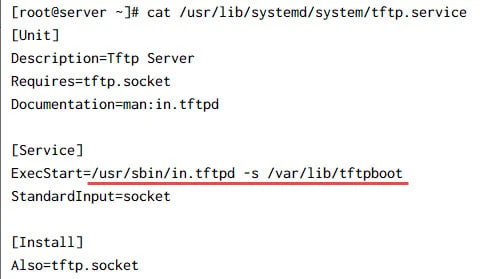
Here you see that by default the tftp service will search for TFTP files
inside/var/lib/tftpboot. So we will placeall our UEFI PXE Boot
files under this location. If you plan to use a different path then
you can modify this service file and execute following command to update
your changes:
]# systemctl daemon-reload
]# systemctl restart tftp.service
Next enable and start this service to make sure the service is started automatically post reboot.
]# systemctl enable tftp.service --now
Created symlink /etc/systemd/system/sockets.target.wants/tftp.socket → /usr/lib/systemd/system/tftp.socket.
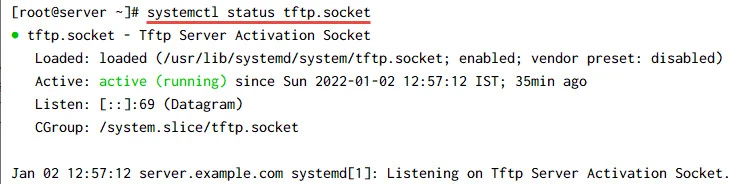
Since the tftp service is managed by tftp socket, it is important that the socket is up and running. As and when there is an incoming TFTP request, the socket will start the service automatically.
Check the status of the socket to make sure it was started successfully.
~]# systemctl status tftp.service
Step-3: Configure UEFI PXE Boot Server
Next to perform UEFI {XE Boot installation, we will need PXE boot files.
Normally for Legacy BIOS PXE boot we
neededpxelinux.0andldlinux.c32part ofsyslinux-tftpbootrpm.
But for UEFI BIOS we need following files:
- grubx64.efiprovided by grub2-efi-x64 rpm
- shimx64.efiprovided by shim-x64 rpm
- BOOTX64.EFIprovided by shim-x64 rpm
You can copy the mentioned rpms from the image to some temporary
location such as/tmpand extract the rpm to get the required files:
]# cp /home/images/centos82/BaseOS/Packages/grub2-efi-x64-2.02-81.el8.x86_64.rpm /tmp/

]# cp /home/images/centos82/BaseOS/Packages/shim-x64-15-11.el8.x86_64.rpm /tmp/
Next extract these rpms using rpm2cpio command.
]# cd /tmp

]# rpm2cpio shim-x64-15-11.el8.x86_64.rpm | cpio -idm

]# rpm2cpio grub2-efi-x64-2.02-81.el8.x86_64.rpm | cpio -idm
We will store all our PXE files inside/var/lib/tftpboot/pxelinux. Now
if you recall, by default TFTP will look into/var/lib/tftpbootso we
must handle the extrapxelinuxdirectory while setting up our UEFI PXE
Boot server.
]# mkdir /var/lib/tftpboot/pxelinux
Copy the PXE boot files from/tmpwhere we extracted the rpm to this
location:
]# cp /tmp/boot/efi/EFI/BOOT/BOOTX64.EFI /var/lib/tftpboot/pxelinux/

]# cp /tmp/boot/efi/EFI/centos/shimx64.efi /var/lib/tftpboot/pxelinux/

]# cp /tmp/boot/efi/EFI/centos/grubx64.efi /var/lib/tftpboot/pxelinux/
Next we needinitrdandvmlinuzfile to load the Operating System
until hard disk and other interfaces are detected. I hope you are
familiar with thesteps of Linux Boot Process. These files can again be copied from the image,
so we will copy and place them also inside/var/lib/tftpboot/pxelinux/
]# cp /home/images/centos82/isolinux/vmlinuz/var/lib/tftpboot/pxelinux/

]# cp /home/images/centos82/isolinux/initrd.img /var/lib/tftpboot/pxelinux/
Following is the content of my/var/lib/tftpboot/pxelinuxat this
stage:
~]# ls -l /var/lib/tftpboot/pxelinux/
total 78460
-rwx------. 1 root root  1877384 Jan  2 11:02 ,
-rwxr-xr-x. 1 root root  1211224 Jan  2 11:00 BOOTX64.EFI
-rwxr-xr-x. 1 root root  1877384 Jan  2 11:02 grubx64.efi
-r--r--r--. 1 root root 65114456 Jan  2 11:01 initrd.img
-rwxr-xr-x. 1 root root  1211224 Jan  2 11:02 shimx64.efi
-r-xr-xr-x. 1 root root  8913656 Jan  1 22:17 vmlinuz
Step-4: Configure DHCPv6 for IPv6 UEFI PXE Boot
Next we need to install and configure DHCP to support UEFI PXE Boot installation.
]# dnf -y install dhcp-server
You can check a sample dhcpd6.conf file under
/usr/share/doc/dhcp-server/dhcpd6.conf.example. Here is my sample
dhcpd6.conf file:
~]# vim /etc/dhcp/dhcpd6.conf
#
# DHCPv6 Server Configuration file.
#   see /usr/share/doc/dhcp-server/dhcpd6.conf.example
#   see dhcpd.conf(5) man page
#
default-lease-time 2592000;
preferred-lifetime 604800;
option dhcp-renewal-time 360;
option dhcp-rebinding-time 720;
allow leasequery;
dhcpv6-lease-file-name "/var/lib/dhcpd/dhcpd6.leases";
option dhcp6.info-refresh-time 21600;
option dhcp6.bootfile-url code 59 = string;
option dhcp6.vendor-class code 16 = {integer 32, integer 16, string};

subnet6 2001:0001:0001:1442::0400/122
{
    range6 2001:0001:0001:1442::0405 2001:0001:0001:1442::0420;
    option dhcp6.bootfile-url "tftp://[2001:0001:0001:1442::0407]/pxelinux/BOOTX64.EFI";
}
You can follow the official documentation to understand
about the different options used in dhcpd6.conf file. Although let me
explain the subnet6 declaration part i.e.:
subnet6 2001:0001:0001:1442::0400/122
{
    range6 2001:0001:0001:1442::0405 2001:0001:0001:1442::0420;
    option dhcp6.bootfile-url "tftp://[2001:0001:0001:1442::0407]/pxelinux/BOOTX64.EFI";
}
Here we have basically defined our IPv6 subnet and netmask. You can get
this using route -n command as shown below:
 ~]# route -6 -n
Kernel IPv6 routing table
Destination                    Next Hop                   Flag Met Ref Use If
::1/128                        ::                         U    256 2     0 lo
2001:1:1:1442::400/122         ::                         U    100 16     0 eno49
Here eno49 is our primary interface using the same subnet i.e.
2001:1:1:1442::400/122. Now the start and end IP Address provided in
the range is something which you will have to add based on your
environment. The IP address will be assigned from this range for the
target server.
With DHCPv6 we don't use next-server and filename any more, instead we
have to use dhcp6.bootfile-url which will contain the path of PXE file
which we extracted in previous step.
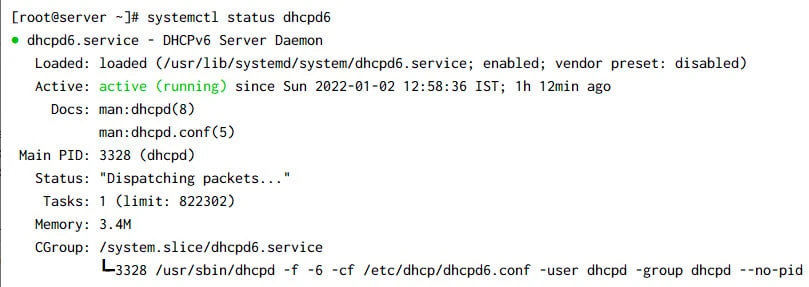
Next enable and start the DHCP server service:
dhcpd6.service instead of dhcpd.service
# systemctl enable dhcpd6 --now
Check the status of the dhcpd6 service:
Step-5: Configure Kickstart file for automated installation
Next we will create our kickstart file to have an un-attended automated installation. Now I have already explaineddifferent syntax and parameters used in kickstart fileso I will not repeat the same here.
By default, when we install CentOS or RHEL server, we will
have/root/anaconda.cfgfile available which will contain the
parameters used for the current installation. You can always take this
file as your base and further modify it based on your requirement.
I will create a new directory to store our kickstart file for the UEFI PXE Boot purpose:
~]# mkdir /ks

~]# cp /root/anaconda-ks.cfg /ks/kickstart.conf
Make sure the file is world readable and permission of /ks directory
is 755
[root@server ~]# ls -dl /ks/kickstart.conf
-rw-r--r--. 1 root root 1601 Jan  2 12:50 /ks/kickstart.conf

[root@server ~]# ls -dl /ks
drwxr-xr-x. 2 root root 28 Jan  2 12:50 /ks
We will update our kickstart.conf at later part of this tutorial once
we have configured HTTPD service
Step-6: Configure HTTP Server
Now we also need a service to host our image repository, we can use FTP or HTTP or NFS to host our image repository which we created in Step-1 of this tutorial. In my previous example where I hadsetup kickstart server using Legacy BIOS, I had used NFS so this time I decided to use HTTP server.
~]# dnf -y install httpd
Next we will configure Virtual Hosting to host our image repo path. I
have created a new fileks-server.confunder/etc/httpd/conf.d/with
the following content:
<VirtualHost [2001:1:1:1442::407]:80>
    ServerAdmin [email protected]
    DocumentRoot /
    ServerName server.example.com
    ErrorLog logs/ks-server.example.com-error_log
    CustomLog logs/ks-server.example.com-access_log common
    <Directory /ks>
       Options Indexes MultiViews
        AllowOverride All
        Require all granted
    </Directory>
    <Directory /home/images/centos82>
        Options Indexes MultiViews
        AllowOverride All
        Require all granted
    </Directory>
</VirtualHost>
So here I am basically serving two different PATH over my HTTP server i.e. my kickstart configuration file and my image repository. I have also provided the required permission to access these path, you may checkApache DirectoryListingsfor more information.
The nextimportantthing we must do is to allow visibility of hidden
files in the HTTP server as I mentioned earlier, installation over
network requires validation of the repository using.treeinfofile
which is basically a hidden file in Linux. So by default this file will
not be visible on the web server.
So to fix this we must remove.??*fromIndexIgnoreparameter
of/etc/httpd/conf.d/autoindex.conffile.
Change
IndexIgnore .??* *~ *# HEADER* README* RCS CVS *,v *,t
To
IndexIgnore *~ *# HEADER* README* RCS CVS *,v *,t
Next enable and start the httpd service:
# systemctl enable httpd --now
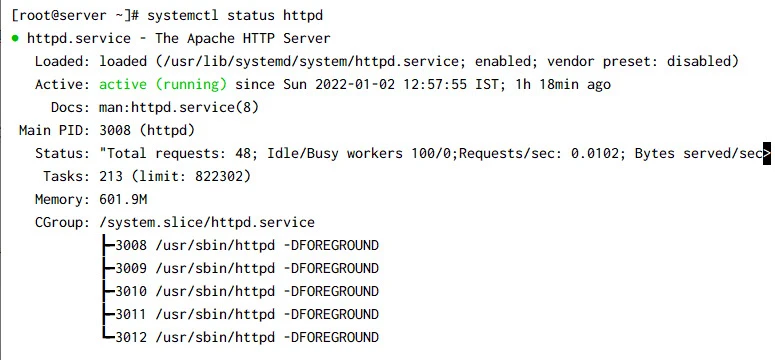
Make sure the service has started successfully:
~]# systemctl status httpd
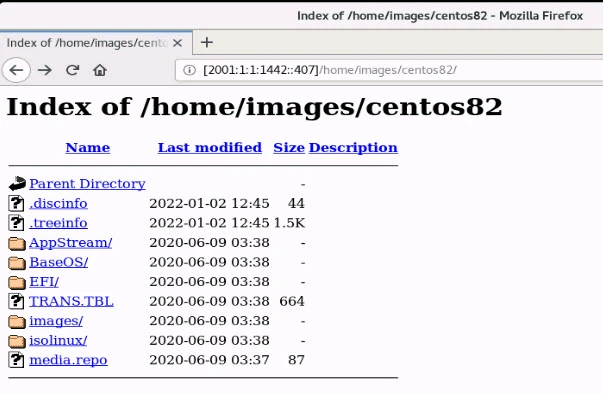
Next try to access the image repository path over the web server:
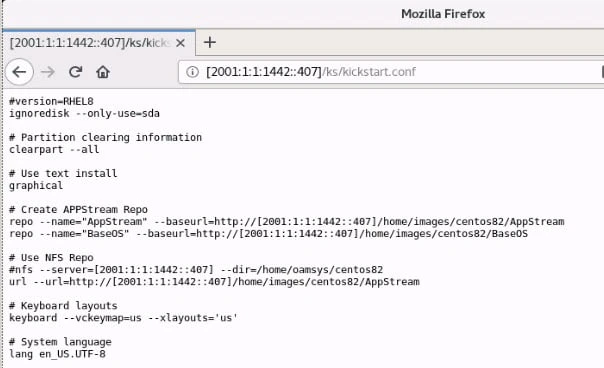
Similarly try to access the kickstart config file on the web browser:
For any issues you can check the log file which you have added in your virtual hosting configuration file:
[root@server ~]# ls -l /etc/httpd/logs/*
-rw-r--r--. 1 root root     0 Jan  2 12:32 /etc/httpd/logs/access_log
-rw-r--r--. 1 root root  6638 Jan  2 12:57 /etc/httpd/logs/error_log
-rw-r--r--. 1 root root 12646 Jan  2 14:19 /etc/httpd/logs/ks-server.example.com-access_log
-rw-r--r--. 1 root root  6750 Jan  2 12:45 /etc/httpd/logs/ks-server.example.com-error_log
Step-7: Update kickstart configuration file
Now we had taken kicksrart template from anaconda which was created for an installation performed using CDROM in my case, so I have to do some changes to use HTTP server for the installation instead of CDROM
So replace cdrom with the following entry
url --url=http://[2001:1:1:1442::407]/home/images/centos82/AppStream
Update the AppStream repo url, as with CDROM by
defaultfile://handler is used but since we place to use HTTP so we
will have to use following path, additionally also mention the path of
BaseOS repository.
# Create APPStream Repo
repo --name="AppStream" --baseurl=http://[2001:1:1:1442::407]/home/images/centos82/AppStream
repo --name="BaseOS" --baseurl=http://[2001:1:1:1442::407]/home/images/centos82/BaseOS
Now you can choose to modify other configurations as well, let me add a static IPv6 address for my interface:
# Network information
network  --bootproto=dhcp --device=eno49 --noipv4 --ipv6=2001:1:1:1442::409/122 --activate --ipv6gateway=2001:1:1:1442::43f
network  --hostname=myhost.example.com
You can
usepython -c 'import crypt,getpass;pw=getpass.getpass();print(crypt.crypt(pw) if (pw==getpass.getpass("Confirm: ")) else exit())'command
to generate an encrypted password which can be used in the kickstart
file for any user.
rootpw --iscrypted $6$w7El/FYx9mbTG6x9$Te.Yg6dq0TsQwGpdSjeDGSw4J9ZBAkLXzT9ODMV7I7lHvX3n5.9PCS4jIkS2GbVLZOpVRLvrua3wwbwA.cfWX.
Here is my sample kickstart configuration file:
#version=RHEL8
ignoredisk --only-use=sda,sdb
autopart --type=lvm

# Partition clearing information
clearpart --all --initlabel --drives=sda,sdb

# Use graphical install
graphical

# Use CDROM installation media
url --url=http://[2001:1:1:1442::407]/home/images/centos82/AppStream

# Keyboard layouts
keyboard --vckeymap=us --xlayouts='us'

# System language
lang en_US.UTF-8

# Create APPStream Repo
repo --name="AppStream" --baseurl=http://[2001:1:1:1442::407]/home/images/centos82/AppStream
repo --name="BaseOS" --baseurl=http://[2001:1:1:1442::407]/home/images/centos82/BaseOS

# Network information
network --bootproto=dhcp --device=eno49 --noipv4 --ipv6=2001:1:1:1442::409/122 --activate --ipv6gateway=2001:1:1:1442::43f
network  --bootproto=dhcp --device=eno50 --onboot=off --ipv6=auto
network  --bootproto=dhcp --device=eno51 --onboot=off --ipv6=auto
network  --bootproto=dhcp --device=eno52 --onboot=off --ipv6=auto
network  --bootproto=dhcp --device=eno53 --onboot=off --ipv6=auto
network  --bootproto=dhcp --device=eno54 --onboot=off --ipv6=auto
network  --bootproto=dhcp --device=eno55 --onboot=off --ipv6=auto
network  --bootproto=dhcp --device=eno56 --onboot=off --ipv6=auto
network  --hostname=myhost.example.com

# Root password
rootpw --iscrypted $6$E1ogwDVio48x2y7K$ZX1EPw78y8gc7BXqcvpSAx16DzHmvA8cnNULjPBRq8zd/aj7FmfgXS1u/0Z5/Zp76nHO9InF4G.DXUYwc9AKd0

# X Window System configuration information
xconfig  --startxonboot

# Run the Setup Agent on first boot
firstboot --enable

# System services
services --disabled="chronyd"

# Reboot after installation
reboot
# System timezone
timezone Asia/Kolkata --isUtc --nontp

user --groups=wheel --name=deepak --password=$6$aJ53Yzqx8A1gBbfE$TgZ3dkZXi7nmCBCdhSbDxdP4aXxlpV0XsuMdQ7M0LR6TdwiXfYAXLDLdACqluWsWjWPrKGIqOnqPrQxoxYzGk. --iscrypted --gecos="deepak"

%packages
@^graphical-server-environment
kexec-tools

%end

%addon com_redhat_kdump --enable --reserve-mb='auto'

%end

%anaconda
pwpolicy root --minlen=6 --minquality=1 --notstrict --nochanges --notempty
pwpolicy user --minlen=6 --minquality=1 --notstrict --nochanges --emptyok
pwpolicy luks --minlen=6 --minquality=1 --notstrict --nochanges --notempty
%end
Step-8: Configure grub.cfg (Dracut Kernel Menu)
For UEFI PXE Boot we need agrub.cfgfile with the details of PXE boot
files required for installation over network. Following is the content
from mygrub.cfgfile:
 ~]# cat /var/lib/tftpboot/pxelinux/grub.cfg
set timeout=30
menuentry 'Install CentOS 8' {
    linuxefi pxelinux/vmlinuz inst.ks=http://[2001:1:1:1442::407]/ks/kickstart.conf inst.stage2=http://[2001:1:1:1442::407]/home/images/centos82/ ip=[2001:1:1:1442::409]::[2001:1:1:1442::43F]:122::eno49:none
    initrdefi pxelinux/initrd.img
}
Here we have created a single menu entry with the location of our
kickstart configuration file. Theinst.stage2=boot option specifies
the location of the installation program’s runtime image. This option
expects the path to a directory that contains a valid.treeinfofile
and reads the runtime image location from the.treeinfofile.
Additionally I am assigning a static IP Address to my client because by default DHCPv6 will assign /128 subnet to all the clients. This has been discussed at multiple forums and looks like something which needs to be fixed at the router side.
The syntax to assign static IP address via dracut command line is as below:
ip=<client-IP-number>:[<server-id>]:<gateway-IP-number>:<netmask>:<client-hostname>:<interface>:{dhcp|dhcp6|auto6|on|any|none|off}
In our case, 2001:1:1:1442::409 will be the client's IP Address with
122 subnet and gateway 2001:1:1:1442::43F assigned to eno49
interface.
Alternatively, if you have MAC address of your client, then you can create different grub.cfg file for individual MAC address and assign static IP Address but again this is something which I have not tested with IPv6 and UEFI yet, I have previously explained this with IPv4 and Legacy BIOS. You can give it a try and share your experience.
Step-9: Configure Firewall
We have three services which must be allowed in the firewall i.e. DHCP,
TFTP and HTTP. Since we are using firewalld, we will use firewall-cmd
to enable these service/ports:
~]# firewall-cmd --add-service=http --add-service=tftp --add-service=dhcpv6 --permanent
~]# firewall-cmd --reload
success
Verify the rules are added properly
~]# firewall-cmd --list-service
cockpit dhcpv6 dhcpv6-client http ssh tftp
Step-10: Configure SELinux
I have kept my SELinux into Permissive mode for the sake of this tutorial.
~]# getenforce
Permissive
You can also set it to permissive mode using following command
~]# setenforce 0
or you may also choose tocompletely disable it.
Step-11: Verify TFTP Access
It is a good practice to verify if your TFTP server is working properly and if you are able to access the files via tftp client. As if there is any problem then during PXE boot, it would be very hard to troubleshoot as there won't be much logs to debug such issues.
I will use the same server to verify this, you may choose a different client node as well. Go ahead and nstall tftp package:
~]# dnf -y install tftp
Next navigate into temporary folder,connect to your TFTP server using the IPv6 address as you have provided in grub.cfg file and attempt to download any file:
[root@server ~]# cd /tmp/
[root@server tmp]# tftp [2001:0001:0001:1442::0407]
tftp> get pxelinux/grub.cfg
tftp> quit

[root@server tmp]# ls -l grub.cfg
-rw-r--r--. 1 root root 291 Jan  2 15:15 grub.cfg
As you can see, I was successfully able to download grub.cfg file. If
you want, you can repeat the same for other files which are served over
TFTP or just make sure, all of them have world readable permission
Step-12: Perform IPv6 UEFI PXE Boot
Now we are all setup to perform IPv6 UEFI PXE Boot of our target client blades to install them over the network.
Boot your client node and perform a network based installation. Now the shortcut button to boot over network may vary for different hardware but on most cases we are expected to press F12 to boot from network:
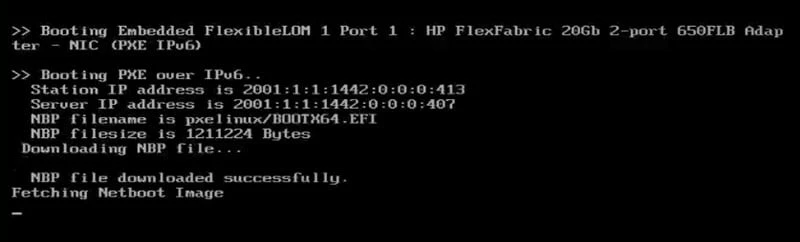
If your UEFI PXE Boot Server configuration is proper, then the TFTP files should get successfully downloaded as shown below
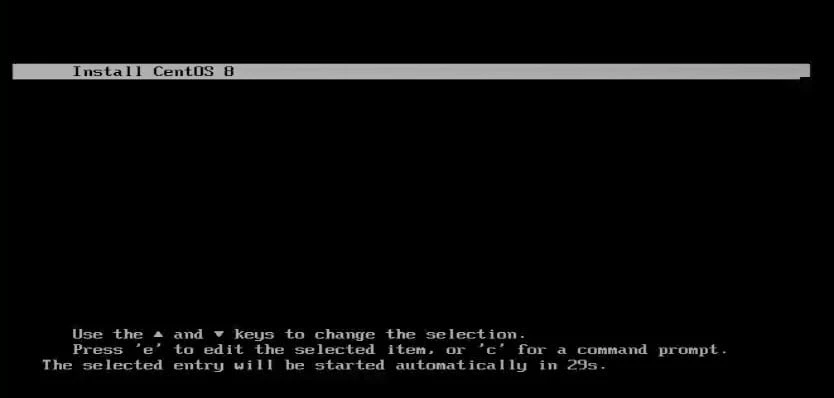
Next we should be able to see our boot menu as per grub.cfg
configuration. Hit Enter or the default option would be selected
after the provided timeout value:
You can also check the server logs using journalctl -f:
Jan 02 14:53:18 server.example.com dhcpd[6050]: Solicit message from fe80::217:a4ff:fe77:32 port 546, transaction ID 0x5740AE00
Jan 02 14:53:18 server.example.com dhcpd[6050]: Picking pool address 2001:1:1:1442::410
Jan 02 14:53:18 server.example.com dhcpd[6050]: Advertise NA: address 2001:1:1:1442::410 to client with duid 00:04:00:00:00:00:00:00:00:00:00:00:00:00:00:00:00:00 iaid = -559186 valid for 2592000 seconds
Jan 02 14:53:18 server.example.com dhcpd[6050]: Sending Advertise to fe80::217:a4ff:fe77:32 port 546
Jan 02 14:53:22 server.example.com dhcpd[6050]: Request message from fe80::217:a4ff:fe77:32 port 546, transaction ID 0x5740AF00
Jan 02 14:53:22 server.example.com dhcpd[6050]: Reply NA: address 2001:1:1:1442::410 to client with duid 00:04:00:00:00:00:00:00:00:00:00:00:00:00:00:00:00:00 iaid = -559186 valid for 2592000 seconds
Jan 02 14:53:22 server.example.com dhcpd[6050]: Sending Reply to fe80::217:a4ff:fe77:32 port 546
Jan 02 14:53:33 server.example.com in.tftpd[6520]: tftp: client does not accept options
Jan 02 14:53:34 server.example.com in.tftpd[6521]: Client 2001:1:1:1442::410 finished pxelinux/BOOTX64.EFI
Jan 02 14:53:34 server.example.com in.tftpd[6522]: Client 2001:1:1:1442::410 finished /pxelinux/grubx64.efi
Jan 02 14:53:34 server.example.com dhcpd[6050]: Release message from fe80::217:a4ff:fe77:32 port 546, transaction ID 0x5740B000
Jan 02 14:53:34 server.example.com dhcpd[6050]: Client 00:04:00:00:00:00:00:00:00:00:00:00:00:00:00:00:00:00 releases address 2001:1:1:1442::410
Jan 02 14:53:34 server.example.com dhcpd[6050]: Sending Reply to fe80::217:a4ff:fe77:32 port 546
Jan 02 14:53:35 server.example.com in.tftpd[6525]: Client 2001:1:1:1442::410 finished /pxelinux/grub.cfg
Jan 02 14:53:35 server.example.com in.tftpd[6530]: Client 2001:1:1:1442::410 finished /pxelinux/grub.cfg
Jan 02 14:53:42 server.example.com in.tftpd[6531]: Client 2001:1:1:1442::410 finished pxelinux/vmlinuz
Jan 02 14:53:48 server.example.com in.tftpd[6532]: Client 2001:1:1:1442::410 finished pxelinux/initrd.img
Next if everything is good, then your installation should start, so looks like all the boxes are checked successfully and now the installation should start, you can go prepare your coffee.

Sit back and relax..
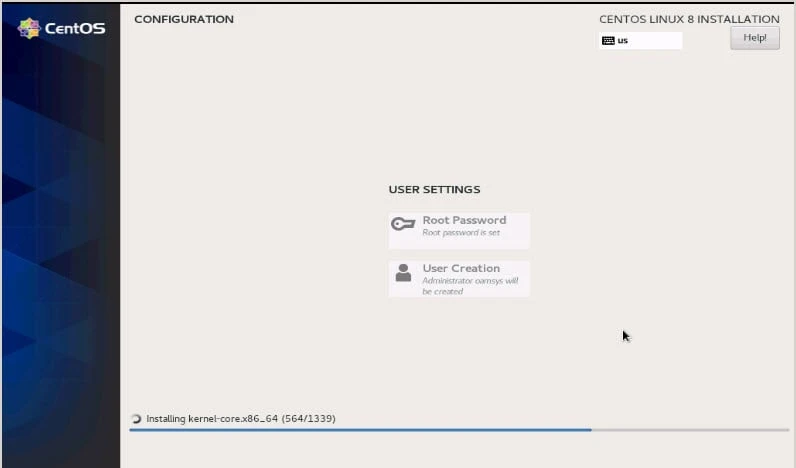
So our client is successfully installed using IPv6 UEFI PXE Boot:
Summary
In this tutorial I shared step by step instructions to configure IPv6 UEFI PXE Boot server using DHCPv6. There were some hicups during the testing phase, mostly related to DHCPv6 as the configuration is quiet different for dpcpd6 compared to dhcpd when it comes to the usage for network installation. But the one thing which still remains open is the handling of /128 subnet which is assigned by DHCPv6 to all the clients. Due to which the connection over network doesn't happen because we may not be always using /128 subnet as in my case I was using /122 subnet.
I hope someone can come up with a solution or I will try to come up with one in future when we go for production with such environment. For now, let's settle with assigning static IP address and go ahead.