Kubernet autoscaling is used to scale the number of pods in a Kubernetes resource such as deployment, replica set etc. In this article, we will learn how to create a Horizontal Pod Autoscaler (HPA) to automate the process of scaling the application. We will also test the HPA with a load generator to simulate a scenario of increased traffic hitting our services.
I will use my existing multi-node Kubernetes Cluster which I had brought up using oracle VirtualBox with Calico CNI.
Overview on Horizontal Pod Autoscaler
An HPA object watches the resource consumption of pods that are managed by a controller (Deployment, ReplicaSet, or StatefulSet) at a given interval and controls the replicas by comparing the desired target of certain metrics with their real usage.
For instance, suppose that we have a Deployment controller with two pods initially, and they are currently using 1,000 m of CPU on average while we want the CPU percentage to be 200 m per pod. The associated HPA would calculate how many pods are needed for the desired target with 2*(1000 m/200 m) = 10, so it will adjust the replicas of the controller to 10 pods accordingly. Kubernetes will take care of the rest to schedule the eight new pods.
How Horizontal Pod Autoscaler works?
An illustration of the process is as follows:
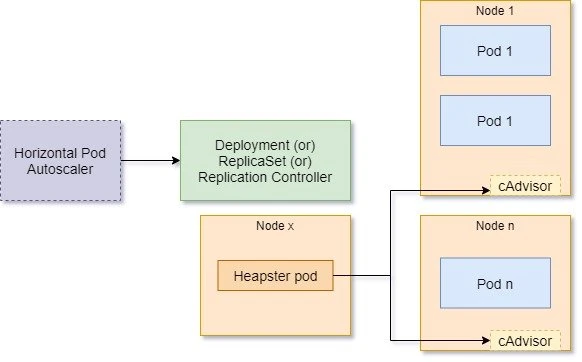
- cAdvisor acts as a container resource utilization monitoring service, which is running inside kubelet on each node.
- The CPU utilizations we just monitored are collected by cAdvisor and aggregated by Heapster.
- Heapster is a service running in the cluster that monitors and aggregates the metrics.
- It queries the metrics from each cAdvisor.
- When HPA is deployed, the controller will keep observing the metrics which are reported by Heapster, and scale up and down accordingly.
- Based on the specified metrics,HPAdetermines whether scaling is required
Install and configure Kubernetes Metrics Server
It is mandatory that you have a metrics server installed and running on your Kubernetes Cluster. The metrics server will proved the metrics through the Metrics API. Horizontal Pod Autoscaler uses this API to collect metrics.
You can also use a custom metrics server such as Prometheus, Grafana etc, but in such case your cluster must be able to communicate with the API server providing the custom Metrics API.
Enable firewall
The metrics server use port 4443 to communicate with the API server.
So this port must be enabled on all the nodes of the cluster to be able
to communicate with the API server
Open the listener port with firewall-cmd --add-port and reload; the firewalld shows --permanent pairs and zone selection.
 ~]# firewall-cmd --add-port=4443/tcp --permanent
success

 ~]# firewall-cmd --reload
success
Deploy metrics-server
You can check the list of releases available with Metrics Server. Download the latest available manifest file required to deploy metrics-server:
[root@controller ~]# wget https://github.com/kubernetes-sigs/metrics-server/releases/latest/download/components.yaml
This will download the components.yaml file to your current working
directory. We will add some more configuration to this components.yaml
file, look out for the following section and add the new entries as
highlighted:
...
  template:
    metadata:
      labels:
        k8s-app: metrics-server
    spec:
      hostNetwork: true   ## add this line
      containers:
      - args:
        - --cert-dir=/tmp
        - --secure-port=4443
        - --kubelet-insecure-tls   ## add this line
        - --kubelet-preferred-address-types=InternalIP,ExternalIP,Hostname
        - --kubelet-use-node-status-port
        image: k8s.gcr.io/metrics-server/metrics-server:v0.4.2
...
Here,
--kubelet-preferred-address-types - The priority of node address types used when determining an address for connecting to a particular node
--kubelet-insecure-tls            - Do not verify the CA of serving certificates presented by Kubelets.
hostNetwork                       - Enable hostNetwork mode
Next we will deploy this manifest using kubectl apply command:
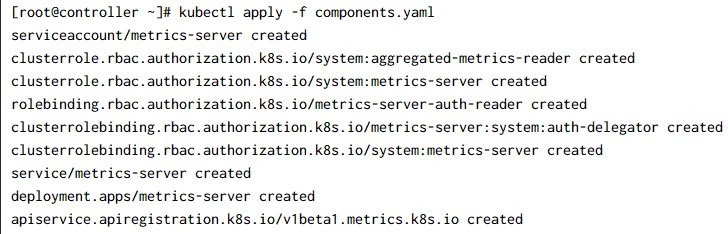
kubectl edit deployment metrics-server -n kube-system command
We now have a deployment under kube-system namespace:
[root@controller ~]# kubectl get deployment -n kube-system
NAME                      READY   UP-TO-DATE   AVAILABLE   AGE
calico-kube-controllers   1/1     1            1           2d2h
coredns                   2/2     2            2           2d2h
metrics-server            1/1     1            1           106m
Verify the connectivity status
You can examine the status of the v1beta1.metrics.k8s.io APIService
using following command (as highlighted):
[root@controller ~]# kubectl get apiservice v1beta1.metrics.k8s.io -o yaml
apiVersion: apiregistration.k8s.io/v1
kind: APIService
metadata:
  annotations:
    kubectl.kubernetes.io/last-applied-configuration: |
      {"apiVersion":"apiregistration.k8s.io/v1","kind":"APIService","metadata":{"annotations":{},"labels":{"k8s-app":"metrics-server"},"name":"v1beta1.metrics.k8s.io"},"spec":{"group":"metrics.k8s.io","groupPriorityMinimum":100,"insecureSkipTLSVerify":true,"service":{"name":"metrics-server","namespace":"kube-system"},"version":"v1beta1","versionPriority":100}}
  creationTimestamp: "2021-03-29T08:19:23Z"
  labels:
    k8s-app: metrics-server
  name: v1beta1.metrics.k8s.io
  resourceVersion: "110350"
  selfLink: /apis/apiregistration.k8s.io/v1/apiservices/v1beta1.metrics.k8s.io
  uid: 82d83f5e-24f4-406e-9c99-26f2f6a0f519
spec:
  group: metrics.k8s.io
  groupPriorityMinimum: 100
  insecureSkipTLSVerify: true
  service:
    name: metrics-server
    namespace: kube-system
    port: 443
  version: v1beta1
  versionPriority: 100
status:
  conditions:
  - lastTransitionTime: "2021-03-29T08:41:57Z"
    message: all checks passed
    reason: Passed
    status: "True"
    type: Available
You should now be able to get the CPU and Memory consumption of each of the nodes in the Cluster:
[root@controller ~]# kubectl top nodes
NAME                     CPU(cores)   CPU%   MEMORY(bytes)   MEMORY%
controller.example.com   96m          9%     1339Mi          36%
worker-1.example.com     74m          7%     873Mi           23%
worker-2.example.com     51m          5%     1000Mi          27%
Example-1: Autoscaling applications using HPA for CPU Usage
Now that our metrics-server is configured and running properly, we will create Horizontal Pod Autoscaler (HPA) to automate the process of scaling the application running on a deployment. So first let us create one deployment:
Create deployment
I will use the following YAML file to create a deployment with single replica and using nginx image. It is important that you also define a CPU or Memory resource limit in the deployment.
[root@controller ~]# cat nginx-deploy.yaml
apiVersion: apps/v1
kind: Deployment
metadata:
  labels:
    type: dev
  name: nginx-deploy
spec:
  replicas: 1
  selector:
    matchLabels:
      type: dev
  template:
    metadata:
      labels:
        type: dev
    spec:
      containers:
      - image: nginx
        name: nginx
        ports:
        - containerPort: 80
        resources:
          limits:
            cpu: 500m
          requests:
            cpu: 200m
Use kubectl command to create this deployment:
[root@controller ~]# kubectl create -f nginx-deploy.yaml
deployment.apps/nginx-deploy created
List the available deployment:
[root@controller ~]# kubectl get deployment
NAME           READY   UP-TO-DATE   AVAILABLE   AGE
nginx-deploy   1/1     1            1           25m
Create Horizontal Pod Autoscaler
Create a HorizontalPodAutoscaler resource for this Deployment that
will be able to auto-scale the Deployment from one to five replicas,
with a CPU utilization of 10%, in imperative form:
[root@controller ~]# kubectl autoscale deployment nginx-deploy --cpu-percent=10 --min=1 --max=5
horizontalpodautoscaler.autoscaling/nginx-deploy autoscaled
Alternatively we could have also used following YAMLfile to create this HPA resource:
apiVersion: autoscaling/v1
kind: HorizontalPodAutoscaler
metadata:
  name: nginx-deploy
spec:
  minReplicas: 1
  maxReplicas: 5
  scaleTargetRef:
    apiVersion: apps/v1
    kind: Deployment
    name: nginx-deploy ## Name of the deployment
  targetCPUUtilizationPercentage: 10
Check horizontal pod autoscaler (HPA) status:
[root@controller ~]# kubectl get hpa
NAME           REFERENCE                 TARGETS         MINPODS   MAXPODS   REPLICAS   AGE
nginx-deploy   Deployment/nginx-deploy   <unknown>/10%   1         5         0          8s
We find the target shows as unknown and replicas are 0. Why is this? the
runs as a control loop, at a default interval of 30 seconds. There might
be a delay before it reflects the real metrics. The default sync period
of an HPA can be altered by changing the following parameter in control
manager: --horizontal-pod-autoscaler-sync-period
After waiting a couple of seconds, we will find the current metrics are
there now. The number showed in the target column presents (current /
target). It means the load is currently 0%, and scale target is 10%:
[root@controller ~]# kubectl get hpa
NAME           REFERENCE                 TARGETS   MINPODS   MAXPODS   REPLICAS   AGE
nginx-deploy   Deployment/nginx-deploy   0%/10%    1         5         1          2m11s
Currently we have a single replica of the nginx pod as the CPU usage
is almost 0%:
[root@controller ~]# kubectl get pods
NAME                            READY   STATUS    RESTARTS   AGE
nginx-deploy-7979f78fb5-2qhtc   1/1     Running   0          2m45s
Verify kubernetes autoscaling UP and DOWN
We will manually induce some stress to the pod to increase the CPU
utilization. We will connect to the pod and use dd command to increase
the CPU load:
root@nginx-deploy-7979f78fb5-2qhtc:/# dd if=/dev/zero of=/dev/null

^C21529234+0 records in
21529234+0 records out
11022967808 bytes (11 GB, 10 GiB) copied, 47.9597 s, 230 MB/s
As expected, this has increased the CPU load on our deployment:
[root@controller ~]# kubectl get hpa
NAME           REFERENCE                 TARGETS    MINPODS   MAXPODS   REPLICAS   AGE
nginx-deploy   Deployment/nginx-deploy   250%/10%   1         5         4          9m57s
As a result of this, HPA has automatically created 4 more pods because our max-limit was 5:
[root@controller ~]# kubectl get pods
NAME                            READY   STATUS              RESTARTS   AGE
nginx-deploy-7979f78fb5-2qhtc   1/1     Running             0          11m
nginx-deploy-7979f78fb5-49v9f   1/1     Running             0          8s
nginx-deploy-7979f78fb5-7hdpt   0/1     ContainerCreating   0          8s
nginx-deploy-7979f78fb5-bpcq5   0/1     ContainerCreating   0          8s
nginx-deploy-7979f78fb5-qw7qb   0/1     ContainerCreating   0          8s
Now we exit the dd command so the CPU usage should come down:
[root@controller ~]# kubectl get hpa
NAME           REFERENCE                 TARGETS   MINPODS   MAXPODS   REPLICAS   AGE
nginx-deploy   Deployment/nginx-deploy   0%/10%    1         5         5          10m
Now you can see that the number of replicas will be set to 1 again 5 minutes after the CPU utilization is low:
[root@controller ~]# kubectl get pods
NAME                            READY   STATUS        RESTARTS   AGE
nginx-deploy-7979f78fb5-49v9f   1/1     Running       0          5m51s
nginx-deploy-7979f78fb5-7hdpt   0/1     Terminating   0          5m51s
nginx-deploy-7979f78fb5-qw7qb   0/1     Terminating   0          5m34s
nginx-deploy-7979f78fb5-bpcq5   0/1     Terminating   0          5m49s
You can also use kubectl describe to check the Events:
[root@controller ~]# kubectl describe hpa nginx-deploy
...
Deployment pods:                                       1 current / 1 desired
Conditions:
  Type            Status  Reason            Message
  ----            ------  ------            -------
  AbleToScale     True    ReadyForNewScale  recommended size matches current size
  ScalingActive   True    ValidMetricFound  the HPA was able to successfully calculate a replica count from cpu resource utilization (percentage of request)
  ScalingLimited  True    TooFewReplicas    the desired replica count is less than the minimum replica count
Events:
  Type    Reason             Age   From                       Message
  ----    ------             ----  ----                       -------
  Normal  SuccessfulRescale  31m   horizontal-pod-autoscaler  New size: 4; reason: cpu resource utilization (percentage of request) above target
  Normal  SuccessfulRescale  31m   horizontal-pod-autoscaler  New size: 5; reason: cpu resource utilization (percentage of request) above target
  Normal  SuccessfulRescale  25m   horizontal-pod-autoscaler  New size: 1; reason: All metrics below target
Example-2: Autoscaling applications using HPA for Memory Usage
In this example we will create a new HPA to perform autoscaling based on Memory utilisation.
Create deployment
We will use our existing deployment i.e. "nginx-deploy" and modify the
CPU limit to Memory limit.
[root@controller ~]# kubectl edit deployment nginx-deploy
...
      containers:
      - image: nginx
        imagePullPolicy: Always
        name: nginx
        ports:
        - containerPort: 80
          protocol: TCP
        resources:
          limits:
            memory: 524Mi  # Maximum amount of RAM in a container
          requests:
            memory: 256Mi  # Minimum amount of RAM available in a Pod
...
Once you save this, the existing replica will be terminated and a new pod will be created with the new spec.
[root@controller ~]# kubectl edit deployment nginx-deploy
deployment.apps/nginx-deploy edited

[root@controller ~]# kubectl get pods
NAME                            READY   STATUS              RESTARTS   AGE
nginx-deploy-7979f78fb5-49v9f   1/1     Running             0          45m
nginx-deploy-ffd7f4f57-6jnd2    0/1     ContainerCreating   0          5s
Create Horizontal Pod Autoscaler
Unlike autoscaling based on CPU utilization, memory-based autoscaling can only be enabled by creating a HorizontalPodAutoscaler from a raw YAML/JSON definition.
We will use this following manifest file to create a new HPA which will
use memory resource usage for autoscaling. The threshold for the target
average utilization is 30%, if the memory utilisation goes beyond 30%
then we will allow a maximum of 5 replicas for our nginx-deploy
deployment. The autoscaling.v1 spec doesn't support "metrics" so we
will be using autoscaling/v2beta1 for the HorizontalPodAutoscaler
[root@controller ~]# cat hpa-memory.yaml
apiVersion: autoscaling/v2beta1
kind: HorizontalPodAutoscaler
metadata:
  name: nginx-memory
spec:
  maxReplicas: 5
  minReplicas: 1
  scaleTargetRef:
    apiVersion: apps/v1
    kind: Deployment
    name: nginx-deploy
  metrics:
  - type: Resource
    resource:
      name: memory
      targetAverageUtilization: 30
Use kubectl command to create this HPA:
[root@controller ~]# kubectl create -f hpa-memory.yaml
horizontalpodautoscaler.autoscaling/nginx-memory created
List the available HPA resources:
[root@controller ~]# kubectl get hpa
NAME           REFERENCE                 TARGETS   MINPODS   MAXPODS   REPLICAS   AGE
nginx-deploy   Deployment/nginx-deploy   0%/10%    1         5         1          69m
nginx-memory   Deployment/nginx-deploy   0%/30%    1         5         1          17s
Verify kubernetes autoscaling UP and DOWN
We will manually stress some memory load in our pod to increase the memory usage:
root@nginx-deploy-ffd7f4f57-6jnd2:/# cat <(yes | tr \\n x | head -c $((1024*1024*100))) <(sleep 120) | grep n
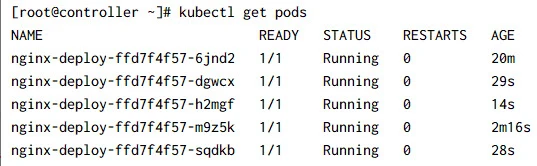
With this we see the memory usage increasing gradually, I have added a
watch using -w command to monitor any changes in the utilization. As
you can see based on the amount of memory increase, more number of
replicas are deployed.
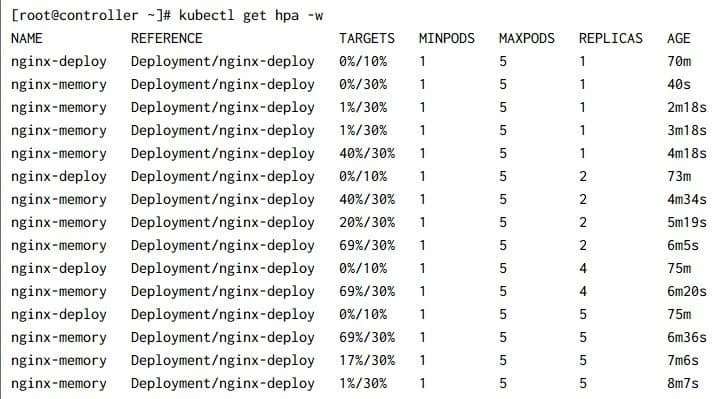
Check the status of the pods:
Once the memory utilization is below the threshold value, after 5 minutes the additional replicas would be terminated:
[root@controller ~]# kubectl get hpa
NAME           REFERENCE                 TARGETS   MINPODS   MAXPODS   REPLICAS   AGE
nginx-deploy   Deployment/nginx-deploy   0%/10%    1         5         1          94m
nginx-memory   Deployment/nginx-deploy   1%/30%    1         5         1          25m
Summary
In this tutorial we learned about kubernetes horizontal pod autoscaler. We executed different example to see how auto scaling working in Kubernetes for CPU and Memory usage. Autoscaling can be used to scale UP and DOWN the number of replicas based on the usage. It is not advisable to activate CPU- and RAM-based autoscalers at the same time as they may conflict with each other. Determine what resources your application relies on most of the time and use the appropriate autoscaling.
References
Related Searches: kubernetes horizontal pod autoscaler, how auto scaling works in kubernetes, kubernetes hpa scale down, hpa metrics server, horizontal pod autoscaler custom metrics, kubernetes pod autoscaling custom metrics, horizontal pod autoscaler, kubernetes autoscaling, kubernetes hpa yaml example, kubernetes horizontal pod autoscaling example
