In this tutorial we will learn how to set environment variables for a container using Kubernetes ConfigMaps.
Why do we need Kubernetes ConfigMap?
It is a good practice to make container images as reusable as possible. The same image should be able to be used for development, staging, and production. But it is possible these images are dependent on certain environment variables for example, the database URL to connect to so testing and versioning get riskier and more complicated if images need to be recreated for each new environment.
To overcome this problem, we can write our applications in such a way that the environment-specific data is provided to the application by the environment it is being deployed into. There are multiple ways to provide environment-specific configuration data to our application:
- Provide command-line arguments to the Pods.
- Provide environment variables to the Pods.
- Mount configuration files in the containers.
Overview on Kubernetes ConfigMaps
- A ConfigMap allows us to define application-related data.
- It decouples the application data from the application so that the same application can be ported across different environments.
- It also provides a way to inject customized data into running services from the same container image.
- The key thing is that the ConfigMap is combined with the Pod right before it is run. This means that the container image and the Pod definition itself can be reused across many apps by just changing the ConfigMap that is used.
How to create ConfigMap
ConfigMaps can be created through a literal value or from a file or all the files in a directory, we will explore both these options in this tutorial. The command syntax to create a ConfigMap has the following format:
kubectl create configmap <map-name> <data-source>
Here, <map-name> is the name you want to assign to the ConfigMap and
<data-source> is the directory, file, or literal value to draw the
data from. The <data source> corresponds to a key-value pair in the
ConfigMap, where:
- Key is the filename or the key you provided on the command line
- Value is the file content or the literal value you provided on the command line
When creating ConfigMaps, you can use a combination of all the options mentioned here:
$ kubectl create configmap my-config
➥   --from-file=foo.json         --> A single file
➥   --from-file=bar=foobar.conf  --> A file stored under a custom key
➥   --from-file=config-opts/     --> A whole directory
➥   --from-literal=some=thing    --> A literal value
Example-1: Create ConfigMap using file
Create data for the Pod
Following is a configuration file which we want to place in our nginx container. So I have created a separate file with the content to be added:
[root@controller ~]# cat nginx-custom-config.conf
server {
   listen       8888;
   server_name  localhost;
   location / {
        root   /usr/share/nginx/html;
        index  index.html index.htm;
   }
}
Create ConfigMap
Next we will create our ConfigMap. Here cm is a short abbrevation for
configmap.
[root@controller ~]# kubectl create cm nginx-cm --from-file nginx-custom-config.conf
configmap/nginx-cm created
Inspect ConfigMap content
So, our ConfigMap is successfully created, lets check the status:
[root@controller ~]# kubectl get cm
NAME       DATA   AGE
nginx-cm   1      6s
Let's see what the Kubernetes ConfigMap object looks like. Enter the
kubectl get command as follows:

As you can see in the third line of the preceding output, the
ConfigMap is created and the literal value we entered is available as
a key-value pair in the data section of the ConfigMap. Here, the
name of the file, nginx-custom-config.conf, becomes the key under
the data section, and the entire file payload is the value of the
key.
Create Pod using the ConfigMap
Now that we have defined our ConfigMap, the next step is to mount it
onto a container. Create a YAML file named nginx-cm.yml to be used as
our Pod configuration using the following content:
[root@controller ~]# cat nginx-cm.yml
apiVersion: v1
kind: Pod
metadata:
  name: nginx-cm
  labels:
    role: web
spec:
  containers:
  - name: nginx-cm
    image: nginx
    volumeMounts:
    - name: conf
      mountPath: /etc/nginx/conf.d
  volumes:
  - name: conf
    configMap:
      name: nginx-cm
      items:
      - key: nginx-custom-config.conf
        path: default.conf
First, let's focus on the volumes section in the preceding file. In
this section, we are instructing Kubernetes to define a volume from our
ConfigMap named conf. Here we want to include the key
nginx-custom-config.conf and the entry's value should be stored at
default.conf
Secondly, in the volumeMounts section, we are defining that Kubernetes
should mount the volume in the /etc/nginx/conf.d directory. So the
value from the key would be stored under
/etc/nginx/conf.d/default.conf
volume and volumeMounts sections has to be
the same so that Kubernetes can identify which volume is associated with
which volumeMounts.
Use the following command to start a Pod using the YAML file we just created:
[root@controller ~]# kubectl create -f nginx-cm.yml
pod/nginx-cm created
Verify ConfigMap data inside Pod's container
Next let's connect to this Pod and verify if our content was added into
/etc/nginx/conf.d/default.conf:
[root@controller ~]# kubectl exec -it nginx-cm -- cat /etc/nginx/conf.d/default.conf
server {
   listen       8888;
   server_name  localhost;
   location / {
        root   /usr/share/nginx/html;
        index  index.html index.htm;
   }
}
So we have just successfully defined a ConfigMap and mounted it as a file in a Pod that printed the name of the file.
Example-2: Create Kubernetes ConfigMap using command line arguments
Assign variable as command line argument
In this section we will assign single environment variables using
ConfigMap by providing the key value pair as command line arguments
instead of a file. Here color is the KEY while red is the VALUE of
the KEY.
[root@controller ~]# kubectl create cm myconfig --from-literal=color=red
configmap/myconfig created
Inspect the ConfigMap
Once we create the ConfigMap, let's confirm that it is created by issuing a command to get all the ConfigMaps in the default namespace:
[root@controller ~]# kubectl get cm
NAME       DATA   AGE
myconfig   1      9s
nginx-cm   1      66m
Let's see what the Kubernetes ConfigMap object looks like. Enter the
kubectl get command as follows:

As you can see in the highlighted section of the preceding output, the ConfigMap is created and the literal value we entered is available as a key-value pair in the data section of the ConfigMap.
Create Pod using ConfigMap
Now, we will create a YAML file named test-cm-pod.yml to create a Pod into which we will inject fields from our ConfigMap as an environment variable. Using your favorite text editor, create a YAML file with the following content:
[root@controller ~]# cat test-cm-pod.yml
apiVersion: v1
kind: Pod
metadata:
  name: test-pod
spec:
  containers:
  - name: test
    image: nginx
    env:
    - name: COLOR   ## Define the name of the variable
      valueFrom:
        configMapKeyRef:
          name: myconfig    ## Search for "myconfig" configmap which must be installed before creating this Pod
          key: color   ## The value of COLOR variable will be the value of "color" key in "myconfig" configmap i.e. "red"
  restartPolicy: Never
Here,
- We are setting the environment variable called
COLOR. - Instead of setting a fixed value, we are initializing it from a ConfigMap key.
- The name of the ConfigMap you’re referencing is
myconfig - We are setting the variable to whatever is stored under this key of
colorin the ConfigMap.
Verify environment variable inside the container
Once the Pod is up and running, we can connect to the Pod's container and make sure that our variable is SET:
[root@controller ~]# kubectl exec -it test-pod -- env | grep COLOR
COLOR=red
So we have just successfully defined an environment variable for the Pod using command line arguments with ConfigMap.
Example-3: Use Kubernetes ConfigMap to declare environment variables
We have performed the same exercise in the previous example but there we
used input command line argument to declare the variable color=red.
But if you have to define multiple variables then a YAML file solution
would be more cleaner and efficient method.
In this example we will define multiple environment variables in our Pod using Kubernetes ConfigMap. To start with let us create a configmap to declare the key and value of the environment variables:
 ~]# cat configmap-1.yaml
apiVersion: v1
kind: ConfigMap
metadata:
  name: declare-colors
data:
  # property-like keys; each key maps to a simple value
  color1: "red"
  color2: "blue"
  color3: "green"
data". Here color1, color2 and color3 are just a key used to
reference the values. You will define the exact variable name inside the
Pod yaml file.
Let us create this config map:
~]# kubectl create -f configmap-1.yaml
configmap/declare-colors created
Check the status of available configmaps, as you can see our configmap
has 3 variables defined under DATA:
 ~]# kubectl get cm
NAME             DATA   AGE
declare-colors   3      7s
You can get the details of these variables using kubectl describe
command:
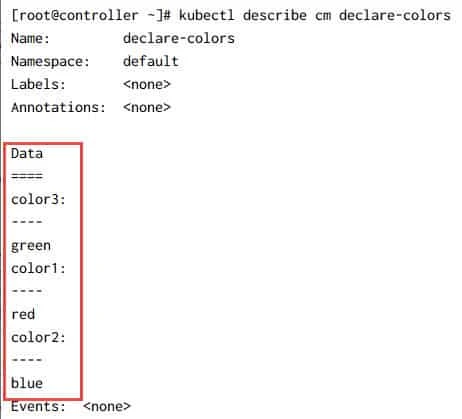
Now we will use these KEYs inside our POD definition file. Here is a sample YAML file to create nginx pod:
 ~]# cat nginx-1.yaml
apiVersion: v1
kind: Pod
metadata:
  name: nginx
spec:
  containers:
  - name: nginx
    image: nginx
    env:
    - name: VAR1  ## Define the name of the variable
      valueFrom:
        configMapKeyRef:
          name: declare-colors   ## This must match the name of the configmap
          key: color1  ## The key to fetch
    - name: VAR2  ## Define the name of the variable
      valueFrom:
        configMapKeyRef:
          name: declare-colors   ## This must match the name of the configmap
          key: color2  ## The key to fetch
    - name: VAR3  ## Define the name of the variable
      valueFrom:
        configMapKeyRef:
          name: declare-colors   ## This must match the name of the configmap
          key: color3  ## The key to fetch
    imagePullPolicy: Always
Create this Pod:
~]# kubectl create -f nginx-1.yaml
pod/nginx created
Wait till the pod is in running state:
 ~]# kubectl get pods
NAME                            READY   STATUS    RESTARTS   AGE
nginx                           1/1     Running   0          14s
Now you can verify if your environment variables are set inside the Pod container as we defined in our Pod definition file:
~]# kubectl exec -it nginx -- printenv | grep VAR
VAR1=red
VAR2=blue
VAR3=green
Example-4: Kubernetes mount ConfigMap as file
In this example we will declare environment variables but rather than
applying it to the Pod, we will store them in a separate file. This file
will basically be mounted as read-only on the define path of the Pod
container. We did something similar in Example-1 where we mounted nginx
configuration file nginx-custom-config.conf on /etc/nginx/conf.d as
default.conf. But there we had created our configmap from a file while
here we will manually create our ConfigMap with the list of variables
and filename.
Here is our YAML file to create the ConfigMap to mount variables as a
file. I have defined the name of the data file as variables.conf.
Inside this we have defined key value pairs.
➥Here I am using equal to (=) sign to map the key and value instead of semi-colon (:). This is done to directly source
variables.conf inside
the Pod and use the data as variables.➥Also here you will not have an option to provide an alternate variable name as we did earlier by using VAR1, VAR2 and VAR3 in previous example. Here the variable will be defined as
color1: red and so on where
color1 will act as the variable name.
~]# cat configmap-2.yaml
apiVersion: v1
kind: ConfigMap
metadata:
  name: declare-vars
data:
  variables.conf: |
    color1="red"
    color2="blue"
    color3="green"
Let us create this configmap:
~]# kubectl create -f configmap-2.yaml
configmap/declare-vars created
Check the status of this configmap:
~]# kubectl get cm
NAME             DATA   AGE
declare-colors   3      90m
declare-vars     1      68s
Here DATA contains single value because we are storing all the
variables inside variables.conf file.
Next we will create YAML file to create a Pod which will use this configmap. I have added enough comments to help you understand the chart:
~]# cat nginx-vars.yaml
apiVersion: v1
kind: Pod
metadata:
  name: nginx-vars
spec:
  containers:
  - name: nginx
    image: nginx
    volumeMounts:
    - name: variables
      mountPath: "/dir1"  ## This will be created if not present
  volumes:
    # You set volumes at the Pod level, then mount them into containers inside that Pod
    - name: variables  ## This must be same as name used under volumeMounts
      configMap:
        # Provide the name of the ConfigMap you want to mount.
        name: declare-vars
        # An array of keys from the ConfigMap to create as files
        items:
        - key: "variables.conf"  ## Key to fetch
          path: "default.conf"   ## Mount the file using this name.
Let us create this Pod and make sure it is in Running state:
~]# kubectl create -f nginx-vars.yaml
pod/nginx-vars created

~]# kubectl get pods
NAME                            READY   STATUS    RESTARTS   AGE
nginx                           1/1     Running   0          76m
nginx-vars                      1/1     Running   0          13s
Connect to this Pod and check if our default.conf file is mounted on
/dir1:
[root@controller ~]# kubectl exec -it nginx-vars -- bash
root@nginx-vars:/# cat /dir1/default.conf
color1="red"
color2="blue"
color3="green"
root@nginx-vars:/# source /dir1/default.conf

root@nginx-vars:/# echo $color1
red
root@nginx-vars:/# echo $color2
blue
root@nginx-vars:/# echo $color3
green
Conclusion
In this Kubernetes Tutorial, we have seen the different ways that Kubernetes provides to associate environment-specific data with our applications running as containers. Kubernetes provides ways to store normal application data as ConfigMaps. We have also seen how to create ConfigMaps and associate it with our containers via CLI. Associating data with containers enables us to use the same container across different environments in our IT systems (for example, in test and production). Separating configuration from application code will make your applications more reliable and reusable.