Kubernetes provides three layers of health checking. First, in the form of HTTP or TCP checks, K8s can attempt to connect to a particular endpoint and give a status of healthy on a successful connection. Second, application-specific health checks can be performed using command-line scripts. We can also use the exec container to run a health check from within your container. Anything that exits with a 0 status will be considered healthy. We will cover them in more details and with different examples and demos in this tutorial.
Using Probes for Kubernetes Health Checks
Kubernetes has a concept of probes to provide the seam between the orchestration engine and the application developer. Kubernetes uses these probes to find out more about the inner state of the application service at hand. Probes are part of container spec and are executed locally, inside each container.
There are three probes available with Kubernetes used to perform health checks:
- Liveness probe: used to continue checking the availability of a Pod
- Readiness Probe: used to make sure a Pod is not published as available until the readinessProbe has been able to access it.
- Startup Probe: If we define a startup probe for a container, then Kubernetes does not execute the liveness or readiness probes, as long as the container's startup probe does not succeed.
These probes further utilize different probes to get the health of the application inside the container:
- tcpSocket: Just check that TCP socket for a port is successful
- exec: Run a command that returns 0 for success
- httpGet: an HTTP request returns a response code between 200 and 399
Configure Probes
From kubernetes.io:
You can further utilise different options in these probes spec to
control the behaviour of liveness and readiness probes:
initialDelaySeconds: Number of seconds after the container has started before liveness or readiness probes are initiated. Defaults to 0 seconds. Minimum value is 0.periodSeconds: How often (in seconds) to perform the probe. Default to 10 seconds. Minimum value is 1.timeoutSeconds: Number of seconds after which the probe times out. Defaults to 1 second. Minimum value is 1.successThreshold: Minimum consecutive successes for the probe to be considered successful after having failed. Defaults to 1. Must be 1 for liveness and startup Probes. Minimum value is 1.failureThreshold: When a probe fails, Kubernetes will tryfailureThresholdtimes before giving up. Giving up in case of liveness probe means restarting the container. In case of readiness probe the Pod will be marked Unready. Defaults to 3. Minimum value is 1.
Kubernetes liveness probe
Kubectl watches over your containers. If a container process crashes,
kubelet will take care of it based on the restart policy. But this is
not always enough. Your process may not crash, but instead run into an
infinite loop or a deadlock. The restart policy might not be nuanced
enough. With a liveness probe, you get to decide when a container is
considered alive.
Kubernetes uses the liveness probe to decide when a container needs to be killed and when another instance should be launched instead. Since Kubernetes operates at a pod level, the respective pod is killed if at least one of its containers reports as being unhealthy
Alternatively, we can say it the other way around: only if all the containers of a pod report to be healthy, is the pod considered to be healthy.
Some guidelines on using liveness probe to perform health check in Kubernetes:
- Liveness probes should be used with caution. The wrong configuration of this probe can result in cascading failures in your services and container restart loops. As a quick experiment, you can redeploy the voting application manifest where you replace the readiness probe with a liveness probe, with similar configuration but very short timeouts and delays—you will experience multiple random crashes and poor availability of the application!
- Do not use liveness probes unless you have a good reason for this. A good reason may, for example, be a known issue with a deadlock in your application that has an as yet unknown root cause.
- Execute simple and fast checks that determine the status of the process, not its dependencies. In other words, you do not want to check external dependencies' statuses in the liveness probe—this can lead to cascading failures due to an avalanche of container restarts and overloading a small subset of Service Pods.
- If your process running in the container is able to crash or exit whenever it encounters an unrecoverable error, you probably do not need a liveness probe at all.
- Use conservative settings for
initialDelaySecondsto avoid any premature container restarts and falling into a restart loop.
Example-1: Define liveness probe with exec
In this example we will create an nginx container using a simple Pod and
use exec probe to check for nginx service status. This means that as
long as nginx service is in 'running' state, the Pod will be
considered alove or else it will be killed based on other configuration
options such as failureThreshold, number of retries etc.
Following is the YAML file for my Pod with liveness probe defined:
[root@controller ~]# cat liveness-eg-1.yaml
apiVersion: v1
kind: Pod
metadata:
  name: liveness-demo
  namespace: default
spec:
  containers:
  - name: test-liveness-probe
    image: nginx
    ports:
    - containerport: 80
    livenessProbe:
      exec:
        command:
          - sh
          - -c
          - service nginx status | grep running
      initialDelaySeconds: 10
      periodSeconds: 5
The relevant part is in the livenessProbe section. First, we define a
command that Kubernetes will execute as a probe inside the container. In
our case, we have a nginx container and use exec probe to execute
"service nginx status" command and grep for the string 'running'. By
default the nginx service is expected to be in running state.
The other two settings, initialDelaySeconds and periodSeconds,
define how long Kubernetes should wait after starting the container
until it first executes the probe and how frequently the probe should be
executed thereafter. In our case, Kubernetes waits for 10 seconds prior
to executing the first probe and then executes a probe every 5 seconds.
We will create this pod and check the status of the Pod:
[root@controller ~]# kubectl create -f liveness-eg-1.yaml
pod/liveness-demo created
Check the status of the Pod:

So at the moment our Pod is in running state which would mean that
liveness probe is able to find the nginx service running. We can also
use kubectl describe command to get more details.
For the demonstration purpose, I will intentionally fail the liveness
probe by setting incorrect command and will create another pod by the
name fail-liveness-demo. Here even though I have intentionally given a
wrong command, the pod seems to be in running state:
[root@controller ~]# kubectl get pods
NAME                 READY   STATUS    RESTARTS   AGE
fail-liveness-demo   1/1     Running   0          23s
liveness-demo        1/1     Running   0          4m11s
So let's use kubectl describe pod fail-liveness-demo command to get
the details:
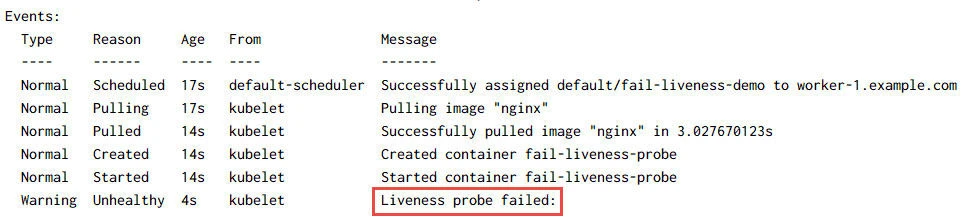
Under Events, we can see that the Liveness Probe has failed but by
default the Pod will attempt to restart the container 3 times which is
the default failure threshold after which the container will be killed.
We can check the status of the pods in few seconds:
[root@controller ~]# kubectl get pods
NAME                 READY   STATUS             RESTARTS   AGE
fail-liveness-demo   0/1     CrashLoopBackOff   3          4m41s
liveness-demo        1/1     Running            0          8m29s
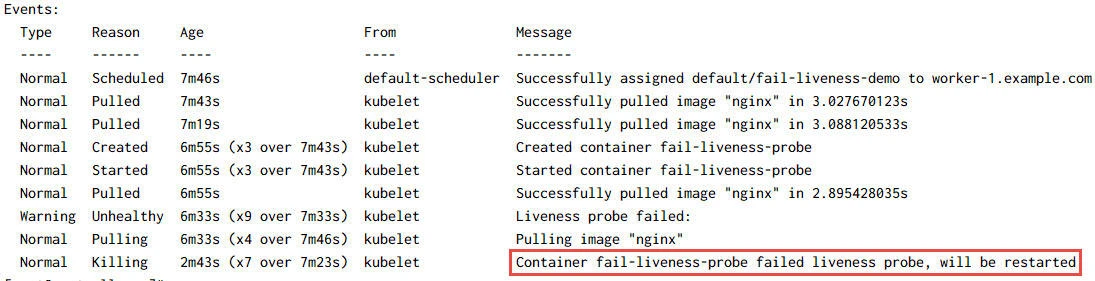
As expected, our fail-liveness-demo has been marked as failed. You can
get more details using kubectl describe pod fail-liveness-demo
command:
Let's delete both these pods:
[root@controller ~]# kubectl delete pod liveness-demo
pod "liveness-demo" deleted

[root@controller ~]# kubectl delete pod fail-liveness-demo
pod "fail-liveness-demo" deleted
Example-2: Define liveness probe with httpGet
In this example we will use httpGet to probe the liveness of a pod.
Normally for containers with webservers we can also directly use the
kubelet to send an HTTP GET request to the server that is running in the
container and listening on port 80. If the handler for the server's /
path returns a success code, the kubelet considers the container to be
alive and healthy. If the handler returns a failure code, the kubelet
kills the container and restarts it.
Here is my sample YAML file to create a Pod with liveness probe using
httpGet:
[root@controller ~]# cat liveness-eg-3.yaml
apiVersion: v1
kind: Pod
metadata:
  name: liveness-probe-httpget
  namespace: default
spec:
  containers:
  - name: test-liveness-probe
    image: nginx
    ports:
    - containerport: 80
    livenessProbe:
      httpGet:
        path: /
        port: 8080
      initialDelaySeconds: 10
      periodSeconds: 5
Create the pod and check the status:
[root@controller ~]# kubectl create -f liveness-eg-3.yaml
pod/liveness-probe-httpget created

[root@controller ~]# kubectl get pods
NAME                     READY   STATUS    RESTARTS   AGE
liveness-probe-httpget   1/1     Running   0          7s
So our pod is in running state, we will also check the events of this
pod using kubectl describe command:
[root@controller ~]# kubectl describe pods liveness-probe-httpget
Sample output from my controller, there doesn't seem to be any events of failure of liveness probe so our nginx server must be up and running:

Again for the demonstration purpose I intentionally gave a wrong port to check the liveness probe in another pod and here is the sample Event from that Pod:
Warning Unhealthy 1s kubelet Liveness probe failed: Get "http://10.36.0.2:8080/": dial tcp 10.36.0.2:8080: connect: connection refused
and the respective pod has entered into CrashLoopBackOff state with
continuous restarts:
[root@controller ~]# kubectl get pods
NAME                          READY   STATUS             RESTARTS   AGE
liveness-probe-httpget        1/1     Running            0          7m21s
liveness-probe-httpget-fail   0/1     CrashLoopBackOff   6          6m26s
Let's delete both these pods:
[root@controller ~]# kubectl delete pod liveness-probe-httpget liveness-probe-httpget-fail
pod "liveness-probe-httpget" deleted
pod "liveness-probe-httpget-fail" deleted
Example-3: Define liveness probe with tcpSocket
Kubernetes also supports health checks via simple TCP socket checks.
With this configuration, the kubelet will attempt to open a socket to
your container on the specified port. If it can establish a connection,
the container is considered healthy, if it can't it is considered a
failure.
Following is the YAML file to create this Pod with tcpSocket as the
probe for liveness health check:
[root@controller ~]# cat liveness-eg-4.yaml
apiVersion: v1
kind: Pod
metadata:
  name: liveness-probe-tcpsocket
  namespace: default
spec:
  containers:
  - name: test-liveness-probe
    image: nginx
    ports:
    - containerport: 80
    livenessProbe:
      tcpSocket:
        port: 80
      initialDelaySeconds: 10
      periodSeconds: 5
Create this pod and check the status:
[root@controller ~]# kubectl create -f liveness-eg-4.yaml
pod/liveness-probe-tcpsocket created

[root@controller ~]# kubectl get pods
NAME                       READY   STATUS    RESTARTS   AGE
liveness-probe-tcpsocket   1/1     Running   0          99s
The pod seems to be in running state but we must also check the Events to make sure there are no liveness probe failures:
[root@controller ~]# kubectl describe pods liveness-probe-tcpsocket
Sample Events output from my controller node for this command:

Let's delete this pod:
[root@controller ~]# kubectl delete pod liveness-probe-tcpsocket
pod "liveness-probe-tcpsocket" deleted
Kubernetes readiness probe
Kubernetes uses a readiness probe to decide when a service instance, that is, a container, is ready to accept traffic. Pods that are not ready (a Pod is ready only if all of its containers are considered ready) will be removed from the Service Endpoints list until they become ready again. In other words, it is a signal for notifying that a given Pod can be used for requests incoming to the Service.
Some guidelines which are recommended to be followed when using readiness probe to perform health checks in Kubernetes:
- Use this probe whenever your containers may not be ready to properly serve traffic as soon as the container is started.
- Ensure that you check the cache warm-up or database migration status during readiness probe evaluation. You may also consider starting the actual process of a warm-up if it hasn't been started yet, but use this approach with caution—a readiness probe will be executed constantly throughout the life cycle of a Pod, which means you shouldn't do any costly operations for every request. Alternatively, you may want to use a startup probe for this purpose, newly-introduced in Kubernetes 1.16.
- For microservice applications that expose HTTP endpoints, consider always configuring the httpGet readiness probe. This will ensure that all cases are covered when a container is successfully running but the HTTP server is not fully initialized.
- It is a good idea to use a separate, dedicated HTTP endpoint for
readiness checks in your application, for example, a common convention
is using
/health. - If you are checking the state of dependencies (external database and logging services) in this type of probe, be careful with shared dependencies, such as SQL Server in the voting application. In this case, you should consider using a probe timeout, which is greater than the maximum allowed timeout for the external dependency— otherwise, you may get cascading failures and lower availability instead of occasionally increased latency.
Example: Define readiness probe with httpget
In this example we will use readiness probe to determine the health of
the container in an deployment using httpget. Following is ,y sample
YAML file to create a deployment:
[root@controller ~]# cat readiness-eg-1.yaml
apiVersion: apps/v1
kind: Deployment
metadata:
  labels:
    type: dev
  name: readiness-probe-demo
spec:
  replicas: 2
  selector:
    matchLabels:
      type: dev
  template:
    metadata:
      labels:
        type: dev
    spec:
      containers:
      - image: nginx
        name: nginx
        readinessProbe:
          httpGet:
            path: /
            port: 80
          initialDelaySeconds: 30
          periodSeconds: 10
          timeoutSeconds: 1
          successThreshold: 1
          failureThreshold: 3
Let's create this deployment and check the status of pods created as part of this deployment:
[root@controller ~]# kubectl create -f readiness-eg-1.yaml
deployment.apps/readiness-probe-demo created
Check the status of the pods:

As you can see the containers are running but are still not marked as
"READY". It is because we had defined initialDelaySeconds as 30 to
give some time for the nginx service to come up before we perform the
health check.
We check the status again in few seconds and now the pods are marked as
READY:

You can use kubectl describe command to check the Events for any
failures.
[root@controller ~]# kubectl describe pod readiness-probe-demo-65b4cd6f7f-47rht
Sample events output from this command:

Let's delete our deployment
[root@controller ~]# kubectl delete deployment readiness-probe-demo
deployment.apps "readiness-probe-demo" deleted
Kubernetes startup probe
Startup probes have been introduced in Kubernetes 1.16 to support cases
when a container may require more time for initialization than
initialDelaySeconds + failureThreshold * periodSeconds set in the
readiness probe. In general, you should use the same handler
configuration for startup probes that you would for readiness probes but
use larger delays. If a container is not ready within
initialDelaySeconds + failureThreshold * periodSeconds for a readiness
probe, then the container will be killed and subject to the Pod's
restart policy.
If we define a startup probe for a container, then Kubernetes does not execute the liveness or readiness probes, as long as the container's startup probe does not succeed. Once again, Kubernetes looks at pods and starts executing liveness and readiness probes on its containers if the startup probes of all the pod's containers succeed.
When should you use startup probes?
There might be situations where we have to account for exceptionally long startup and initialization times, such as when containerizing a legacy application. We could technically configure the readiness or the liveness probes to account for this fact, but that would defeat the purpose of these probes. The latter probes are meant to provide quick feedback to Kubernetes on the health and availability of the container. If we configure for long initial delays or periods, then this would counter the desired outcome.
Example: Using startup probe with httpget
We will use one of our previous examples to demonstrate the behaviour of starup probes. We will create a simple pod using the following YAML file:
[root@controller ~]# cat startup-eg-1.yaml
apiVersion: v1
kind: Pod
metadata:
  name: startup-probe-httpget
  namespace: default
spec:
  containers:
  - name: nginx
    image: nginx
    ports:
    - containerport: 80
    startupProbe:
      httpGet:
        path: /
        port: 80
      initialDelaySeconds: 10
      failureThreshold: 30
      periodSeconds: 5
As you can see, the syntax to use startup probe is same as liveness and readiness probe. We just need to change the probe name.
Let us create this pod and check the status:
[root@controller ~]# kubectl create -f startup-eg-1.yaml
pod/startup-probe-httpget created

[root@controller ~]# kubectl get pods
NAME                    READY   STATUS    RESTARTS   AGE
startup-probe-httpget   0/1     Running   0          16s
So our pod with startup probe was created and is in Running status but
is yet not marked as READY. After waiting for few seconds and now the
pod is marked as running:
[root@controller ~]# kubectl get pods
NAME                         READY   STATUS              RESTARTS   AGE
startup-probe-httpget        1/1     Running             0          3m42s
So the only advantage we get here is that the application will have a maximum of around 3.3 minutes (10 + 30 * 5 = 200s) to finish its startup. To demonstrate this I have created another pod with incorrect port value for the health check with startup probe.
Warning Unhealthy 2m44s (x21 over 4m24s) kubelet Startup probe failed: Get "http://10.36.0.2:8080/": dial tcp 10.36.0.2:8080: connect: connection refused
Here this pod has been marked unhealthy for over 4m24s and yet it has been restarted only once because the probe waited for 3.3 minutes before restarting the container.
[root@controller ~]# kubectl get pods
NAME                         READY   STATUS    RESTARTS   AGE
startup-probe-httpget        1/1     Running   0          8m20s
startup-probe-httpget-fail   0/1     Running   1          4m41s
Let's delete these pods:
[root@controller ~]# kubectl delete pod startup-probe-httpget startup-probe-httpget-fail
pod "startup-probe-httpget" deleted
pod "startup-probe-httpget-fail" deleted
Summary
In this tutorial we learned about different types of probes available in
Kubernetes which can be used to check the health of Pods and
containers. You may
choose the type of probe based on your requirement. But liveness probes
are not used very frequently unless you expect your application to be
stuck in some deadlock scenario. Most preferred method would be
readiness probe in most cases while for legacy applications which takes
more time to come up, we can use startup probes. The usage syntax for
startup probe is exactly same as liveness and readiness probe. You can
further use exec, httpget or tcpsocket with any of these probes to
perform the health check.
*
Related Searches: health check in kubernetes, k8s health check,
kubernetes disable health check, health check kubernetes, kubernetes
health check https, kubernetes pod health check, kubernetes health check
deployment*
