In Kubernetes API server we learned that the API server requires clients to authenticate themselves before they’re allowed to perform operations on the server. All actions in a Kubernetes Cluster need to be authenticated and authorized. Service Accounts are used for basic authentication from within the Kubernetes Cluster.
Overview on Kubernetes Service Accounts
By default the pods can authenticate by sending the contents of the file
/var/run/secrets/kubernetes.io/serviceaccount/token, which is mounted
into each container’s filesystem through a secret volume. The token file
holds the ServiceAccount’s authentication token. When an app uses this
token to connect to the API server, the authentication plugin
authenticates the ServiceAccount and passes the ServiceAccount’s
username back to the API server core.
Service-Account usernames are formatted like this:
system:serviceaccount:<namespace>:<service account name>
The API server passes this username to the configured authorization plugins, which determine whether the action the app is trying to perform is allowed to be performed by the ServiceAccount. These are nothing more than a way for an application running inside a pod to authenticate itself with the API server.
Understanding ServiceAccount resource
- ServiceAccounts are resources just like Pods, ConfigMap, Secret and so on, and are scoped to individual namespaces.
- A
defaultServiceAccount is automatically created for each namespace (that’s the one your pods have used all along). - Every Pod uses the
defaultServiceAccount to contact the API server. - This default ServiceAccount allows a resource to get information from the API server. The API server obtains this information from the system-wide authorization plugin configured by the cluster administrator. One of the available authorization plugins is the role-based access control (RBAC) plugin.
- Each Service Account uses a secret to automount API credentials
- Service accounts come with a secret which contains the API credentials
- By specifying the ServiceAccount to be used by a pod, the ServiceAccount secret is auto-mounted to provide API access credentials.
- Each pod is associated with exactly one ServiceAccount, but multiple pods can use the same ServiceAccount. As you can see in following image, a pod can only use a ServiceAccount from the same namespace.
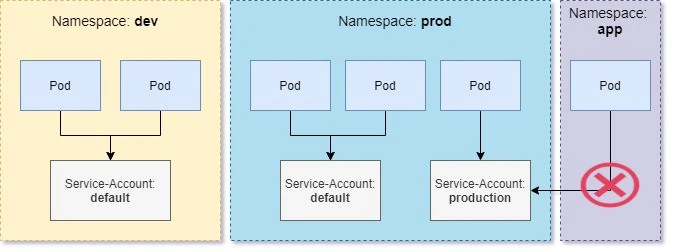
You can assign a ServiceAccount to a pod by specifying the account’s name in the pod manifest. If you don’t assign it explicitly, the pod will use the default ServiceAccount in the namespace.
Creating ServiceAccount resource
A default ServiceAccount is automatically created for each namespace. You can list ServiceAccounts like you do other resources:
[root@controller ~]# kubectl get sa
NAME      SECRETS   AGE
default   1         10d
serviceaccount is sa. You can use either with
kubectl command.
You can also list the available ServiceAccount for all the namespaces in your cluster (output is trimmed in the below screenshot):
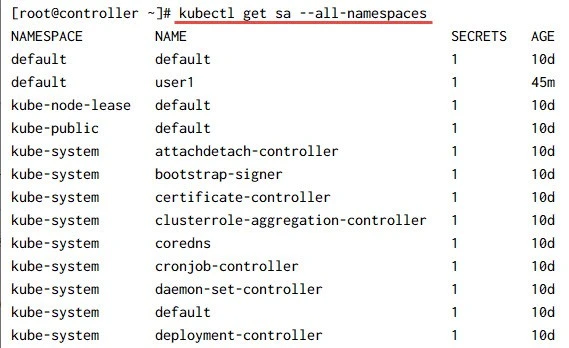
Every namespace contains its own default ServiceAccount, but additional ones can be created if necessary. This is done mostly for improved security, Pods that don’t need to read any cluster metadata should run under a constrained account that doesn’t allow them to retrieve or modify any resources deployed in the cluster. Pods that need to retrieve resource metadata should run under a ServiceAccount that only allows reading those objects’ metadata, whereas pods that need to modify those objects should run under their own ServiceAccount allowing modifications of API objects.
You can create a ServiceAccount directly using kubectl command or by using a YAML file same as any other resources.
Method-1: Using kubectl command
To create a Service Account using kubectl, execute the following command on the controller node:
[root@controller ~]# kubectl create serviceaccount user1
serviceaccount/user1 created
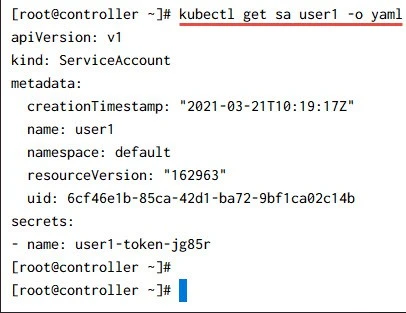
This command created a user1 ServiceAccount. To get the details of
this ServiceAccount we can use kubectl get sa user1 -o yaml:
Method-2: Using YAML file
As we mentioned, you can use a YAML file to create a ServiceAccount same
like any other resource type. Following is s simple YAML file to create
user2 ServiceAccount, you can add more data such as namespace, labels
etc in this.
[root@controller ~]# cat service-account.yaml
apiVersion: v1
kind: ServiceAccount
metadata:
  name: user2
Use kubectl to create this ServiceAccount:
[root@controller ~]# kubectl create -f service-account.yaml
serviceaccount/user2 created
Here you will see that a token has automatically been created and is referenced by the service account.
[root@controller ~]# kubectl get sa user2 -o yaml
apiVersion: v1
kind: ServiceAccount
metadata:
  creationTimestamp: "2021-03-21T11:25:52Z"
  name: user2
  namespace: default
  resourceVersion: "168196"
  uid: fc3c62ef-762a-488c-87cb-8b3251c438d7
secrets:
- name: user2-token-r9lxc
By default, a pod can mount any Secret it wants. But the pod’s
ServiceAccount can be configured to only allow the pod to mount Secrets
that are listed as mountable Secrets on the Service-Account. To enable
this feature, the ServiceAccount must contain the following annotation:
kubernetes.io/enforce-mountable-secrets="true". If the ServiceAccount
is annotated with this annotation, any pods using it can mount only the
ServiceAccount’s mountable Secrets—they can’t use any other Secret.
Add ImagePullSecrets to a service account
If your images are available in a private registry (like, for example,
the Docker Hub, Quay.io or a self-hosted registry), you will need to
configure your Kubernetes cluster so that it is authorized to actually
access these images. For this, you will add your registry credentials as
a Secret object. For this, use the kubectl create secret
command:
kubectl create secret docker-registry my-private-registry --docker-server https://index.docker.io/v1/ --docker-username <your-username> --docker-password <your-password> --docker-email <your-email>
In the code example above, my-private-registry is an arbitrarily
chosen name for your set of Docker credentials. The --docker-server
flag https://index.docker.io/v1/ specifies the URL of the official
Docker Hub. If you are using a third-party registry, remember to change
this value accordingly.
You can create secrets for multiple registries (or multiple users for
the same registry) if needed. The kubelet will combine all
ImagePullSecrets. However, because pods can access secrets only in
their own namespace, you must create a secret within each namespace
where you want the pod to run.
You can now use this newly created Secret object when creating a new
Pod, by adding an imagePullSecrets attribute to the Pod specification:
apiVersion: v1
kind: Pod
metadata:
  name: example-from-private-registry
spec:
  containers:
  - name: secret
    image: quay.io/devs-private-registry/secret-application:v1.2.3
  imagePullSecrets:
  - name: my-private-registry
Using the imagePullSecrets attribute also works when you are creating
Pods using a StatefulSet or a Deployment controller.
Assign ServiceAccount to a Pod
After you have created ServiceAccount, you can start assigning them to
respective pods. You can use spec.serviceAccountName field in the pod
definition to assign a ServiceAccount. Here I am creating a simple nginx
pod using our user1 ServiceAccount.
[root@controller ~]# cat nginx.yaml
apiVersion: v1
kind: Pod
metadata:
  name: nginx
  namespace: default
spec:
  serviceAccount: user1
  containers:
  - name: nginx
    image: nginx
    ports:
    - containerPort: 80
We can create the pod using kubectl and check the status:
[root@controller ~]# kubectl create -f nginx.yaml
pod/nginx created

[root@controller ~]# kubectl get pods
NAME    READY   STATUS    RESTARTS   AGE
nginx   1/1     Running   0          8s
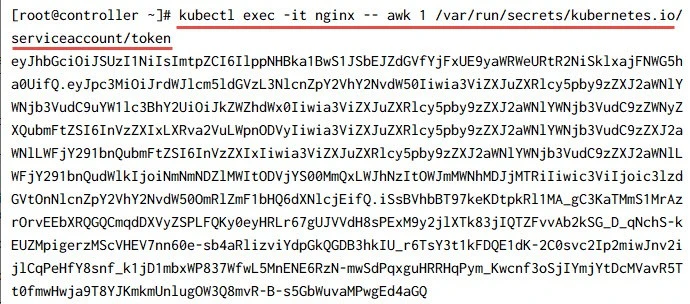
To confirm that the custom ServiceAccount’s token is mounted into the
two containers, you can compare the content of token from
/var/run/secrets/kubernetes.io/serviceaccount/token within the Pod and
the secret token part of user1 ServiceAccount i.e.
user1-token-jg85r.
Output of /var/run/secrets/kubernetes.io/serviceaccount/token from
nginx Pod
You can get the secret token id for your ServiceAccount using:
[root@controller ~]# kubectl describe sa user1 | grep "Tokens:"
Tokens:              user1-token-jg85r
Content of user1-token-jg85r token:
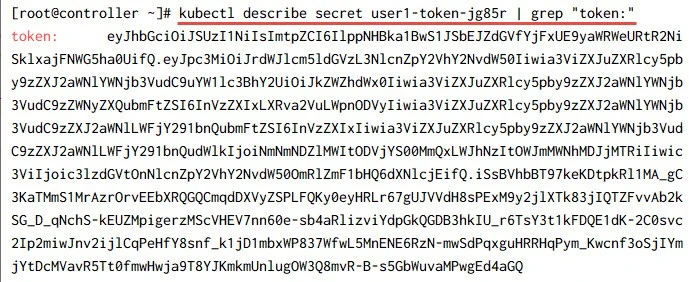
As you can see the content of both the tokens are same.
Access API server using ServiceAccount within Pod
We will create a busybox pod and assign user2 ServiceAccount which we
created earlier in this tutorial.
[root@controller ~]# cat busybox.yaml
apiVersion: v1
kind: Pod
metadata:
  name: busybox
  namespace: default
spec:
  serviceAccountname: user2
  containers:
  - name: busybox
    image: progrium/busybox
    command:
      - sleep
      - "3600"
    imagePullPolicy: IfNotPresent
  restartPolicy: Always
I have used progrium/busybox image as the default busybox doesn't have
curl and it also doesn't allow us to install a package. Let's create a
pod using this YAML file:
[root@controller ~]# kubectl create -f busbybox.yaml
Check the status of the pod:
[root@controller ~]# kubectl get pods
NAME         READY   STATUS    RESTARTS   AGE
busybox      1/1     Running   0          2m52s
Next we will install curl inside this busybox container using opkg:
[root@controller ~]# kubectl exec -it busybox -- opkg-install curl
Now let connect to this Pod:
[root@controller ~]# kubectl exec -it busybox -- /bin/sh
and make sure that you are able to resolve kubernetes.default using
CoreDNS.
/ # nslookup kubernetes.default
Server:    10.96.0.10
Address 1: 10.96.0.10 kube-dns.kube-system.svc.cluster.local

name:      kubernetes.default
Address 1: 10.96.0.1 kubernetes.default.svc.cluster.local
Now let us try to access our API server using curl:
/ # curl --insecure   https://kubernetes.default.svc/
{
  "kind": "Status",
  "apiVersion": "v1",
  "metadata": {

  },
  "status": "Failure",
  "message": "forbidden: User \"system:anonymous\" cannot get path \"/\"",
  "reason": "Forbidden",
  "details": {

  },
  "code": 403
As you see we are getting Forbidden error message because a normal user
is not allowed to access the API server so we must use our secret token
of user2 ServiceAccount along with the CA certificate inside the
serviceaccount directory:
}/ # curl --cacert /var/run/secrets/kubernetes.io/serviceaccount/ca.crt -H "Authorization: Bearer $(cat /var/run/secrets/kubernetes.io/serviceaccount/token)" https://kubernetes.default.svc/
{
  "paths": [
    "/api",
    "/api/v1",
    "/apis",
    "/apis/",
    "/apis/admissionregistration.k8s.io",
    "/apis/admissionregistration.k8s.io/v1",
    "/apis/admissionregistration.k8s.io/v1beta1",
    "/apis/apiextensions.k8s.io",
    "/apis/apiextensions.k8s.io/v1",
    "/apis/apiextensions.k8s.io/v1beta1",
    "/apis/apiregistration.k8s.io",
    "/apis/apiregistration.k8s.io/v1",

...

    "/apis/rbac.authorization.k8s.io/v1beta1",
    "/apis/scheduling.k8s.io",
    "/apis/scheduling.k8s.io/v1",
    "/apis/scheduling.k8s.io/v1beta1",
    "/apis/storage.k8s.io",
    "/apis/storage.k8s.io/v1",
    "/apis/storage.k8s.io/v1beta1",
    "/healthz",
    "/healthz/autoregister-completion",
    "/healthz/etcd",
    "/healthz/log",

    "/version"
  ]
}/ #
As you can see, we were able to contact the kubernetes API server using the service account token, and it gives a long list of available APIs. You can go ahead and check individual APIs from this list such as available resources:
/ # curl --cacert /var/run/secrets/kubernetes.io/serviceaccount/ca.crt -H "Authorization: Bearer $(cat /var/run/secrets/kubernetes.io/serviceaccount/token)" https://kubernetes.default.svc/api/v1
{
  "kind": "APIResourceList",
  "groupVersion": "v1",
  "resources": [
    {
      "name": "bindings",
      "singularName": "",
      "namespaced": true,
      "kind": "Binding",
      "verbs": [
        "create"
      ]
    },

...

    {
      "name": "services/status",
      "singularName": "",
      "namespaced": true,
      "kind": "Service",
      "verbs": [
        "get",
        "patch",
        "update"
      ]
    }
  ]
}/ #
Assign Role and RoleBinding for ServiceAccount
It is possible in some cases the ServiceAccount may not be able to access the API server due to RBAC restrictions. When your cluster isn’t using proper authorization, creating and using additional ServiceAccounts doesn’t make much sense, since even the default ServiceAccount is allowed to do anything. The only reason to use ServiceAccounts in that case is to enforce mountable Secrets or to provide image pull Secrets through the Service-Account.
In this section we will create a ServiceAccount and assign RBAC role to list the pods using API server.
Create ServiceAccount
We will use a different ServiceAccount in this example:
[root@controller ~]# kubectl create sa user3
Create Role
A Role resource defines what actions can be taken on which resources. I will create a separate role which allows to list the Pods in default namespace:
[root@controller ~]# cat list-pods.yaml
apiVersion: rbac.authorization.k8s.io/v1
kind: Role
metadata:
  name: list-pods
  namespace: default
rules:
  - apiGroups:
    - ''
    resources:
    - pods
    verbs:
    - list
Use kubectl command to create this role:
[root@controller ~]# kubectl create -f list-pods.yaml
role.rbac.authorization.k8s.io/list-pods created
List the available roles:
[root@controller ~]# kubectl get roles
NAME        CREATED AT
list-pods   2021-03-22T06:44:13Z
Create RoleBinding
A Role defines what actions can be performed, but it doesn’t specify who can perform them. To do that, you must bind the Role to a subject, which can be a user, a Service-Account, or a group (of users or ServiceAccounts).
[root@controller ~]# cat list-pods-binding.yaml
apiVersion: rbac.authorization.k8s.io/v1
kind: RoleBinding
metadata:
  name: list-pods-user3-binding
  namespace: default
roleRef:
  kind: Role
  name: list-pods
  apiGroup: rbac.authorization.k8s.io
subjects:
  - kind: ServiceAccount
    name: user3
    namespace: default
Create and list the RoleBinding:
[root@controller ~]# kubectl create -f list-pods-binding.yaml

[root@controller ~]# kubectl get rolebindings
NAME                      ROLE             AGE
list-pods-user3-binding   Role/list-pods   14s
Create a Pod
We will create a new pod using user3 ServiceAccount:
[root@controller ~]# cat user3-busybox.yaml
apiVersion: v1
kind: Pod
metadata:
  name: user3-busybox
  namespace: default
spec:
  serviceAccountname: user3
  containers:
  - name: busybox
    image: progrium/busybox
    command:
      - sleep
      - "3600"
    imagePullPolicy: IfNotPresent
  restartPolicy: Always
Use kubectl command to create this Pod:
[root@controller ~]# kubectl create -f user3-busybox.yaml
Verify API server access from the Pod
Next we will install the curl package:
[root@controller ~]# kubectl exec -it busybox -- opkg-install curl
Connect to this Pod:
[root@controller ~]# kubectl exec -it busybox -- /bin/sh
Verify if you can access the API server using user3 ServiceAccount:
/ # TOKEN=$(cat /var/run/secrets/kubernetes.io/serviceaccount/token)
/ # curl --cacert /var/run/secrets/kubernetes.io/serviceaccount/ca.crt -H "Authorization: Bearer $TOKEN" https://kubernetes.default.svc/api/v1/namespaces/dev/pods
You can read more about Roles Based Access Controls at at Beginners guide on Kubernetes RBAC with examples
Summary
In this tutorial we learned about creating and managing Service Accounts in Kubernetes Clusters. Applications inside pods can be associated with a custom ServiceAccount or default ServiceAccount will be used. By default, pods run under the default ServiceAccount, which is created for each namespace automatically. ServiceAccounts can be configured to allow mounting only a constrained list of Secrets in a given pod. A ServiceAccount can also be used to attach image pull Secrets to pods, so you don’t need to specify the Secrets in every pod.