In this tutorial we will cover Kubernetes Volumes. We have learned till now that pods are similar to logical hosts where processes running inside them share resources such as CPU, RAM, network interfaces, and others. It is quiet normal for one to expect that the processes also share disks, but that’s not the case. You’ll remember that each container in a pod has its own isolated filesystem, because the file-system comes from the container’s image.
Now assuming if a container within a Pod gets restarted (either because the process died or because the liveness probe signaled to Kubernetes that the container wasn’t healthy anymore) and you’ll realize that the new container will not see anything that was written to the filesystem by the previous container, even though the newly started container runs in the same pod.
In certain scenarios you want the new container to continue where the last one finished, such as when restarting a process on a physical machine. You may not need (or want) the whole filesystem to be persisted, but you do want to preserve certain directories that hold actual data.
Kubernetes provides this by defining storage volumes. They aren’t top-level resources like pods, but are instead defined as a part of a pod and share the same lifecycle as the pod. This means a volume is created when the pod is started and is destroyed when the pod is deleted. Because of this, a volume’s contents will persist across container restarts. After a container is restarted, the new container can see all the files that were written to the volume by the previous container. Also, if a pod contains multiple containers, the volume can be used by all of them at once.
Overview on Kubernetes Volumes
- Now you must have a basic idea on Kubernetes Volumes. These are a component of a pod and are thus defined in the pod’s specification much like containers.
- They aren’t a standalone Kubernetes object and cannot be created or deleted on their own.
- A volume is available to all containers in the pod, but it must be mounted in each container that needs to access it.
- In each container, you can mount the volume in any location of its filesystem.
Let us take this example to get a more clear understanding:
One container runs a web server that serves HTML pages from the
/var/htdocs directory and stores the access log to /var/logs. The
second container runs an agent that creates HTML files and stores them
in /var/html. The third container processes the logs it finds in the
/var/logs directory (rotates them, compresses them, analyzes them, or
whatever).
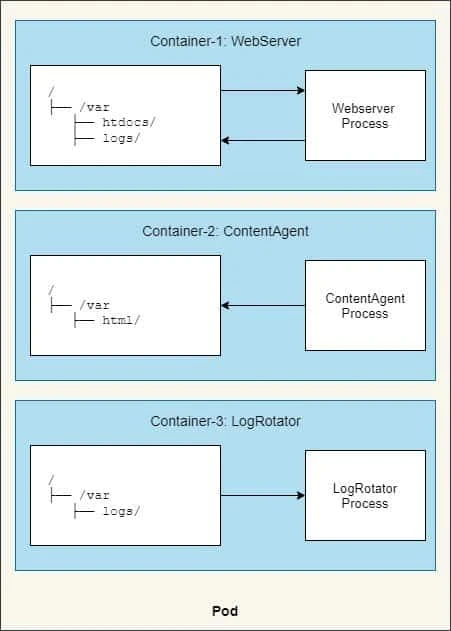
These 3 containers within the Pod are working just fine but they all are
performing read and write operation to their own file system, even
though all of them are using /var directory. So it doesn't make sense
to have such architecture, we need our logRotator container to process
the logs from other containers and similarly contentAgent will write
new content inside /var/html.
But by mounting the same volume into two containers, they can operate on the same files. In your case, you’re mounting two volumes in three containers. By doing this, your three containers can work together and do something useful. Let me explain how.
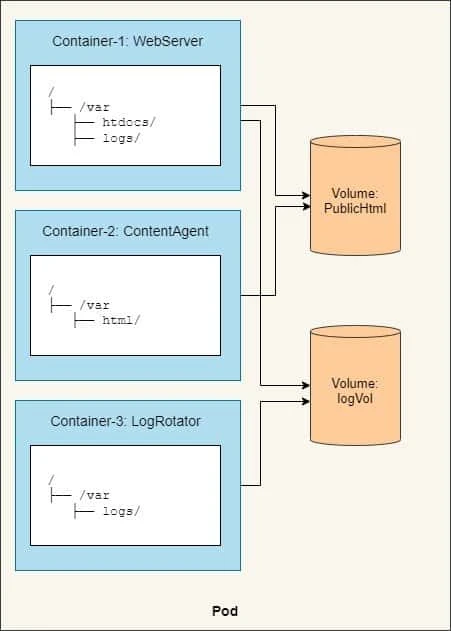
- First, the pod has a volume called
publicHtml. - This volume is mounted in the
WebServercontainer at/var/htdocs, because that’s the directory the web server serves files from. - The same volume is also mounted in the
ContentAgentcontainer, but at/var/html, because that’s where the agent writes the files to. By mounting this single volume like that, the web server will now serve the content generated by the content agent. - Similarly, the pod also has a volume called
logVolfor storing logs. - This volume is mounted at
/var/logsin both theWebServerand theLogRotatorcontainers. - Note that it isn’t mounted in the
ContentAgentcontainer.The container cannot access its files, even though the container and the volume are part of the same pod. - The two volumes in this example can both initially be empty, so you
can use a type of volume called
emptyDir.
Different volume types in Kubernetes
Now we know that Kubernetes introduces volume, which lives with a Pod across a container life cycle. It supports various types of volumes, including popular network disk solutions and storage services in different public clouds. Here are a few:
| Volume Type | Storage Provider |
|---|---|
| emptyDir | Localhost |
| hostPath | Localhost |
| glusterfs | GlusterFS cluster |
| downwardAPI | Kubernetes Pod information |
| nfs | NFS server |
| awsElasticBlockStore | Amazon Web Service Amazon Elastic Block Store |
| gcePersistentDisk | Google Compute Engine persistent disk |
| azureDisk | Azure disk storage |
| projected | Kubernetes resources; currently supports secret, downwardAPI, and configMap |
| secret | Kubernetes Secret resource |
| vSphereVolume | vSphere VMDK volume |
| gitRepo | Git repository |
Create Pods with Different Volume Types
Storage providers are required when you start to use volume in
Kubernetes, except for emptyDir, which will be erased when the Pod is
removed. For other storage providers, folders, servers, or clusters have
to be built before using them in the Pod definition.
volumes section of the pod definition with
unique names. Each type of volume has a different configuration to be
set. Once you define the volumes, you can mount them in the
volumeMounts section in the container specs.volumeMounts.name and
volumeMounts.mountPath are required, which indicate the name of the
volumes you defined and the mount path inside the container,
respectively.
Using emptyDir on Disk
emptyDir is the simplest volume type, which will create an empty
volume for containers in the same Pod to share. When the Pod is removed,
the files in emptyDir will be erased, as well. emptyDir is created
when a Pod is created.
In the following configuration file, we'll create a Pod running alpine
with commands to sleep for 999999 seconds. As you can see, one volume is
defined in the volumes section with name data, and the volumes will be
mounted under the /alpine1 path in the alpine1 container and
/alpine2 in the alpine2 container respectively:
[root@controller ~]# cat shared-volume-emptyDir.yml
apiVersion: v1
kind: Pod
metadata:
  name: shared-volume-emptyDir
spec:
  containers:
  - name: alpine1
    image: alpine
    command: ["/bin/sleep", "999999"]
    volumeMounts:
    - mountPath: /alpine1
      name: data
  - name: alpine2
    image: alpine
    command: ["/bin/sleep", "999999"]
    volumeMounts:
    - mountPath: /alpine2
      name: data
  volumes:
  - name: data
    emptyDir: {}
We will create this Pod:
[root@controller ~]# kubectl create -f shared-volume-emptydir.yml
pod/shared-volume-emptydir created
Check the status of the Pod:
[root@controller ~]# kubectl get pods shared-volume-emptydir
NAME                     READY   STATUS              RESTARTS   AGE
shared-volume-emptydir   0/2     ContainerCreating   0          7s
The containers are getting created, we will check check the status of the Pod in sometime again:
[root@controller ~]# kubectl get pods shared-volume-emptydir
NAME                     READY   STATUS    RESTARTS   AGE
shared-volume-emptydir   2/2     Running   0          84s
So both our containers are created and in Running state.
Next we will connect to these containers, if you don't have the container name then you can use following command:
[root@controller ~]# kubectl get pod shared-volume-emptydir -o json | jq .spec.containers
[
  {
    "command": [
      "/bin/sleep",
      "999999"
    ],
    "image": "alpine",
    "imagePullPolicy": "Always",
    "name": "alpine1",
    "resources": {},
    "terminationMessagePath": "/dev/termination-log",
    "terminationMessagePolicy": "File",
    "volumeMounts": [
      {
        "mountPath": "/alpine1",
        "name": "data"
      },
      {
        "mountPath": "/var/run/secrets/kubernetes.io/serviceaccount",
        "name": "default-token-glntg",
        "readOnly": true
      }
    ]
  },
  {
    "command": [
      "/bin/sleep",
      "999999"
    ],
    "image": "alpine",
    "imagePullPolicy": "Always",
    "name": "alpine2",
    "resources": {},
    "terminationMessagePath": "/dev/termination-log",
    "terminationMessagePolicy": "File",
    "volumeMounts": [
      {
        "mountPath": "/alpine2",
        "name": "data"
      },
      {
        "mountPath": "/var/run/secrets/kubernetes.io/serviceaccount",
        "name": "default-token-glntg",
        "readOnly": true
      }
    ]
  }
]
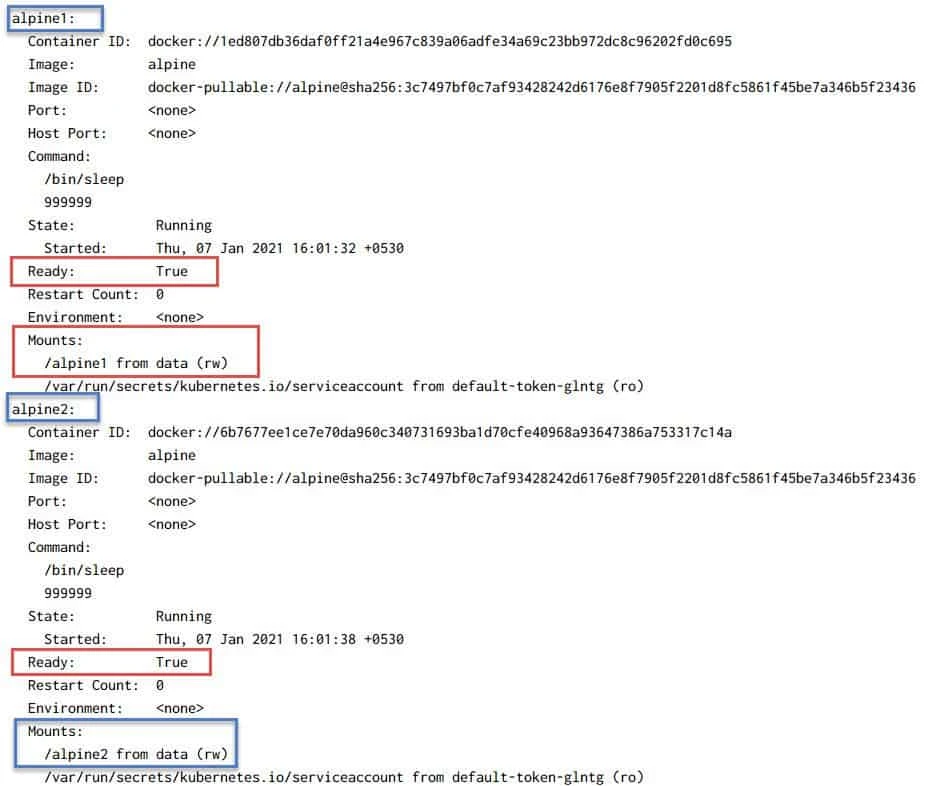
Here you can see our containers names are alpine1 and alpine2. This
is required to connect to individual container inside the shared-volume-emptydir pod.
Next we will connect to alpine1 container and create an empty file
inside /alpine1
[root@controller ~]# kubectl exec -it shared-volume-emptydir -c alpine1 -- touch /alpine1/someFile.txt
Now let us verify if this file is visible on alpine2 container under /alpine2
[root@controller ~]# kubectl exec -it shared-volume-emptydir -c alpine2 -- ls -l /alpine2/
total 0
-rw-r--r--    1 root     root             0 Jan  7 09:15 someFile.txt
As expected since the path is shared across both containers, they can access the same path over two mount points.
But how does it work?
Kubernetes mounts
/var/lib/kubelet/pods/<id>/volumes/kubernetes.io~empty-dir/<volumeMount name>
to /<mount-point> for all the containers inside the Pod. To verify
this first let's check the worker node where our
shared-volume-emptydir pod is running:
[root@controller ~]# kubectl get pods -o wide shared-volume-emptydir
NAME                     READY   STATUS    RESTARTS   AGE    IP          NODE                   NOMINATED NODE   READINESS GATES
shared-volume-emptydir   2/2     Running   0          137m   10.36.0.4   worker-1.example.com   <none>           <none>
So the containers are created on worker1 node. List the available
docker containers on worker1:
[root@worker-1 ~]# docker ps
CONTAINER ID        IMAGE                  COMMAND                  CREATED             STATUS              PORTS               NAMES
fc1e28f4e745        alpine                 "/bin/sleep 999999"      2 hours ago         Up 2 hours                              k8s_alpine2_shared-volume-emptydir_default_f2bf42e2-ef45-4abc-bbda-0bc82edb7d40_0
4459730a01f5        alpine                 "/bin/sleep 999999"      2 hours ago         Up 2 hours                              k8s_alpine1_shared-volume-emptydir_default_f2bf42e2-ef45-4abc-bbda-0bc82edb7d40_0
d1600fbf812c        k8s.gcr.io/pause:3.2   "/pause"                 2 hours ago         Up 2 hours                              k8s_POD_shared-volume-emptydir_default_f2bf42e2-ef45-4abc-bbda-0bc82edb7d40_0
a8cfd8cc1cdb        alpine                 "/bin/sleep 999999"      4 hours ago         Up 4 hours                              k8s_main_pod-privileged_default_322c1041-c9e0-489a-ac9e-54a19b816e6f_4
...
After the Pod is running, you can use docker inspect <container ID> on
the respective worker node and you can see the detailed mount points
inside your container. The default mount propagation isrprivate,
which means any mount points on the host are invisible in the container,
and vice versa.
[root@worker-1 ~]# docker inspect 4459730a01f5   <-- First container
...
        "Mounts": [
            {
                "Type": "bind",
                "Source": "/var/lib/kubelet/pods/f2bf42e2-ef45-4abc-bbda-0bc82edb7d40/volumes/kubernetes.io~empty-dir/data",  <-- Same source path for both containers
                "Destination": "/alpine1",
                "Mode": "",
                "RW": true,
                "Propagation": "rprivate"
            },
...

[root@worker-1 ~]# docker inspect fc1e28f4e745   <-- Second container
...
        "Mounts": [
            {
                "Type": "bind",
                "Source": "/var/lib/kubelet/pods/f2bf42e2-ef45-4abc-bbda-0bc82edb7d40/volumes/kubernetes.io~empty-dir/data", <-- Same source path for both containers
                "Destination": "/alpine2",
                "Mode": "",
                "RW": true,
                "Propagation": "rprivate"
            },
...
Using emptyDir with Memory
The emptyDir we used as the volume was created on the actual disk of
the worker node hosting your pod, so its performance depends on the type
of the node’s disks. But we can tell Kubernetes to create the emptyDir
on a tmpfs filesystem (in memory instead of on disk).
Here we will create another Pod with the same YML as we used for
shared-volume-emptydir with the following changes:
...
  volumes:
  - name: data
    emptyDir:
      medium: Memory
Next we will create the Pod
[root@controller ~]# kubectl create -f shared-volume-emptydir.yml
pod/shared-volume-memory created
Make sure all the containers part of this Pod is in running state:
[root@controller ~]# kubectl get pods shared-volume-memory
NAME                   READY   STATUS    RESTARTS   AGE
shared-volume-memory   2/2     Running   0          13m
Now that our containers are in Running state, we can check the
FileSystem type of the mounted partition:
Check mount-point usage and filesystem types with df; the df and du covers -h, -T, and filtering pseudo-filesystems.
[root@controller ~]# kubectl exec -it shared-volume-memory -c alpine2 -- df -h /alpine2
Filesystem                Size      Used Available Use% Mounted on
tmpfs                     1.4G         0      1.4G   0% /alpine2
So now we have a tmpfs FileSystem for our mount point which if you
compare from our old Pod i.e. shared-volume-emptydir was mounted on
disks:
[root@controller ~]# kubectl exec -it shared-volume-emptydir -c alpine2 -- df -h /alpine2
Filesystem                Size      Used Available Use% Mounted on
/dev/mapper/rhel-root
                         10.3G      7.9G      1.8G  81% /alpine2
tmpfs is stored in memory instead of in the filesystem. No file
will be created, and it'll be flushed in every reboot. In addition, it
is constrained by memory limits in Kubernetes.
Using hostPath
hostPath acts as data volume in Docker. The local folder on a node
listed in hostPath will be mounted into the Pod.
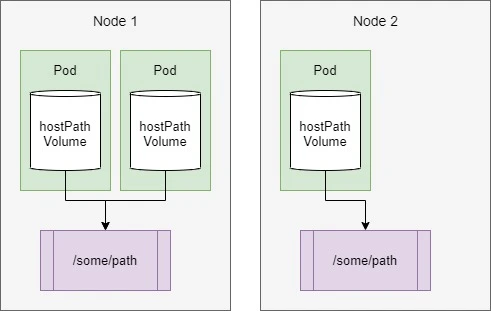
hostPathvolumes are the first type of persistent storage, because both thegitRepoandemptyDirvolumes’ contents get deleted when a pod is torn down, whereas ahostPathvolume’s contents don’t.- If a pod is deleted and the next pod uses a
hostPathvolume pointing to the same path on the host, the new pod will see whatever was left behind by the previous pod, but only if it’s scheduled to the same node as the first pod. - Because the volume’s contents are stored on a specific node’s filesystem, when the database pod gets rescheduled to another node, it will no longer see the data.
- This explains why it’s not a good idea to use a
hostPathvolume for regular pods, because it makes the pod sensitive to what node it’s scheduled to.
Here we are creating a new Pod using hostPath as /tmp/data:
[root@controller ~]# cat shared-volume-hostpath.yml
apiVersion: v1
kind: Pod
metadata:
  name: shared-volume-hostpath
spec:
  containers:
  - name: alpine1
    image: alpine
    command: ["/bin/sleep", "999999"]
    volumeMounts:
    - mountPath: /alpine1
      name: data
  - name: alpine2
    image: alpine
    command: ["/bin/sleep", "999999"]
    volumeMounts:
    - mountPath: /alpine2
      name: data
  volumes:
  - name: data
    hostPath:
      path: /tmp/data
Next we will create this Pod:
[root@controller ~]# kubectl create -f shared-volume-hostpath.yml
pod/shared-volume-hostpath created
Make sure both the containers in this Pod are up and running:
[root@controller ~]# kubectl get pods shared-volume-hostpath -o wide
NAME                     READY   STATUS    RESTARTS   AGE     IP          NODE                   NOMINATED NODE   READINESS GATES
shared-volume-hostpath   2/2     Running   0          3m50s   10.36.0.5   worker-1.example.com   <none>           <none>
In the above command you can see that our Pod is running on worker-1
so on this target node you can use docker inspect <container-id> to
get the Mount details:
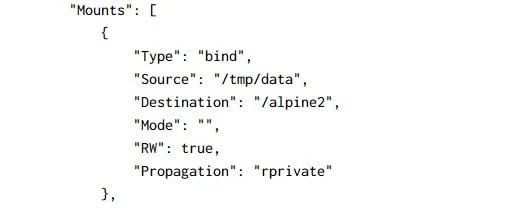
Now we if create an empty file in the shared path on any of the container:
[root@controller ~]# kubectl exec -it shared-volume-hostpath -c alpine1 -- touch /alpine1/someFile.txt
We should also see this data on the respective worker node under the
source path i.e. /tmp/data:
[root@worker-1 ~]# ll /tmp/data/
total 0
-rw-r--r-- 1 root root 0 Jan  7 15:26 someFile.txt
Using NFS
You can mount an network filesystem (NFS) to your Pod as nfs volume. Multiple Pods can mount and share the files in the same nfs volume. The data stored into nfs volume will be persistent across the Pod lifetime.
nfs-utils package is installed on Kubernetes minions. You should check
out the/etc/exportsfile with a proper sharing parameter and
directory, and use
themount -t nfs : command
to
check whether it could be mounted locally.
The configuration file of the volume type with NFS is similar to others,
but nfs.server and nfs.path are required in the volume definition to
specify NFS server information and the path mounted from nfs.readOnly
is an optional field for specifying whether the volume is read-only or
not (the default is false):
[root@controller ~]# cat shared-volume-nfs.yml
apiVersion: v1
kind: Pod
metadata:
  name: shared-volume-nfs
spec:
  containers:
  - name: alpine1
    image: alpine
    command: ["/bin/sleep", "999999"]
    volumeMounts:
    - mountPath: /alpine1
      name: data
  - name: alpine2
    image: alpine
    command: ["/bin/sleep", "999999"]
    volumeMounts:
    - mountPath: /alpine2
      name: data
  volumes:
  - name: data
    nfs:
      server: controller
      path: /nfs_share
Next we will create this Pod:
[root@controller ~]# kubectl create -f shared-volume-nfs.yml
pod/shared-volume-nfs created
Check the status of the containers to make sure they are in Running
state:
[root@controller ~]# kubectl get pods shared-volume-nfs -o wide
NAME                READY   STATUS    RESTARTS   AGE    IP          NODE                   NOMINATED NODE   READINESS GATES
shared-volume-nfs   2/2     Running   0          2m7s   10.36.0.6   worker-1.example.com   <none>           <none>
You can use kubectl describe pod <pod-name> to check if the mounting
status. If it's mounted successfully, it should show conditions. Ready
as true and the target nfs you mount:
If we inspect the container with the docker command, we can see the
volume information in the Mounts section:
Actually, Kubernetes just mounts your <nfs server>:<share name> into
/var/lib/kubelet/pods/<id>/volumes/kubernetes.io~nfs/nfs, and then
mounts it into the container as the destination in /<mount-point>. You
could also use kubectl exec to touch the file, to test whether it's
perfectly mounted.
I will also connect to one of the containers and make sure the NFS path is properly mounted:
[root@controller ~]# kubectl exec -it shared-volume-nfs -c alpine1 -- mount | grep nfs_share
controller:/nfs_share on /alpine1 type nfs4 (rw,relatime,vers=4.2,rsize=524288,wsize=524288,namlen=255,hard,proto=tcp,timeo=600,retrans=2,sec=sys,clientaddr=192.168.43.49,local_lock=none,addr=192.168.43.48)
Let me create an empty file inside /alpine1
[root@controller ~]# kubectl exec -it shared-volume-nfs -c alpine1 -- touch /alpine1/someFile.txt
As you see the file is also available on our NFS server's source path
[root@controller ~]# ls -l /nfs_share/
total 0
-rw-r--r-- 1 root root 0 Jan  7 16:34 someFile.txt
Conclusion
In this Kubernetes Tutorial we learned you how volumes are used to provide either temporary or persistent storage to a pod’s containers. You’ve learned how to
- Create a multi-container pod and have the pod’s containers operate on the same files by adding a volume to the pod and mounting it in each container
- Use the
emptyDirvolume to store temporary, non-persistent data - Use the NFS volume to use persistent volume which can store the data of the containers even when the containers are started on a different worker node.
- Use the
hostPathvolume to access files from the host node
