This tutorial is going to guide you in the most perplexing of ways. Trust me. It’s about creating an image gallery using Laravel and an Intervention Image library. It starts off with a lot of basic stuff like setup, image uploading, and gallery display. Then it gets into more complicated things but not too hard where its difficult to understand.
Laravel is a very popular PHP framework that was designed for all of your web application needs. Following the model-view-controller (MVC) architectural pattern, Laravel brings new life to building applications. With this powerful toolset, it simplifies tasks in everyday projects such as routing, authentication, sessions, caching and so much more! This package will quickly become any developer's go-to choice when looking to build scalable applications fast.
The Intervention Image package is the best there is when it comes to handling images in Laravel apps. Its open-source layout makes it very simple and easy to use as well. Not only does this have a lot of great features for editing images but its also super flexible with making them as well! You can create and compose whatever you need with ease using this package. Also if you are wondering about how many image formats Intervention Image can handle don’t worry! Its got all of them covered from resizing to cropping or even adding watermarks this tool has everything you need!
Steps to build an Image Gallery using Laravel Intervention
1. Setting Up Laravel Project
Ensure that Laravel is installed
before setting up application. We're going to make a different project
to showcase the uses of Laravel Intervention. I keep all my projects at
/opt/projects in my system, but you can select any path you like.
Open your terminal or command prompt and run this Composer command to
create a new project called "laravelImageApp":
sudo mkdir -p /opt/projects
sudo chmod 777 /opt/projects
cd /opt/projects
composer create-project --prefer-dist laravel/laravel laravelImageApp
This command will download and install a fresh Laravel application in a directory named "laravelImageApp". Once the installation is complete, you can navigate into your project directory with:
cd laravelImageAppGet your database settings figured out. You can find them in the .env
file at the root of your Laravel project. It’s actually already covered
when we were installing Laravel, so I’ll just
use the same values:
DB_CONNECTION=mysql
DB_HOST=127.0.0.1
DB_PORT=3306
DB_DATABASE=my_laravel_db
DB_USERNAME=user1
DB_PASSWORD=Passw0rd
Generate a migration for images table:
php artisan make:migration create_images_table --create=images
Edit the migration file using any text editor or IDE to define your table structure which was created with above command:
Schema::create('images', function (Blueprint $table) {
    $table->id();
    $table->string('title');
    $table->string('filename');
    $table->timestamps();
});
Apply the migration to create the table:
php artisan migrate
2. Installing and Configuring the Intervention Image Package (Version 3)
Install the Laravel-specific package for Intervention Image:
composer require intervention/image-laravel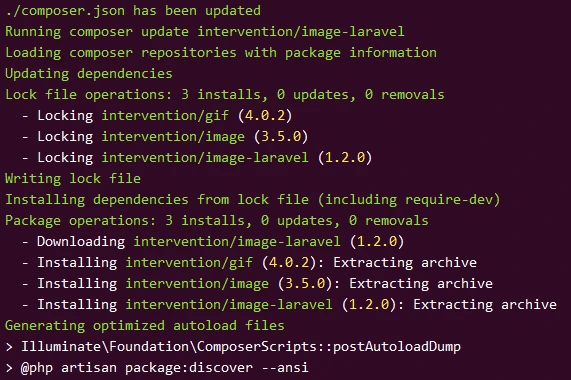
Intervention\Image\ImageServiceProvider and you may get error
Class "Intervention\Image\ImageServiceProvider" not found if you are
still using config/app.php.
Publish the configuration file if you need to customize library settings (Optional):
php artisan vendor:publish --provider="Intervention\Image\Laravel\ServiceProvider"
This command creates a config file at config/image.php, where you can
adjust settings as needed, though for many applications, the defaults
are sufficient.
3. Create a Model
Generate an Image model:
php artisan make:model ImageGo to the app/Models folder and click on the Image.php document.
This has been made by you when used php artisan make:model Image. To
begin with, in the Image model class you will have to determine which
attributes are mass assignable. This is an important security measure
that allows for only specific attributes to be included when several are
being assigned.
<?php

namespace App\Models;

use Illuminate\Database\Eloquent\Factories\HasFactory;
use Illuminate\Database\Eloquent\Model;

class Image extends Model
{
    /**
     * The attributes that are mass assignable.
     *
     * @var array<int, string>
     */
    protected $fillable = ['title', 'filename'];
}
An array $fillable is a database columns names that can be assigned in mass. For this image gallery, title and filename are the attributes we want to allow to be mass-assigned.
4. Creating a Controller
Create a controller for handling image uploads and display.
php artisan make:controller ImageController
In ImageController.php, add methods for showing the upload form
(create), storing uploaded images (store), and displaying images
(index).
<?php

namespace App\Http\Controllers;

use Illuminate\Http\Request;
use App\Models\Image;
use Intervention\Image\Facades\Image as ImageFacade;

class ImageController extends Controller
{
    /**
     * Show the form for uploading a new image.
     *
     * @return \Illuminate\Http\Response
     */
    public function create()
    {
        return view('images.create');
    }

    /**
     * Store a newly uploaded image in storage and database.
     *
     * @param  \Illuminate\Http\Request  $request
     * @return \Illuminate\Http\Response
     */
    public function store(Request $request)
    {
        $request->validate([
            'title' => 'required|max:255',
            'image' => 'required|image|mimes:jpeg,png,jpg,gif,svg|max:2048',
        ]);

        $imageFile = $request->file('image');
        $filename = time() . '.' . $imageFile->getClientOriginalExtension();

        // Save the image file to public storage
        $path = $imageFile->storeAs('images', $filename, 'public');

        // Optionally, you can use Intervention Image to manipulate the image
        // $image = ImageFacade::make($imageFile)->resize(800, null, function ($constraint) {
        //     $constraint->aspectRatio();
        // })->save(public_path('storage/images/' . $filename));

        // Create a new image record using Eloquent
        Image::create([
            'title' => $request->title,
            'filename' => $filename
        ]);

        // Redirect back to the same page with a success message
        return back()->with('success', 'Image uploaded successfully!');
    }

    /**
     * Display a listing of the images.
     *
     * @return \Illuminate\Http\Response
     */
    public function index()
    {
        $images = Image::all();
        return view('images.index', compact('images'));
    }
}
The function of this controller is:
- create(): A view with a form for uploading images is returned.
Ensure there are templates corresponding to them in the directory
resources/views/images/create.blade.php. - store(Request $request): Validate the uploaded file and title,
handle the image (resize or manipulate it using Intervention Image),
store it in
public/storage/images, and keep its information in the database. Then, redirect to image gallery with successful message. - index(): Fetch all images from database and give them out to
gallery view found at
resources/views/images/index.blade.phpfor display.
The storeAs function lives up to its name. It stores the image in the
storage/app/public/images directory. In order for these images to be
publicly accessible, you need to create a symbolic link from
public/storage to storage/app/public. If you haven't done this yet,
run this Artisan command:
php artisan storage:linkThis command creates a symbolic link that allows you to access stored
files from the public directory. After doing this, you can access your
images via a URL like http://yourapp.test/storage/images/filename.jpg.
5. Creating Layouts and Views
Laravel’s templating engine, Blade, is a great way to keep things consistent across your application. You can make certain views inherit from a base layout to maintain that consistency.
We will create a new directory under resources/views to store our
layout:
mkdir resources/views/layoutsNext create a base layout app.blade.php within the
resources/views/layouts directory.
<!-- Bootstrap CSS -->
<link rel="stylesheet" href="https://stackpath.bootstrapcdn.com/bootstrap/4.5.2/css/bootstrap.min.css">

<!DOCTYPE html>
<html lang="{{ str_replace('_', '-', app()->getLocale()) }}">
<head>
    <meta charset="UTF-8">
    <meta name="viewport" content="width=device-width, initial-scale=1.0">
    <title>Image Gallery</title>
    <!-- Link to CSS (e.g., Bootstrap for styling) -->
    <link href="{{ asset('css/app.css') }}" rel="stylesheet">
</head>
<body>
    <div id="app">
        <nav class="navbar navbar-expand-lg navbar-light bg-light">
            <div class="container">
                <a href="{{ route('images.index') }}">Image Gallery</a>
            </div>
        </nav>

        <main class="py-4">
            @yield('content')
        </main>
    </div>

    <!-- Scripts -->
    <script src="{{ asset('js/app.js') }}" defer></script>
</body>
</html>

<!-- Optional JavaScript -->
<!-- jQuery first, then Popper.js, then Bootstrap JS -->
<script src="https://code.jquery.com/jquery-3.5.1.slim.min.js"></script>
<script src="https://cdn.jsdelivr.net/npm/@popperjs/[email protected]/dist/umd/popper.min.js"></script>
<script src="https://stackpath.bootstrapcdn.com/bootstrap/4.5.2/js/bootstrap.min.js"></script>
This layout includes a basic navigation bar and a content area where your specific page content will be inserted. Adjust the layout to fit your application's needs. We are using Bootstrap's modal component for the clickable thumbnails that open a larger image in a modal
Next create views for uploading and displaying images. You might need at
least two views: create.blade.php for the upload form and
index.blade.php for displaying the images.
I will create a new directory to store my views:
mkdir resources/views/imagesNext create upload form view inside
resources/views/images/create.blade.php. This view displays a form
allowing users to upload an image with a title.
{{-- Layout and section directives might vary based on your app's structure --}}
@extends('layouts.app')

@section('content')
<div class="container">
    <h1>Upload Image</h1>
    @if(session('success'))
        <div class="alert alert-success">
            {{ session('success') }}
        </div>
    @endif
    <form action="{{ url('/images') }}" method="post" enctype="multipart/form-data">
        @csrf
        <div class="form-group">
            <label for="title">Image Title:</label>
            <input type="text" class="form-control" id="title" name="title" required>
        </div>
        <div class="form-group">
            <label for="image">Select image:</label>
            <input type="file" class="form-control" id="image" name="image" required>
        </div>
        <button type="submit" class="btn btn-primary">Upload</button>
    </form>
</div>
@endsection
Next create gallery view under resources/views/images/index.blade.php.
This view displays all uploaded images in a simple gallery format.
{{-- Layout and section directives might vary based on your app's structure --}}
@extends('layouts.app')

@section('content')
<div class="container">
    <h1>Image Gallery</h1>
    <div class="row">
        @foreach($images as $image)
            <div class="col-md-4">
                <div class="thumbnail">
                    <!-- Thumbnail Image -->
                    <img src="{{ asset('storage/images/' . $image->filename) }}" alt="{{ $image->title }}" style="width:100%; cursor:pointer;" data-toggle="modal" data-target="#imageModal{{ $image->id }}">

                    <!-- Modal -->
                    <div class="modal fade" id="imageModal{{ $image->id }}" tabindex="-1" role="dialog" aria-labelledby="imageModalLabel{{ $image->id }}" aria-hidden="true">
                        <div class="modal-dialog modal-lg" role="document">
                            <div class="modal-content">
                                <div class="modal-header">
                                    <h5 class="modal-title" id="imageModalLabel{{ $image->id }}">{{ $image->title }}</h5>
                                    <button type="button" class="close" data-dismiss="modal" aria-label="Close">
                                        <span aria-hidden="true">×</span>
                                    </button>
                                </div>
                                <div class="modal-body">
                                    <!-- Full Size Image -->
                                    <img src="{{ asset('storage/images/' . $image->filename) }}" alt="{{ $image->title }}" style="width:100%;">
                                </div>
                            </div>
                        </div>
                    </div>
                    <!-- End of Modal -->
                </div>
            </div>
        @endforeach
    </div>
</div>
@endsection
6. Define Routes
In routes/web.php, define routes for your image gallery:
use App\Http\Controllers\ImageController;

Route::get('/images', [ImageController::class, 'index'])->name('images.index');
Route::get('/images/upload', [ImageController::class, 'create'])->name('images.create');
Route::post('/images', [ImageController::class, 'store'])->name('images.store');
7. Testing the application
Next we will start our Laravel application by running the following command in the terminal:
php artisan serveThis command will start a development server at http://127.0.0.1:8000 by default.
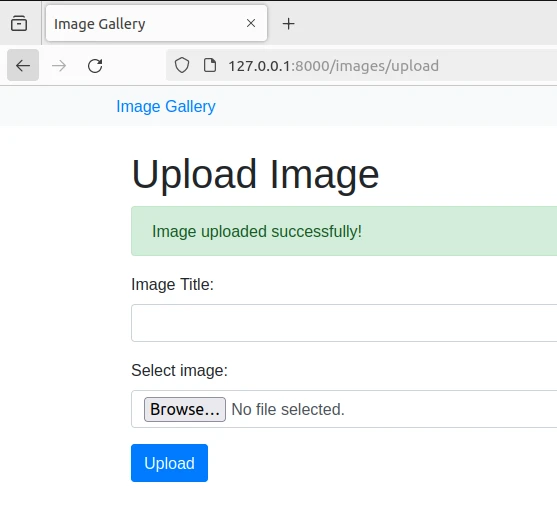
To start, open a browser and go to http://127.0.0.1:8000/images/upload.
You should be able to see an image upload form that looks similar to the
create.blade.php view. If you can't , make sure that your routes are
properly set up in routes/web.php and that your views are named
correctly and in the correct directory

Next to upload your image:
- Fill in the "Image Title" field.
- Choose an image file by clicking on "Select image."
- Submit the form by clicking on the "Upload" button.
Once the Image is loaded successfully, you should see a confirmation:
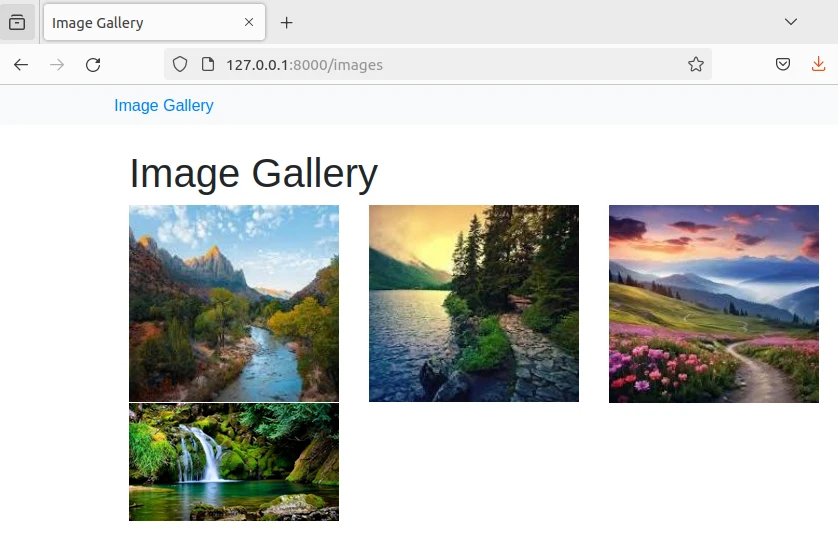
Next either click on "Image Gallery" link or navigate to 127.0.0.1:8000/images to view the image gallery:
Use Laravel's built-in debugging tools and logs
(storage/logs/laravel.log) to troubleshoot any issues.
Conclusion
I’ve completely broken out the process of building an image gallery with Laravel into several key areas: setting up a Laravel project, integrating Intervention Image for image manipulation, creating a database model for storing image information, handling file uploads through a controller, and displaying images both as thumbnails and in full size using Bootstrap modals. Here's the rundown:
- Setting Up a New Laravel Project: Starting from scratch by creating a new Laravel project and preparing it to be developed.
- Integrating Intervention Image: Perfect guide on how to install and configure the Intervention Image library for Laravel. This enables us to have advanced image manipulation capabilities within our application.
- Database and Model Configuration: We set up a migration for creating an images table, ran the migration, and created an Eloquent model to interact with this table.
- Image Upload Handling: Created a form your users can use to upload their photos with ease. Then we created a controller that handles those forms submissions, validates uploaded files and saves them all accordingly.
- Displaying Images: Finally we showed how to display uploaded images in a gallery — using thumbnails to keep things nice and clean. And of course using Bootstrap modals for viewing full-size images.
Suggestions for Advanced Customization and Feature Expansion
- Seamless Gallery Updates: Once AJAX uploads are in place, amp up
the gallery's playfulness by adding new image thumbnails instantly as
soon as they’re uploaded. Get rid of page refreshes.
Extended Image Manipulation: Use every tool in the suit to grant your users options on doing whatever they want with their images. From cropping, resizing, and applying artistic filters pre-upload. - Secure User Accounts: Authenticate all your user’s info so that way you can link images with specific users. Granting exclusive rights for them to upload and manage their personal image collections.
- Advanced Image Search: Introduce a tagging system for images coupled with a robust search functionality. Allow your users to find what they need effortlessly based on tags or descriptive titles.
- Optimize for All Devices: Make sure everyone has a good time no matter how they’re viewing it by using responsive design techniques across all devices and frameworks like Bootstrap or Tailwind CSS for fluid layouts.
- Cloud Storage Solutions: Switch things up! For enhanced durability and scalability, consider moving your image storage elsewhere with cloud-based services like Amazon S3 or Google Cloud Storage. Then use Laravel's built-in file system abstraction to streamline everything!
- Bolster Security Measures : Increase security by enforcing rigorous server-side validation for all uploads and safeguard against potential threats. Ensure only legitimate files are processed.
