
You’re about to embark on a whirlwind tutorial that will change your life, my friend. We’re diving deep into the world of Laravel Validation. By the end, you’ll know everything from basic rules and advanced techniques to custom rule creation, error handling, and more!
The Laravel validation system is a beast (in the best way possible). With it, you can apply multiple built-in validation rules to your data — whether it’s checking for string length, numerical ranges, uniqueness in a database or format conformity. But the fun doesn’t stop there. This open-source PHP framework also comes equipped with a clean and fluent API that lets you define these rules with ease.
Long story short? You’ll be spending a lot less time debugging code and much more time getting sh!t done once you master this Laravel Validation tutorial.
Setting Up Laravel Project for Validation
We will create a separate project where we will demonstrate all the different kinds of Laravel validation. Now these steps would require that Laravel is already installed on your setup.
sudo mkdir -p /opt/projects
sudo chmod 777 /opt/projects
cd /opt/projects
composer create-project --prefer-dist laravel/laravel laravelValidationDemo
This command downloads the Laravel framework and sets up a new project for you.
Navigate to your project directory
cd laravelValidationDemoConfigure .env file for any environment-specific settings, such as database connections. I had created MariaDB database while installing Laravel so I will use the same database in this project:
DB_CONNECTION=mysql
DB_HOST=127.0.0.1
DB_PORT=3306
DB_DATABASE=my_laravel_db
DB_USERNAME=user1
DB_PASSWORD=Passw0rd
If you made any changes to your .env file then you can
perform a migration:
php artisan migrateThis step is optional and depends on whether your validation examples require database interaction.
To start the Laravel development server, run:
php artisan serveThis command starts a web server, making your new Laravel application
accessible in your web browser at http://localhost:8000.
List of supported Laravel Validation Rules
Here I will try to list down some of the most common and widely used validation rules in Laravel but the list may be longer which you can find in official documentations of Laravel:
| Validation Rule | Description | Example Usage |
|---|---|---|
bail |
Stop running validation rules after the first validation failure. | `'name' => 'bail |
before:date |
The field under validation must be before a given date. | 'end_date' => 'before:2023-01-01' |
before_or_equal:date |
The field under validation must be before or equal to a given date. | 'end_date' => 'before_or_equal:start_date' |
date_equals:date |
The field under validation must be equal to the given date. | 'start_date' => 'date_equals:today' |
date_format:format |
The field under validation must match the given format. | 'event_time' => 'date_format:Y-m-d H:i:s' |
different:field |
The field under validation must have a different value than another field. | 'password' => 'different:current_password' |
digits:value |
The field under validation must be numeric and must have an exact length of value. | 'postal_code' => 'digits:5' |
digits_between:min,max |
The field under validation must have a length between the given min and max. | 'age' => 'digits_between:1,2' |
dimensions |
The file under validation must match the given dimensions. | 'photo' => 'dimensions:min_width=100,min_height=200' |
distinct |
Each item in the field under validation must be unique. | 'user_ids' => 'distinct' |
ends_with:foo,bar,... |
The field under validation must end with one of the given values. | 'file' => 'ends_with:txt,csv' |
gt:field |
The field under validation must be greater than another field. | 'end_year' => 'gt:start_year' |
gte:field |
The field under validation must be greater than or equal to another field. | 'quantity' => 'gte:minimum_order' |
image |
The file under validation must be an image (jpeg, png, bmp, gif, svg, or webp). | 'avatar' => 'image' |
in_array:anotherfield.* |
The field under validation must exist in another field's values. | 'option' => 'in_array:available_options.*' |
integer |
The field under validation must be an integer. | 'votes' => 'integer' |
ip |
The field under validation must be an IP address. | 'server_ip' => 'ip' |
ipv4 |
The field under validation must be an IPv4 address. | 'local_ip' => 'ipv4' |
ipv6 |
The field under validation must be an IPv6 address. | 'global_ip' => 'ipv6' |
json |
The field under validation must be a valid JSON string. | 'metadata' => 'json' |
lt:field |
The field under validation must be less than another field. | 'start_year' => 'lt:end_year' |
lte:field |
The field under validation must be less than or equal to another field. | 'used_space' => 'lte:total_space' |
mimes:foo,bar,... |
The file under validation must have one of the given MIME types. | 'document' => 'mimes:doc,docx,pdf' |
mimetypes:text/plain,... |
The file under validation must match one of the given MIME types. | 'data_file' => 'mimetypes:text/plain' |
not_regex:pattern |
The field under validation must not match the given regular expression. | 'username' => 'not_regex:/^[a-z0-9]+$/i' |
nullable |
The field under validation can be null. | `'nickname' => 'nullable |
numeric |
The field under validation must be numeric. | 'weight' => 'numeric' |
password |
The field under validation must be a valid password. | 'password' => 'password' |
present |
The field under validation must be present in the input data but can be empty. | 'middle_name' => 'present' |
prohibited |
The field under validation must be empty or not present. | 'deprecated' => 'prohibited' |
prohibited_if:field,value,... |
The field under validation must be empty or not present if another field is equal to any value. | 'old_feature' => 'prohibited_if:status,active' |
prohibited_unless:field,value,... |
The field under validation must be empty or not present unless another field is equal to any value. | 'legacy_field' => 'prohibited_unless:mode,legacy' |
regex:pattern |
The field under validation must match the given regular expression. | 'code' => 'regex:/^[A-Z]+\d+$/' |
required |
The field under validation must be present and not empty. | 'name' => 'required' |
required_if:field,value,... |
The field under validation must be present and not empty if another field is equal to any value. | 'city' => 'required_if:country,US' |
required_unless:field,value,... |
The field under validation must be present and not empty unless another field is equal to any value. | 'state' => 'required_unless:country,CA' |
required_with:foo,bar,... |
The field under validation must be present and not empty only if any of the other specified fields are present. | 'last_name' => 'required_with:first_name' |
required_with_all:foo,bar,... |
The field under validation must be present and not empty only if all of the other specified fields are present. | 'password_confirmation' => 'required_with_all:password' |
required_without:foo,bar,... |
The field under validation must be present and not empty only if any of the other specified fields are not present. | 'email' => 'required_without:phone' |
required_without_all:foo,bar,... |
The field under validation must be present and not empty only if all of the other specified fields are not present. | 'contact_method' => 'required_without_all:email,phone' |
same:field |
The field under validation must match the value of another field. | 'password_confirmation' => 'same:password' |
size:value |
The field under validation must have a size matching the given value. | 'username' => 'size:8' |
sometimes |
The field under validation may be present but is not required. | `'optional_field' => 'sometimes |
starts_with:foo,bar,... |
The field under validation must start with one of the specified values. | 'prefix' => 'starts_with:Mr.,Mrs.,Miss.' |
string |
The field under validation must be a string. | 'greeting' => 'string' |
timezone |
The field under validation must be a valid timezone identifier according to the timezone_identifiers_list PHP function. |
'user_timezone' => 'timezone' |
unique:table,column,except,idColumn |
The field under validation must be unique in a database table, ignoring a specific ID. | 'email' => 'unique:users,email_address,NULL,id,account_id,1' |
url |
The field under validation must be a valid URL. | 'homepage' => 'url' |
uuid |
The field under validation must be a valid UUID. | 'identifier' => 'uuid' |
Basic Validation Rules
1. Create a Controller
First, create a controller where we will define our form handling logic and validation rules.
Open your terminal and navigate to your Laravel project directory. Run
the following Artisan command to create a controller named
FormController:
php artisan make:controller FormController
2. Define Routes
Open the routes/web.php file in your Laravel project and define a
route for displaying the form and another for handling the form
submission. Add the following lines:
use App\Http\Controllers\FormController;

Route::get('/form', [FormController::class, 'showForm'])->name('showForm');
Route::post('/submit-form', [FormController::class, 'submitForm'])->name('submitForm');
3. Create the Form View
Create a new file named form.blade.php in the resources/views
directory. Add a simple HTML form with input fields for name, email, and
age:
<!-- resources/views/form.blade.php -->
<form action="{{ route('submitForm') }}" method="POST">
    @csrf
    <label for="name">Name:</label>
    <input type="text" name="name" id="name">
    <br>
    <label for="email">Email:</label>
    <input type="email" name="email" id="email">
    <br>
    <label for="age">Age:</label>
    <input type="text" name="age" id="age">
    <br>
    <button type="submit">Submit</button>
</form>

@if ($errors->any())
    <div class="alert alert-danger">
        <ul>
            @foreach ($errors->all() as $error)
                <li>{{ $error }}</li>
            @endforeach
        </ul>
    </div>
@endif
After submitting, Laravel will automatically redirect back to the form with error messages for each field that fails validation. These errors are stored in a session variable and can be displayed in your form view by iterating over them:
4. Implement Validation Logic
In the FormController you created, implement the showForm method to
return the form view, and the submitForm method to handle form
submission and validation. Here's how you might write these methods:
namespace App\Http\Controllers;

use Illuminate\Http\Request;

class FormController extends Controller
{
    public function showForm()
    {
        return view('form');
    }

    public function submitForm(Request $request)
    {
        $validatedData = $request->validate([
            'name' => 'required|string|max:255',
            'email' => 'required|email',
            'age' => 'required|numeric',
        ]);

        // Process the data...
        return back()->with('success', 'Form submitted successfully!');
    }
}
5. Test the Validation
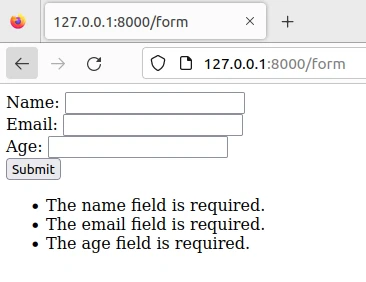
Navigate to http://localhost:8000/form in your web browser. Try
submitting the form with various inputs to see how Laravel handles
validation:
Leave all fields blank to test the required validation.
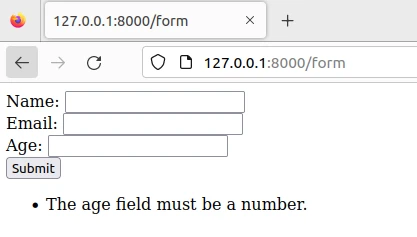
Enter a non-numeric value in the age field to test the numeric validation.
Enter an improperly formatted email to test the email validation.

Create Custom Validation Rules
Laravel’s custom validation rules are a way to put complex logic into one neat and easy-to-manage package. Standard rule sets aren’t always enough when there’s more to check than just data formatting. Custom validation makes it possible for unique business needs to come true.
1. Use Artisan to Generate a Custom Rule
Laravel provides a convenient Artisan command to generate a new rule class:
php artisan make:rule IsEvenThis command generates a new rule class in the app/Rules directory,
specifically app/Rules/IsEven.php.
2. Implement the Rule Logic
Open the generated rule class app/Rules/IsEven.php. You'll see two
methods: passes and message.
passes($attribute, $value): This is where you define the validation logic. It should returntrueif the validation passes andfalseotherwise.message(): Defines the error message that will be returned if the validation fails.
<?php

namespace App\Rules;

use Closure;
use Illuminate\Contracts\Validation\Rule;

class IsEven implements Rule
{
    public function passes($attribute, $value)
    {
        // Check if the number is even
        return $value % 2 == 0;
    }

    public function message()
    {
        return 'The :attribute must be an even number.';
    }
}
3. Configure Controller
You can either use your existing controller or generate a new
controller. In my case I will generate a new controller called
NumberController:
php artisan make:controller NumberController
Open app/Http/Controllers/NumberController.php and add a method to
show the form and another to handle the form submission:
namespace App\Http\Controllers;

use Illuminate\Http\Request;
use App\Rules\IsEven;

class NumberController extends Controller
{
    // Show the form
    public function show()
    {
        return view('number_form');
    }

    // Handle the form submission
    public function submit(Request $request)
    {
        $request->validate([
            'number' => ['required', 'numeric', new IsEven],
        ]);

        return back()->with('success', 'The number is even!');
    }
}
4. Define Routes
Open routes/web.php and define two routes for showing the form and
handling the submission:
use App\Http\Controllers\NumberController;

Route::get('/number', [NumberController::class, 'show']);
Route::post('/number', [NumberController::class, 'submit']);
5. Create the Form View
Create a new Blade template at resources/views/number_form.blade.php. This form will
submit a number to be validated by our custom rule:
<!DOCTYPE html>
<html>
<head>
    <title>Number Validation</title>
</head>
<body>

@if(session('success'))
    <p>{{ session('success') }}</p>
@endif

@if($errors->any())
    <ul>
        @foreach($errors->all() as $error)
            <li>{{ $error }}</li>
        @endforeach
    </ul>
@endif

<form action="/number" method="POST">
    @csrf
    <label for="number">Enter a number:</label>
    <input type="text" id="number" name="number">
    <button type="submit">Submit</button>
</form>

</body>
</html>
This form will display any success messages or validation errors, and it provides an input for the user to submit a number.
6. Test the Custom Validation Rule
Start your Laravel development server:
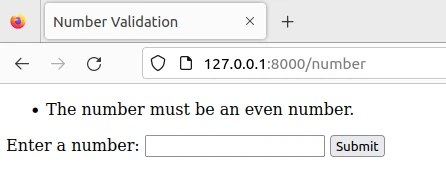
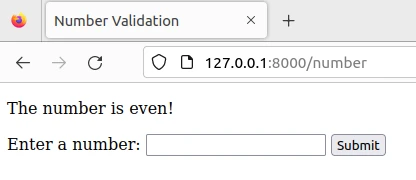
php artisan serveNavigate to http://localhost:8000/number in your web browser. Try
entering both even and odd numbers to see how the custom validation rule
works. If you enter an even number, you should see the success message.
If you enter an odd number or anything that's not a number, you'll see
the validation error message defined in the IsEven rule.
7. Make the Custom Rule Globally Accessible
To make the IsEven rule (or any custom rule) globally accessible in
Laravel, allowing you to use it directly in your validation rules, you
can register it as a custom validation rule within a service provider.
The most common place to register custom validation rules is within the
boot method of your AppServiceProvider. You can find this file in
the app/Providers directory.
use Illuminate\Support\Facades\Validator;

public function boot()
{
    Validator::extend('is_even', function ($attribute, $value, $parameters, $validator) {
        return $value % 2 == 0;
    }, 'The :attribute must be an even number.');
}
Here’s what’s happening in the code above:
Validator::extendis used to add a custom rule. The first parameter is the name of the rule, which you will use in your validations. In this case, it'sis_even.- The second parameter is a closure that contains your validation logic.
It returns
trueif the validation passes andfalseotherwise. - The third parameter is the error message that will be used if the
validation fails. The
:attributeplaceholder will be replaced by the actual attribute name being validated.
After registering your custom rule as shown above, you can use it
directly in your validation rules array by its name, is_even, like so
in app/Http/Controllers/NumberController.php:
public function submit(Request $request)
    {
        $request->validate([
            'number' => 'required|is_even',
        ]);

        return back()->with('success', 'The number is even!');
    }
As you can notice, now instead of using new IsEven we are directly
using is_even as our validation rule. Next
clear your cache:
php artisan config:cacheThis command clears the configuration cache to ensure your application is working with the most recent configurations, including your newly registered global validation rule.
Validate the rule on the browser:
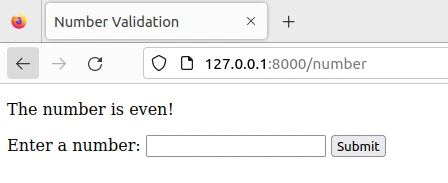
As expected, the is_even custom rule is working perfectly and is now
accessible globally.
Handling Errors for Validation Failures
Laravel gives you the tools to handle and display validation errors. With this, you can provide your users with clear messages that make it easy for them to correct their mistakes. We can use all kinds of different tools like Controllers and Forms etc. Let’s make a custom rule for password validation where we’ll really emphasize effective error handling.
1. Generate a Custom Validation Rule
First, create a custom validation rule named ComplexPassword:
php artisan make:rule ComplexPassword
2. Implement the Rule Logic
Edit the generated rule in app/Rules/ComplexPassword.php to reflect
our criteria:
<?php

namespace App\Rules;

use Closure;
use Illuminate\Contracts\Validation\Rule;

class ComplexPassword implements Rule
{
    public function passes($attribute, $value)
    {
        // Password must be at least 8 characters long, include at least one uppercase letter,
        // one lowercase letter, one number, and one special character.
        return preg_match('/^(?=.*[a-z])(?=.*[A-Z])(?=.*\d)(?=.*[@$!%*?&])[A-Za-z\d@$!%*?&]{8,}$/', $value);
    }

    public function message()
    {
        // Provide a detailed error message to guide users
        return 'The :attribute must be at least 8 characters long and include at least one uppercase letter, one lowercase letter, one number, and one special character.';
    }
}
3. Handle Errors in Controller
We will create a new controller for this section as
UserController.php:
php artisan make:controller UserController
We can use the ComplexPassword rule as part of our validation logic in
the store method of app/Http/Controllers/UserController.php:
<?php

namespace App\Http\Controllers;

use Illuminate\Http\Request;
use App\Rules\ComplexPassword;
use Illuminate\Validation\ValidationException;

class UserController extends Controller
{
    public function register()
    {
        return view('users.register');
    }

    public function store(Request $request)
    {
        try {
            $request->validate([
               'email' => 'required|email|unique:users,email',
               'password' => ['required', new ComplexPassword],
            ], [
                'email.required' => 'We need to know your email address!',
                'password.required' => 'Please enter a password!',
            ]);

            return redirect()->back()->with('success', 'User registered successfully!');
        } catch (ValidationException $exception) {
            // Redirect to a custom location or handle the error differently
            return redirect()->back()->withErrors($exception->validator)->withInput();
        }
    }
}
In the controller, we use the custom rule within the validation logic to catch potential validation exceptions to customize the redirection or error response.
4. Handle Error in Form Views
Create a Blade view resources/views/users/register.blade.php for user
registration. To display validation errors in your Blade templates,
Laravel provides a global $errors variable, which is an instance of
MessageBag.
The old('email') function repopulates the email field with previously
submitted value if validation fails, ensuring that users do not have to
re-enter their email addresses.
<!DOCTYPE html>
<html>
<head>
<title>User Registration</title>
</head>
<body>
@if(session('success'))
<div style="color: green;">
{{ session('success') }}
</div>
@endif
@if ($errors->any())
<div style="color: red;">
<div class="alert alert-danger">
<strong>Please correct the following errors:</strong>
</div>
</div>
@endif
<form action="{{ route('users.store') }}" method="POST">
@csrf
<label for="email">Email:</label>
<input type="email" id="email" name="email" value="{{ old('email') }}">
@if ($errors->has('email'))
<div style="color: red;">
{{ $errors->first('email') }}
</div>
@endif
<br>
<label for="password">Password:</label>
<input type="password" id="password" name="password">
@if ($errors->has('password'))
<div style="color: red;">
{{ $errors->first('password') }}
</div>
@endif
<br>
<small>Password must be at least 8 characters long and include at least one uppercase letter, one lowercase letter, one number, and one special character.</small>
<br>
<button type="submit">Register</button>
</form>
</body>
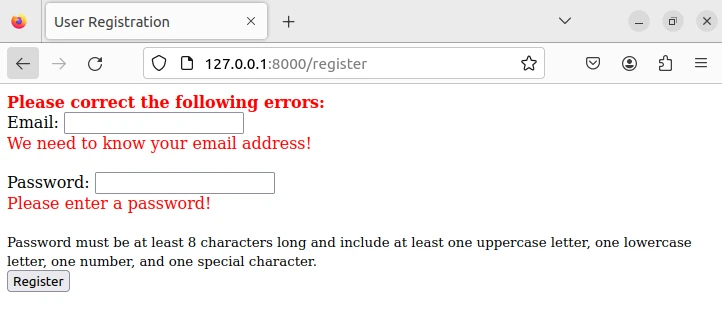
</html>5. Testing the Implementation
If you go to /register and try to create a new user, the
ComplexPassword rule will ensure that the password is up to par. If
it’s not, Laravel will redirect back to the form and provide an error
message set by the ComplexPassword rule.
When we don't provide any Input
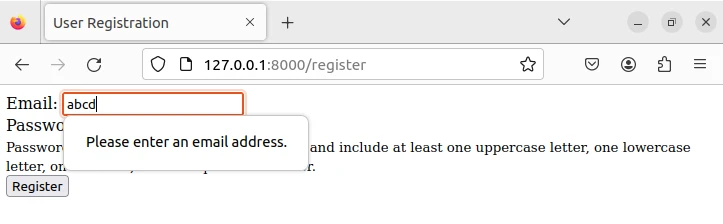
When provided email address is not valid
When provided Password doesn't meet the ComplexPassword criteria:

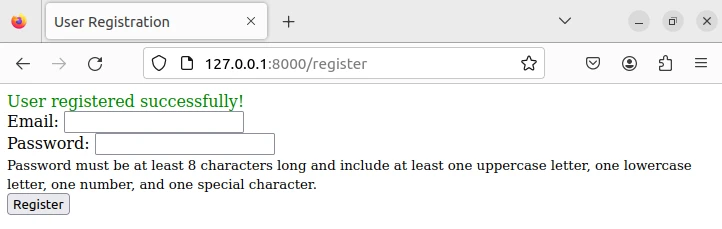
When all entries are proper
Summary
In this tutorial, we did a deep dive into Laravel validation. We went from the basics to the advanced, including specific topics like creating custom rules and handling errors properly. Speaking of custom rules, we showed you how to make one for even numbers. From there, we made it universal and implemented it in a Laravel app. The second half of this guide was focused on error handling… because let’s be honest - who likes error messages? We talked about best practices for guiding users as clearly as possible while also maintaining their input data so they don’t lose everything. Lastly, we fixed an issue related to applying a custom validation rule and corrected the implementation approach for integrating custom rules within Laravel's validation system. Congratulations! You now know more about Laravel validation than 99% of people out there!
