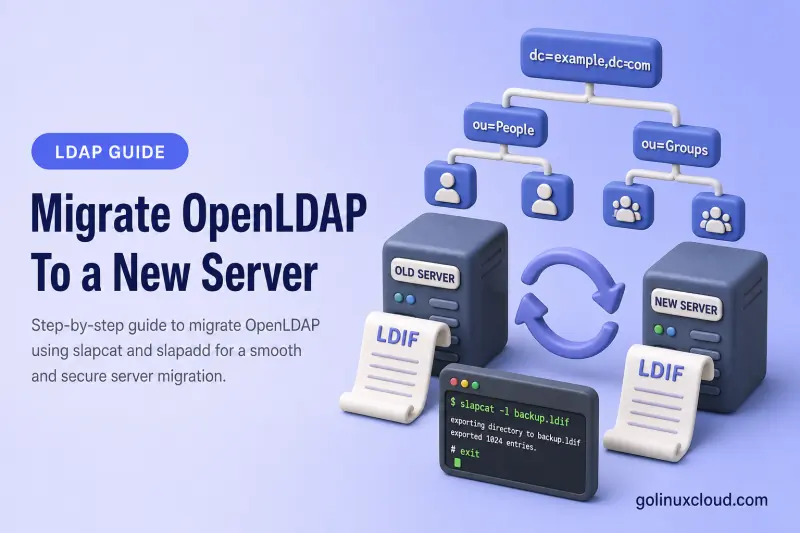
This guide walks through an offline OpenLDAP server migration on RHEL-family Linux using slapcat exports and slapadd restores. Follow the numbered steps in order during planning and cutover; alternative scenarios and troubleshooting come after the primary procedure.
Tested on: Rocky Linux 10.2; OpenLDAP 2.6.10 (
openldap-serversfrom EPEL).
Complete these lessons first:
/etc/passwd, /etc/shadow, or /etc/group into LDAP entries. For that workflow, see Migrate Linux users and groups to OpenLDAP. For recurring backup, retention, systemd timers, and disaster-recovery drills on the same host, see OpenLDAP backup and restore. When the destination is 389 Directory Server rather than another OpenLDAP host, follow Migrate OpenLDAP to 389 Directory Server.
slapcat and restore with slapadd.
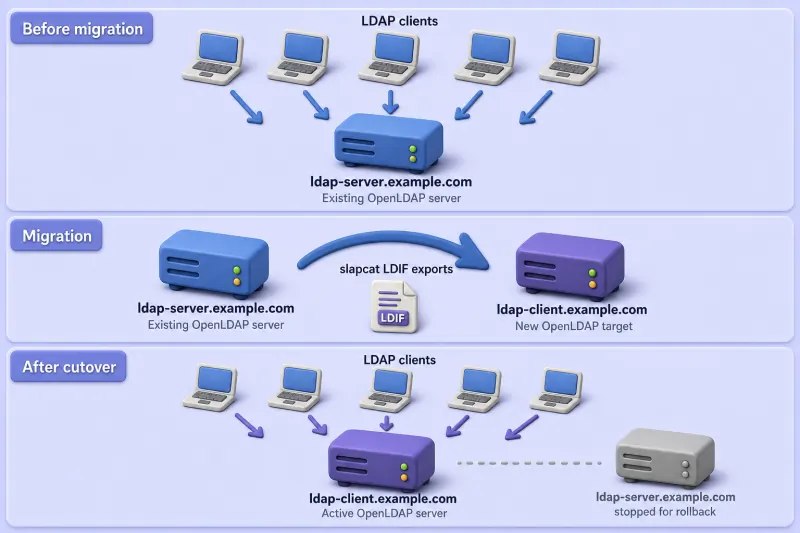
1. Migration scenario used in this guide
This primary procedure assumes:
| Assumption | Lab value |
|---|---|
| Source and target OpenLDAP | 2.6 MDB → 2.6 MDB |
| Migration style | Offline (slapcat / slapadd) |
| Source server | ldap-server.example.com (192.168.56.108) |
| Target server | ldap-client.example.com (192.168.56.109) |
| Directory suffix | dc=example,dc=com (same on both hosts) |
| Target role after cutover | Standalone writable server |
| Source after final export | Stopped until rollback or decommission |
Although the target host is named ldap-client.example.com, it runs openldap-servers and becomes the active LDAP server after migration.
The migration moves more than user entries:
| Component | Examples |
|---|---|
| Configuration database | cn=config |
| Directory data | dc=example,dc=com |
| Standard and custom schemas | cosine, nis, inetorgperson, org-specific classes |
| ACLs, indexes, overlays | olcAccess, olcDbIndex, syncprov, memberof |
| TLS and listeners | CA, server certificate, LDAP/LDAPS/LDAPI URLs |
| Client endpoints | SSSD, applications, DNS, load balancers |
Decide before cutover how clients will reach the new server:
Option 1 — update every client URI:
  ldap://ldap-server.example.com  →  ldap://ldap-client.example.com

Option 2 — stable service alias (certificate SAN must match):
  ldap://ldap.example.com
See Configure OpenLDAP TLS on RHEL-based Linux when you must reissue certificates for the target hostname or alias.
2. Inventory the source server
Record operating system, package versions, databases, modules, overlays, schemas, and acceptance-test baselines on ldap-server.example.com while slapd is still running.
Confirm the distribution and kernel baseline:
cat /etc/os-release | head -3Sample output:
NAME="Rocky Linux"
VERSION="10.2 (Red Quartz)"
RELEASE_TYPE="stable"
Check the running slapd build string:
slapd -VV 2>&1 | head -3Sample output:
@(#) $OpenLDAP: slapd 2.6.10 (Jan 28 2026 00:00:00) $
	openldap
Match that against the installed RPM NEVRAs:
rpm -q openldap openldap-servers openldap-clientsSample output:
openldap-2.6.10-1.el10.x86_64
openldap-servers-2.6.10-1.el10_2.x86_64
openldap-clients-2.6.10-1.el10.x86_64
The target should run the same major OpenLDAP version and backend family before you import cn=config unchanged.
List every configured database and suffix. Do not assume slapcat -n 1 is the production suffix.
Directory queries in this section use the ldapsearch command.
sudo ldapsearch -Q -LLL -Y EXTERNAL -H ldapi:/// -b cn=config '(objectClass=olcDatabaseConfig)' dn olcDatabase olcSuffix olcDbDirectorySample output:
dn: olcDatabase={-1}frontend,cn=config
olcDatabase: {-1}frontend

dn: olcDatabase={0}config,cn=config
olcDatabase: {0}config

dn: olcDatabase={1}monitor,cn=config
olcDatabase: {1}monitor

dn: olcDatabase={2}mdb,cn=config
olcDatabase: {2}mdb
olcDbDirectory: /var/lib/ldap
olcSuffix: dc=example,dc=com
In this lab dc=example,dc=com is database {2}mdb. Use slapcat -b "dc=example,dc=com" rather than guessing -n.
List loaded modules—the target must provide the same .la files or you must adjust olcModuleLoad in step 8:
sudo ldapsearch -Q -LLL -Y EXTERNAL -H ldapi:/// -b cn=config '(objectClass=olcModuleList)' dn olcModulePath olcModuleLoadList overlays such as syncprov or memberof that must appear in the reviewed cn=config:
sudo ldapsearch -Q -LLL -Y EXTERNAL -H ldapi:/// -b cn=config '(objectClass=olcOverlayConfig)' dn olcOverlayList every schema DN loaded in cn=config:
sudo ldapsearch -Q -LLL -Y EXTERNAL -H ldapi:/// -b cn=schema,cn=config dnRecord replication agreements, TLS certificate expiry, firewall rules, and every client ldap_uri.
Search and bind a known user as an acceptance baseline:
ldapsearch -x -ZZ -H ldap://ldap-server.example.com -b "dc=example,dc=com" -LLL "(uid=jdoe)" dn uid uidNumber gidNumberSample output:
dn: uid=jdoe,ou=people,dc=example,dc=com
uid: jdoe
uidNumber: 10001
gidNumber: 10001
Identity checks in this section use the ldapwhoami command.
ldapwhoami -x -ZZ -H ldap://ldap-server.example.com -D "uid=jdoe,ou=people,dc=example,dc=com" -WWhen the bind succeeds, ldapwhoami prints the authenticated DN:
Sample output:
dn:uid=jdoe,ou=people,dc=example,dc=comRecord the entry count as an early inventory baseline. Entries can change between this inventory and the final maintenance window—the authoritative count for cutover validation comes from the final export in step 6:
ldapsearch -x -ZZ -H ldap://ldap-server.example.com -b "dc=example,dc=com" -LLL "(objectClass=*)" dn | grep -c '^dn:'Sample output:
8Store all results in migration notes. Also note every application that writes to LDAP, estimate export/import duration for large directories, lower DNS TTL before record changes, and define rollback triggers.
3. Prepare the target server
Complete these steps on ldap-client.example.com before the maintenance window. You are not importing production data yet.
Install OpenLDAP using Install and configure OpenLDAP on RHEL-based Linux. Package layout must exist, but the production cn=config and directory data come from the migration bundle later.
Confirm the target FQDN matches the TLS certificate and client URIs you plan to use:
hostname -fSample output:
ldap-client.example.comConfirm compatible package versions on the target:
rpm -q openldap openldap-servers openldap-clientsThe NEVRAs should match your compatibility plan from step 2. Also verify hostname resolution, system time, MDB support, SELinux enforcing mode, firewall rules, and free disk space for LDIF files and /var/lib/ldap.
Issue or install a TLS certificate whose SAN matches the name clients will use. The source cn=config export still references ldap-server.example.com certificate paths—you will edit those in step 8. Sign ldap-client.example.com with your CA (see Configure OpenLDAP TLS on RHEL-based Linux) and install files under /etc/openldap/certs/ with ldap ownership on the private key.
If the target previously held data or acted as a replication consumer, back it up before you wipe it in step 9:
sudo install -d -m 0700 /root/pre-migration-consumer-backupCopy the live cn=config tree:
sudo cp -a /etc/openldap/slapd.d /root/pre-migration-consumer-backup/slapd.dCopy the MDB data directory:
sudo cp -a /var/lib/ldap /root/pre-migration-consumer-backup/ldap-dataPreserve the clean package-generated configuration so you can return to a known state if the import fails:
sudo cp -a /etc/openldap/slapd.d /root/slapd.d-clean-installOn the source, create the migration working tree used in steps 5–7:
sudo install -d -m 0700 /root/openldap-migration/{inventory,exports,schemas,tls,system,checksums}The exports and checksums subdirectories receive LDIF files and sha256sum output during cutover.
Migration exports can contain password hashes, replication secrets, and personal data. Encrypt the bundle in transit and at rest according to local policy.
4. Perform an optional rehearsal
A rehearsal times the import on the target while production keeps running. It is optional but useful for large directories or first-time migrations.
Stop slapd on the source so slapcat reads a consistent offline snapshot—the same requirement as the final export in step 6:
sudo systemctl stop slapdThe command exits with no output when the stop succeeds.
Export cn=config to the rehearsal bundle. Database -n 0 is always the configuration tree:
LDIF exports in this section use the slapcat command.
sudo slapcat -n 0 -l /root/openldap-migration/exports/cn-config.ldifExport the production suffix by DN rather than by guessed database number:
sudo slapcat -b "dc=example,dc=com" -l /root/openldap-migration/exports/example-com.ldifBoth slapcat commands exit silently on success. Rehearsal files land in the same paths as the final cutover export—you will overwrite them in step 6.
Restart the source so clients and applications can use LDAP again while you practice on the target:
sudo systemctl start slapdConfirm the service is active before you leave the source:
sudo systemctl is-active slapdSample output:
activeTransfer the rehearsal bundle with the step 7 rsync command, then walk through steps 8–12 on the target or on a snapshot VM. Record how long each phase takes.
Do not use rehearsal LDIF for final cutover. Password changes, new users, and group updates on the source after a rehearsal export will not appear in those files.
5. Begin the final maintenance window
When you are ready for production cutover:
- Announce the maintenance window.
- Freeze application and administrator writes to LDAP.
- Confirm no batch jobs or scripts are still modifying the directory.
- Stop
slapdonldap-server.example.com.
sudo systemctl stop slapdThe stop command exits silently when it succeeds.
Confirm the service is no longer running:
sudo systemctl is-active slapdSample output:
inactiveKeep the source stopped after the final export in step 6 until clients use the target.
6. Export cn=config and directory data
Create fresh exports into /root/openldap-migration/exports/, overwriting any rehearsal files.
Export cn=config while slapd remains stopped on the source:
sudo slapcat -n 0 -l /root/openldap-migration/exports/cn-config.ldifExport the production suffix by DN:
sudo slapcat -b "dc=example,dc=com" -l /root/openldap-migration/exports/example-com.ldifBoth commands exit silently on success. Export additional suffixes with separate -b exports when your deployment has more than one data database.
Do not run systemctl start slapd on the source. The stopped source preserves the authoritative cutover data set.
Count lines to spot truncated exports:
sudo wc -l /root/openldap-migration/exports/*.ldifSample output:
680 /root/openldap-migration/exports/cn-config.ldif
  121 /root/openldap-migration/exports/example-com.ldif
  801 total
Inspect TLS paths in the configuration export:
sudo head -n 12 \
  /root/openldap-migration/exports/cn-config.ldif
Sample output:
dn: cn=config
objectClass: olcGlobal
cn: config
structuralObjectClass: olcGlobal
entryUUID: 816286ec-1322-1041-9c44-f99043b9b2da
creatorsName: cn=config
createTimestamp: 20260713162028Z
olcTLSCACertificateFile: /etc/openldap/certs/example-ldap-ca.crt
olcTLSProtocolMin: 3.3
olcSecurity: simple_bind=128
olcTLSCertificateFile: /etc/openldap/certs/ldap-server.example.com.crt
olcTLSCertificateKeyFile: /etc/openldap/certs/ldap-server.example.com.key
The olcTLSCertificateFile and olcTLSCertificateKeyFile lines are host-specific—you will change them in step 8.
Record the entry count from the authoritative suffix LDIF. You compare the target against this number in step 12—not the early inventory from step 2:
sudo grep -c '^dn:' /root/openldap-migration/exports/example-com.ldif |
sudo tee /root/openldap-migration/inventory/final-entry-count.txt
Sample output:
8Back up separately on the source: /etc/openldap/, /etc/sysconfig/slapd, systemd drop-ins, CA and certificate files, SELinux rules, firewall configuration, and monitoring scripts. If the source uses delta-syncrepl, document and back up the local cn=accesslog database.
7. Generate checksums and transfer the bundle
On the source, generate checksums. Pipe through sudo tee so the redirection runs with root privileges:
sudo sha256sum /root/openldap-migration/exports/*.ldif |
sudo tee /root/openldap-migration/checksums/exports.sha256
Sample output:
ba1d0ae9393cbccfe04c9f06293b60e63e007a2d714339aebeba62092d184a51  /root/openldap-migration/exports/cn-config.ldif
7a75e815991670a00773019b3c9fde9d24702e9384a6b72d5c6aaefcd4886ed3  /root/openldap-migration/exports/example-com.ldif
Install rsync on both hosts when it is not already present (sudo dnf install -y rsync).
Copy the full migration directory from the source. -aHAX preserves permissions, extended attributes, and ACLs:
sudo rsync -aHAX --numeric-ids /root/openldap-migration/ [email protected]:/root/openldap-migration/The command exits silently when the transfer completes. On the target, verify every export before you edit or import:
sudo sha256sum -c /root/openldap-migration/checksums/exports.sha256Sample output:
/root/openldap-migration/exports/cn-config.ldif: OK
/root/openldap-migration/exports/example-com.ldif: OK
Do not begin step 8 until every file reports OK.
8. Review the exported cn=config
Copy the export to a reviewed file so the original LDIF stays untouched:
sudo cp /root/openldap-migration/exports/cn-config.ldif /root/openldap-migration/exports/cn-config-reviewed.ldifDo not run a global hostname substitution across the entire cn=config LDIF—that can unintentionally change replication provider URIs, referrals, ACL values, or application-specific attributes.
Inspect host-specific attributes:
sudo grep -nE \
  'ldap-server\.example\.com|olcTLS|olcServerID|olcSyncrepl|olcUpdateRef|olcMultiProvider' \
  /root/openldap-migration/exports/cn-config-reviewed.ldif
Sample output on the lab provider (TLS paths only):
8:olcTLSCACertificateFile: /etc/openldap/certs/example-ldap-ca.crt
11:olcTLSCertificateFile: /etc/openldap/certs/ldap-server.example.com.crt
12:olcTLSCertificateKeyFile: /etc/openldap/certs/ldap-server.example.com.key
Edit only attributes that require target-specific values:
- replace
olcTLSCertificateFileandolcTLSCertificateKeyFilewith target certificate paths; - remove obsolete
olcSyncrepllines; - remove obsolete
olcUpdateReflines; - remove or reassess
olcServerID; - remove
olcMultiProviderfor a standalone target; - review any remaining
ldap-server.example.comreferences individually.
Tested targeted TLS path edits after installing ldap-client.example.com certificates in step 3. Change only the certificate file attribute:
sudo sed -i \
  's|olcTLSCertificateFile: /etc/openldap/certs/ldap-server.example.com.crt|olcTLSCertificateFile: /etc/openldap/certs/ldap-client.example.com.crt|' \
  /root/openldap-migration/exports/cn-config-reviewed.ldif
Change only the private key attribute:
sudo sed -i \
  's|olcTLSCertificateKeyFile: /etc/openldap/certs/ldap-server.example.com.key|olcTLSCertificateKeyFile: /etc/openldap/certs/ldap-client.example.com.key|' \
  /root/openldap-migration/exports/cn-config-reviewed.ldif
Both sed commands exit silently when the lines match.
Confirm the result:
sudo grep -E \
  'olcTLSCertificate|olcSyncrepl|olcServerID|olcUpdateRef|olcMultiProvider' \
  /root/openldap-migration/exports/cn-config-reviewed.ldif
Sample output after TLS edits on a standalone target:
olcTLSCertificateFile: /etc/openldap/certs/ldap-client.example.com.crt
olcTLSCertificateKeyFile: /etc/openldap/certs/ldap-client.example.com.key
When olcSyncrepl lines appear because you exported a consumer configuration, delete those attributes from the reviewed LDIF before import.
New entries in this section are added with the ldapadd command.
9. Clear the target configuration and database
On ldap-client.example.com, stop slapd before you touch database files:
sudo systemctl stop slapdConfirm the service is inactive:
sudo systemctl is-active slapdSample output:
inactiveClear the live configuration tree. slapadd -n 0 into a non-empty slapd.d fails the same way a non-empty data directory causes MDB_KEYEXIST during suffix import.
sudo find /etc/openldap/slapd.d -mindepth 1 -deleteThe find command removes every file under slapd.d but leaves the directory itself.
Empty the MDB files. olcDbDirectory in the imported cn=config points at /var/lib/ldap—slapadd always writes there.
sudo rm -f /var/lib/ldap/*Confirm only the directory remains:
ls -la /var/lib/ldap/Sample output:
total 8
drwx------.  2 ldap ldap 4096 Jul 14 08:35 .
drwxr-xr-x. 23 root root 4096 Jul 14 07:23 ..
Importing into a database that already contains dc=example,dc=com produces MDB_KEYEXIST errors:
Offline imports in this section use the slapadd command.
mdb_id2entry_put: mdb_put failed: MDB_KEYEXIST: Key/data pair already exists(-30799) "dc=example,dc=com"
slapadd: could not add entry dn="dc=example,dc=com" (line=1): txn_aborted! MDB_KEYEXIST: Key/data pair already exists (-30799)
10. Restore cn=config
Import the reviewed configuration into the empty slapd.d tree:
sudo slapadd -n 0 -F /etc/openldap/slapd.d -l /root/openldap-migration/exports/cn-config-reviewed.ldifslapadd exits silently on success when stdout is not a TTY.
Give the ldap service account ownership of the configuration tree:
sudo chown -R ldap:ldap /etc/openldap/slapd.dReapply SELinux contexts after replacing files under /etc/openldap:
sudo restorecon -Rv /etc/openldap/slapd.dValidate syntax before you import directory data:
Configuration checks in this section use the slaptest command.
sudo slaptest -F /etc/openldap/slapd.d -uSample output:
config file testing succeeded11. Import directory data
Dry-run the import when you want slapadd to parse the LDIF without writing:
sudo slapadd -u -b "dc=example,dc=com" -F /etc/openldap/slapd.d -l /root/openldap-migration/exports/example-com.ldifWhen the dry-run succeeds, slapadd exits with no errors and leaves the database empty.
Perform the real import:
sudo slapadd -b "dc=example,dc=com" -F /etc/openldap/slapd.d -l /root/openldap-migration/exports/example-com.ldifOn an interactive terminal, slapadd prints a progress bar. In automation it often exits silently when the import succeeds.
Give the ldap user ownership of the data directory:
sudo chown -R ldap:ldap /var/lib/ldapRestore SELinux labels on the data and configuration paths:
sudo restorecon -Rv /var/lib/ldapsudo restorecon -Rv /etc/openldapRe-run slaptest on the combined configuration and data tree:
sudo slaptest -F /etc/openldap/slapd.d -uWhen the import and ownership steps succeeded, slaptest reports config file testing succeeded.
Use slapadd for bulk offline restore because it writes directly into the database without requiring an online administrator bind. ldapadd is for incremental online changes, not a full suffix replacement.
12. Start and validate the target
Start slapd on the target:
sudo systemctl start slapdConfirm the daemon stayed running:
sudo systemctl status slapd --no-pagerSample output:
● slapd.service - OpenLDAP Server Daemon
     Active: active (running) since Tue 2026-07-14 08:35:13 IST
   Main PID: 9379 (slapd)
If Active: shows failed instead of running, read the journal before you change any client URIs:
sudo journalctl -u slapd -n 100 --no-pagerRun the acceptance checks you recorded in step 2:
| Test | Command focus |
|---|---|
| StartTLS + hostname | openssl s_client … -verify_hostname |
| Root DSE | ldapsearch on namingContexts |
| Known user | ldapsearch for uid=jdoe |
| Password bind | ldapwhoami |
| Entry count | Compare target to final-export count from step 6 (8 in the lab) |
Verify TLS and hostname matching. -verify_hostname confirms the certificate matches the name clients use, not just the CA chain:
openssl s_client -starttls ldap -connect ldap-client.example.com:389 -servername ldap-client.example.com -verify_hostname ldap-client.example.com -CAfile /etc/openldap/certs/example-ldap-ca.crt -verify_return_error -brief </dev/nullSample output:
CONNECTION ESTABLISHED
Peer certificate: CN=ldap-client.example.com, O=Example Organization
Verification: OK
Verified peername: ldap-client.example.com
Confirm the migrated suffix appears in the Root DSE:
ldapsearch -x -ZZ -H ldap://ldap-client.example.com -b "" -s base -LLL namingContexts supportedLDAPVersionSample output:
dn:
namingContexts: dc=example,dc=com
supportedLDAPVersion: 3
Compare the migrated user against the step 2 baseline:
ldapsearch -x -ZZ -H ldap://ldap-client.example.com -b "dc=example,dc=com" -LLL "(uid=jdoe)" dn uid uidNumber gidNumber homeDirectory loginShellSample output:
dn: uid=jdoe,ou=people,dc=example,dc=com
uid: jdoe
uidNumber: 10001
gidNumber: 10001
homeDirectory: /home/jdoe
loginShell: /bin/bash
Confirm password hashes survived the LDIF export and import:
ldapwhoami -x -ZZ -H ldap://ldap-client.example.com -D "uid=jdoe,ou=people,dc=example,dc=com" -WSample output:
dn:uid=jdoe,ou=people,dc=example,dc=comCompare the target entry count to the final-export baseline recorded in step 6:
SOURCE_COUNT=$(
  sudo cat /root/openldap-migration/inventory/final-entry-count.txt
)

TARGET_COUNT=$(
  ldapsearch -x -ZZ \
    -H ldap://ldap-client.example.com \
    -b "dc=example,dc=com" \
    -LLL "(objectClass=*)" dn |
  grep -c '^dn:'
)

printf 'Exported entries: %s\n' "$SOURCE_COUNT"
printf 'Imported entries: %s\n' "$TARGET_COUNT"

if [[ "$SOURCE_COUNT" -ne "$TARGET_COUNT" ]]; then
  echo "Entry count mismatch—do not cut over clients." >&2
  exit 1
fi
Sample output when counts match:
Exported entries: 8
Imported entries: 8
Do not restart the stopped source just to re-count entries. The final-entry-count.txt file transferred in step 7 is the authoritative cutover baseline.
13. Cut over one test client
Before you change every host, repoint one canary client to ldap-client.example.com and confirm NSS and login still work. See Configure an OpenLDAP client with SSSD on RHEL-based Linux for SSSD URI and TLS settings.
Example URI change:
Old: ldap_uri = ldap://ldap-server.example.com
New: ldap_uri = ldap://ldap-client.example.com
On the canary client, confirm NSS resolves the LDAP user after you change ldap_uri:
getent passwd jdoeCheck UID, GID, and supplementary groups:
id jdoeConfirm interactive login when PAM is configured for LDAP. A successful ssh session from the migration client validates cutover readiness:
ssh jdoe@client-hostFix TLS, ACL, or URI issues on the target before you proceed to step 14.
14. Cut over all remaining clients
Update every remaining client and integration point:
/etc/openldap/ldap.conf
/etc/sssd/sssd.conf
application LDAP URIs
load balancer pools
monitoring checks
backup scripts
automation variables
Confirm:
ldap-server.example.comremains stopped.- No application writes to both servers independently.
- The target certificate matches the URI clients use.
Allow LDAP writes only on ldap-client.example.com after clients are switched.
15. Preserve or execute rollback
Keep the stopped source intact until the new server is proven in production. Choose the rollback path based on whether the target has already accepted writes.
Rollback before target writes begin
Use when validation or the canary client fails before step 14:
- Stop applications that might write to
ldap-client.example.com. - Stop
slapdon the target. - Restore DNS, VIP, or LDAP client URIs to the source.
- Start
slapdonldap-server.example.com. - Verify TLS and a known user bind.
- Verify one SSSD client.
- Resume writes only when the source is authoritative again.
The unchanged source still holds every change made before the final export because it was kept stopped after step 6.
Rollback after the target has accepted writes
Use when clients already wrote password changes, new users, or group updates to the target:
- Freeze all LDAP writes on both hosts.
- Export the current target database with
slapcatwhileslapdis stopped on the target. - Restore or synchronize those changes back to the source before making the source writable again.
- Validate users, password hashes, groups, and application entries on the source.
- Switch clients back only after the source contains every target-side change.
- Resume writes on the source.
Two standalone servers created from the same LDIF export do not remain synchronized automatically.
Alternative migration scenarios
The numbered procedure above fits compatible OpenLDAP 2.6 MDB → 2.6 MDB offline moves. Use these variations when your environment differs.
| Source and target | Recommended approach |
|---|---|
| Different OpenLDAP 2.6 package builds | Review module names, paths, and supported attributes before importing cn=config |
| OpenLDAP 2.4 to 2.6 | Rebuild cn=config on the target; import data LDIF only |
| BDB/HDB to MDB | Create a new MDB database; replace olcBdbConfig / olcHdbConfig with olcMdbConfig |
Legacy slapd.conf |
Convert or rebuild using cn=config |
| Different directory suffix | Plan a DIT rename rather than a straight import |
| Large directory | Benchmark rehearsal export/import; plan a longer maintenance window |
| Minimal downtime | Seed the target and use provider-consumer replication until clients switch |
| Multi-provider source | Plan server IDs, CSNs, and topology removal separately |
Rebuild cn=config instead of importing it
Prefer rebuilding when you upgrade from 2.4, move from BDB/HDB to MDB, still use slapd.conf, change OS major versions, or lack required modules on the target. Use the exported cn=config as a reference checklist:
- Clean MDB data database
- Standard and custom schemas
- Indexes, ACLs, overlays
- TLS and listener settings
- Replication settings, only when required
| Legacy item | Target action |
|---|---|
| BDB/HDB backend | Recreate using MDB |
olcBdbConfig or olcHdbConfig |
Replace with olcMdbConfig |
| Old module path | Use target RPM paths (/usr/lib64/openldap) |
| Old TLS path | Install certificates in SELinux-labelled locations |
| Old certificate hostname | Reissue for target hostname or service alias |
| Old replication server ID | Reassess before enabling replication |
olcMirrorMode |
Review migration to olcMultiProvider |
Multiple suffixes
Export each suffix with a separate slapcat -b command in step 6. Transfer all LDIF files in step 7 and verify each checksum. Import each suffix with a separate slapadd -b in step 11. Review cn=config for every olcSuffix and olcDbDirectory entry in step 8.
Troubleshoot OpenLDAP migration
| Error or symptom | Likely cause | Fix |
|---|---|---|
MDB_KEYEXIST: Key/data pair already exists |
Target MDB database was not empty | Recreate an empty target database and import once |
| Unknown object class | Required schema was not loaded | Load standard or custom schema before importing |
| Unknown attribute type | Schema or overlay configuration is missing | Compare source and target schemas |
Unknown backend bdb or hdb |
Legacy backend is unavailable | Rebuild the target using MDB |
| Module cannot be loaded | Module path or package differs | Inspect installed RPM modules and update olcModulePath |
slapadd cannot open database |
Wrong directory, permissions, or running slapd |
Stop the service and inspect the target path |
slaptest fails |
Unsupported attribute or invalid path | Review the configuration export |
| TLS works only with verification disabled | CA trust or SAN is wrong | Correct the CA or issue a valid certificate |
| Search works but password bind fails | Password data or ACL differs | Inspect protected LDIF and access rules |
| Users exist but groups are incomplete | Group schema or membership data is missing | Compare group entries and schemas |
memberof is missing |
Overlay configuration was omitted | Recreate and test the overlay using Configure OpenLDAP memberOf and referential integrity overlays |
| New server returns referrals | Suffix or database configuration is wrong | Verify olcSuffix and database selection |
| SSSD lookup fails | URI, TLS, ACL, or cache problem | Test LDAP, NSS, PAM, and SSH separately |
| Replication errors after migration | Old server IDs or agreements were restored | Review olcServerID, olcSyncrepl, and olcMultiProvider |
When slapd fails after import, work through these checks in order.
Test configuration syntax first:
sudo slaptest -F /etc/openldap/slapd.d -uRead recent service messages when slaptest passes but systemctl start fails:
sudo journalctl -u slapd -n 200 --no-pagerInspect ownership and SELinux contexts on configuration and data paths:
sudo ls -lZR /etc/openldap/slapd.d /var/lib/ldapLook for recent SELinux denials when permissions look correct but access still fails:
sudo ausearch -m AVC -ts recentConfirm slapd is listening on the expected LDAP ports:
sudo ss -ltnp | grep slapdReferences
Summary
Plan with steps 1–3, optionally rehearse in step 4, then run the final window in steps 5–14: freeze writes, export with the source kept stopped, checksum and rsync the bundle, review cn=config attribute by attribute, import offline with slapadd, validate TLS hostname verification and password binds, cut over a canary client then all clients, and keep step 15 rollback paths ready depending on whether the target has accepted writes.
