
In this tutorial I will share the steps to run SSHD as non-root (normal) user in Linux platform. Recently we had a requirement to use SSHD inside a container of Kubernetes Pod. Now these Pods would be running as non-privileged so we wanted to use SSHD as normal user without any additional privilege or capabilities.
Why SSHD service fails to start as normal user?
Before we go ahead, let us first understand the problems which we must address to configure SSHD as non-root user in Linux.
- The default location of
sshd_configis/etcwhich is by default not accessible by non-root users. - All the sshd related configuration files are present inside
/etcsuch assshd_configand other host keys - The default port used by SSHD is 22 which is considered as a privilege port. So a normal user cannot use any privileged port (0-1024) to bind any service.
- By default sshd stores the PID file inside
/var/runwhich is again not accessible by normal users with write privilege
Configure SSHD as normal user on Linux Server
Let me first cover the steps I used to configure SSHD as normal user on Linux server.
Lab Environment
We will use Oracle Virtual Box to create a Virtual Machine with Ubuntu 18.4. Following are my OS details:
# cat /etc/lsb-release
DISTRIB_ID=Ubuntu
DISTRIB_RELEASE=18.04
DISTRIB_CODENAME=bionic
DISTRIB_DESCRIPTION="Ubuntu 18.04.5 LTS"
In this tutorial we will configure SSHD for deepak user without
using sudo or any other privilege.
Step-1: Generate SSH Host keys
Now that we know the pain points so we can work on fixing them.
First of all we will create a different directory which is accessible by
deepak user.
root@ubuntu:~# mkdir /opt/ssh
SSHD server requires Host Keys which is generated using ssh-keygen -A.
This command generates keys for each of the key types i.e. rsa, dsa,
ecdsa and ed25519 for which host keys do not exist and store them inside
/etc/ssh.
But since we intend to use /opt/ssh as our directory so we will
generate all these keys manually:
root@ubuntu:~# ssh-keygen -q -N "" -t dsa -f /opt/ssh/ssh_host_dsa_key
root@ubuntu:~# ssh-keygen -q -N "" -t rsa -b 4096 -f /opt/ssh/ssh_host_rsa_key
root@ubuntu:~# ssh-keygen -q -N "" -t ecdsa -f /opt/ssh/ssh_host_ecdsa_key
root@ubuntu:~# ssh-keygen -q -N "" -t ed25519 -f /opt/ssh/ssh_host_ed25519_key
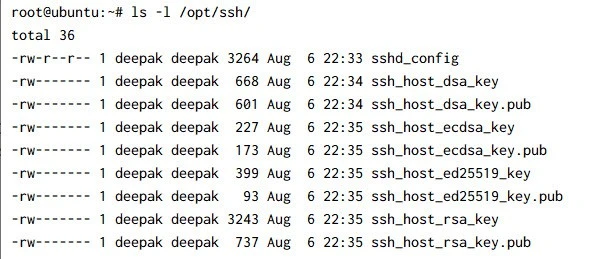
List the generated keys:
root@ubuntu:~# ls -l /opt/ssh/
-rw------- 1 root root 1393 Aug  6 23:16 ssh_host_dsa_key
-rw-r--r-- 1 root root  615 Aug  6 23:16 ssh_host_dsa_key.pub
-rw------- 1 root root  525 Aug  6 23:16 ssh_host_ecdsa_key
-rw-r--r-- 1 root root  187 Aug  6 23:16 ssh_host_ecdsa_key.pub
-rw------- 1 root root  419 Aug  6 23:16 ssh_host_ed25519_key
-rw-r--r-- 1 root root  107 Aug  6 23:16 ssh_host_ed25519_key.pub
-rw------- 1 root root 3389 Aug  6 23:16 ssh_host_rsa_key
-rw-r--r-- 1 root root  751 Aug  6 23:16 ssh_host_rsa_key.pub
Step-2: Configure SSHD as non-root user
Copy the existing sshd_config file into /opt/ssh:
root@ubuntu:~# cp /etc/ssh/sshd_config /opt/ssh/
Add or Modify the following parameters in the /opt/ssh/sshd_config
file:
After you add a custom unit under /etc/systemd/system/, run systemctl daemon-reload before enable or restart; see the systemctl command.
root@ubuntu:~# grep -vE '^#|^$' /opt/ssh/sshd_config
## Use a non-privileged port
Port 2022
## provide the new path containing these host keys
HostKey /opt/ssh/ssh_host_rsa_key
HostKey /opt/ssh/ssh_host_ecdsa_key
HostKey /opt/ssh/ssh_host_ed25519_key
## Enable DEBUG log. You can ignore this but this may help you debug any issue while enabling SSHD for the first time
LogLevel DEBUG3
ChallengeResponseAuthentication no
UsePAM yes
X11Forwarding yes
PrintMotd no
## Provide a path to store PID file which is accessible by normal user for write purpose
PidFile /opt/ssh/sshd.pid
AcceptEnv LANG LC_*
Subsystem sftp /usr/lib/openssh/sftp-serverIn some Linux distribution you may also need to add
UsePrivilegeSeparation no. This depends on the fact that this
parameter is still supported by SSHD. To check this, execute
# sshd -T | grep -i UsePrivilegeSeparation
If you get an output, it would mean that this parameter is supported and
you can set this param as no inside /opt/ssh/sshd_config.
Step-3: Configure SSHD as systemd service
Next we will create our systemd service to monitor and manage the SSHD
daemon. We have created a new service unit file
/etc/systemd/system/sshd-1.service with the following content:
root@ubuntu:~# cat /etc/systemd/system/sshd-1.service
[Unit]
Description=OpenBSD Secure Shell server
After=network.target auditd.service

[Service]
ExecStartPre=/usr/sbin/sshd -t
ExecStart=/usr/sbin/sshd -D -f /opt/ssh/sshd_config -E /tmp/sshd.log
ExecReload=/usr/sbin/sshd -t
User=deepak
ExecReload=/bin/kill -HUP $MAINPID
KillMode=process
Restart=on-failure
RestartPreventExitStatus=255
Type=notify

[Install]
WantedBy=multi-user.target
Alias=sshd-1.service
Here,
- ExecStart: section contains the command to be executed to start
the SSHD daemon. We have defined a custom configuration file with
-f /opt/ssh/sshd_configand a log file path using-E /tmp/sshd.log. So the SSHD daemon will be started using our configuration file and log path. - User: Provide the username of your non-root user
- After: This service will be started after network.target is active during boot up time
- Alias: Use sshd-1 as the alias name for this daemon
ssh.service while for
Red Hat and similar distros the SSHD daemon is names as sshd.service
Step-4: Fix Permission
We have been doing all our task as root user uptil now. But our end goal
is to use SSHD as normal user. So we must now change the permission of
required files so that they are accessible by deepak user:
So we will make sure all the required files and directories are
accessible by deepak user.
To have a secure environment we will use 600 permission for all the Hostkeys.
root@ubuntu:~# chmod 600 /opt/ssh/*
For the sshd_config we will give 644 permission:
root@ubuntu:~# chmod 644 /opt/ssh/sshd_config
Change the owner of all files inside /opt/ssh directory:
Ownership changes in this section use chown command syntax.
root@ubuntu:~# chown -R deepak. /opt/ssh/
Sample Output:
We also need to change permission of our systemd unit file:
root@ubuntu:~# chown deepak:deepak /etc/systemd/system/sshd.service

root@ubuntu:~# ls -l /etc/systemd/system/sshd.service
-rw-r--r-- 1 deepak deepak 493 Aug  6 22:31 /etc/systemd/system/sshd.service
Step-5: Start SSHD Service (without sudo)
We are all done with our setup to configure SSHD as non-root user. To activate our recent systemd changes we must perform a daemon reload:
root@ubuntu:~# systemctl daemon-reload
Next stop the default SSHD daemon.
sshd.service instead of ssh.service
root@ubuntu:~# systemctl stop ssh.service
Check and make sure there are no more SSHD daemon running in the background:

Now we can start our sshd-1.service:
root@ubuntu:~# systemctl start sshd-1
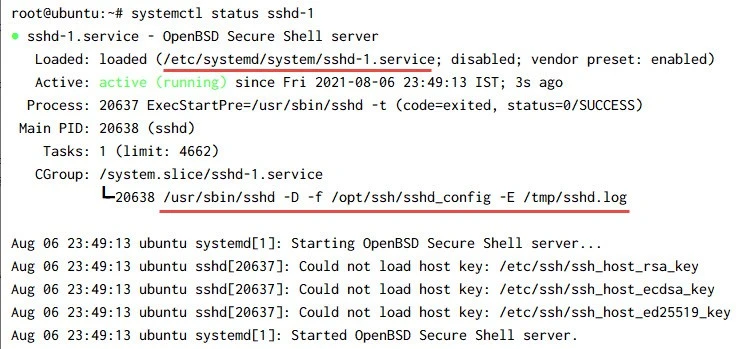
Check the status of the service:
You may also enable the sshd-1 service to be started at boot up stage:
root@ubuntu:~# systemctl enable sshd-1
Check the active process status to make sure sshd daemon has started as
deepak user (see the ps command for ps -ef and filtering):
root@ubuntu:~# ps -ef | grep sshd
root      1669     1  0 09:09 ?        00:00:00 sshd: deepak [priv]
deepak    1739  1669  0 09:10 ?        00:00:01 sshd: deepak@pts/0
deepak   20638     1  0 23:49 ?        00:00:00 /usr/sbin/sshd -D -f /opt/ssh/sshd_config -E /tmp/sshd.log
root     20647 20068  0 23:52 pts/0    00:00:00 grep --color=auto sshd
So now we don't have any SSHD daemon running as root user, and we only
have one single sshd daemon running as deepak user.
Step-6: Test SSH connection
We are all done with our SSHD configuration as normal user. Now we will
try to connect to this server using a different Linux client node. Here
server-1 is a different Linux client node while 192.168.0.108 is our
Ubuntu server where we had configured the SSHD daemon as deepak user:
Test the listener on port 2022 with ssh; the ssh command shows user@host logins, -p, and first-connection host-key prompts.
[root@server-1 ~]# ssh [email protected] -p 2022
[email protected]'s password:
Welcome to Ubuntu 18.04.5 LTS (GNU/Linux 5.4.0-77-generic x86_64)

 * Documentation:  https://help.ubuntu.com
 * Management:     https://landscape.canonical.com
 * Support:        https://ubuntu.com/advantage

25 updates can be applied immediately.
19 of these updates are standard security updates.
To see these additional updates run: apt list --upgradable

New release '20.04.2 LTS' available.
Run 'do-release-upgrade' to upgrade to it.

Your Hardware Enablement Stack (HWE) is supported until April 2023.
Last login: Fri Aug  6 09:10:00 2021 from 10.0.2.2
deepak@ubuntu:~$ ^C
So the SSH is successful which means our configuration is working as expected. Now there are also some limitations which I will explain at the end of this tutorial
Configure SSHD as non-root user on containers with Kubernetes
Here I will share the steps to configure SSHD as non-root user on docker container which we will later use with Kubernetes Pod without any privilege, capabilities or sudo permission.
Step-1 Create docker image
I will assume that you already have a docker image as I won't be explain detailed steps to create a docker image. You can connect to your docker image using the following command as root user:
# docker run -td --name deepak_test --user root private-registry:7000/ssh-harden:latest
Here my docker image is loaded on private-registry:7000/ssh-harden
with latest tag. Next we will connect to this docker image:
# docker exec -ti deepak_test bash
Now you will have a shell of your container image. Here you can make the
SSHD related changes as well did on following steps of this article
above:
Step-1: Generate SSH Host keys
Step-2: Configure SSHD
Step-4: Fix permission
Step-2: Install and Configure supervisord
Since we are planning to use non-privileged pods, so we will use supervisor as our daemon to monitor and manage SSHD process. If you plan to use systemd then you can just follow the step-3
List every PATH match with which -a; the which command compares which to type -a and command -v.
which I explained above.
First of all we would need python and pip as we will use pip to
install supervisor. We would also need python package to use
supervisord process:
# yum -y python python-pip
Now we can install supervisor using pip as shown below:
# python -m pip install supervisor supervisord-dependent-startup
Once installed we can configure supervisord service. Most of the
contents are self-explanatory, but for more details you can check man
page of supervisord:
$ cat /etc/supervisord.conf
[supervisord]
nodaemon=true
pidfile = /tmp/supervisord.pid
user = deepak
logfile = /tmp/supervisord.log
logfile_maxbytes = 10MB
logfile_backups=10
loglevel = debug

[unix_http_server]
file = /tmp/supervisor.sock

[supervisorctl]
serverurl = unix:///tmp/supervisor.sock

[rpcinterface:supervisor]
supervisor.rpcinterface_factory = supervisor.rpcinterface:make_main_rpcinterface

[include]
files = /etc/supervisord.d/*.conf
Next we need to create a program file to start SSHD service. We will use
/etc/supervisord.d to create and store our program files:
# cat /etc/supervisord.d/sshd.conf
[program:sshd]
stdout_logfile=/tmp/sshd.out
stderr_logfile=/tmp/sshd.err
stdout_logfile_maxbytes=10MB
autostart=true
autorestart=true
stdout_logfile_backups=10
command=/usr/sbin/sshd -D -f /opt/ssh/sshd_config  -E /tmp/sshd.log
We have used similar configuration as we were using with systemd. The
command section contains similar command as we were using with
ExecStart in systemd.
Step-3: Commit docker container changes
If you were using docker run command to make these modification then
we must commit our changes:
# docker commit deepak_test deepak_test_image
Next tag the image:
# docker tag deepak_test_image private-registry:7000/ssh-harden:latest
Push the changes to the registry:
# docker push private-registry:7000/ssh-harden:latest
Now we can safely delete the local repo
# docker stop deepak_test1
# docker rm deepak_test1
So our docker image is ready to be used with Kubernetes Pod.
Step-4: Create Kubernetes Pod
You can now use this container image with any type of Kubernetes resource such as Statefulset, Deployment, Pod etc.
Here I am creating a simple Pod:
apiVersion: v1
kind: Pod
metadata:
  name: test-pod  ## name of the pod
spec:
  containers:
  - name: main  ## container name
    image: bcmt-registry:5000/secure-ssh:latest  ## Location of the docker container image
    command: ["supervisord", "-c", "/etc/supervisord.conf"]  ## Start supervisord service with pod startup
    securityContext:
      runAsUser: 1025  ## I have already created user deepak with 1025 uid in my container
      privileged: false  ## The pod will run as non-privileged
      allowPrivilegeEscalation: false  ## privilege escalation action such as sudo and su will not be allowed
Let us create this pod:
[root@cluster ~]# kubectl create -f test-pod.yaml
pod/test-pod created
Step-5: Verify SSHD process is started as non-root user
Now we will connect to our pod and verify if the SSHD service is started
successfully or not. Use kubectl command to connect to the pod:
[root@ncs20fp1-02-w8-ipv4-control-01 hardening]# kubectl exec -it test-pod -- bash
As expected by default we connect as non-root usr (deepak) which you can
verify with id command:
[deepak@test-pod /]$ id
uid=1025(deepak) gid=1025(deepak) groups=1025(deepak)
Check where sshd process was started successfully:
[deepak@test-pod /]$ ps -ef
UID        PID  PPID  C STIME TTY          TIME CMD
deepak          1     0  1 18:54 ?        00:00:00 /usr/bin/python /usr/bin/supervisord -c /etc/supervisord.conf
deepak          8     1  0 18:54 ?        00:00:00 /usr/sbin/sshd -D -f /opt/ssh/sshd_config -p 5022 -E /tmp/sshd.log
deepak         77     0  0 18:54 pts/0    00:00:00 bash
deepak        100    77  0 18:55 pts/0    00:00:00 ps -ef
So our SSHD service is successfully running as deepak user on a pod
without any privilege or sudo. The same can be verified using
supervisorctl status:
[deepak@test-pod /]$ supervisorctl status
sshd                             RUNNING   pid 8, uptime 0:00:37
Step-6: Troubleshooting Errors
If you face any issues then you can look into following files for any error messages:
- /tmp/sshd.err : This will contain any error messages caused during supervisord startup stage
- /tmp/sshd.log : This will contain any error messages caused by SSHD daemon in general during startup
We have intentionally selected LogLievel as DEBUG3 so you may get
verbose log messages, to reduce them you can use LogLevel as INFO
If you make any changes to supervisord configuration or program file then you must execute following commands to refresh the changes:
$ supervisorctl reread
$ supervisorctl update
Next you can restart sshd daemon using
$ supervisorctl restart sshd
Restrictions or Problems using SSHD as non-root user
The biggest limitation of having SSHD run as non-root user is that the
SSH will work only for respective user using which the SSHD daemon is
running. For example, I have started SSHD daemon as deepak user so
if I try to connect to the SSHD server as a different user then SSH
won't work:
[root@server-1 ~]# ssh [email protected] -p 2022
[email protected]'s password:
Permission denied, please try again.
As you can see, even though the password for amit user is correct,
still we get authentication failure:
debug1: PAM: password authentication failed for amit: Authentication failure
debug3: mm_answer_authpassword: sending result 0
debug3: mm_request_send entering: type 13
Failed password for amit from 192.168.0.153 port 47272 ssh2
But when we use the default port to perform SSH then the same works:
[root@server-1 ~]# ssh -q [email protected]
[email protected]'s password:
Last login: Sat Aug  7 00:42:25 2021 from 192.168.0.153
$
To overcome this you will have to start multiple SSHD process using different user using which you plan to use SSH on your server.
Summary
In this tutorial we covered following topics:
- Steps to configure SSHD as non-root user on Linux server and unprivileged docker container and Kubernetes Pod
- Configure SSHD daemon as systemd and supervisord
- Known limitations of using SSHD as non-root user
