![How to set up Java with BlueJ IDE [Step-by-Step]](/set-up-java-with-bluej-ide/set-up-java-with-bluej-ide.webp)
In this tutorial we will cover step by step instructions to set up Java with BlueJ IDE. We will also learn to write our very first Java Program using BlueJ IDE. But first let me give you a brief overview on BlueJ IDE.
Introduction to BlueJ IDE
BlueJ is an IDE developed at a university. It was created specifically for beginning Java students and is available for MacOS, Windows, and other systems atBluej website.
BlueJ requires that you already have Java installed. Windows users should download and install the JDK from Oracle, as described previously. MacOS users will already have Java installed by default.
BlueJ is user friendly and has simple, minimal user interfaces, but lack some of the advanced editors’ features, such as autocompletion of fields, methods, and import statements. The advanced editors are faster, feature-packed, more powerful, highly customizable, and replete with various plug-ins, but they also have a steep learning curve and user interfaces that may be more daunting to beginners.
Here, we will learn step by step procedure to install and set up Java with BlueJ on Windows OS.
Set up Java with BlueJ
This section will cover how to set up theBlueJIDE. Since it was designed for beginners, the number of steps is small and the process is straightforward, as you will see.
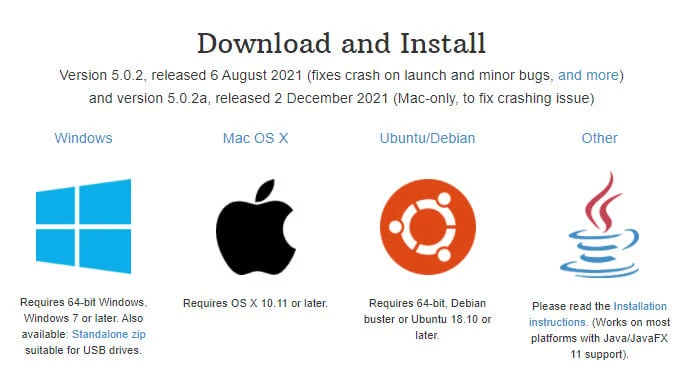
Step-1: Download BlueJ IDE
Download the coding pack for Java - Windows from Bluej website.
There are multiple download options available for a variety of operating systems. Furthermore, some of these downloads are bundled with the JDK,and some are not. The JDK includes tools for developing and debugging Java applications; in particular, it is necessary for compiling your code. If you have used your computer to develop Java applications before,you likely already have the JDK installed and can just select the stand-alone BlueJ installer. If you aren’t sure, you should download and run the BlueJ combined installer.
Step-2: Install BlueJ IDE
Step 2 : So, BlueJ-windows-502.msi file will be downloaded to your downloads folder. Now, double click on this setup file to get this window.

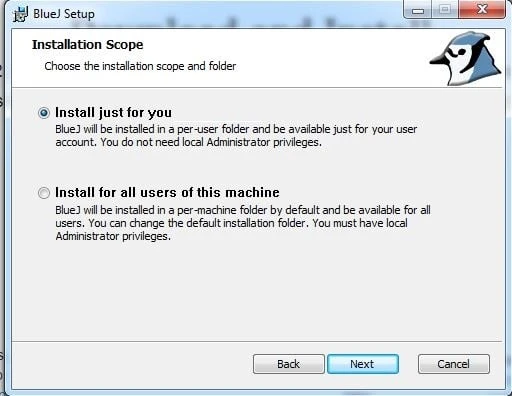
Now, select the installation scope and folder for the current user or all the users of this system. Then click on Next.
This window shows the associations and shortcuts. Click on Next.

Select the destination folder for installation. Then click Next.

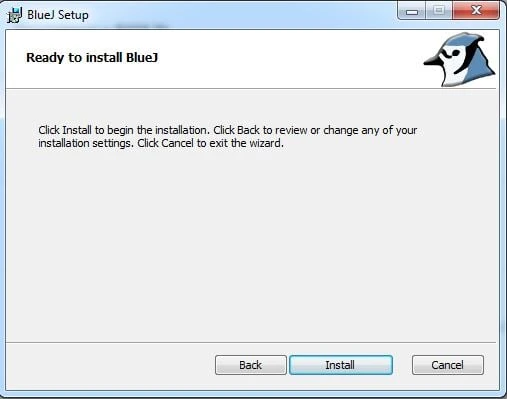
Click on Install to begin the installation.
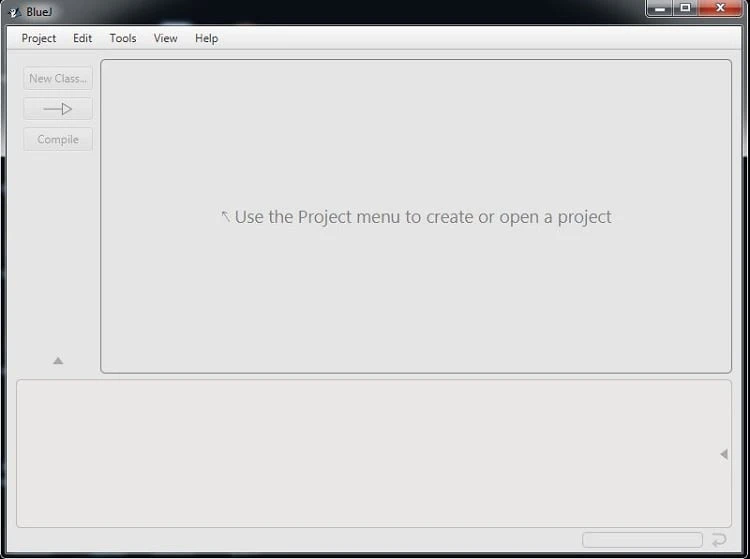
Now, we are done with the installation and set up java with BlueJ IDE. Click on Finish to exit the setup wizard.

Write and compile your first program with BlueJ
Once, we are done with the installation and set up Java with BlueJ. We will compile and run our first program step by step.
Step-1: Launch BlueJ IDE
Start up the BlueJ software.
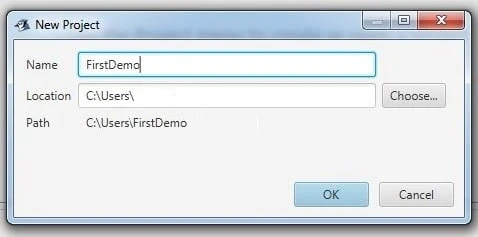
Step-2: Create New Project
Now click on Project - > New project in the Menu bar.BlueJ organizes your work into projects, which are stored as directories; all Java source code and compiled class files are stored in the project directory.

Give the name to the new project. Here we will name it as a "FirstDemo". Select the location to store the project. BlueJ creates separate folder for each project. So, a folder named FirstDemo will be created automatically at given location.
Step-3: Create New Class
Now click on the button "New Class". This will open a popup as shown below. Here, give the class name and select the class type. So, we are giving the class name as "First". Then click Ok.

Here, you can see the First class has been created. As it is not compiled, it is shaded with the lines.

Step-4: Create and Compile Hello World Java Program using BlueJ IDE
Double click on the class to open it in an editor. By default, it has one constructor, one class variable and a sample method.

Here, we are just writing a main method in the class as shown below. Now click on the button Compile.

If the program is compiled successfully, you can see the message in the grey bar as "Class compiled - no syntax errors".

Close this program editor. And go back to the main editor. Here, you can see the dashed lines is now replaced by two lines on the name. This is because the program is compiled successfully. Now, to execute your code follow this steps.
Right click on the class "First". You will see
"void main(String[])". Click on this which opens a pop up as shown
below. Click on OK to execute your code.

As you can see, the output in the terminal as shown below. Hence, we are done compiling our first program with BlueJ Editor.

Summary
Here, We are done with step by step procedure to set up Java with BlueJ. This is the first step to learning the Java Programming. This editor is very useful for beginners to understand the core java concepts as it allows you to visualize the memory allocations. In this tutorial, we covered step by step procedure to download, install and set up java with BlueJ editor for windows OS. All in all, this tutorial, covers everything that you need to know in order to set up java with BlueJ on Windows OS.
References
Download BlueJ
