![How to setup Laravel Pagination? [In-Depth Tutorial]](/setup-laravel-pagination/laravel-pagination-800w.webp)
Laravel Pagination is essential for web applications that display large amounts of data, such as search results or product listings, as it helps to boost the user experience by lowering the amount of data displayed on a single page.
This article explores how to implement pagination in Laravel. Whether you're a beginner or an experienced Laravel developer, this article will provide a comprehensive guide to Laravel pagination.
Setting up Laravel Pagination
Setting up pagination in Laravel is a two-step process:
step~1: fetch data with the
paginate() method
$paginated_data = DB::table('table_name')->paginate(records_per_page)step~2: display pages using the
links() method.
{{ $paginated_data->links() }}Here is a practical example.
Fetch data from the database using the paginate() method
Launch your terminal and create a
Laravel application called pagination then cd into it.
laravel new pagination
cd pagination
Open the new project with a code
editor like Visual Studio Code. Move into
database/seeders/DatabaseSeeder.php file and seed 100 users. We will
use the data for pagination.
<?php

namespace Database\Seeders;

// use Illuminate\Database\Console\Seeds\WithoutModelEvents;
use Illuminate\Database\Seeder;

class DatabaseSeeder extends Seeder
{
    /**
     * Seed the application's database.
     */
    public function run(): void
    {
        \App\Models\User::factory(100)->create();
    }
}
Create a database with details in
.env file and migrate the database while seeding it.
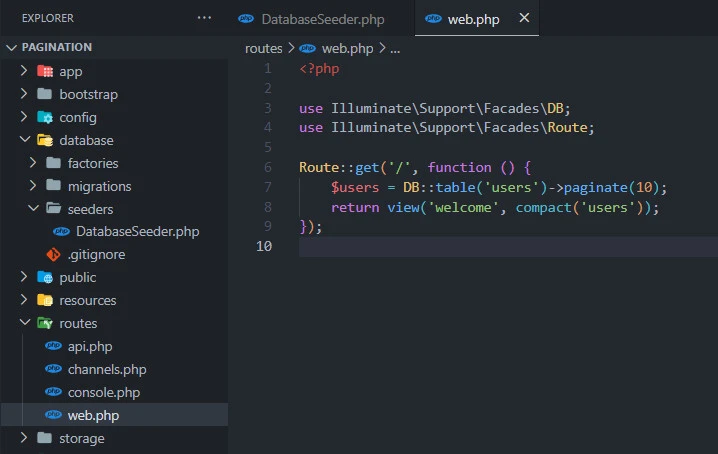
php artisan migrate --seedNow open the routes/web.php and
implement the paginate() method.
<?php

use Illuminate\Support\Facades\DB;
use Illuminate\Support\Facades\Route;

Route::get('/', function () {
    $users = DB::table('users')->paginate(10);
    return view('welcome', compact('users'));
});
This code sets up a route in a
Laravel application that handles
HTTP GET requests to the root URL
(/). When a user visits the root URL, the anonymous function defined
within the Route::get() method is executed.
Inside this function, the code uses
the DB facade to fetch the data from the users table in the
database. The paginate() method is called to retrieve the data in
chunks of 10 records per page.
The data is then passed to the
welcome view using the compact() function, which creates an array of
variables with their names as keys and their values as values. In this
case, the variable $users is passed to the view, which can be used to
display the paginated data in the view.
Finally, the view is returned to the
user as a response to their HTTP request. When the user visits the root URL, they will see the
paginated data displayed in the welcome view.
Now let's head to the view file and show the paginated data.
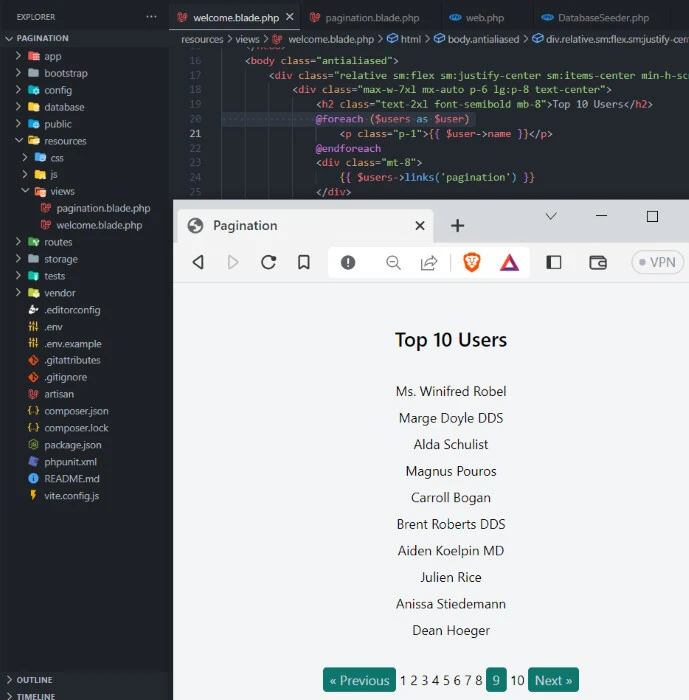
Display the paginated data in the view using the links() method
...
            <div class="max-w-7xl mx-auto p-6 lg:p-8 text-center">
                <h2 class="text-2xl font-semibold mb-8">Top 10 Users</h2>
                @foreach ($users as $user)
                    <p class="p-1">{{ $user->name }}</p>
                @endforeach
                <div class="mt-8">
                    {{ $users->links() }}
                </div>
            </div>
...
The variable $users contains a
collection of records fetched from a database using the paginate()
method. The @foreach loop iterates over each record in the
collection.
Inside the loop, the name of each
user is displayed using the {{ }} syntax, which is a Blade template
syntax for echoing the value of a variable. The ->name part accesses
the name property of each record in the collection.
After displaying the data, the
{{ $users->links() }} code generates the pagination links for the
collection using Laravel's built-in pagination functionality. This will
output a set of links that allow the user to navigate through the
paginated data. The mt-8 class is used to add some margin-top spacing
below the data, so that the pagination links are separated from the
data.
Customize the pagination view
Let's create a view called
pagination.blade.php to customize the pagination links.
@if ($paginator->hasPages())
<div class="pagination">
{{-- Previous Page Link --}}
@if (! $paginator->onFirstPage())
<a class="bg-teal-700 py-1 px-2 rounded text-gray-300" href="{{ $paginator->previousPageUrl() }}" rel="prev">« Previous</a>
@endif
{{-- Numbered Page Links --}}
@foreach ($elements as $element)
@if (is_array($element))
@foreach ($element as $page => $url)
@if ($page == $paginator->currentPage())
<span class="active bg-teal-700 py-1 px-2 rounded text-gray-300">{{ $page }}</span>
@else
<a href="{{ $url }}">{{ $page }}</a>
@endif
@endforeach
@endif
@endforeach
{{-- Next Page Link --}}
@if ($paginator->hasMorePages())
<a class="bg-teal-700 py-1 px-2 rounded text-gray-300" href="{{ $paginator->nextPageUrl() }}" rel="next">Next »</a>
@endif
</div>
@endifWe begin by using the
@if ($paginator->hasPages()) directive to check if the paginator has
pages. If so, we display the pagination links using the custom
view.
We open a div element with a class
of "pagination" to contain the pagination links. We then check if the
current page is not the first page, and if so, we display a "Previous"
button with a link to the previous page.
Next, we iterate through each
pagination element (page link or ellipsis) in the $elements array, and
for each page link, we assign the page number and URL to variables. We
then check if the current page is the current page being displayed, and
if so, we display the page number with a class of "active" to indicate
the current page.
We also check if there are more pages after the current page, and if so, we display a "Next" button with a link to the next page. The buttons are styled using Tailwind CSS classes.
Lastly, update the
resources/views/welcome.blade.php file to use the custom pagination
file.
...
            <div class="max-w-7xl mx-auto p-6 lg:p-8 text-center">
                <h2 class="text-2xl font-semibold mb-8">Top 10 Users</h2>
                @foreach ($users as $user)
                    <p class="p-1">{{ $user->name }}</p>
                @endforeach
                <div class="mt-8">
                    {{ $users->links('pagination') }}
                </div>
            </div>
...
The $users variable is the
collection of data that is being paginated. The links() method
generates the pagination links for this collection, and the pagination
argument passed to it specifies the
resources/views/pagination.blade.php file to be used for rendering the
pagination links.
Summary
Laravel's built-in pagination functionality provides a convenient and efficient way to paginate large sets of data in web applications. With just a few lines of code, we can display data in manageable chunks and make it easy for users to navigate through large sets of data.
In this article, we have covered the basics of Laravel pagination, including how to use it to paginate data, how to customize the view of the pagination links, and how to implement pagination using both the built-in pagination methods and custom pagination links.
By using Laravel's pagination functionality, we can improve the performance and user experience of our web applications, making it easier for users to find and interact with the data they need.


![How to remove /public from Laravel URL? [SOLVED]](/how-to-remove-public-from-laravel-url/laravel-remove-public-url_hu_2e39073acb6ea505.webp)
![Master the Astonishing Power of Laravel Octane [Tutorial]](/laravel-octane/laravel-octane_hu_133cebf73cf6dc5a.webp)
![Send mails in Laravel 10.x with Example [100% Working]](/send-mails-in-laravel/laravel-sending-mail_hu_1ea0a558f6623afc.webp)
![Laravel withCount() Explained [In-Depth Tutorial]](/laravel-withcount/laravel-withcount_hu_e24ff995838b5c7c.webp)