
How to automate SSH login with password? How to pass password to scp command used in bash script ? How to perform SSH login with password instead of using private key? How to pass password to scp command used in bash script?
In this tutorial I will share different methods you can use to ssh and scp to target node with password in shell script or from terminal.
Method 1: Use expect to do ssh with password instead of key
We can utilise expect to provide the password in an automated way without user prompt in a shell script. Expect is a really handy tool when it comes to automation where user input is expected. Although the demerit would be that anyone can open the script and check the password as the password would be in plain text format.
So if security is not your concern you can use expect to ssh with password.
apt to install/update the rpm
Install expect if it is not installed already on your server.
Package installs and updates in this section use dnf command.
~]# dnf install expect
Scenario-1: Use separate expect script
Below is a sample expect script which can use used to perform SSH and execute a command, the password is provided internally in the script:
  1 #!/usr/bin/expect
  2
  3 set USER [lindex $argv 0]
  4 set HOST [lindex $argv 1]
  5 set PWD [lindex $argv 2]
  6 log_file /var/log/ssh_tmp.log
  7
  8 set timeout  30
  9 log_user  1
 10 set send_slow {1 .01}
 11
 12 send_log  "Connecting to $HOST using $USER user\n"
 13 eval spawn ssh -o UserKnownHostsFile=/dev/null -o StrictHostKeyChecking=no -o Connecttimeout =30 "$USER\@$HOST"
 14 expect  {
 15         timeout       { send_user  "timeout  while connecting to $HOST\n"; exit }
 16         "*No route to host*" { send_user  "$HOST not reachable\n"; exit }
 17         "*assword: " { send -s $PWD\r }
 18         }
 19 expect  {
 20         timeout  { send_user  "timeout  waiting for prompt\n"; exit }
 21         "*]#"   { send_user  "Login successful to $HOST\n" }
 22         }
 23 send "hostname\r"
 24 expect  {
 25         "*]#"   { send "exit\r" }
 26         }
 27 send_user  "Disconnected\n"
 28 close
Line 3collects user name as the first input argumentLine 4collects hostname as the second input argumentLine 5collects password as the third input argumentLine 6we have defined the log file to store the output from the scriptLine 8definestimeoutfor the scriptLine 9We are printing the output on the console. If you wish to suppress it then uselog_user 0Line 10we have defined the speed with which the output should be sent. This can be helpful on slow systems to control the input buffer or you may choose to ignore this.Line 12we usesend_userto log a message to STDOUT as well as in the log file. By defaultsend_userdoes not add new line at the end hence we have added"\n"Line 13we usespawnto initiate SSH towards our target host. We have intentionally disabledStrictHostCheckingto avoid additional prompt on the screen.Line 14starts theexpectprocess. In this box we have added three possible conditionsLine 15In the first condition we expect atimeoutmessage where in we will just log and print the event and exitLine 16In the second condition we expect "No route to host" prompt which would mean the target server is not reachable. In such event also we will log and print the message and exitLine 17In the third condition we expect for the prompt where P can be small or capital so we use "*assword" which will support "Password" and "password". If this prompt is found then we send the password for the user. We use\rwhich is referred as carriage return which moves the cursor to the beginning of the row after executionLine 19we start newexpectconditionLine 20we again expect for possibletimeoutwherein we will log and print a message and exitLine 21we expect for a prompt wherein we will log and print a success messageLine 23we send thehostnamecommandLine 24-26we send exit command in a new expect blockLine 27We print and log an even for logging outLine 28we close the expect session
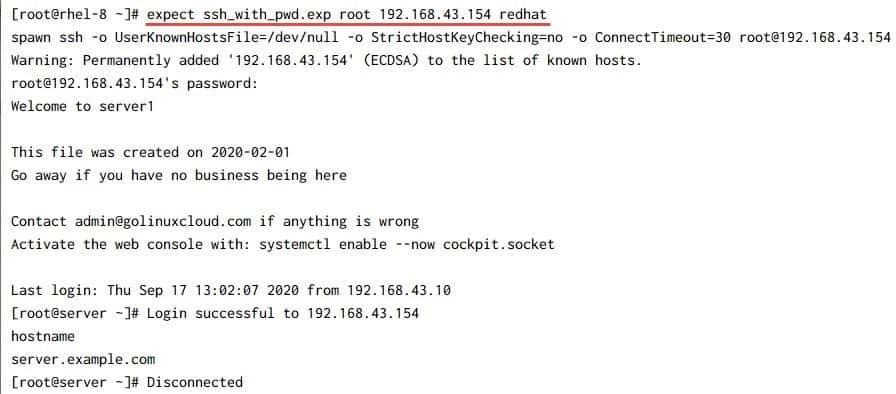
Let us execute the script and verify the output:
~]# expect ssh_with_pwd.exp root 192.168.43.154 redhat
Snippet from my terminal
You can find the same output in /var/log/ssh_tmp.log which we have
defined as our log file in the script.
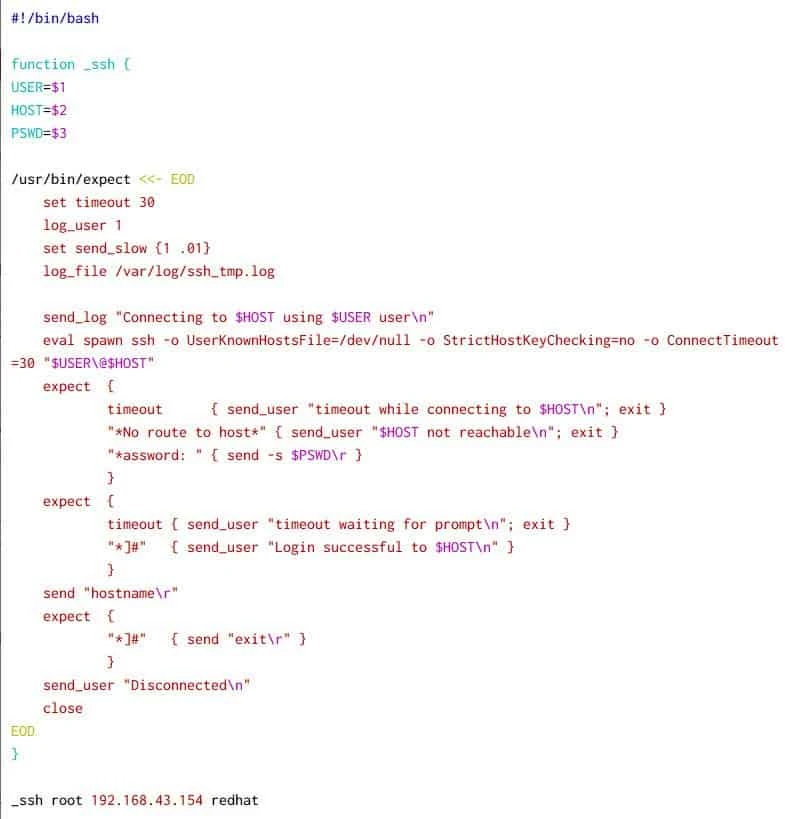
Scenario-2: Use expect inside bash script
Now this was a separate expect script but you can choose to integrate it
inside a shell script which would look like below. I have moved the
input argument inside the bash script instead of expect but that is
totally upto you, there is no such restriction what so ever.
Scenario-3: Perform scp with password using expect
We can also transfer files to another server without getting a password
prompt using expect script. Here is one example which uses a separate
expect script to transfer /tmp/src_file to target host:
#!/usr/bin/expect

set USER [lindex $argv 0]
set HOST [lindex $argv 1]
set PWD [lindex $argv 2]
log_file /var/log/ssh_tmp.log

set timeout 30
log_user 1
set send_slow {1 .01}

send_log "Connecting to $HOST using $USER user\n"

eval spawn scp  -o UserKnownHostsFile=/dev/null -o StrictHostKeyChecking=no -o ConnectTimeout=30 /tmp/src_file "$USER\@$HOST:/tmp/"
expect  {
        timeout      { send_user "timeout while connecting to $HOST\n"; exit }
        "*No route to host*" { send_user "$HOST not reachable\n"; exit }
        "*assword: " { send -s $PWD\r }
        }
interact
Here since we only intend to copy the files and hence there is a single
expect block and in the end we use interact to return to our terminal
Method 2: Use sshpass to provide password with SSH
sshpass is a utility designed for running ssh using the mode referred
to as "keyboard-interactive" password authentication, but in
non-interactive mode. This rpm is provided as part of EPEL repository
and does not requires a key for performing SSH.
Make sure EPEL repository is installed on your server:
Bootstrap extra repos by installing the release .rpm with rpm -Uvh; see the rpm command for local file installs.
~]# rpm -q epel-release
epel-release-8-8.el8.noarch
If it is not installed, then you can install the same using:
~]# dnf -y install epel-release
You can search for this package in the repository
~]# dnf search sshpass
Last metadata expiration check: 0:00:27 ago on Thu 17 Sep 2020 01:25:51 PM IST.
===================================== Name Exactly Matched: sshpass =====================================
sshpass.x86_64 : Non-interactive SSH authentication utility
Let's quickly install this rpm for the demonstration:
~]# dnf install sshpass -y
Scenario-1: Provide clear text password with sshpass
In this example we provide a plain text password to sshpass which is
highly insecure
because any user with access to your server and history can see the
password.
Syntax:
sshpass -p <PASSWORD> ssh USER@HOST [COMMANDS]
If we wish to check the hostname of remote server, then the command
would be:
~]# sshpass -p redhat ssh [email protected] hostname
rhel-8.example.com
Scenario-2: Perform scp using sshpass
You can also transfer files without getting a password prompt by
combining scp with sshpass. In this example we copy a file
/tmp/src_file to our remote server with scp and sshpass
~]# sshpass -p 'redhat' scp /tmp/src_file [email protected]:/tmp/
Here 'redhat' is my password.
Scenario-3: Use file descriptor with sshpass
This is the most
recommended method to use sshpass wherein we provide the
password as a file descriptor instead of plain text. This part of code
snippet is taken from stackoverflow
# Create a pipe
PIPE=$(mktemp -u)
mkfifo -m 600 $PIPE
# Attach it to file descriptior 3
exec 3<>$PIPE
# Delete the directory entry
rm $PIPE
# Write your password in the pipe
echo 'my_secret_password' >&3
# Connect with sshpass -d
sshpass -d3 ssh user@host

# Close the pipe when done
exec 3>&-
You can put this in a script and use it to securely login to a server without getting a password prompt.
There are many other methods to use sshpass such as use a text file
The step below resolves a command name with which; see the which command for PATH lookup, -a, and portable command -v alternatives.
which contains the password, define a variable SSHPASS and use it instead of plain text password. You can get all these information from the man page of sshpass.
Method 3: Using Private Public passphrase instead of password
This is definitely the most recommended method to use ssh if you want to automate the SSH process. I have already written a well detailed article on how SSH public key based authentication works. There are 6 different types of authentication methods with SSH but we will for now concentrate on public key based authentication for this tutorial.
Scenario-1: Create a password less passphrase to perform SSH
In this example we create a password less key pair so that the SSH won't
prompt for any password. Use
ssh-keygen
to generate a key pair with -P "" to provide an empty password
~]# ssh-keygen -t rsa -P ""
Generating public/private rsa key pair.
Enter file in which to save the key (/root/.ssh/id_rsa):
Your identification has been saved in /root/.ssh/id_rsa.
Your public key has been saved in /root/.ssh/id_rsa.pub.
The key fingerprint is:
SHA256:m9TcEC+9H53ObDbnC/Tp5OnNd9ztwv+x3LskMMf1wZI [email protected]
The key's randomart image is:
+---[RSA 3072]----+
|          .      |
|           +  o  |
|          o oE + |
|         o +..o.+|
|        S ooo+..o|
|       . o  =.=..|
|        o    +.#+|
|              &o#|
|              .#/|
+----[SHA256]-----+
Now copy the public key to the remote node to which you wish to connect
via SSH. The best way to copy the public key is with ssh-copy-id so
you don't have to worry about permission, path etc
~]# ssh-copy-id -i /root/.ssh/id_rsa.pub [email protected]
/usr/bin/ssh-copy-id: INFO: Source of key(s) to be installed: "/root/.ssh/id_rsa.pub"
/usr/bin/ssh-copy-id: INFO: attempting to log in with the new key(s), to filter out any that are already installed
/usr/bin/ssh-copy-id: INFO: 1 key(s) remain to be installed -- if you are prompted now it is to install the new keys
[email protected]'s password:

Number of key(s) added: 1

Now try logging into the machine, with: "ssh '[email protected]'"
and check to make sure that only the key(s) you wanted were added.
So now we can SSH to our target server 192.168.43.10 without any password.
~]# ssh [email protected] hostname
rhel-8.example.com
If you face any issues, make sure PubkeyAuthentication is set to yes
in /etc/ssh/sshd_config of your target node i.e. 192.168.43.10 in
this case.
Scenario-2: Automate SSH with passphrase
In the previous scenario we had set an empty passphrase for the key pair but what if you have set a passphrase. In that case the script will still prompt for a passphrase. We cannot avoid this scenario but if you have multiple hosts then we do can make sure that you get a passphrase prompt only once and SSH will continue to connect all the hosts. Now this is only possible if all these hosts are configured with the same private public key pair.
We generate a passphrase based key pair where our passphrase will be
"redhat"
[root@server ~]# ssh-keygen -t rsa -P "redhat"
Generating public/private rsa key pair.
Enter file in which to save the key (/root/.ssh/id_rsa):
Your identification has been saved in /root/.ssh/id_rsa.
Your public key has been saved in /root/.ssh/id_rsa.pub.
The key fingerprint is:
SHA256:Z0jNJwJQwGpXHsQGJXuDhBHcVKLUK0m7pPoq/7I3voo [email protected]
The key's randomart image is:
+---[RSA 3072]----+
| .+OOX*          |
| .+o+==. o       |
| ..+o=o.o + .    |
|  B o..o o o     |
| + +    S o      |
|. .      o       |
|.                |
|o.. o            |
|E+=B+o           |
+----[SHA256]-----+
Next we copy this public key to our remote server's
~/.ssh/authorised_keys file using ssh-copy-id
[root@server ~]# ssh-copy-id [email protected]
/usr/bin/ssh-copy-id: INFO: Source of key(s) to be installed: "/root/.ssh/id_rsa.pub"
/usr/bin/ssh-copy-id: INFO: attempting to log in with the new key(s), to filter out any that are already installed
/usr/bin/ssh-copy-id: INFO: 1 key(s) remain to be installed -- if you are prompted now it is to install the new keys
[email protected]'s password:

Number of key(s) added: 1

Now try logging into the machine, with:   "ssh '[email protected]'"
and check to make sure that only the key(s) you wanted were added.
Now let's verify to login and make sure we get a passphrase prompt
[root@server .ssh]# ssh [email protected]
Enter passphrase for key '/root/.ssh/id_rsa':
Last failed login: Thu Sep 17 13:52:02 IST 2020 from server on ssh:notty
Last login: Thu Sep 17 13:38:35 2020 from server
[root@rhel-8 ~]#
[root@rhel-8 ~]# logout
Connection to 192.168.43.10 closed.
So our connection is working as expected. Now to automate this via a script we will create a ssh agent and bind it to the private key which we use while connecting to the remote server
[root@server ~]# eval `ssh-agent` ssh-add /root/.ssh/id_rsa
Agent pid 60251
Enter passphrase for /root/.ssh/id_rsa:
Identity added: /root/.ssh/id_rsa ([email protected])
A new ssh agent PID is created 60251. So as long as this PID is running we can now SSH to our remote server without adding any passphrase. You can verify the same:
[root@server ~]# ssh [email protected]
Last login: Thu Sep 17 15:01:00 2020 from server
[root@rhel-8 ~]# logout
Connection to 192.168.43.10 closed.
Once you are done, you can kill the ssh-agent process
[root@server ~]# kill -9 60251
If you wish to in-corporate this into a script, here I have written a shell script which performs multiple checks before using or creating a new ssh agent
Find the blocking PID with ps aux piped to grep; the ps command explains BSD versus UNIX options and filtering command lines.
#!/bin/bash

declare _SSH_AGENT_BINARY=/usr/bin/ssh-agent
declare _SSH_AGENT_LIFETIMESEC=3600
declare _SSH_ENV="$HOME/.ssh/environment"
declare SYSTEM_AGENT=""

function create_env {
  # Create $HOME/.ssh if not present
  if [ ! -e `dirname $_SSH_ENV` ]
  then
    mkdir -p `dirname $_SSH_ENV` > /dev/null 2>&1
    chmod 0700 `dirname $_SSH_ENV` > /dev/null 2>&1
    touch $_SSH_ENV > /dev/null 2>&1
  fi
}

function _launch_ssh_agent ()
{

  # launch ssh agent and comment the echo statement
  $_SSH_AGENT_BINARY -t $_SSH_AGENT_LIFETIMESEC | sed 's/^echo/#echo/' > $_SSH_ENV
  [[ $? -ne 0 ]] && echo "failed to launch ssh-agent" &&  return 1

  chmod 0600 $_SSH_ENV > /dev/null 2>&1
  source $_SSH_ENV > /dev/null 2>&1
  return 0
}

function _use_ssh_agent ()
{
  # Check for existing agent (if running) do not launch another agent
  if [ ! -z "$SSH_AGENT_PID" ]; then
    ps -p $SSH_AGENT_PID -opid= | grep -q $SSH_AGENT_PID
    if [[ $? -eq 0 ]];then
       echo "An ssh agent with $SSH_AGENT_PID PID is already running, not creating a new agent"
       SYSTEM_AGENT=YES
       return 0
    fi
  fi

  # If environment file contains PID then check if the PID is running
  # accordingly launch new ssh agent
  # if file is not present and generate new agent PID
  if [ -f $_SSH_ENV ]; then
    source $_SSH_ENV > /dev/null 2>&1
    ps -p $SSH_AGENT_PID -opid= | grep -q $SSH_AGENT_PID
    [ $? -ne 0 ] && _launch_ssh_agent
  else
    _launch_ssh_agent
    [ $? -ne 0 ] && return 1
  fi

  return 0
}

function _ssh_add
{
  _use_ssh_agent
  [ $? -ne 0 ] && return 1

  ssh-add $1 > /dev/null 2>&1
  [[ $? -ne 0 ]] && exit "failed to add $1 to ssh-agent" && return 1

  return 0
}

# Create the environment (if not present)
create_env

# Provide the path of the private key
_ssh_add /root/.ssh/id_rsa

echo "Doing ssh"
ssh [email protected] hostname

# Kill the ssh agent
if [[ $SYSTEM_AGENT == YES ]];then
   echo "used system generated agent, can't kill this one.."
else
   [[ -f $_SSH_ENV ]] && source $_SSH_ENV
   [ ! -z ${SSH_AGENT_PID} ] && kill -9 ${SSH_AGENT_PID} 2>/dev/null
fi
Here,
- I check for
~/.sshdirectory and if not found the same is created usingcreate_envfunction - If you/someone from your Linux server has launched an ssh-agent then
the PID would be stored in
$SSH_AGENT_PIDfile so we check if this PID is running or not. If this PID is found in running state then we don't create a new agent and use the existing one - If PID from
$SSH_AGENT_PIDis not in running state then we launch a new agent and add it to~/.ssh/environmentfile - Next we add the
ssh-agentwe created earlier or the one which already exists - Now you can perform your SSH activity, i.e. you can connect to any number of hosts using the same public key and you won't get multiple password prompt
- Once the SSH activity is completed we will kill the ssh agent. But if the ssh agent was not created by our script then we leave it as it is.
Method 4: Using PSSH and PSCP
We also have a very handy tool written in python i.e. PSSH and PSCP where you can connect to multiple hosts by just entering the password once on the terminal. You can also setup password less login using private public key pair and then use the public key to connect to remote server without any password.
PSSH is part of EPEL repository which we had already installed in our previous section so we will just install PSSH.
~]# dnf -y install pssh
Next we will generate a password less private public key pair
~]# ssh-keygen -t rsa -P ""
Generating public/private rsa key pair.
Enter file in which to save the key (/root/.ssh/id_rsa):
/root/.ssh/id_rsa already exists.
Your identification has been saved in /root/.ssh/id_rsa.
Your public key has been saved in /root/.ssh/id_rsa.pub.
The key fingerprint is:
SHA256:EyUcATZszzFr1b6+f5fZc8vAbvRsfpCcbIlsL5oC2Yo [email protected]
The key's randomart image is:
+---[RSA 3072]----+
|     .+o+o..     |
|     .o.+o. .    |
|     . o.= .     |
|        =.  .    |
|       +S  . = + |
|      o ..  *.O  |
|     . o   o.=o.+|
|    E . .  .+.+B*|
|         .o.o=+=*|
+----[SHA256]-----+
We have to now create an ssh agent and bind it to the private key which PSSH will use:
~]# eval `ssh-agent` ssh-add /root/.ssh/id_rsa
Agent pid 67300
Identity added: /root/.ssh/id_rsa ([email protected])
Now we can use PSSH to connect to remote server without worrying about
password:
~]# pssh -i -H "192.168.43.10" -l root -x "-o StrictHostKeyChecking=no -o GSSAPIAuthentication=no -o PreferredAuthentications=publickey -o PubkeyAuthentication=yes" hostname
[1] 16:34:13 [SUCCESS] 192.168.43.10
rhel-8.example.com
Here I have used multiple SSH options to only use PubKeyAuthentication
and disable other type of authentication methods.
Conclusion
In this tutorial we covered different scenarios to automate SSH with password in shell scripts with different methods. The most recommended and secure method is Public key authentication followed by SSHPASS with descriptor. You may also choose to use expect script which is also preferred but the only problem would be lack of security as the password would be in plain text format.
Lastly I hope the steps from the article to configure ssh with password in Linux was helpful. So, let me know your suggestions and feedback using the comment section.
