
In this tutorial I will give a detailed overview on different tmux commands with examples and screenshots form my Linux server terminal. if you don't know this already tmux is an alternative to screen rpm, many Linux distributions such as CentOS 8 have already started dropping screen from their repository so it is between you start getting familiar with tmux commands.
We will cover below topics in this tutorial
- Installing
tmux - Learn about prefix key combination
- Creating session with windows and panes
- Attach and Detach sessions
- Create multiple windows
- Splitting panes (horizontal and vertical)
- Using
tmuxcommands with shortcuts
You can also access tmux cheatsheet with 50+ shortcuts commands and key combinations
What is tmux
tmuxis a terminal multiplexer- It is an alternative to screen utility
- It lets you use a single environment to launch multiple terminals, or windows, each running its own process or program
- For example, you can launch
tmuxand load up the Vim text editor. - You can then create a new window, load up a database console, and switch back and forth between these programs all within a single session.
- You can divide your terminal windows into horizontal or vertical panes, which means you can run two or more programs on the same screen side by side.
Installing tmux
You can install tmux in one of two ways: using a package manager for your operating system, or building tmux from source. Whichever method you choose, you’ll want to ensure you install tmux version 2.2 or higher. Earlier versions of tmux don’t support some of the features we’re going to cover in this tutorial
Installing on MAC
The easiest way to install tmux on the Mac is with Homebrew. First, install Xcode through the Mac App Store. Once Xcode is installed, open a new terminal and run the command
$ xcode-select --installto install the command-line tools that Homebrew needs. Next, install Homebrew by following the instructions on the Homebrew website.
Finally, install tmux with the following terminal command:
$ brew install tmuxTo ensure that tmux is installed properly, and to check that you have the correct version, execute this command from your terminal:
$ tmux -VInstalling on Debian and Ubuntu
On Ubuntu and Debian distributions you can use
apt-get
to install tmux
$ sudo apt install tmuxInstalling on RHEL, CentOS or Fedora
On RHEL and other similar distributions such as CentOS, Fedora, SuSE you
can use
[yum or dnf to install tmux. dnf is available starting with RHEL/CentOS 8 and SLES 12 text # yum install tmux ### Installation using source code In earlier examples we used tmux in the form of rpm, you can also download the source code from official repository](/dnf-command-in-linux/)
$ tar -zxvf tmux-X.X.tar.gz
$ cd tmux-X.6X
$ ./configure
$ make
$ sudo make install
The Prefix key
There is a special key in tmux called the prefix key that is used to
perform most of the keyboard shortcuts. Its default binding in tmux is
Ctrl + b. To get a feel for how this works, open tmux again:
# tmuxThen, inside of tmux, press Ctrl-b, then press t. A large clock will
appear on the screen.
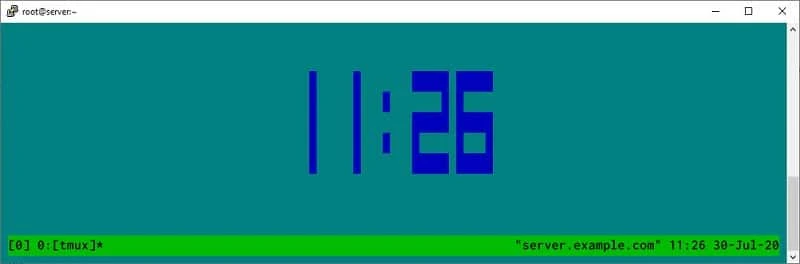
display clock with tmux session
Press the Enter key to dismiss the clock, and exit tmux by typing
exit.
Ctrl-b simultaneously, release those keys, and
then immediately press the key for the command you want to send to
tmux. Throughout the rest of this tutorial, I’ll use the notation
Prefix, followed by the shortcut key for tmux commands, like
Prefix d instead of Ctrl+b d for detaching from a session.
Create your first tmux session
Let us jump in and start playing with tmux. Open your favourite
terminal application, I will use Putty. On the terminal just hit
"tmux" without any arguments (We will learn about tmux configuration
and arguments later)
# tmuxYou'll probably see a screen flash, and it'll seem like not much else
has happened; it looks like you're right where you were previously, with
a command prompt. The word tmux is gone, but not much else appears to
have changed.
However, you should notice that now there is a bar along the bottom of your terminal window. This can be seen in the following screenshot of the terminal window:
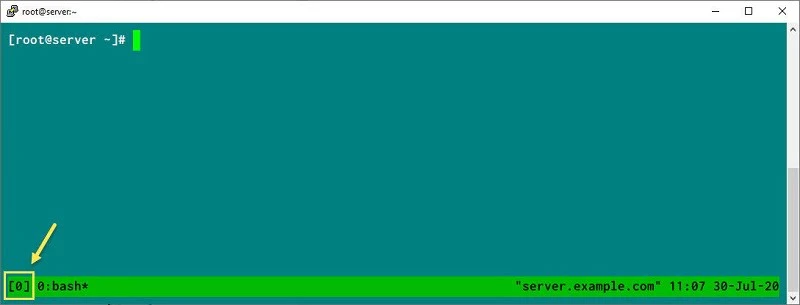
tmus session name
That bar along the bottom is provided by tmux. We call this bar the
status line. The status line gives you information about the session
and window you are currently viewing, which other windows are available
in this session, and more.
Rename existing session
Notice the [0] at the very left of the status bar in the snippet I
added in the above section? This is the name of the session in brackets.
Here, since you just started tmux without any arguments, it was given
the name 0. However, this is not a very useful name, so let's change
it to "tutorial".
To rename an existing tmux session we use
"tmux rename-session <session_name>"
# tmux rename-session tutorialObserve the status bar in the below screenshot
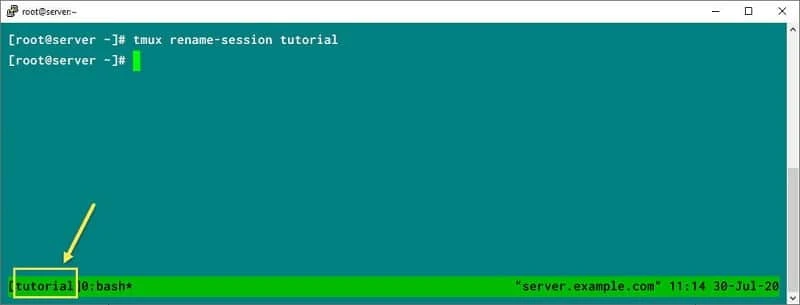
tmux rename session
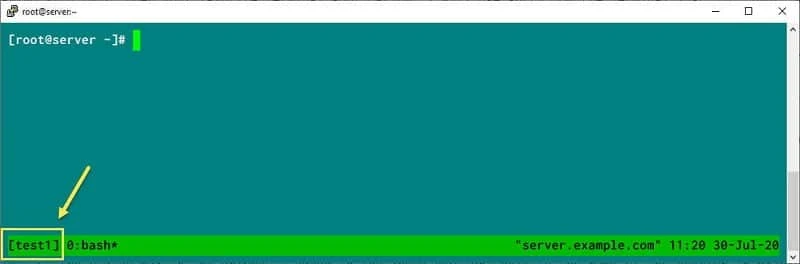
Create new named session
We can also create a new session with a pre-defined name using:
# tmux new-session -s test1Alternatively you can also use
# tmux new -s test1This would create a new session with name test1.
Enter "exit" to exit the session for now, we will learn more about it
later in this tutorial
# exitDetach and Attach to tmux session
Similar to screen, one of the biggest advantages of these virtual
sessions with tmux is that you can detach a tmux session and leave
your process running in the background
If you close a regular terminal session, all the programs you have
running in that session are killed off. But when you detach from a
tmux session, you’re not actually closing tmux. Any programs you
started up in that session will stay running. You can then “attach” to
the session and pick up where you left off.
Let's create a new session
# tmux new -s onePress Prefix d to detach the session.
List the available sessions
# tmux ls
one: 1 windows (created Thu Jul 30 11:44:08 2020) [105x10]
Alternatively you can also use below command to list the active tmux sessions
# tmux list-sessions
one: 1 windows (created Thu Jul 30 11:44:08 2020) [105x10]
The command shows that there’s one session currently running:
one: 1 windows (created Thu Jul 30 11:44:08 2020) [105x10]To attach to the session, use the attach keyword. If you only have one session running, you can simply use
# tmux attachTo attach to a defined session use:
# tmux attach -t <session_name>Killing sessions
You can type exit "within a session" to destroy the session
# exitAlternatively you can also kill a session kill-session command
# tmux kill-session -t oneNow list the available sessions
# tmux ls
no server running on /tmp/tmux-0/default
Since there are no tmux sessions running, tmux itself isn’t running,
so it isn’t able to handle the request.
Working with windows
We have an option to create multiple windows within the same session. So we need not be creating separate sessions for individual processes. These windows will continue to function even if we detach the session.
Let's create a new session as "windows"
# tmux new -s windowsand open a dummy file for editing.
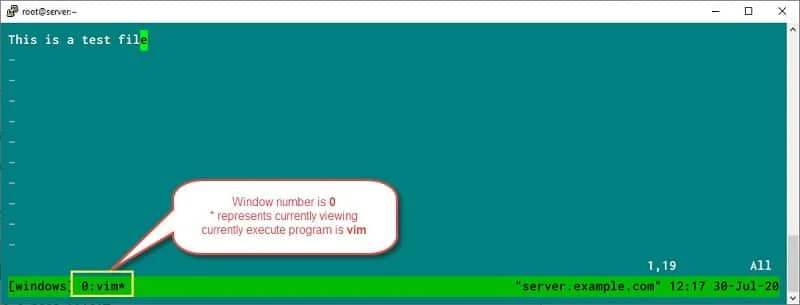
tmux windows
The status bar has a string that represents each window to inform us
about the things that are currently running. So the text bash in our
status bar just to the right of our session name ([windows]) has
changed. It used to be 0:bash* and now it's 0:vim*.
Understanding the content in status bar
- The zero in the front represents the number of the window. As we'll shortly see, each window is given a number that we can use to identify and switch to it.
- The colon separates the window number from the name of the program running in that window.
- The symbols
~orvimin the previous screenshot are loosely names of the running program. We say "loosely" because you'll notice that~is not the name of a program, but was the directory we were visiting. - The symbol * indicates that this is the currently viewed window
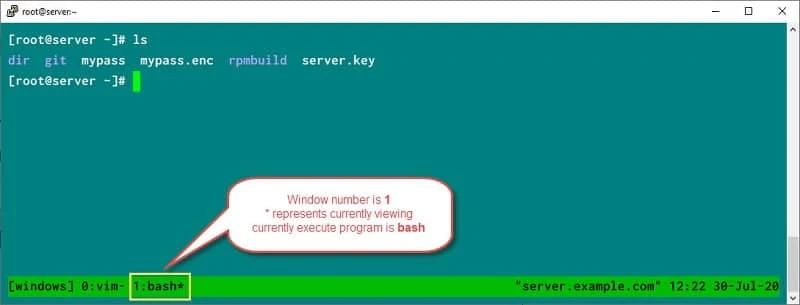
Create more windows
So now we know the syntax used for windows in status bar, let us create
new windows in our existing session. To create a new window within a
session just press Prefix c and you will be presented with new
window
tmux windows
Let us understand the status bar here
- There is a new window with the label
1:bash*. It is given the number 1 because the last one was 0. The next will be 2, then 3, 4, and so on. - The
asteriskthat denoted the currently active window has been moved to 1 since it is now the active one. - The
vimapplication is still running in window 0. - The asterisk on window 0 has been replaced by a hyphen (
-). The-symbol denotes the previously opened window.
Switch windows
Now assuming you have created multiple windows but how will you move around individual windows?
Prefixnto go to next windowPrefixpto go to the previous windowPrefix0to go to the first windowPrefix1to go to the second window and so on..Prefixlto go to the last window
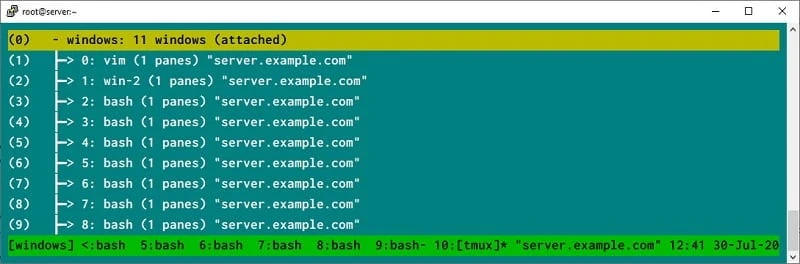
If you end up with more than nine windows, you can use
Prefixwto display a visual menu of your windows so you can select the one you’d likePrefix fto find a window that contains a string of text- Typing the text and pressing
Enterdisplays a list of windows containing that text.
switch windows in tmux session
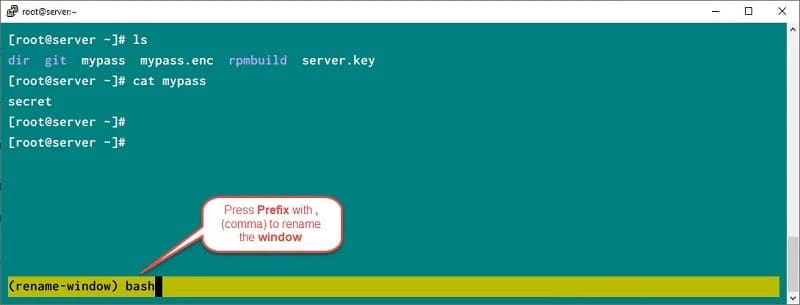
Rename windows
To rename a window, press Prefix followed by , (a comma), and the
status line changes, letting you rename the current window.
rename windows-1
Go ahead and rename the window to "win-2"
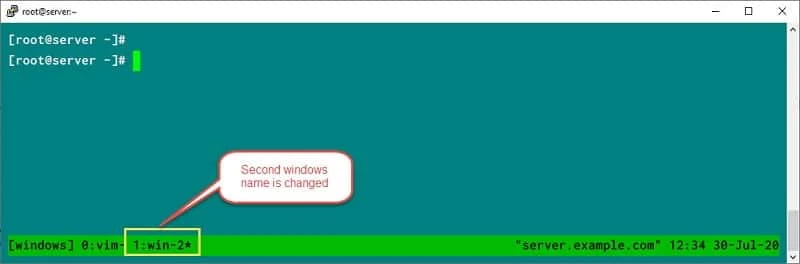
rename windows-2
You can also assign a name to the window while creating your session using
# tmux new -s windows -n shellSo here we create a new session by the name "windows" and inside
windows our first window would be named as "shell" instead of the
default name "bash"
Killing windows
As the last to kill a window you can switch to your respective window
using Prefix <Window_number>
Prefix & to kill it. You will receive a prompt to which you have to
confirm that you want to kill it.
OR
Prefix x to kill it. You will receive a prompt to which you have to
confirm that you want to kill it.
OR
You can Enter "exit" to exit that window session
How do I remember Prefix combination
That is a valid question. It is not possible to remember all these
Prefix key combination so we can also use the help section of key
bindings
Press Prefix``? to see your screen change to show a list with
bind-key to the left, the key binding in the middle, and the command
it runs to the right.
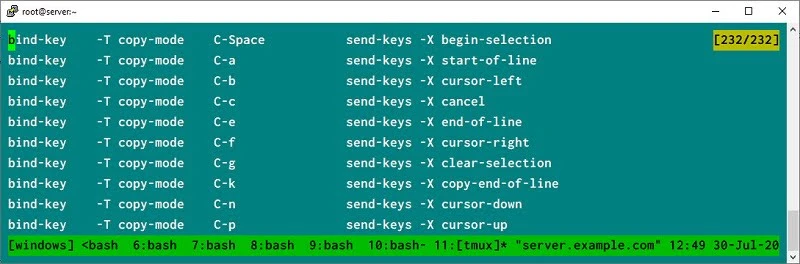
tmux Prefix combination
Press Ctrl + s and you'll see a prompt appear that says
Search Down:, where you can type a string and it will search the help
document for that string.
tmux uses Emacs for all the key combinations, but it can
be changed to vi via configuration (which we will learn later). It may
also be set to vi automatically based on the global $EDITOR setting
in your shell.
So you can press ctrl+s multiple times to navigate around the key bind
help section and look for the Prefix combination you are looking for.
Working with Panes
Now having different windows is one good idea but it still requires alot of moving around if something you have to constantly monitor. In such case we can split our session into panes so all the screens
Split the session into Panes
Based on the prefix combination you can split your session into horizontal or vertical panes
Prefix%, and the window will divide down the middle and start up a second terminal session in the new pane.Prefix"(double quote) will split this new pane in half horizontally.
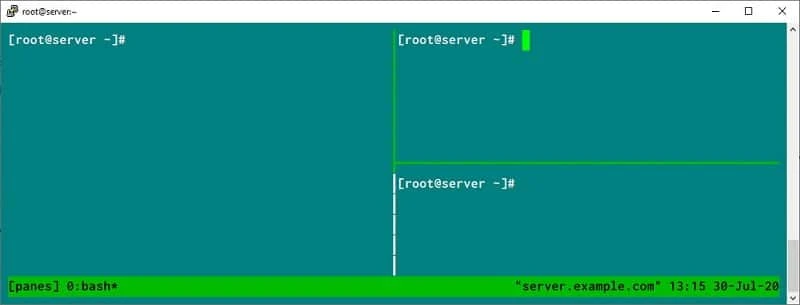
tmux splitting panes
You can also use Prefix Spacebar to change to layout of all your
panes
Move around Panes
You can use below prefix combinations to move around different panes
PrefixoTo cycle through the panesPrefixUpArrow To go pane right abovePrefixDownArrow To go to the pane right belowPrefixRightArrow To go to the pane in the right sidePrefixLeftArrow To go to the pane in the left side
Killing Panes
We can use the same prefix combination to kill panes as we used for windows.
Prefix & to kill it. You will receive a prompt to which you have to
confirm that you want to kill it.
OR
Prefix x to kill it. You will receive a prompt to which you have to
confirm that you want to kill it.
OR
You can Enter "exit" to exit that window session
Working with tmux commands
We have used different key combinations with prefix to perform different operations. Sometimes it can become hectic to punch all these key combinations so we have a better alternative to use tmux commands
We can execute tmux commands two ways:
- from the terminal itself
- from the command area in the
tmuxstatus line.
To enter Command mode, press Prefix : (the colon) from within a
running tmux session. The status line changes color and we get a
prompt that indicates that we can type our command.
new-windowTo create a new windowsplit-window -vTo split the window and create a new pane (vertically)split-window -hTo split the window and create a new pane (horizontally)select-window -t :=0To select window from terminal 0next-windowTo go to the next windowlast-windowTo go to the last window
By pressing Prefix ?, you can get a list of all predefined tmux
keybindings and the associated commands these trigger.
Conclusion
In this tmux tutorial we learned about different sessions, windows, panes and tmux commands. This is just a beginners guide, tmux gives much more flexibility using configuration options where we can customize sessions, windows and all other configurable values. This is something which I will cover in my next article but atleast now you must be familar with the basic usage of tmux.
What's Next
Now that you are familiar with tmux basics, next you should go into the advanced mode by configuring tmux with customized options such as define your own prefix key combination, default editor etc.
10 practical examples of tmux configuration with examples
References
I have used below external references for this tutorial guide
learning Tmux


![Convert Decimal to Fraction [7 Programming Languages]](/convert-decimal-to-fraction/convert-decimal-to-fraction_hu_e9014f91c5b79b23.webp)


![Linux File Descriptors [In-Depth Tutorial]](/linux-file-descriptors/file-descriptors-1_hu_4f270b08d7bdafb.webp)
![How to Edit a File in Linux? [SOLVED]](/linux-how-to-edit-a-file/linux-edit-file_hu_cb0d51fc1cfd0419.webp)