ISO is an archive format that enables the portability of your local data to portable media such as CD/DVD and USB, and your local data to media such as CD/DVD. The archive format extension is “.iso”. Most of us are familiar with the ISO format when downloading and installing an operating system.
In this article, let's look for an answer to the question "How to Mount ISO Image on Linux".
Why do we need to manually mount ISO Image in Linux?
In Windows it is quiet easy wherein you just inserted the DVD and you were to access the content of the image but in Linux you have to follow some extra steps. Although if you have a GUI based Linux environment then mounting and accessing an ISO is almost similar to any other graphical distribution.
Now when we place an ISO file in a Linux box, it basically is a file which needs to be accessed but you need a tool which can read an ISO file. So either you install such tool and then you should be able to access the ISO file without the need of mounting or alternatively you have to consider the ISO image as a device and mount it on a mount point to access it.
For example, if you add some disk to your VM then you have to basically mount it to access it right?
Consider your root partition in Linux, you had created a partition /dev/XXX with some size but to be able to access and write to this storage, you have mounted it to root or any other partition. So the same logic applies to an ISO image.
Also Read:Linux mount command to access filesystems, iso image, usb, network drives
Scenario-1: Access an ISO mounted as Virtual Media via CD/DVDROM
If you have mounted your ISON image using Virtual Media Manager such as CD/DVDROM or similar interface then the steps to mount an ISO image will be as follows:
Connect to the Linux VM and execute lsblk command to list the
available connected devices:

Here, as you can see sr0 device contains the image which I have mounted using Virtual Media
[root@mail ~]# lsblk
NAME          MAJ:MIN RM  SIZE RO TYPE MOUNTPOINT
loop0           7:0    0 99.3M  1 loop /var/lib/snapd/snap/core/11743
loop1           7:1    0 42.3M  1 loop /var/lib/snapd/snap/certbot/1434
loop2           7:2    0 61.8M  1 loop /var/lib/snapd/snap/core20/1081
sda             8:0    0 10.4G  0 disk
+-sda1          8:1    0  205M  0 part /boot
+-sda2          8:2    0  488M  0 part [SWAP]
+-sda3          8:3    0  9.8G  0 part
  +-rhel-root 253:0    0  9.8G  0 lvm  /
sr0            11:0    1  4.3G  0 rom  /run/media/root/CentOS 7 x86_64
To get more details on this device, you can use blkid command:
~]# blkid /dev/sr0
/dev/sr0: BLOCK_SIZE="2048" UUID="2018-11-25-23-54-16-00" LABEL="CentOS 7 x86_64" TYPE="iso9660" PTUUID="15a0523f" PTTYPE="dos"
To mount this ISO, we will execute mount command with source as
/dev/sr0 and destination will your mount point.
You can either mount the ISO on /mnt if it is for temporary purpose or
you can create a directory where you will mount this ISO. This directory
can be under any path but it is recommended to keep it inside /media.
~]# mkdir /media/img
~]# mount /dev/sr0 /media/img/
mount: /media/img: WARNING: device write-protected, mounted read-only.
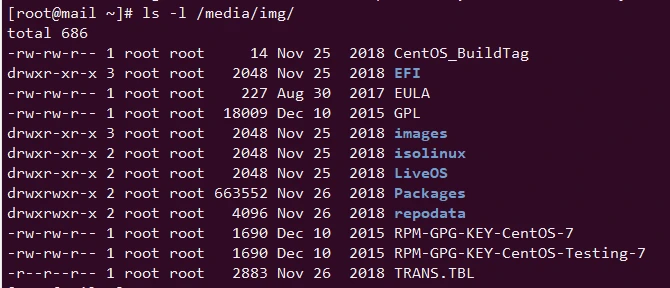
Now you should be able to access the content of the ISO:
Scenario-2: Mount ISO Image using CLI
If you have copied an ISO image to your Linux box then you can directly
go ahead and mount it. You can either use /mnt for temporary mounting
or create a mount point:
ubuntu@ubuntu:~$ sudo mkdir /mnt/iso_mount
Then it is mounted to the system with the mount command. The way the command is written should be as follows;
ubuntu@ubuntu:~$ sudo mount [iso_image.iso] [directory]
For example;
ubuntu@ubuntu:~$ sudo mount /home/ubuntu/local_backup.iso /mnt/iso_mount
mount: /mnt/iso_mount: WARNING: device write-protected, mounted read-only.
Next;
ubuntu@ubuntu:~$ ls /mnt/iso_mount/
file_000.bac file_001.bac file_002.bac file_003.bac file_004.bac file_bac.bac
You can view directory information with the command. When the mount status made in this way is displayed, you should get a command output as follows;
ubuntu@ubuntu:~$ mount -l
/home/ubuntu/local_backup.iso on /mnt/iso_mount type iso9660 (ro,relatime,nojoliet,check=s,map=n,blocksize=2048,iocharset=utf8) [CDROM]
Mounted iso file location, mount file and mount type are displayed.
If you are going to mount a Linux operating system (for example AlmaLinux) iso file, the command is written as follows;
foc@fedora:~$ sudo mount -o loop -t iso9660 /home/ubuntu/AlmaLinux-9-latest-x86_64-dvd.iso /mnt/iso_mount
This way the iso file is mounted in a directory. The directory connected
with the "-o loop" parameter is detected as a disk. Most linux
distributions can mount it as a disk without giving the -o loop
parameter. But it should be written in order not to encounter a problem.
Depending on your purpose of mounting, you can mount this directory as a repository to the system, after making changes in the directory, you can customize the operating system by converting it to iso format.
Unmount The ISO via CLI
To umount an ISO you can use umount command. Search for all the mount points with "iso"
ubuntu@ubuntu:~$ mount -l | grep iso
~]# mount -l | grep iso
/dev/sr0 on /run/media/root/CentOS 7 x86_64 type iso9660 (ro,nosuid,nodev,relatime,nojoliet,check=s,map=n,blocksize=2048,uid=0,gid=0,dmode=500,fmode=400,uhelper=udisks2) [CentOS 7 x86_64]
/dev/sr0 on /media/img type iso9660 (ro,relatime,nojoliet,check=s,map=n,blocksize=2048,uid=0,gid=0,dmode=500,fmode=400) [CentOS 7 x86_64]
All mounted directories are listed with the command. Then the umount command is typed;
ubuntu@ubuntu:~$ umount /media/img
Or unmount by typing the address of the mounted iso file;
umount /dev/sr0
Then, it is seen that the directory mounted with the mount -l command
is removed from the system.You can get more detailed information by
typing the "man mount" command in the terminal.
Scenario-3: Mount ISO Image Using GUI
The desktop environment you are using brings with it utilities to mount the ISO files. For example, with Disk Image Mounter that comes with GNOME, you can right-click the iso file and mount it to the system.

Then you can see it mount the iso file as a disk.
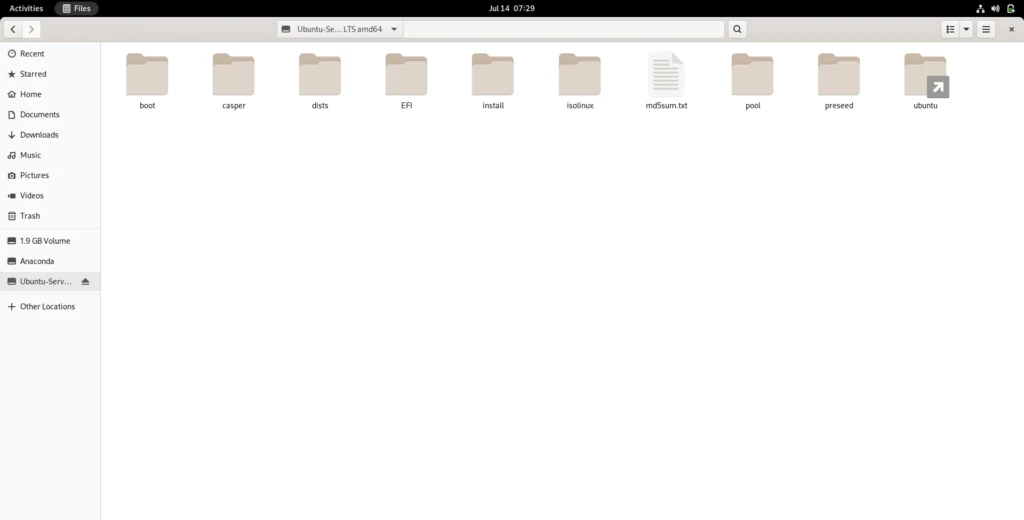
You can view the contents of the iso file by double-clicking the file that appears as a disk.
Unmount ISO from GUI
Right click the disk view and click unmount to remove the iso file mounted on the system. Or click on the unmount icon that appears on the screen.

Finally, you can open iso files with applications such as p7zip and Xarchiver without mounting them. However, this may not always be the best method.
Summary
In this tutorial we learned why and how to mount ISO image in Linux. I explained multiple methods to mount and access the ISO image in CLI as well as GUI. It is quiet common to work with ISOs to perform installation, configure offline repositories and many more. So one must be familiar with the steps to mount and read the content of the image. Although you should know that you will be able to mount an ISO image as READ ONLY and it is not possible to mount the image as READ WRITE until you use some third party software.
Also Read
https://linux.die.net/man/8/mount
Related Keywords: mount iso linux ubuntu, how to mount iso image in linux virtual machine, mount windows iso in linux, how to mount iso file in linux command line, how to mount iso file in redhat linux 7, how to install packages from iso image in linux, how to mount iso file in ubuntu using terminal, unmount iso linux