
How to create shared folder using Oracle VirtualBox with Linux Operating System? Can I share a folder from Windows host to Linux OS inside Oracle Virtual Box? How to access shared folder as normal user (non root) from Oracle VBox inside Linux? How to transfer files between Oracle VirtualBox and Windows Host? How to map network drive from Windows to Linux VM using Oracle VBox?
In this tutorial I will share step by step instructions to configure shared folder feature from Oracle VirtualBox. Normally i use samba server to configure a share between Linux and Windows but lately I came to know about this feature from VirtualBox and thought to give it a try. The configuration is easy so you can also SSH into a VirtualBox VM when you need shell access without relying on the guest console only. even a non-techie can easily setup a shared folder which is I believe many people choose for this option instead of samba share. You can use this option to transfer files between Windows and Linux and vice versa
Lab Environment
I am using Oracle VirtualBox 6.1 which is installed on Windows 10 host. It is possible the steps may vary in future with a different version of VirtualBox. I will use RHEL/CentOS 8 as my Linux OS to access the shared folder as normal and root user.
1. Install VBoxGuestAddition
This is a mandatory pre-requisite if you wish to configure a shared
folder with VirtualBox. The good thing is that you don't have to
download any additional software to setup VBoxGuestAddition.
1.1 Load Guest Additions ISO Image
Just power on your VM and on the console look out for Devices from the top menu. In the drop down menu click on Insert Guest Additions CD Image..
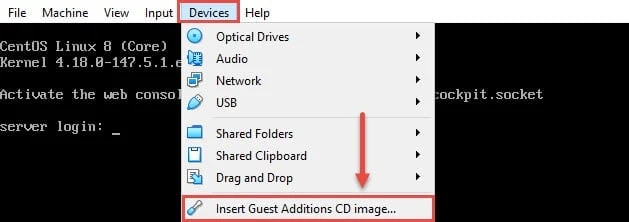
Insert Guest Additions CD Image to the VM
To verify if the Image is mounted successfully, click on Machine from the top menu and from the drop down click on Settings. This will open a new window, select Storage from the left menu and check if VBoxAdditions.iso is mounted
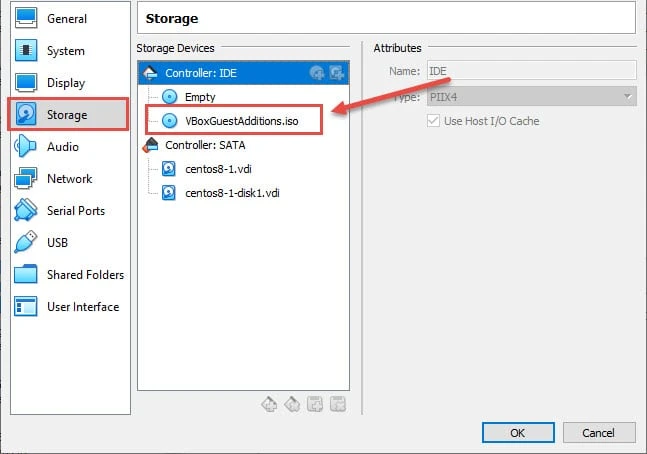
Verify if Guest Additions Image is added
1.2 Mount Guest Additions Image on the server
Next mount this ISO on some mount point. Currently my server has two ISOs which are mounted
[root@server ~]# lsscsi
[0:0:0:0]    cd/dvd  VBOX     CD-ROM           1.0   /dev/sr0
[1:0:0:0]    cd/dvd  VBOX     CD-ROM           1.0   /dev/sr1
[2:0:0:0]    disk    ATA      VBOX HARDDISK    1.0   /dev/sda
[3:0:0:0]    disk    ATA      VBOX HARDDISK    1.0   /dev/sdb
I know sr1 contains the virtual box addition image so I will mount it
on /mnt
[root@server ~]# mount /dev/sr1 /mnt
mount: /mnt: WARNING: device write-protected, mounted read-only.
1.3 Verify the content of the Image
Check the content of the ISO.
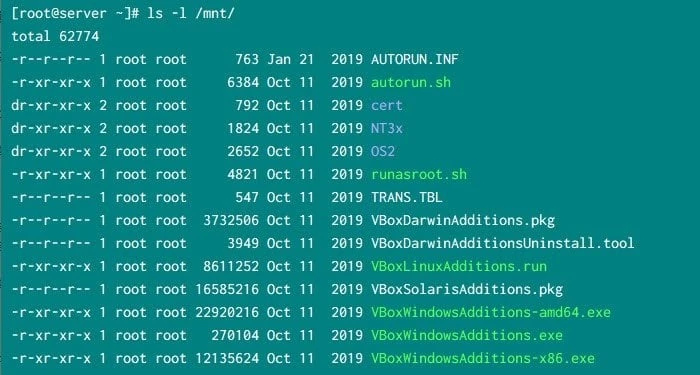
List the content of VirtualBox Guest Additions ISO
1.4 Install pre-requisite rpms
Before we install the Guest Addition software, there are certain
pre-requisite which must be covered or else the installation will fail
with errors like
"VirtualBox Guest Additions: Kernel Headers Not Found For Target Kernel"
[root@server ~]# yum -y install gcc make perl bzip2 kernel-headers-$(uname -r) kernel-devel-$(uname -r) elfutils-libelf-devel xorg-x11-drivers xorg-x11-util
This will install the list of compilers and modules required to install the Virtual Box addition software.
1.5 Install VBox Guest Addition
Since we are on a Linux platform we will use VBoxLinuxAdditions.run to
install VirtualBox Guest Addition modules. if you are on a windows
platform you can use VBoxWindowsAdditions.exe
As you see the scripts are already having executable permission so just go ahead and execute the script as root user. The execution may take some time depending upon your VM resources
[root@server ~]# /mnt/VBoxLinuxAdditions.run
Verifying archive integrity... All good.
Uncompressing VirtualBox 6.1.12 Guest Additions for Linux........
VirtualBox Guest Additions installer
Copying additional installer modules ...
Installing additional modules ...
VirtualBox Guest Additions: Starting.
VirtualBox Guest Additions: Building the VirtualBox Guest Additions kernel
modules.  This may take a while.
VirtualBox Guest Additions: To build modules for other installed kernels, run
VirtualBox Guest Additions:   /sbin/rcvboxadd quicksetup
VirtualBox Guest Additions: or
VirtualBox Guest Additions:   /sbin/rcvboxadd quicksetup all
VirtualBox Guest Additions: Building the modules for kernel
4.18.0-193.14.2.el8_2.x86_64.
VirtualBox Guest Additions: Running kernel modules will not be replaced until
the system is restarted
Next restart the server to activate the changes
[root@server ~]# reboot
2. Configure Virtual Box to create shared folder
We are all set at the Linux client so next all we need is to setup shared folder on the Windows Host and Oracle Virtual Box.
Open the console of your VM, in the footer menu look out for the folder icon as I have shown in the screenshot.
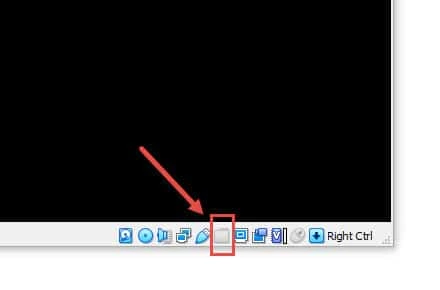
Oracle VirtualBox Shared Folder Settings
Right click on this icon and click on Shared Folders Settings. Next click on the Add icon
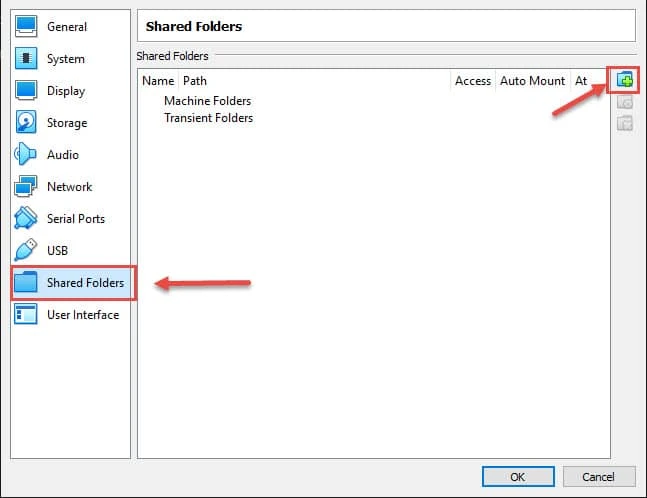
Create new shared folder
In the next window Browse for the directory which you wish to share on the Windows Host on your Linux client. Select Auto-Mount to mount the directory automatically after every reboot.
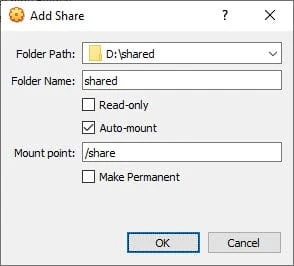
Add shared folder
Click OK to save the configuration
3. Access Shared Folder (as root and non-root user)
By default the shared folder will be allowed to be mounted as root user only. So to access the shared folder on the Linux client, execute the command using below syntax:
# mount.vboxsf <folder_name> <path/on/linux/client>
For example to mount our shared folder
# mount shared /share
Here shared is my folder name from Windows Host while /share is the mount point on the Linux client. Now check if the share is mounted successfully.
Check mount-point usage and filesystem types with df; the df and du covers -h, -T, and filtering pseudo-filesystems.
# df -h /share/
Filesystem      Size  Used Avail Use% Mounted on
shared          235G  117G  118G  50% /share
Since we have used Auto-Mount, this share will be automatically
mounted after reboot so no configuration required in /etc/fstab.
Check the permission of this /share
# ls -ld /share/
drwxrwx--- 1 root vboxsf 4096 Aug 30 09:52 /share/
The permission is 750 with user owner as root and group owner as
vboxsf. So only root user and all users part of vboxsf will be
allowed to access this shared folder. Any other users are by default not
allowed to access this folder.
To allow a normal user to perform read/write operation in this shared folder, you must make him/her part of vboxsf group.
# usermod -aG vboxsf admin

# id admin
uid=1004(admin) gid=1004(admin) groups=1004(admin),982(vboxsf)
Here I have added user admin to vboxsf group so now he can also access
this folder without using sudo privilege.
Now you can go ahead and start using your shared folder from Windows Host.
What's Next
We used Auto-Mount feature to mount the shared folder automatically on the Linux client but I will tell you when and why you should avoid using Auto-Mount in my next article.
How to access VirtualBox shared folder at startup with systemd in Linux
Conclusion
In this tutorial we configured shared folder using Oracle Virtual Box Guest Addition. The shared folder is created between the Windows Host and our Linux client. This is actually a good feature but somehow I feel samba as a better option although for few users it can be tricky to configure while configuring "shared folder" is comparatively easy.
