
addEventListener is the standard way to register a listener on any EventTarget in the browser—most often a DOM element, but also document, window, and XMLHttpRequest.
Compared with HTML one-shot handlers (onclick="..."), addEventListener lets you attach multiple listeners, choose capture vs bubbling, and use modern options such as once, passive, and signal (see the event bubbling guide on this site). The listener argument is a function—review optional parameters and arrow functions if you are new to callback style. Examples import jsdom; the public Run control does not install it, so blocks use {run=false}—run with npm install [email protected] and node, or paste into DevTools.
Tested on: Node.js v20.18.2; DOM snippets use jsdom 24.0.0. A short note after each snippet describes the console output.
Quick reference
Registration, one-shot listeners, passive scrolling hints, and teardown all go through the same addEventListener surface—pick the row that matches your goal.
| Need | API / pattern |
|---|---|
| Register listener | target.addEventListener(type, listener, options?) |
| Run once | { once: true } |
| Detach without keeping fn ref | AbortController + { signal } |
| Remove explicitly | removeEventListener with the same function reference |
Syntax
Overload shapes
The API is usually documented in three equivalent shapes:
target.addEventListener(type, listener);target.addEventListener(type, listener, options);target.addEventListener(type, listener, useCapture);— legacy boolean capture flag
Parameters
type: event name string, e.g."click","keydown","change"(noonprefix).listener: function or object withhandleEvent. The browser passes anEventinstance (or subtype such asMouseEvent,KeyboardEvent).- Third argument: either legacy
useCapture(true= capture phase,false= bubble, default), or anoptionsobject:capture,once,passive,signal.
DOM behavior with jsdom
One jsdom script exercises click, multiple listeners, delegation, stopPropagation, CustomEvent, { once: true }, removeEventListener, and AbortSignal—run with Node.js v20.18.2 and jsdom 24.0.0 (npm install [email protected], then node with ES modules).
import { JSDOM } from "jsdom";

const dom = new JSDOM(`<!DOCTYPE html><html><body>
<button id="myButton"></button>
<div id="parent"><div id="child"></div></div>
<ul id="list"><li>a</li><li>b</li></ul>
<div id="box"></div>
</body></html>`);
const { document, MouseEvent, CustomEvent, AbortController } = dom.window;

document.getElementById("myButton").addEventListener("click", () => console.log("click:ok"));
document.getElementById("myButton").dispatchEvent(new MouseEvent("click", { bubbles: true }));

const b2 = document.createElement("button");
document.body.appendChild(b2);
b2.addEventListener("click", () => console.log("multi:first"));
b2.addEventListener("click", () => console.log("multi:second"));
b2.dispatchEvent(new MouseEvent("click", { bubbles: true }));

const list = document.getElementById("list");
list.addEventListener("click", (e) => {
  if (e.target.tagName === "LI") console.log("delegate:" + e.target.textContent);
});
list.querySelectorAll("li")[1].dispatchEvent(new MouseEvent("click", { bubbles: true }));

const parent = document.getElementById("parent");
const child = document.getElementById("child");
parent.addEventListener("click", () => console.log("parent-should-not-run"));
child.addEventListener("click", (e) => {
  e.stopPropagation();
  console.log("child-only");
});
child.dispatchEvent(new MouseEvent("click", { bubbles: true }));

const box = document.getElementById("box");
box.addEventListener("mine", (e) => console.log("custom:" + e.detail.k));
box.dispatchEvent(new CustomEvent("mine", { detail: { k: "v" } }));

const b3 = document.createElement("button");
document.body.appendChild(b3);
let c = 0;
b3.addEventListener(
  "click",
  () => {
    c++;
    console.log("once-call");
  },
  { once: true },
);
b3.dispatchEvent(new MouseEvent("click", { bubbles: true }));
b3.dispatchEvent(new MouseEvent("click", { bubbles: true }));
console.log("once-count=" + c);

const b4 = document.createElement("button");
document.body.appendChild(b4);
function h() {
  console.log("BAD");
}
b4.addEventListener("click", h);
b4.removeEventListener("click", h);
b4.dispatchEvent(new MouseEvent("click", { bubbles: true }));
console.log("removed:ok");

const b5 = document.createElement("button");
document.body.appendChild(b5);
const ac = new AbortController();
b5.addEventListener("click", () => console.log("signal-fired"), { signal: ac.signal });
b5.dispatchEvent(new MouseEvent("click", { bubbles: true }));
ac.abort();
b5.dispatchEvent(new MouseEvent("click", { bubbles: true }));
console.log("signal:ok");click:ok
multi:first
multi:second
delegate:b
child-only
custom:v
once-call
once-count=1
removed:ok
signal-fired
signal:okYou should see 11 lines of output, starting with click:ok and ending with signal:ok.
Use querySelector when you select by CSS selector; getElementById is fine for stable ids.
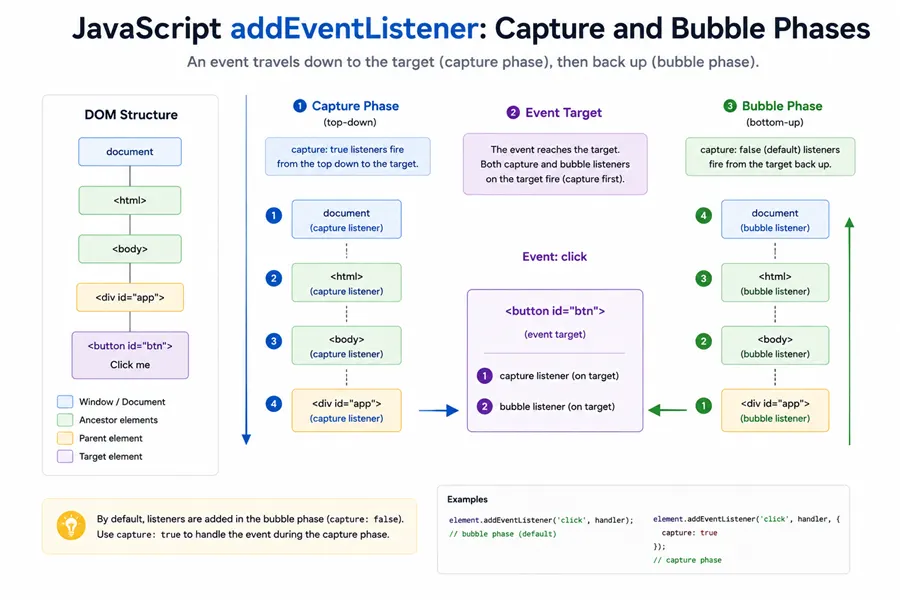
Capture phase vs bubbling phase
Capture listeners run down the tree toward the target; bubble listeners run up afterward. The snippet prints the order for one click on a nested div.
import { JSDOM } from "jsdom";
const dom = new JSDOM(
  '<!DOCTYPE html><html><body><div id="outer"><div id="inner"></div></div></body></html>',
);
const { document, MouseEvent } = dom.window;
const outer = document.getElementById("outer");
const inner = document.getElementById("inner");
outer.addEventListener("click", () => console.log("outer-bubble"), false);
inner.addEventListener("click", () => console.log("inner-target"), false);
outer.addEventListener("click", () => console.log("outer-capture"), true);
inner.addEventListener("click", () => console.log("inner-capture"), true);
inner.dispatchEvent(new MouseEvent("click", { bubbles: true }));outer-capture
inner-capture
inner-target
outer-bubbleYou should see 4 lines: outer-capture, then inner-capture, then inner-target, then outer-bubble.
preventDefault on submit
import { JSDOM } from "jsdom";
const dom = new JSDOM(
  '<!DOCTYPE html><html><body><form id="f"></form></body></html>',
);
const { document, Event } = dom.window;
const form = document.getElementById("f");
form.addEventListener("submit", (e) => {
  e.preventDefault();
});
const ev = new Event("submit", { bubbles: true, cancelable: true });
form.dispatchEvent(ev);
console.log("defaultPrevented=" + ev.defaultPrevented);defaultPrevented=trueYou should see one line like: defaultPrevented=true.
keydown and event.key (Enter)
Prefer event.key === "Enter" over legacy keyCode.
import { JSDOM } from "jsdom";
const dom = new JSDOM('<!DOCTYPE html><html><body><input id="i"></body></html>');
const { document, KeyboardEvent } = dom.window;
const input = document.getElementById("i");
input.addEventListener("keydown", (event) => {
  console.log("key=" + event.key + " code=" + event.code);
});
input.dispatchEvent(new KeyboardEvent("keydown", { key: "Enter", code: "Enter", bubbles: true }));key=Enter code=EnterYou should see one line like: key=Enter code=Enter.
mouseover and change (common UI events)
mouseover (often what people mean by addEventListener hover style behavior) and change on a <select>:
import { JSDOM } from "jsdom";
const dom = new JSDOM(
  `<!DOCTYPE html><html><body>
<div id="d">hi</div>
<select id="mySelect"><option value="o1">A</option><option value="o2">B</option></select>
<p id="p"></p>
</body></html>`,
);
const { document, MouseEvent, Event } = dom.window;
const d = document.getElementById("d");
d.addEventListener("mouseover", function () {
  this.style.opacity = "0.5";
});
d.dispatchEvent(new MouseEvent("mouseover", { bubbles: true }));
console.log("opacity=" + d.style.opacity);
const sel = document.getElementById("mySelect");
const p = document.getElementById("p");
sel.addEventListener("change", function () {
  p.textContent = "Selected value: " + this.value;
});
sel.value = "o2";
sel.dispatchEvent(new Event("change", { bubbles: true }));
console.log(p.textContent);opacity=0.5
Selected value: o2You should see 2 lines: opacity=0.5, then Selected value: o2.
More pointer vocabulary (click, mousemove, …) is summarized in the JavaScript mouse events article.
window.addEventListener and document.addEventListener
window.addEventListener("load", …), "resize", "scroll", and document.addEventListener("DOMContentLoaded", …) use the same API on global EventTarget objects. Scroll and touch listeners are where { passive: true } most often matters for performance (see MDN and the WICG passive explainer).
Node.js is different: EventEmitter, not DOM
Node does not ship a DOM on EventTarget the same way browsers do for HTML. Typical Node code uses require("events").EventEmitter (or import of the same) with on / emit, not addEventListener on elements.
import { EventEmitter } from "node:events";

class MyEmitter extends EventEmitter {}
const myEmitter = new MyEmitter();
myEmitter.on("event", function () {
  console.log("An event occurred!");
});
myEmitter.emit("event");An event occurred!You should see one line like: An event occurred!.
Summary
addEventListener is the portable contract between your UI logic and the browser’s event system—master capture vs bubble, defaults like passive, and how you detach.
addEventListener(type, listener, options?)registers on anEventTarget; use capture vs bubble options to control phase order.- Prefer
event.key,{ once: true },{ passive: true }when appropriate; useAbortControllerorremoveEventListener(same function reference) to detach. - jsdom reproduces DOM dispatch for tests; Node apps use
EventEmitterinstead of element listeners. - Delegation (
e.targetchecks) keeps few listeners on large lists.
References
MDN and WICG documentation for addEventListener, removal, passive listeners, and event fundamentals.
EventTarget: addEventListener() - MDN
EventTarget: removeEventListener() - MDN
Introduction to events - MDN
Passive event listeners explainer (WICG)