This tutorial guides you through step by step instructions to install PostgreSQL on Ubuntu, including system preparation, secure installation, basic configuration, and accessing the database, with practical examples.
PostgreSQL, an advanced open-source database system, is renowned for its robustness, flexibility, and performance. It supports both SQL (relational) and JSON (non-relational) querying, making it highly versatile for various data storage needs. Renowned for its stability and scalability, PostgreSQL is ideal for handling large datasets and complex queries, which makes it a preferred choice for many businesses and large-scale applications. This tutorial will walk you through the process of installing PostgreSQL on Ubuntu, ensuring you are set up for a smooth and secure database experience.
To install PostgreSQL on Ubuntu using the apt package manager and configure it properly, follow these steps:
1. Update Packages
Before you begin, it’s a good idea to update your system’s package index. Open a terminal and run following command using sudo privilege (add user to sudo group):
sudo apt update2. Listing Available Versions
To list the available versions of PostgreSQL in the repository, you can use the apt-cache command. This allows you to see all the versions of PostgreSQL that you can install. To do this, run:
apt-cache showpkg postgresqlLook for the section labeled "Versions". Under this section, you will find entries that represent the available versions of PostgreSQL
For example:
Package: postgresql
Versions:
14+238
If you wish to continue with this version then you can skip the next step, otherwise we can add the official postgresql repository to get access to latest package:
3. Add PostgreSQL Apt Repository (Optional)
Ubuntu's default repositories include PostgreSQL, making it easy to install with just a few commands. However, these repositories might not always contain the latest version or might lack specific versions needed for certain applications. To address this, you can add the official PostgreSQL repository to your Ubuntu system, which offers a wider range of versions and more frequent updates.
Install software properties common, which provides an easier way to add new repositories.
sudo apt install software-properties-commonPostgreSQL signs its repositories with a GPG key. Import this key to your system using
wget command to ensure the
authenticity of the repository and convert the GPG key to a keyring
format that apt can understand.
apt-key add to add the GPG key but then
apt-key is deprecated. This is part of a broader effort to transition
away from using apt-key for managing repository keys in Debian and
Ubuntu systems. So we chose to manually download and add the GPG key.
wget -qO - https://www.postgresql.org/media/keys/ACCC4CF8.asc | gpg --dearmor -o postgres.gpgNow, move this newly created postgres.gpg (which is in keyring format)
to the /etc/apt/trusted.gpg.d/ directory.
sudo mv postgres.gpg /etc/apt/trusted.gpg.d/Add the PostgreSQL repository to your system. Replace
$(lsb_release -cs) with your
Ubuntu version code name if you
encounter issues.
sudo sh -c 'echo "deb http://apt.postgresql.org/pub/repos/apt $(lsb_release -cs)-pgdg main" > /etc/apt/sources.list.d/pgdg.list'Update the package lists:
sudo apt update -yIn my case this command was giving following message while performing
apt update:
Skipping acquire of configured file 'main/binary-i386/Packages' as repository 'http://apt.postgresql.org/pub/repos/apt jammy-pgdg InRelease' doesn't support architecture 'i386The message about skipping the acquisition of certain packages is not an error but an informational note indicating that the PostgreSQL repository does not provide packages for the 'i386' architecture. This is normal for a 64-bit system, and it shouldn't impede the installation and use of PostgreSQL.
Next let's re-list available postgresql versions on our Ubuntu server:
apt-cache showpkg postgresqlNow we can see two different versions available for installation:
Versions:
16+256.pgdg22.04+1 (/var/lib/apt/lists/apt.postgresql.org_pub_repos_apt_dists_jammy-pgdg_main_binary-amd64_Packages)

14+238 (/var/lib/apt/lists/in.archive.ubuntu.com_ubuntu_dists_jammy_main_binary-amd64_Packages) (/var/lib/apt/lists/in.archive.ubuntu.com_ubuntu_dists_jammy_main_binary-i386_Packages)
4. Install PostgreSQL
Now we can use apt package manager to install the latest available postgresql package:
sudo apt install postgresql postgresql-contrib
This command installs PostgreSQL along with a set of additional
utilities and functionalities (postgresql-contrib).
5. Start and Enable PostgreSQL Service
After installation, the PostgreSQL service should start automatically. To verify its status, run:
Confirm the unit state with systemctl status or is-active; the systemctl command shows exit codes and recent journal lines in one view.
sudo systemctl status postgresql.service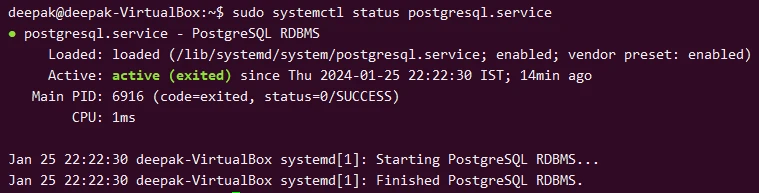
If it's not running, start it with:
sudo systemctl start postgresql.serviceTo ensure PostgreSQL starts when your system boots, enable the service:
sudo systemctl enable postgresql.service6. Securing and Configuring PostgreSQL
Securing your PostgreSQL database is crucial, especially when it
involves setting a strong password for the default postgres user and
securing remote connections.
6.1 Setting Up a Strong Password for the Postgres User
First, you need to access the PostgreSQL command line interface. You can
do this by switching to the postgres user on your system:
sudo -u postgres psqlOnce you're in the PostgreSQL CLI (you should see a postgres=#
prompt), run the following command to set a new password:
ALTER USER postgres WITH PASSWORD 'new_strong_password';Replace new_strong_password with a strong, secure password. Make sure
to remember this password or store it securely, as it's essential for
administrative access to your databases.
Example:
ALTER USER postgres WITH PASSWORD 'ZmqWu8gUbNY5QmQ';6.2 Securing Remote Connections
If your PostgreSQL server is accessible over a network (especially the internet), securing remote connections is vital.
Open the postgresql.conf file located in the PostgreSQL directory
(commonly found at /etc/postgresql/[version]/main/postgresql.conf).
Use a text editor like nano or vim:
sudo nano /etc/postgresql/[version]/main/postgresql.confLook for the line #listen_addresses = 'localhost' and change it to:
listen_addresses = '*'This change allows PostgreSQL to accept connections from any IP address. Be cautious with this setting; ensure your firewall and network settings are properly configured to prevent unauthorized access.
To secure PostgreSQL with a firewall, you can use either ufw command
(Uncomplicated Firewall) or firewalld. The specific commands for each
depend on the firewall system you're using
# For UFW
sudo ufw allow 5432/tcp
sudo ufw status

# For Firewalld
sudo firewall-cmd --permanent --add-service=postgresql
sudo firewall-cmd --permanent --add-port=5432/tcp
sudo firewall-cmd --reload
sudo firewall-cmd --list-all
Next, edit the pg_hba.conf file, which is also in the PostgreSQL
directory:
sudo nano /etc/postgresql/[version]/main/pg_hba.confAdd a line to define which hosts are allowed to connect, the authentication method, and for which databases. For example:
# TYPE  DATABASE  USER  ADDRESS         METHOD
host    all       all   0.0.0.0/0       md5
This line allows all users (all) to connect to all databases (all)
from any IP address (0.0.0.0/0) using MD5 password authentication.
Add the following line to allow remote_user to connect to remote_db
from 192.168.1.10 using md5 authentication:
host remote_db remote_user 192.168.1.10/32 md5To apply the changes, restart the PostgreSQL service:
sudo systemctl restart postgresql7. Accessing the PostgreSQL Shell
Accessing and using PostgreSQL involves interacting with the database
through its shell, commonly known as psql, PostgreSQL's command-line
interface. Here's a guide on how to access the PostgreSQL shell and use
basic commands to interact with your databases:
If you've installed PostgreSQL on a Unix/Linux system, you'll typically
have a postgres user created by default. To access the PostgreSQL
shell, you should switch to this user:
sudo -u postgres psqlThis command launches the psql shell.
If you want to access a specific database, you can do so directly:
sudo -u postgres psql -d database_nameReplace database_name with the name of the database you want to
access.
8. Basic and Advanced Commands for Interacting with the Database
8.1 Basic Commands - Viewing Information
| Command | Description |
|---|---|
\l |
List all databases |
\conninfo |
Show current database and user |
\dt |
List all tables in the current database |
\d table_name |
Describe a table (structure/schema) |
8.2 Basic Commands - Data Manipulation
| Command | Description |
|---|---|
INSERT INTO table_name (column1, column2) VALUES (value1, value2); |
Insert data into a table |
UPDATE table_name SET column1 = value1 WHERE condition; |
Update data in a table |
DELETE FROM table_name WHERE condition; |
Delete data from a table |
SELECT * FROM table_name WHERE condition; |
Select data from a table |
8.3 Basic Commands - Transaction Control
| Command | Description |
|---|---|
BEGIN; |
Begin a transaction |
COMMIT; |
Commit a transaction |
ROLLBACK; |
Rollback a transaction |
8.4 Advanced Commands - Indexing and Performance
| Command | Description |
|---|---|
CREATE INDEX index_name ON table_name (column_name); |
Create an index on a table |
EXPLAIN SELECT * FROM table_name WHERE column_name = value; |
Explain a query plan |
VACUUM (VERBOSE, ANALYZE) table_name; |
Vacuum (clean and optimize) a database |
8.5 Advanced Commands - User and Access Management
| Command | Description |
|---|---|
CREATE USER user_name WITH PASSWORD 'password'; |
Create a new user |
GRANT ALL PRIVILEGES ON database_name TO user_name; |
Grant privileges to a user |
REVOKE ALL PRIVILEGES ON database_name FROM user_name; |
Revoke privileges from a user |
ALTER ROLE user_name SET default_transaction_read_only = on; |
Alter user roles and privileges |
8.6 Advanced Commands - Querying
| Command | Description |
|---|---|
WITH cte_name AS (SELECT * FROM table_name) SELECT * FROM cte_name; |
Use Common Table Expressions (CTE) |
SELECT column_name, AVG(another_column) OVER (PARTITION BY column_name) FROM table_name; |
Use Window Functions |
8.7 Advanced Commands - Database Administration
| Command | Description |
|---|---|
pg_dump database_name > backup_file.sql |
Backup a database |
pg_restore -d database_name backup_file.sql |
Restore a database |
ALTER DATABASE database_name SET parameter TO value; |
Alter database settings |
8.8 Advanced Commands - Working with JSON and Arrays
| Command | Description |
|---|---|
SELECT * FROM table_name WHERE json_column->>'key' = 'value'; |
Query JSON data |
SELECT * FROM table_name WHERE array_column @> ARRAY['value1','value2']; |
Work with array data |
9. Loading Sample Database
Loading a sample database into PostgreSQL is a great way to familiarize yourself with its features and practice SQL queries. A commonly used sample database is the "DVD Rental" database. Below are the steps to download, unzip, restore it, and verify the sample data:
First, you need to download the sample database file. The DVD Rental
database can typically be found as a .zip file.
Download the file with curl; the curl command compares -O, -L, -fsSL, and -o output options.
curl -O https://www.postgresqltutorial.com/wp-content/uploads/2019/05/dvdrental.zipThis command uses cURL to download the dvdrental.zip file.
After downloading the file, you need to unzip it to extract the .tar
file containing the actual database backup.
unzip dvdrental.zip
sudo mv dvdrental.tar /tmp
This command unzips the file, and you should now have a dvdrental.tar
file in your /tmp/ directory.
Before restoring the database, make sure PostgreSQL is running. Then, create a new database to which you'll restore the sample database.
Create New Database: This creates a new database named dvdrental.
sudo -u postgres createdb dvdrentalRestore the Database: This command restores the database from the
dvdrental.tar file into the dvdrental database.
sudo -u postgres pg_restore -C -d dvdrental /tmp/dvdrental.tarAfter restoring the database, you can log into the PostgreSQL shell and explore the sample data.
sudo -u postgres psql dvdrentalThis logs you into the PostgreSQL shell directly into the dvdrental
database. List tables:
\dt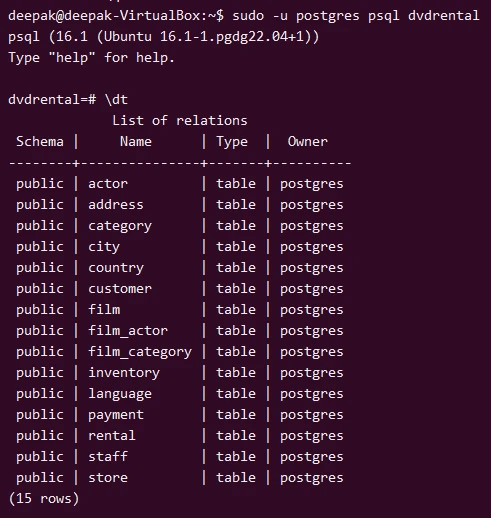
Select data from a table. This command selects the first 10 entries from
the film table.
SELECT * FROM film LIMIT 10;Use this command to exit the psql shell.
\q10. Conclusion
In this guide, we've successfully navigated the installation and configuration of PostgreSQL on Ubuntu, covering the setup of a secure environment, enabling remote connections, and loading a sample database. The process involved steps like updating PostgreSQL configurations, modifying firewall settings, and using the psql shell for database interactions.
For further learning and more detailed information, the official PostgreSQL documentation is an invaluable resource. You can find it at PostgreSQL Documentation.
For broader uninstall and orphan-cleanup patterns, see Ubuntu software removal guide.
