
Getting started with steps to setup VNC Server in CentOS 8
VNC stands for Virtual Network Computing which is a way of virtually accessing the desktop of remote Linux server. You may be familiar with PuTTY client which allows multiple users to access the CLI of the same Linux server. Similarly using VNC, multiple users can access the Desktop (GUI) of same Linux server. Although unlike PuTTY CLI, one user would be able to have only one VNC session for any remote Linux server. Two different users will not be able to access the same Linux server via VNC.
Can I use root user to access remote Linux server with VNC?
Since CentOS is a Linux distro derived from source code released by Red Hat, It follows the same coding principal as used in Red Hat. With RHEL 8 now Red Hat does not support and recommend using VNC session as root user.
Logging in to the GUI as the root user (superuser) may cause unpredictable interactions with GUI sessions of normal users, as well as the rest of the system. If GUI programs need privileged access, this can be done by logging in to the GUI as a normal user, opening a graphical terminal, and running the program using**9 su command examples in Linux [Cheat Sheet]orsudo**.
Key Points before setting up VNC server (Limitations)
- If you are using tigervnc-server older than
1.10.1-7.el8, then you should refer to our older article for the setup. This article usestigervnc-server-1.10.1-7.el8which has completely changed the way how we configure tigervnc server and now the steps are really easy with less chances of getting error while configuration.
From Official TigerVNC HOWTO
The previous Tigervnc versions had a wrapper script called `vncserver` which could be run as a user manually to start *Xvnc* process. The usage was quite simple as you just run
$ vncserver :x [vncserver options] [Xvnc options]and that was it. While this was working just fine, there were issues when users wanted to start a Tigervnc server using *systemd*. For these reasons things were completely changed and there is now a new way how this all is supposed to work.
- Second limitation as we also discussed earlier is that, users will not be able to start a Tigervnc server for a user already logged into a graphical session.
Lab Environment
I have created two virtual machines running with CentOS 8 to demonstrate the setup of vnc server and client. Here one of the Linux server will act as a VNC server while other as client.
VNC Server
Hostname: centos8-1.example.com
IP Address: 192.168.0.165
Release: CentOS Linux release 8.4.2105
VNC Client
Hostname: centos8-2.example.com
IP Address: 192.168.0.113
Release: CentOS Linux release 8.4.2105
Pre-requisites
Since the steps to configure VNC server has changed, so there are some pre-requisites which you must perform before you start configuring your updated tigervnc-server.
1. Clean-up $HOME/.vnc
If vncserver was previously used on the system, make sure
the$HOME/.vncfolder created byvncpasswdhave the
correctSELinuxcontext. There are two possible options to ensure that:
- Delete the
$HOME/.vncfolder and we will recreate it again by creating the password one more time for the respective user - Alternatively run the command:
$ restorecon -RFv /home/<USER>/.vncif you have already configured VNC server using the new steps
2. Clean-up systemd configuration files
If vncserver was previously configured usingsystemd, delete the
previoussystemdconfiguration files(eg:
/etc/systemd/system/[email protected]), otherwise this service file
will be used in place of the latest configuration file.
3. Install GUI on Linux Server
Since VNC works with GUI based Linux server, it is important that your Linux server is installed with GUI based environment such as GNOME, KDE etc. You can list the installed groups which can give you a HINT of the environment on your Linux server:
[root@centos8-1 ~]# dnf grouplist
Last metadata expiration check: 3:40:19 ago on Sat 16 Oct 2021 11:55:08 AM IST.
Available Environment Groups:
   Server
   Minimal Install
   Workstation
   Virtualization Host
   Custom Operating System
Installed Environment Groups:
   Server with GUI
Installed Groups:
   Container Management
   Headless Management
...
But this may not be the most reliable way to check if GUI is installed on your Linux server, so you can use the following command:
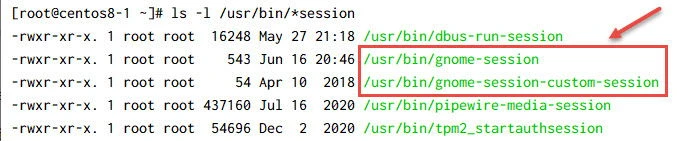
~]# ls /usr/bin/*session
Based on what you see on the screen you can find out what GUI you are using right now. For example you are:
- in GNOME if it returns
/usr/bin/gnome-session(and more); - in MATE if it returns
/usr/bin/mate-session(and more); - in LXDE if it returns
/usr/bin/lxsession(and more); - in JWM if it returns
/usr/bin/icewm-session
Sample Output:
If you don't have GUI installed then on CentOS 8 you can install
Server with GUI group as shown below:
dnf groupinstall -y "Server with GUI"
Setup VNC Server
Let's get started with the steps to setup vnc server on CentOS 8.
Step-1: Install VNC Packages
First we must install the necessary packages required to configure and setup VNC Server on CentOS 8. You can just do a plain search against the available repositories using dnf as shown below:
dnf search tigervnc
Sample Output:
![Tutorial: Setup VNC Server CentOS 8 [Step-by-Step]](/setup-vnc-server-centos-8/vnc-1-1.webp)
Here you can see a long list of packages which are available from
tigervnc. We would need tigervnc-server to setup VNC server on CentOS
8. So we will go ahead and install the same:
~]# dnf -y install tigervnc-server
Step-2: Configure VNC Server for one or multiple users
The VNC server configuration file's location have changed with the
recent release of tigervnc-server-1.10.XX. All the configuration files
are now available inside /etc/tigervnc as shown below:
[root@centos8-1 ~]# ls -l /etc/tigervnc/
total 12
-rw-r--r-- 1 root root 562 Oct 16 15:02 vncserver-config-defaults
-rw-r--r-- 1 root root 452 Sep  8  2020 vncserver-config-mandatory
-rw-r--r-- 1 root root 175 Oct 16 14:58 vncserver.users
Here,
- vncserver.userscontains the user mapping with a port who will have vncserver access
- vncserver-config-defaults contains the parameters to configure Xvnc options. This file is for the default Xvnc configuration and will be applied to every user unless the respective user has its own configuration in $HOME/.vnc/config.
- vncserver-config-mandatory also contains the parameters to configure Xvnc options. But it takes the highest priority over vncserver-config-defaults and user's $HOME/.vnc/config. This option is mostly used by system administrators when they want to force particular Xvnc options.
The format of the configuration file is also quite simple as the configuration is as below:
option=value
Some of the options which one can configure with VNC are:
session=gnome
securitytypes=vncauth,tlsvnc
desktop=sandbox
geometry=2000x1200
localhost
alwaysshared
The most important one to configure here is:
session=VALUE
The value must be replaced by your session desktop file from
/usr/share/xsessions directory. For example, from my CentOS 8:
![Tutorial: Setup VNC Server CentOS 8 [Step-by-Step]](/setup-vnc-server-centos-8/vnc-5.webp)
So based on gnome.desktop, my VALUE would be gnome as used below:
~]# grep -vE '^#|^$' /etc/tigervnc/vncserver-config-defaults
session=gnome
I have not configured other parameters, but you can modify them as per your requirement.
Step-3: Configure USER to DISPLAY NUMBER mapping
Now that we are familiar with the different configuration files, next we
will map the users with respective display numbers who should have VNC
access. Open /etc/tigervnc/vncserver.users file using your favourite
editor and at the end of the file append user:port as shown below:
:1=deepak
:2=aisha
Here, user deepak can access the VNC Server using display number 1 and aisha can access at 2.
How port is mapped to display number in VNC?
By default VNC server uses port 5900 so to access the VNC server one
must add the port number with the display number. So, for deepak to
access the VNC server, her must use 5900+1=5901 port number.
Similarly aisha should use 5900+2=5902 port number.
Step-4: Set vnc password for user
Next we must set VNC password for individual users. Do not assume that if your user already has a system password then you don't need to set vncpassword. This is mandatory to be able to use a user as vncuser.
This must be set while logged in as the user. You cannot set this as
root/other administrators with the command vncpasswd username command.
Although we can perform su and use vncpasswd in the same command as
shown below:
[root@centos8-1 ~]# su - deepak -s /bin/bash -c /usr/bin/vncpasswd
Password:
Verify:
Would you like to enter a view-only password (y/n)? n
A view-only password is not used
This command will create $HOME/.vnc/passwd file where $HOME is the
home directory of the respective user.
~]# ls -l /home/deepak/.vnc/passwd
-rw------- 1 deepak deepak 8 Oct 16 15:04 /home/deepak/.vnc/passwd
The password is stored in encrypted format so it is not human readable:
~]# cat /home/deepak/.vnc/passwd
u,LL▒▒▒
Similarly, I have assigned password for aisha:
~]# ls -l /home/aisha/.vnc/passwd
-rw------- 1 aisha aisha 8 Oct 16 17:06 /home/aisha/.vnc/passwd
Step-5: Enable Firewall
Now the ports to be opened for VNC would depend on the display numbers you have used for each user. For example, in this article I have used display number 1 and 2 so I have to enable port 5901 and 5902 which I have already explained:
Open the listener port with firewall-cmd --add-port and reload; the firewalld shows --permanent pairs and zone selection.
# firewall-cmd --permanent --zone=public --add-port 5901/tcp --add-port 5902/tcp
# firewall-cmd  --reload
If you have multiple ports then you may consider using rich rules or provide a range of ports which you use for your users.
Step-6: Start TigerVNC server
Now we are all set to start our tigervnc server. We have to individually start the service based on the serial number used as shown below:
Enable or disable the unit at boot with systemctl enable; the systemctl command documents enable --now, symlinks under /etc/systemd/system, and masks.
~]# systemctl enable vncserver@\:1.service --now
Created symlink /etc/systemd/system/multi-user.target.wants/vncserver@:1.service → /usr/lib/systemd/system/[email protected].
Check the status of the service:
![Tutorial: Setup VNC Server CentOS 8 [Step-by-Step]](/setup-vnc-server-centos-8/vnc-6.webp)
Similarly I have started vncserver on display number 2 for aisha:
![Tutorial: Setup VNC Server CentOS 8 [Step-by-Step]](/setup-vnc-server-centos-8/vnc-7.webp)
Access VNC Server using VNC Viewer
You can now access your vnc server using a vncviewer. You can either download vncviewer based on your platform. For the demonstration, I will use DNF package manager to install vncviewer.
To check, which package provides vncviewer we can use following command:
[root@centos8-2 ~]# dnf whatprovides vncviewer
Sample Output:
![Tutorial: Setup VNC Server CentOS 8 [Step-by-Step]](/setup-vnc-server-centos-8/vnc-8.webp)
There seems to be two repositories which provides tigervnc rpm which will install vncviewer tool. So, we can just go ahead and install tigervnc and let dnf decide, which repo it wants to use:
[root@centos8-2 ~]# dnf -y install tigervnc
Once installed, connect to the desktop of your Linux server and execute the command in the following syntax on the terminal:
vncviewer VNC_SERVER:PORT
For example, to connect to deepak's session we will use:
# vncviewer 192.168.0.165:5901
Similarly, to connect to aisha's session we will use:
# vncviewer 192.168.0.165:5902
where, 192.16``8.0.165 is the IP of my VNC Server.
This is the sample output from my terminal while connecting to
deepak's session. The connection was successful and now it is
prompting for the password of user deepak which we had set using
vncpasswd earlier.
![Tutorial: Setup VNC Server CentOS 8 [Step-by-Step]](/setup-vnc-server-centos-8/vnc-2.webp)
Once password is provide, hit OK and you will be connected to deepak's session from VNC Server:
![Tutorial: Setup VNC Server CentOS 8 [Step-by-Step]](/setup-vnc-server-centos-8/vnc-3.webp)
Connection was successfully established.
Summary
In this tutorial we learned
- How to setup tigervnc server on CentOS 8
- Different limitations with the newly released tigervnc server package
- How to connect to vnc server using vncviewer from another Linux server
Further Reading
Are there any changes to the default vncserver configuration in RHEL8.3?
