Getting started with Terraform - Overview
- Infrastructure as Code(IaC) as the name stands is a practice, where resources in the cloud are maintained as code, so they can be treated like codes; manage different versions, collaboration, backup and consistent, naming few.
- Infrastructure as code can really come in handy in the situations where same setup of resources are deployed on different environments, or where resources are required temporarily, for instance, a test environment for a particular feature, or to create for instance, a pilot-light DR environment, where few major components are kept running, and rest of the resources could be created automatically with Infrastructure as code. This assures lower costs, consistency, is less prone to human error, and speed.
- There are few Infrastructure as Code tools available and Terraform is by far the most popular one. Terraform supports configuration for almost all the major Cloud Service providers; AWS, Azure, GCP, naming few.
We are going to start a journey of creating infrastructure in AWS with Terraform where we would begin by installing Terraform and then move towards Terraform best practices.
Lab Environment
I have already created an AWS EC2 instance with Ubuntu20.04 which I will use to setup terraform. Later we will use the same setup to create an infrastructure in AWS using terraform. Our instance is created with 8 GB Storage, 2 vCPU and 1 GB RAM. Although in production environment it is recommended to use higher resources based on the requirement but since we are trying to fit into the AWS Free-tier, so we have chosen t3.micro instance.
You may choose to create a new or use any of your existing AWS EC2 instance or alternatively you can also bring up you own Ubuntu or any other Linux distribution on a VM which you can use to further create your infrastructure on AWS. In such case install and configure the CLI on your Ubuntu or Linux VM first—see install AWS CLI on Ubuntu for apt and official v2 paths.
Pre-requisites
- A Ubuntu machine, created on Hypervisor or AWS or your own local machine.
- Terraform uses CLI client and that requires some familiarity with one of the command line tools.
- Terraform creates resources on AWS itself, hence an AWS account is required to follow through the tutorial.
- This tutorial requires enough experience of building resources on AWS manually. You can have a look at steps and best practices for creating EC2 instance.
- On the later part of the series, we are going to build VPCs and use Subnets. So, you are expected to have a good understanding of how networking is done inside an AWS environment.
- Using remote repositories is one of the most fascinating and crucial part of IaC. So, you should have a Github account and are expected to know how git works and basic git commands.
Install Terraform on Ubuntu 20.04
Now that we have all the pre-requisites explained, let's start the tutorial by installing Terraform.First of all you can update your Linux environment to the latest available packages. This step is not mandatory but recommended.
sudo apt-get update
Next install the following set of packages which act as a pre-requisite
for terraform (install cURL on Ubuntu if curl is not already present):
sudo apt-get install -y gnupg software-properties-common curl
By default terraform packages are not included in the Ubuntu repository. So we need to download and create apt repository which will be used to install Terraform.
Import the signing key over HTTPS with curl; see the curl command for piping into gpg and common header flags.
ubuntu@terraform-machine:~$ curl -fsSL https://apt.releases.hashicorp.com/gpg | sudo apt-key add -
OK

ubuntu@terraform-machine:~$ sudo apt-add-repository "deb [arch=amd64] https://apt.releases.hashicorp.com $(lsb_release -cs) main"
Hit:1 http://us-east-1.ec2.archive.ubuntu.com/ubuntu focal InRelease
Get:2 http://us-east-1.ec2.archive.ubuntu.com/ubuntu focal-updates InRelease [114 kB]
Hit:3 https://apt.releases.hashicorp.com focal InRelease
Get:4 http://us-east-1.ec2.archive.ubuntu.com/ubuntu focal-backports InRelease [101 kB]
Get:5 http://security.ubuntu.com/ubuntu focal-security InRelease [114 kB]
Get:6 http://us-east-1.ec2.archive.ubuntu.com/ubuntu focal-updates/main amd64 Packages [1,344 kB]
Get:7 http://us-east-1.ec2.archive.ubuntu.com/ubuntu focal-updates/universe amd64 Packages [877 kB]
Fetched 2,549 kB in 1s (2,948 kB/s)
Reading package lists... Done
Next let's update our repository list and then we can go ahead and install terraform
sudo apt-get update && sudo apt-get install terraform

ubuntu@terraform-machine:~$ sudo apt-get update && sudo apt-get install terraform
Hit:1 http://us-east-1.ec2.archive.ubuntu.com/ubuntu focal InRelease
Hit:2 http://us-east-1.ec2.archive.ubuntu.com/ubuntu focal-updates InRelease
Hit:3 http://us-east-1.ec2.archive.ubuntu.com/ubuntu focal-backports InRelease
Hit:4 https://apt.releases.hashicorp.com focal InRelease
Hit:5 http://security.ubuntu.com/ubuntu focal-security InRelease
Reading package lists... Done
Reading package lists... Done
Building dependency tree
Reading state information... Done
The following NEW packages will be installed:
  terraform
0 upgraded, 1 newly installed, 0 to remove and 16 not upgraded.
Need to get 0 B/18.1 MB of archives.
After this operation, 59.1 MB of additional disk space will be used.
Selecting previously unselected package terraform.
(Reading database ... 95271 files and directories currently installed.)
Preparing to unpack .../terraform_1.0.11_amd64.deb ...
Unpacking terraform (1.0.11) ...
Setting up terraform (1.0.11) ...
To verify the installation, run the command:
ubuntu@terraform-machine:~$ terraform -v
Terraform v1.0.11
on linux_amd64
Now that we have installed terraform, let’s start creating simplest of architecture to get started with on AWS to see exactly how Terraform works.
Deploy your first AWS EC2 instance using Terraform
To get started with, we will begin with deploying a single EC2 instance. We will provide instance size and AMI id only and keep everything else default. The goal is to keep everything simple, so that focus is not on the configuration, but how Terraform actually works.
Step-1: Prepare the environment to deploy EC2 instance
The terraform files within an infrastructure should always be maintained inside a directory. Terraform files have extensions of .tf. So while we run terraform, it will look for all the files inside the directory.
We will create a new directory where we will store the files required to deploy our EC2 instance using terraform:
root@ubuntu:~# mkdir terraform-resources
To create resources with Terraform, the least requirement is to specify
the resource and cloud provider. We will provide this information in
main.tf file.
root@ubuntu:~# cd terraform-resources/
root@ubuntu:~/terraform-resources# touch main.tf
Following is the content of our main.tf. Find the appropriate
AMI according to the region you are choosing and
information about
types of instances. You can check AWS regions and Availability zones to
get your region name.
Here we are creating a single EC2 instance using the AMI image we have provided and add a Tag to this instance. We have not provided any other details such as network, disk, key etc. All the other required specs required to create an EC2 instance will be created at this stage with default values.
root@ubuntu:~/terraform-resources# cat main.tf
terraform {
  required_providers {
    aws = {
      source  = "hashicorp/aws"
      version = "~> 3.27"
    }
  }

  required_version = ">= 0.14.9"
}

provider "aws" {
  profile = "default"
  region  = "us-east-2"
}

resource "aws_instance" "web" {
  ami           = "ami-03f4121463e28151e"
  instance_type = "t3.micro"

  tags = {
    Name = "Web-instance"
  }
}
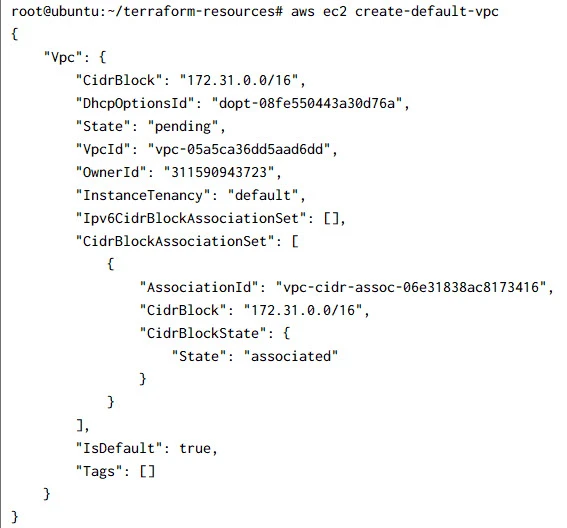
Step-2: Create Default VPC (Optional)
Amazon Virtual Private Cloud (Amazon VPC) enables you to launch AWS resources into a virtual network that you've defined.
This is an optional step and is applicable to users who have just started to practice terraform on a newly created AWS account. In such case you won't have a VPC so you can execute below command to create a default VPC:
aws ec2 create-default-vpc
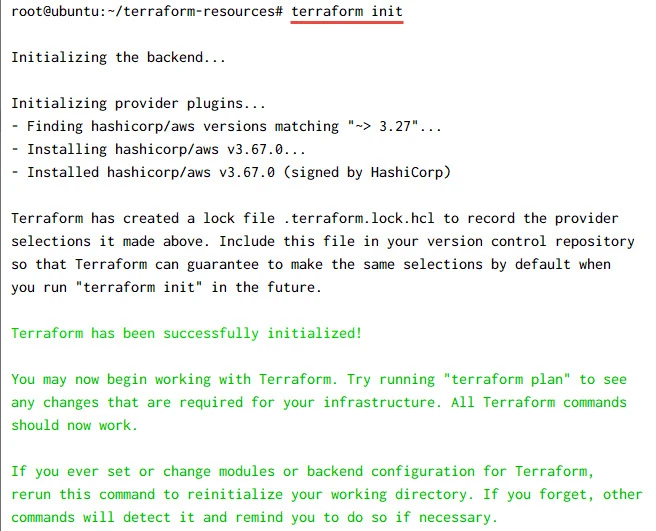
Step-3: Initialize Terraform
For Terraform to understand the configuration, it must be first initialized inside the directory that contains our code. Once terraform is initialized it can look into our configuration and create plan to build our resources accordingly.
terraform init initializes terraform state inside the directory according to the provider, AWS in this case.
Step-4: Plan Terraform deployment
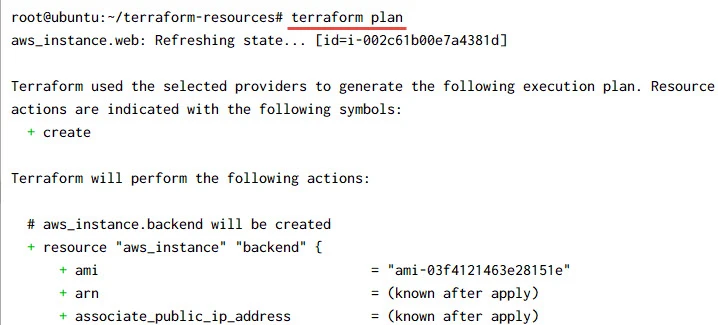
terraform plan does a dry run with the provided instructions and shows the overview of the resources that are going to be built with the provided configuration. If there are errors while in the code somewhere, it shows errors and doesn’t complete the plan.
root@ubuntu:~/terraform-resources# terraform plan

Terraform used the selected providers to generate the following execution plan. Resource actions are
indicated with the following symbols:
  + create

Terraform will perform the following actions:

  # aws_instance.web will be created
  + resource "aws_instance" "web" {
      + ami                                  = "ami-03f4121463e28151e"
      + arn                                  = (known after apply)
      + associate_public_ip_address          = (known after apply)
      + availability_zone                    = (known after apply)
      + cpu_core_count                       = (known after apply)
      + cpu_threads_per_core                 = (known after apply)
      + disable_api_termination              = (known after apply)
      + ebs_optimized                        = (known after apply)
      + get_password_data                    = false
      + host_id                              = (known after apply)
      + id                                   = (known after apply)
      + instance_initiated_shutdown_behavior = (known after apply)
      + instance_state                       = (known after apply)
      + instance_type                        = "t3.micro"
      + ipv6_address_count                   = (known after apply)
      + ipv6_addresses                       = (known after apply)
      + key_name                             = (known after apply)
      + monitoring                           = (known after apply)
      + outpost_arn                          = (known after apply)
      + password_data                        = (known after apply)
      + placement_group                      = (known after apply)
      + placement_partition_number           = (known after apply)
      + primary_network_interface_id         = (known after apply)
...
        }
    }

Plan: 1 to add, 0 to change, 0 to destroy.

─────────────────────────────────────────────────────────────────────────────────────────────────────────────

Note: You didn't use the -out option to save this plan, so Terraform can't guarantee to take exactly these
actions if you run "terraform apply" now.
Here as you can see, most of the options are shown as "known after apply" as we have not defined them in our main.tf config file, so these will be created automatically by terraform.
Step-5: Apply terraform changes
If the output of the dry run is what we need, we can now go ahead and build our resources using **terraform apply.**Here we will get similar output as we got with terraform plan command:
root@ubuntu:~/terraform-resources# terraform apply

Terraform used the selected providers to generate the following execution plan. Resource actions are
indicated with the following symbols:
  + create

Terraform will perform the following actions:

  # aws_instance.web will be created
  + resource "aws_instance" "web" {
      + ami                                  = "ami-03f4121463e28151e"
      + arn                                  = (known after apply)
      + associate_public_ip_address          = (known after apply)
      + availability_zone                    = (known after apply)
      + cpu_core_count                       = (known after apply)
...
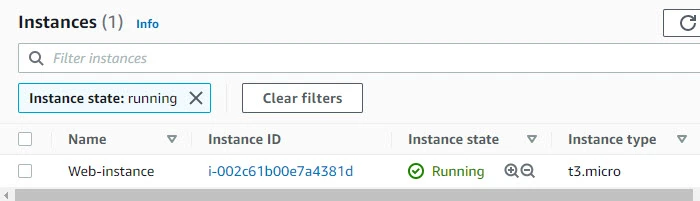
If everything is good then your AWS EC2 instance should be successfully created on the AWS. If you log into the AWS console, you should be able to see the EC2 instance we just created.
At the end of the command execution, you can check the content of your
terraform-resources directory:
root@ubuntu:~/terraform-resources# ls -l
total 12
-rw-r--r-- 1 root root  522 Nov 28 23:17 main.tf
-rw-r--r-- 1 root root 3853 Nov 28 22:58 terraform.tfstate
-rw-r--r-- 1 root root  156 Nov 28 22:58 terraform.tfstate.backup
Here, you should be able to see a new file being created, named
terraform.tfstate. This file is the terraform state file, which is in
the json format that contains the information about all the resources
that terraform created.
Add second EC2 Instance to the Infrastructureusing Terraform
So now let’s add another block for a second instance as a backend
instance of our application in the same main.tf file and see how
terraform state works. We will append following content to our existing
main.tf file:
resource "aws_instance" "backend" {
  ami           = "ami-03f4121463e28151e"
  instance_type = "t3.micro"

  tags = {
    Name = "Backend-instance"
  }
}
Terraform looks into its state file and understands that it has already
created a web instance and it needs to create the resource for the only
block that has been added. That’s why it creates a resource for the
resource block that was added recently. Execute terraform plan to check
the changes with terraform apply command would do to your
infrastructure:
terraform plan
Next you can go ahead and run terraform apply to create the resource.
ubuntu@terraform-machine:~/terraform-resources$ terraform apply
aws_instance.web-instance: Refreshing state... [id=i-09516fff527d24c5b]

Terraform used the selected providers to generate the following execution plan. Resource actions are indicated with the following symbols:
  + create

...

Plan: 1 to add, 0 to change, 0 to destroy.

Do you want to perform these actions?
  Terraform will perform the actions described above.
  Only 'yes' will be accepted to approve.

  Enter a value: yes

aws_instance.backend: Creating...
aws_instance.backend: Still creating... [10s elapsed]
aws_instance.backend: Still creating... [20s elapsed]
aws_instance.backend: Creation complete after 22s [id=i-07542a8f013d169ab]
Apply complete! Resources: 1 added, 0 changed, 0 destroyed.
State files allow terraform to complete the deployment of resources if the build process fails for one or more reasons. Terraform can look into the state file and can resume the deployment from where it was interrupted.
Verify the second EC2 instance on your AWS console:
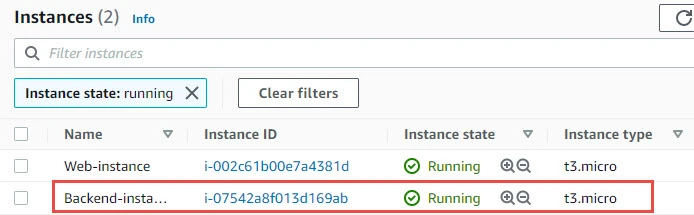
So we have successfully deployed AWS Infrastructure using Terraform.
Use terraform destroy to deleteresources
Now we have understood how the state files work in terraform, we can now go ahead to understand how “destroying” terraform works. When “terraform destroy” is hit, terraform looks into its state file and destroys all the resources that exist in the terraform state file.
root@ubuntu:~/terraform-resources# terraform destroy
aws_instance.backend: Refreshing state... [id=i-07542a8f013d169ab]
aws_instance.web: Refreshing state... [id=i-002c61b00e7a4381d]
Terraform used the selected providers to generate the following execution plan. Resource
actions are indicated with the following symbols:
- destroy
Terraform will perform the following actions:
# aws_instance.backend will be destroyed
- resource "aws_instance" "backend" {
- ami = "ami-03f4121463e28151e" -> null
- arn = "arn:aws:ec2:us-east-2:311590943723:instance/i-07542a8f013d169ab" -> null
...
# aws_instance.web will be destroyed
- resource "aws_instance" "web" {
- ami = "ami-03f4121463e28151e" -> null
- arn = "arn:aws:ec2:us-east-2:311590943723:instance/i-002c61b00e7a4381d" -> null
- associate_public_ip_address = true -> null
- availability_zone = "us-east-2b" -> null
...
Do you really want to destroy all resources?
Terraform will destroy all your managed infrastructure, as shown above.
There is no undo. Only 'yes' will be accepted to confirm.
Enter a value: yes
aws_instance.web: Destroying... [id=i-002c61b00e7a4381d]
aws_instance.backend: Destroying... [id=i-07542a8f013d169ab]
aws_instance.web: Still destroying... [id=i-002c61b00e7a4381d, 10s elapsed]
aws_instance.backend: Still destroying... [id=i-07542a8f013d169ab, 10s elapsed]
aws_instance.web: Still destroying... [id=i-002c61b00e7a4381d, 20s elapsed]
aws_instance.backend: Still destroying... [id=i-07542a8f013d169ab, 20s elapsed]
aws_instance.web: Still destroying... [id=i-002c61b00e7a4381d, 30s elapsed]
aws_instance.backend: Still destroying... [id=i-07542a8f013d169ab, 30s elapsed]
aws_instance.backend: Destruction complete after 36s
aws_instance.web: Still destroying... [id=i-002c61b00e7a4381d, 40s elapsed]
aws_instance.web: Still destroying... [id=i-002c61b00e7a4381d, 50s elapsed]
aws_instance.web: Destruction complete after 58s
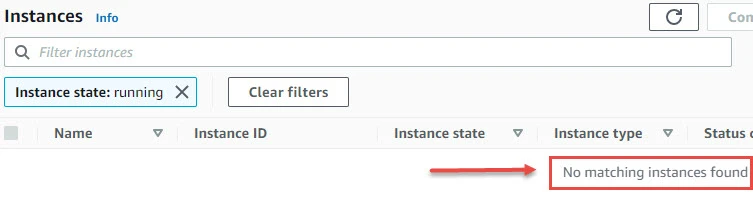
Destroy complete! Resources: 2 destroyed.
To destroy resources, hit terraform destroy and confirm with ‘yes’. The instance has been deleted.
Push the code to the Github repository
As discussed earlier as well, one of the most fascinating features of IaC is that it can be treated as code. So, let’s put that into practice and create a remote repository to store our code. We are using Github but any other remote repository is just as fine.
If you are not familiar with GitHub or Git, you can follow our end to end tutorial on GIT to learn more about the commands which we have used.
Before pushing our changes to Github, let’s create a README.md file
with details about our code and how to run the code.
Contents of README.md
### The Terraform block creates an EC2 resource on AWS

~~~~~ Usage ~~~~
resource "aws_instance" "web" {
  ami           = "ami-03f4121463e28151e"
  instance_type = "t3.micro"

  tags = {
    Name = "Web-instance"
  }
}

resource "aws_instance" "backend" {
  ami           = "ami-03f4121463e28151e"
  instance_type = "t3.micro"

  tags = {
    Name = "Backend-instance"
  }
}
Let’s create a repository on github and initialize in our directory.
git init
git add .
git commit -m "terraform resource for EC2"
git branch -M main
git remote add origin https://<repository-URL>
git push -u origin main
There you go ! You built your first infrastructure on AWS using terraform.
Summary
In this section, we started by installing Terraform on an Ubuntu machine and ran a sample code that creates a instance. On the same configuration, we added block for one more instance to see how the state file works. We saw how terraform init, terraform plan and terraform apply works. On the next part of this series, we will see how to use best practices with Terraform. See you there !
Further Reading
Introduction to Infrastructure as
Code
Provision Infrastructure as Code in AWS
AWS Instance types
