What is Git Workflow?
Git workflow is the structured process of tracking, saving, and sharing changes in a Git repository.
In simple terms, it defines how your code moves through different stages:
Modify → Stage → Commit → Push → SyncThis workflow helps you:
- Track changes over time
- Maintain version history
- Collaborate with others
- Safely manage code updates
Git Workflow Diagram Explained
The diagram shows how changes move across four main components of Git.
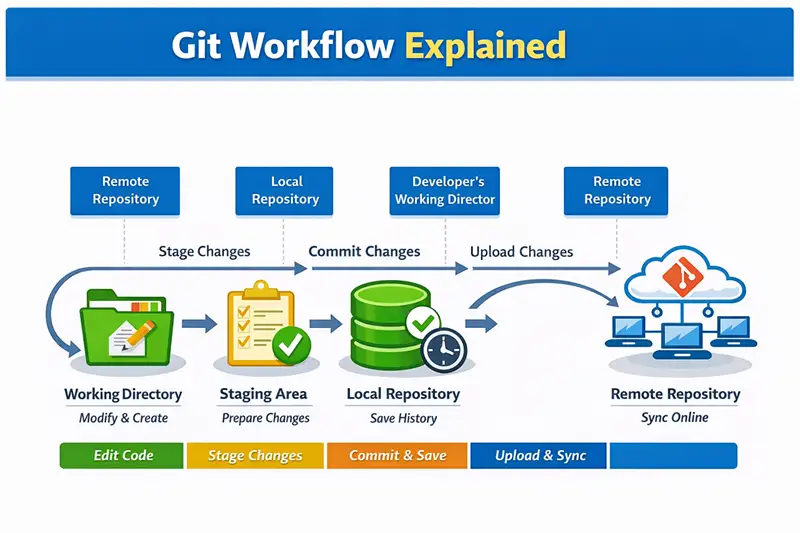
Working Directory (Modify & Create)
This is where you write and edit your code.
- You create new files or modify existing ones
- Changes are not yet tracked by Git
Example:
vim file.txtStaging Area (Prepare Changes)
This is an intermediate step where you prepare changes before saving them.
- You select which changes to include
- Helps avoid committing unwanted modifications
Command used:
git add file.txtLocal Repository (Save History)
This is where your changes are permanently recorded.
- Git saves a snapshot called a commit
- Each commit has a message and history
Command used:
git commit -m "message"Remote Repository (Sync Online)
This is the shared repository (GitHub, GitLab, etc.)
- Your changes are uploaded
- Other team members can access them
Command used:
git pushWorkflow Actions
The diagram uses simple action labels to explain flow:
- Edit Code → Modify files in working directory
- Stage Changes → Prepare changes using git add
- Commit & Save → Save snapshot using git commit
- Upload & Sync → Push changes using git push
Complete Flow Explained
- You edit files in the working directory
- You stage changes using git add
- You commit changes using git commit
- You push changes using git push
- Others can pull updates using git pull
Git Workflow Steps
-
Modify files
Edit or create files in your working directory. -
Stage changes
Select changes you want to include in the next commit using:textgit add file.txt -
Commit changes
Save a snapshot of staged changes in the local repository:textgit commit -m "your message" -
Push to remote
Upload your committed changes to a remote repository:textgit push
Git File Lifecycle Explained
The Git file lifecycle explains how a file moves through different states in a repository, from being untracked to fully committed and tracked by Git.
When you create or modify files, Git does not automatically include them in version control. You must explicitly move them through different stages using Git commands.
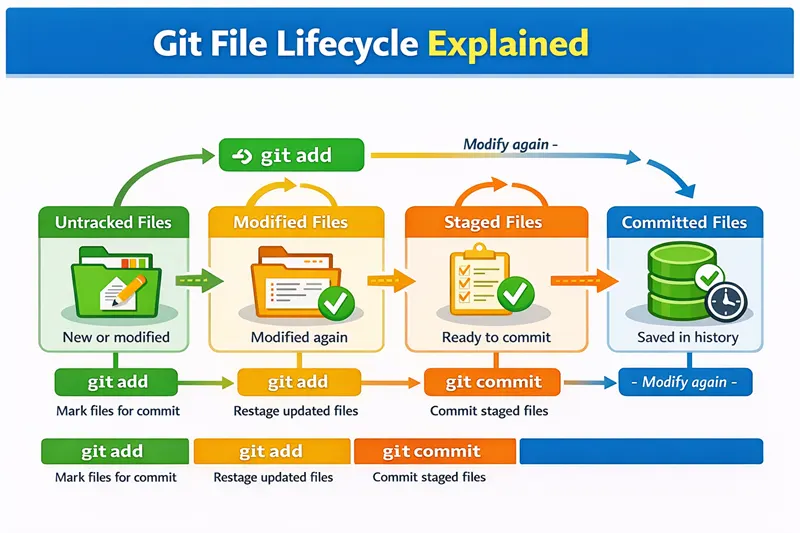
Untracked → Modified → Staged → Committed → Modified (repeat)Untracked Files
These are files that Git is not tracking yet.
- Newly created files fall into this state
- Git ignores them until you explicitly add them
To start tracking a file:
git add file.txtModified Files
Once a file is tracked and you make changes, it becomes modified.
- Git detects changes but does not save them yet
- You can continue editing the file multiple times
To include the latest changes in the next commit, you must stage them again:
git add file.txtStaged Files
Staged files are ready to be committed.
- Only staged changes will be included in the commit
- This allows you to control what goes into version history
To save the staged changes:
git commit -m "message"Committed Files
Committed files are saved in the repository history.
- Git stores a snapshot of your changes
- You can revisit or revert to any previous commit
If you modify the file again, it returns to the modified state and the cycle continues.
Key Points
- Git tracks files in stages, not automatically
- You must use git add and git commit explicitly
- Only staged files are included in commits
- The lifecycle is continuous as you keep updating files
Git Workflow Example (Real Scenario)
Consider a simple example where a developer is working on a project.
- The developer edits a file in the working directory:
vim app.py- After making changes, the developer stages the file:
git add app.py- The changes are then saved as a commit:
git commit -m "Updated application logic"- Finally, the changes are pushed to the remote repository:
git push origin mainThis example shows a complete workflow from modifying code to sharing it with others.
Common Git Workflows
Different teams follow different workflows depending on project size and collaboration needs.
Centralized Workflow
- Uses a single main branch (usually main or master)
- All developers commit directly to this branch
- Simple and suitable for small teams
Flow:
Developer → Commit → Push → Shared BranchFeature Branch Workflow
- Each feature is developed in a separate branch
- Changes are merged into the main branch after completion
- Helps isolate work and avoid conflicts
Flow:
Create Branch → Develop Feature → Merge to MainGitflow Workflow
- Uses multiple branches like main, develop, and feature branches
- Designed for structured development and release management
- Common in large projects
Flow:
Feature → Develop → Release → MainContinue Learning Git (Next Steps)
To deepen your understanding of Git, explore these topics:
- Git init and repository setup
- Git add and staging changes
- Git commit and history tracking
- Git branch and merging and Git merge examples
- Git push and pull operations and Git pull
These topics will help you move from basic workflow understanding to real-world usage.
Summary
Git workflow defines how changes move through different stages in a repository.
- Files are modified in the working directory
- Changes are staged using git add
- Commits are created using git commit
- Changes are shared using git push
Understanding this workflow is essential for working with Git effectively and collaborating with others.
