
In my last article I shared the steps to configure NIC Teaming on RHEL/CentOS 7 Linux. In this article I will show you step by step guide to configure network bridge using nmtui (NetworkManager) on CentOS or RHEL 7 node.A network bridge is a Link Layer device which forwards traffic between networks based on MAC addresses and is therefore also refer to as a Layer 2 device. Bridge networking (also known as network bridging or virtual network switching) will place virtual machine network interfaces on the same network as the physical interface.

You can configure network bridge using NetworkManager Text User Interface (NMTUI) or via Command Line Interface (CLI) by manually creating the required configuration files. I have written another article to configure network bridge on Oracle Virtual Box.
Configure Network Bridge using NMTUI (NetworkManager)
The text user interface toolnmtuican be used to configure network
bridge in a terminal window. Issue the following command to start the
tool:
# nmtui
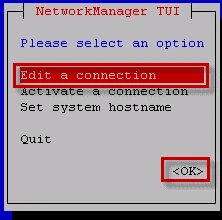
The text user interface appears. Any invalid command prints a usage message.
Tab to
step forwards and press Shift+Tab to step back through the options.
Press Enter to select an option. The Space bar toggles the status of
a check box.
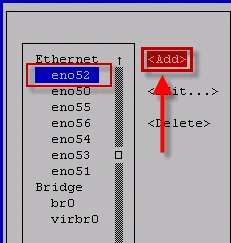
From the starting menu, select Edit a connection. Select Add, the New Connection screen opens.
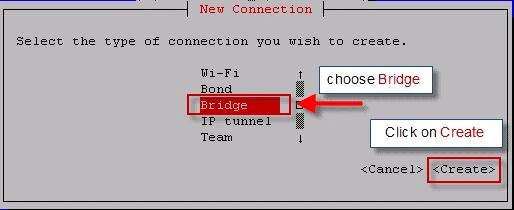
SelectBridgeusing which you wish to configure network bridge, theEdit connectionscreen opens.
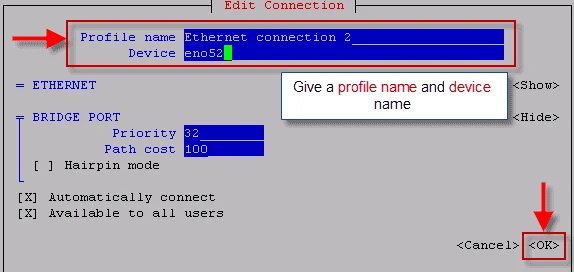
Give a Profile name and Device name to the bridge.
To add slave interfaces to the bridge selectAdd, theNew Connectionscreen opens.
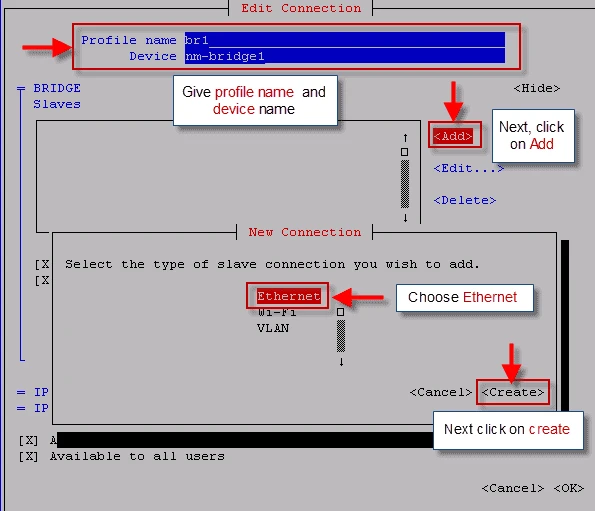
Enter the required slave's device name or MAC address in theDevicesection and select theOKbutton.
The name of the bridge slave appears in theSlavessection.
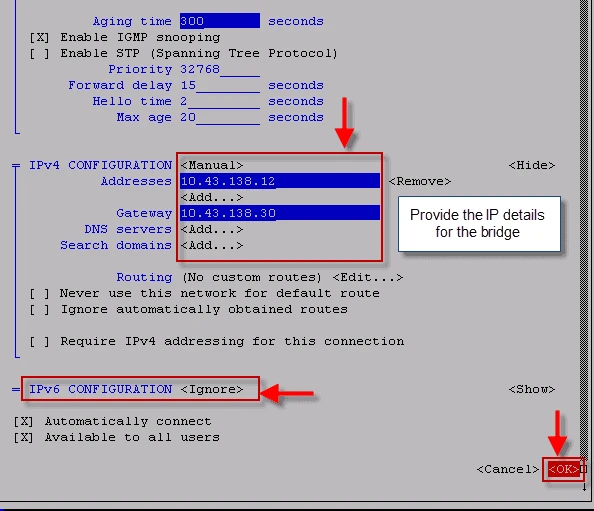
If you have a DHCP server then you can leave the IPv4 and IPv6 Address set to "Automatic". If you wish to assign static IP then manually fill in the network details as shown below. Since we are not using IPv6 so I have set IPv6 Configurationas Ignore.
Review and confirm the settings before selecting theOKbutton which
will exit the nmtui (NetworkManager) utility..
Next restart your network services for the changes to take affect.
Control the running service with systemctl start, stop, or restart; see the systemctl command for try-restart and dependency behavior.
# systemctl restart network
Now check your network configuration
# ifconfig
eno51: flags=4163<UP,BROADCAST,RUNNING,MULTICAST> mtu 1500
ether 9c:dc:71:77:ef:51 txqueuelen 1000 (Ethernet)
RX packets 9856 bytes 554308 (541.3 KiB)
RX errors 0 dropped 0 overruns 0 frame 0
TX packets 0 bytes 0 (0.0 B)
TX errors 0 dropped 0 overruns 0 carrier 0 collisions 0

eno52: flags=4163<UP,BROADCAST,RUNNING,MULTICAST> mtu 1500
ether 9c:dc:71:77:ef:59 txqueuelen 1000 (Ethernet)
RX packets 9895 bytes 557714 (544.6 KiB)
RX errors 0 dropped 0 overruns 0 frame 0
TX packets 73 bytes 10718 (10.4 KiB)
TX errors 0 dropped 0 overruns 0 carrier 0 collisions 0

lo: flags=73<UP,LOOPBACK,RUNNING> mtu 65536
inet 127.0.0.1 netmask 255.0.0.0
inet6 ::1 prefixlen 128 scopeid 0x10<host>
loop txqueuelen 1 (Local Loopback)
RX packets 15454 bytes 1232040 (1.1 MiB)
RX errors 0 dropped 0 overruns 0 frame 0
TX packets 15454 bytes 1232040 (1.1 MiB)
TX errors 0 dropped 0 overruns 0 carrier 0 collisions 0

nm-bridge1: flags=4163<UP,BROADCAST,RUNNING,MULTICAST> mtu 1500
inet 10.43.138.12 netmask 255.255.255.255 broadcast 10.43.138.12
inet6 fe80::9edc:71ff:fe77:ef59 prefixlen 64 scopeid 0x20<link>
ether 9c:dc:71:77:ef:59 txqueuelen 1000 (Ethernet)
RX packets 46 bytes 2324 (2.2 KiB)
RX errors 0 dropped 0 overruns 0 frame 0
TX packets 37 bytes 5336 (5.2 KiB)
TX errors 0 dropped 0 overruns 0 carrier 0 collisions 0

virbr0: flags=4163<UP,BROADCAST,RUNNING,MULTICAST> mtu 1500
inet 192.168.122.1 netmask 255.255.255.0 broadcast 192.168.122.255
ether 52:54:00:2c:4b:76 txqueuelen 1000 (Ethernet)
RX packets 2892 bytes 617616 (603.1 KiB)
RX errors 0 dropped 0 overruns 0 frame 0
TX packets 4322 bytes 372843 (364.1 KiB)
TX errors 0 dropped 0 overruns 0 carrier 0 collisions 0

vnet1: flags=4163<UP,BROADCAST,RUNNING,MULTICAST> mtu 1500
inet6 fe80::fc54:ff:fe1c:8df6 prefixlen 64 scopeid 0x20<link>
ether fe:54:00:1c:8d:f6 txqueuelen 1000 (Ethernet)
RX packets 162 bytes 46797 (45.7 KiB)
RX errors 0 dropped 0 overruns 0 frame 0
TX packets 1487 bytes 85335 (83.3 KiB)
TX errors 0 dropped 0 overruns 0 carrier 0 collisions 0
Finally now we will validate our bridge connectivity
After bringing the link up, verify reachability to the gateway with ping; the ping command documents count limits and timeout flags.
# ping 10.43.138.30
PING 10.43.138.30 (10.43.138.30) 56(84) bytes of data.
64 bytes from 10.43.138.30: icmp_seq=1 ttl=64 time=39.4 ms
64 bytes from 10.43.138.30: icmp_seq=2 ttl=64 time=10.8 ms
^C
--- 10.43.138.30 ping statistics ---
2 packets transmitted, 2 received, 0% packet loss, time 1001ms
rtt min/avg/max/mdev = 10.826/25.147/39.469/14.322 ms
So we can connect to our gateway which means our bridge is working as expected.
Configure network bridge via CLI
To configure network bridge, create a file in
the/etc/sysconfig/network-scripts/directory calledifcfg-brN,
replacingNwith the number for the interface, such as 0. For our case
we will create ifcfg-br1
The contents of the bridge interface file and ethernet interface file is almost. The differences in this example are as follows:
- The
DEVICEdirective is given an interface name as its argument in the formatbrN, whereNis replaced with the number of the interface. - The
TYPEdirective is given an argumentBridge. This directive determines the device type and the argument is case sensitive. - The bridge interface configuration file now has theIPaddress and the physical interface has only a MAC address.
- An extra directive,
DELAY=0, is added to prevent the bridge from waiting while it monitors traffic, learns where hosts are located, and builds a table of MAC addresses on which to base its filtering decisions. - Add
NM_CONTROLLED=noto the Ethernet interface to preventNetworkManagerfrom altering the file.
The following is a sample bridge interface configuration file using a staticIPaddress:
# cat ifcfg-br1
DEVICE=nm-bridge1
STP=no
TYPE=Bridge
BOOTPROTO=none
IPADDR=10.43.138.12
PREFIX=32
GATEWAY=10.43.138.30
IPV6INIT=no
NAME=br1
ONBOOT=yes
DELAY=0
To complete network bridge we must create another interface, or you can
use an existing interface, and point it to the bridge interface. The
following is a sample Ethernet interface configuration file pointing to
a bridge interface. Configure your physical interface
in/etc/sysconfig/network-scripts/ifcfg-ethX, whereXis a unique
number corresponding to a specific interface, as follows:
# cat ifcfg-Ethernet_connection_2
TYPE=Ethernet
NAME="Ethernet connection 2"
DEVICE=eno52
ONBOOT=yes
BRIDGE=nm-bridge1
ethX
or enX or will depend upon the network card type.
Finally restart your network service for the changes to take affect
# systemctl restart network
I hope the article to configure network bridge using NetworkManager nmtui on RHEL/CentOS 7/8 Linux was useful. Please let me know your feedback and views using the comment box below.
