
In this article I will share the steps to create custom rhel iso using cockpit image builder on a RHEL 8 Linux host. Cockpit Image Builder is a tool for creating deployment-ready customized system images. Using the cockpit image builder you can create custom rhel iso in various formats including QCOW2 for OpenStack, AMI (Amazon Machine Image), VHD (Azure Disk Image) etc. Cockpit has been around for some time already. You may have seen in already in RHEL 7. But in RHEL 8, Cockpit has been developed to a management solution that really has the potential to offer the most common management features to occasional Linux administrators. Cockpit Image builder is introduced in RHEL 8 Linux which can be used for various other tasks and not only limited to create custom rhel iso images. I will write more articles in future to cover more on cockpit.
Installing Cockpit Image Builder on RHEL 8
Install the Image Builder and other necessary packages on the virtual machine:
- lorax-composer
- composer-cli
- cockpit-composer
- bash-completion
The web console is installed as a dependency of the cockpit-composer package.
Enable Image Builder to start after each reboot. Now since the socket is enabled the services will be started automatically after reboot as soon as a thread is connected to the socket.
Enable or disable the unit at boot with systemctl enable; the systemctl command documents enable --now, symlinks under /etc/systemd/system, and masks.
# systemctl enable lorax-composer.socket
# systemctl enable cockpit.socket
Next check the status of lorax-composer.
[root@node4 ~]# systemctl status lorax-composer
● lorax-composer.service - Lorax Image Composer API Server
   Loaded: loaded (/usr/lib/systemd/system/lorax-composer.service; disabled; vendor preset: disabled)
   Active: active (running) since Tue 2019-06-18 19:33:43 IST; 9min ago
  Process: 6186 ExecStartPre=/usr/bin/systemd-tmpfiles --create /usr/lib/tmpfiles.d/lorax-composer.conf (code=exited, status=0/SUCCESS)
 Main PID: 6188 (lorax-composer)
    Tasks: 2 (limit: 26213)
   Memory: 88.2M
   CGroup: /system.slice/lorax-composer.service
           ├─6188 /usr/libexec/platform-python /usr/sbin/lorax-composer /var/lib/lorax/composer/blueprints/
           └─6190 /usr/libexec/platform-python /usr/sbin/lorax-composer /var/lib/lorax/composer/blueprints/

Jun 18 19:33:43 node4.example systemd[1]: Starting Lorax Image Composer API Server...
Jun 18 19:33:43 node4.example systemd[1]: Started Lorax Image Composer API Server.
Jun 18 19:33:44 node4.example lorax-composer[6188]: 2019-06-18 19:33:44,767: releasever = 8
Jun 18 19:33:44 node4.example lorax-composer[6188]: 2019-06-18 19:33:44,770: Using platform:el8 for module_platform_id
Jun 18 19:33:44 node4.example lorax-composer[6188]: 2019-06-18 19:33:44,777: Updating repository metadata
Jun 18 19:33:50 node4.example lorax-composer[6188]: 2019-06-18 19:33:50,261: Starting lorax-composer-28.14.16-1 on /run/weldr/api.socket with blueprints from /var>
dnf clean all" to clean the repo cache and
reloading the repo using "dnf repolist". Next restart the
lorax-composer service and refresh the cockpit web console.
Load the shell configuration script so that the autocomplete feature for the composer-cli command starts working immediately without reboot:
[root@node4 ~]# source /etc/bash_completion.d/composer-cli
Accessing Image Builder GUI in the RHEL 8 web console
Thecockpit-composerplugin for the RHEL 8 web console enables users
to manage Image Builder blueprints and composes with a graphical
interface.
Openhttps://localhost:9090/in a web browser on the system where
Image Builder is installed.
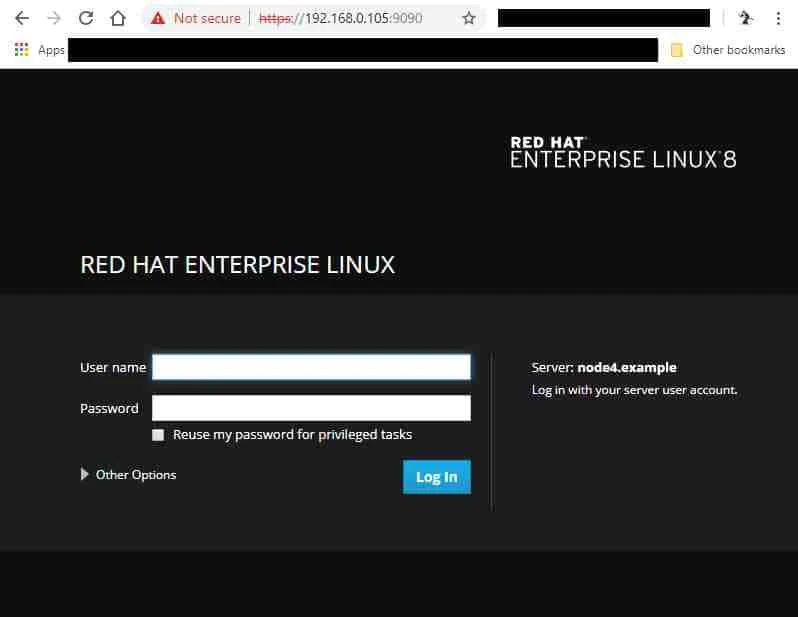
Log into the web console with credentials for an user account with
sufficient privileges on the system. We are using root user credential
to login to cockpit web console.
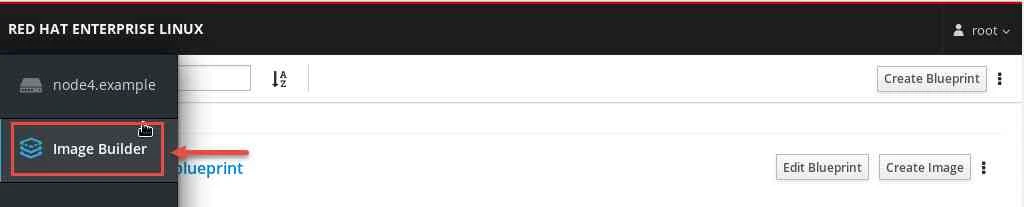
To display the Image Builder controls, click theImage Buildericon, which is in the upper-left corner of the window. The Image Builder view opens, listing existing blueprints.
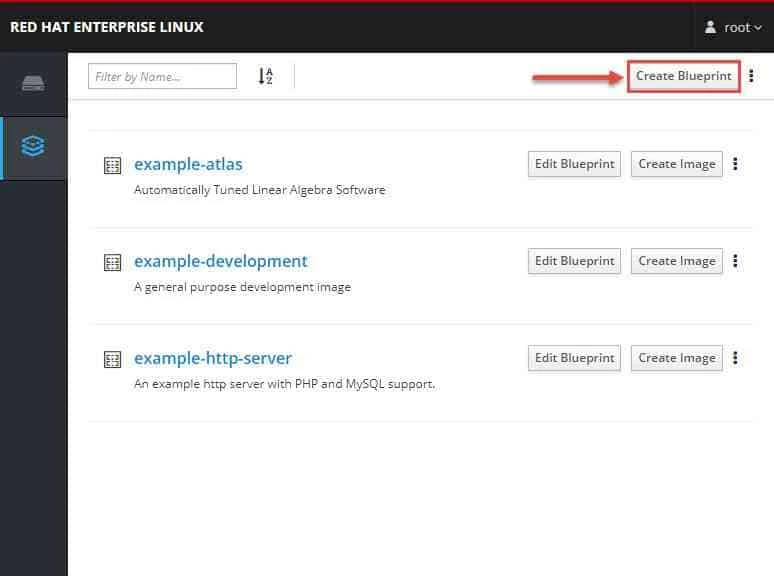
Creating an Image Builder blueprint using Cockpit
ClickCreate Blueprintin the top right corner.
A pop-up appears with fields for the blueprint name and description.
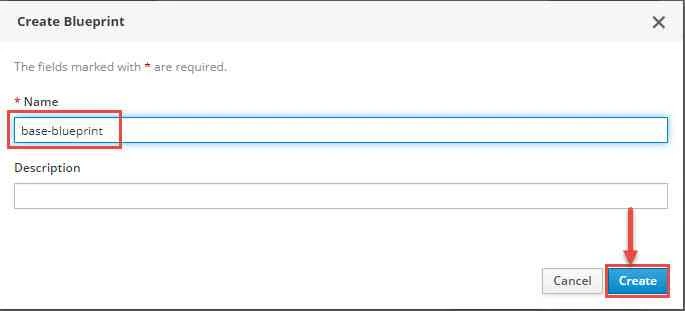
Fill in the Name of the blueprint, its description, then
clickCreate.
The screen changes to blueprint editing mode. I am creating a new
blueprint "base-blueprint".
Add components that you want to include in the system image.On the left, enter all or part of the component name in theAvailable Components field and pressEnter.
The search is added to the list of filters under the text entry field,
and the list of components below is reduced to these that match the
search.
Click on name of the component you intend to use to display its details.
The right pane fills with details of the components, such as its version
and dependencies.
Select the version you want to use in theComponent Optionsbox,
with theVersion Releasedropdown.
ClickAddin the top left.
If you added a component by mistake, remove it by clicking the -
button at the far right of its entry in the right pane, and
selectRemovein the menu.
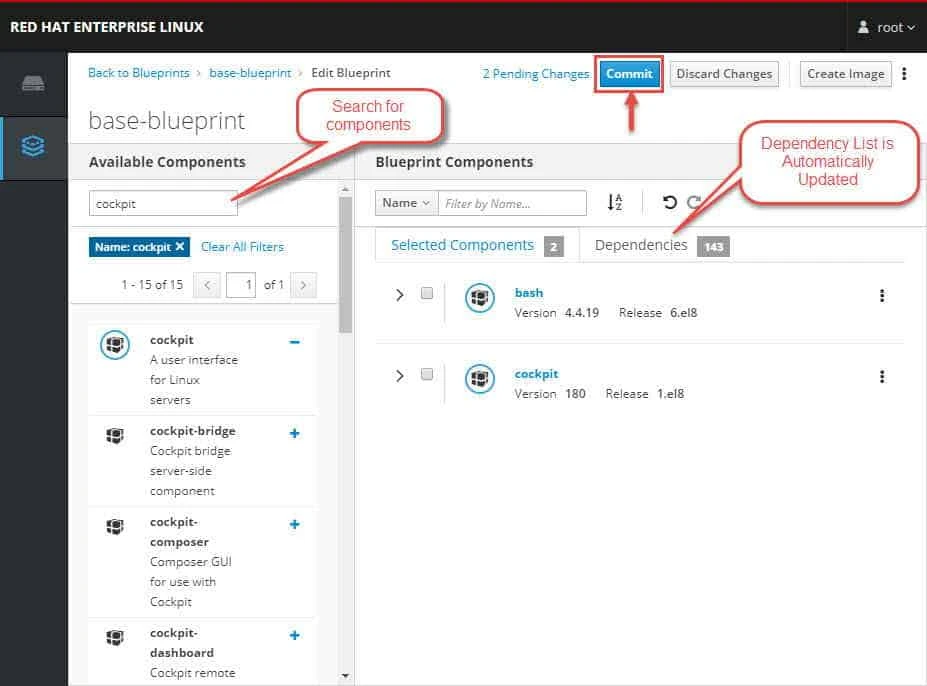
To save the blueprint, clickCommitin the top right. A dialog with
a summary of the changes pops up. ClickCommit.
A small pop-up on the right informs you of the saving progress and then
the result.
Adding users and groups to an Image Builder blueprint
Cockpit Image Builder is a tool for creating custom system images. This procedure describes how to edit an existing Image Builder blueprint in the command line interface.
Save (export) the blueprint to a local text file using which we will
create our custom rhel iso. Here base-blueprint is the name of my
blueprint.
[root@node4 ~]# composer-cli blueprints save base-blueprint
Now you can view the configuration of our blueprint file using any editor:
[root@node4 ~]# cat base-blueprint.toml
name = "base-blueprint"
description = ""
version = "0.0.5"
modules = []
groups = []

[[packages]]
name = "bash"
version = "4.4.19"

[[packages]]
name = "cockpit"
version = "180"

[root@node4 ~]# cat base-blueprint.toml
name = "base-blueprint"
description = ""
version = "0.0.5"
modules = []
groups = []

[[packages]]
name = "bash"
version = "4.4.19"

[[packages]]
name = "cockpit"
version = "180"
Create User for our custom rhel iso
Now since we have our package list ready we will create some users using
which we can login to our custom rhel iso once installed. To achieve
this I have created a file "customizations.txt". You can use any other
name for this file as the file name is not important here.
Package installs and updates in this section use dnf command.
[root@node4 ~]# touch customizations.txt
Below is the template to be followed for adding a user in the custom rhel iso.
[[customizations.user]]
name = "USER-NAME"
description = "USER-DESCRIPTION"
password = "PASSWORD-HASH"
key = "ssh-rsa (...) key-name"
home = "/home/USER-NAME/"
shell = "/usr/bin/bash"
groups = ["users", "wheel"]
uid = NUMBER
gid = NUMBER
Here you can choose only the required arguments for your use case and no need to use every defined variable here. For our use case I will create two users with below details:
[[customizations.user]]
name = "deepak"
description = "testuser1"
password = "$6$PDghsIELxH5QZBfH$Eafg9.U8b0olzaz0OQVF559Gunal1LftY0buYcXlgTrJ9i9FcJgF4Yav83Tb2bB4iVzx0aHp7pJUpqiCecW1e0"
key = "ssh-rsa AAAAB3NzaC1yc2EAAAADAQABAAABAQDbdvsMQy46/QDGlXfzU6976b8sDD1sz/9Aa7rr6vu+eFffKGoZZWkSzvk83plp8VQgZDaODyudP80jQP82fOk6kPZ5JDIwDYZ6jIVSxWbnE5QQHQdbib3i4cJ3MZJSOpJFx/ywNcr32F8NdVCQperw+iNzT7oWcW3bwEStUIjo+aD15yF7aatLXhkbjpNQTPJub1sduikhTZY3+bplP5l/dX0anrZX5h8R3x+xufbcOoXAtlMjA8ewgbrP9T9jOh9mdKiiPjvLFjKmTd3tarehohMG4lySguWt7XEkmj5q0AodQZ0okH09EmH3X1DB3BEi+spoQO8ZTcgus+c8P8LH [email protected]"
home = "/home/deepak/"
shell = "/usr/bin/bash"
groups = ["users", "wheel"]

[[customizations.user]]
name = "rahul"
description = "testuser2"
password = "$6$PDghsIELxH5QZBfH$Eafg9.U8b0olzaz0OQVF559Gunal1LftY0buYcXlgTrJ9i9FcJgF4Yav83Tb2bB4iVzx0aHp7pJUpqiCecW1e0"
key = "ssh-rsa AAAAB3NzaC1yc2EAAAADAQABAAABAQDbdvsMQy46/QDGlXfzU6976b8sDD1sz/9Aa7rr6vu+eFffKGoZZWkSzvk83plp8VQgZDaODyudP80jQP82fOk6kPZ5JDIwDYZ6jIVSxWbnE5QQHQdbib3i4cJ3MZJSOpJFx/ywNcr32F8NdVCQperw+iNzT7oWcW3bwEStUIjo+aD15yF7aatLXhkbjpNQTPJub1sduikhTZY3+bplP5l/dX0anrZX5h8R3x+xufbcOoXAtlMjA8ewgbrP9T9jOh9mdKiiPjvLFjKmTd3tarehohMG4lySguWt7XEkmj5q0AodQZ0okH09EmH3X1DB3BEi+spoQO8ZTcgus+c8P8LH [email protected]"
home = "/home/rahul/"
shell = "/usr/bin/bash"
groups = ["users", "wheel"]
How to get encrypted password for blueprint?
As you must have observed I have provided an encrypted form of the password for both the users. To generate the hash, you must install python3 on your system. The following command will install the python3 package.
# yum install python3
Replace PASSWORD-HASH with the actual password hash in
customizations.txt file. To generate the hash, use eg. this command:
[root@node4 ~]# python3 -c 'import crypt,getpass;pw=getpass.getpass();print(crypt.crypt(pw) if (pw==getpass.getpass("Confirm: ")) else exit())'
Password:
Confirm:
$6$PDghsIELxH5QZBfH$Eafg9.U8b0olzaz0OQVF559Gunal1LftY0buYcXlgTrJ9i9FcJgF4Yav83Tb2bB4iVzx0aHp7pJUpqiCecW1e0
How to get SSH key for blueprint?
Now if you wish to enable a passphrase based login for your custom rhel iso then you can create a set of public and private key using ssh-keygen command. Store the private key on localhost while provide the public key details here.
[root@node4 ~]# ssh-keygen -t rsa -P "redhat"
Generating public/private rsa key pair.
Enter file in which to save the key (/root/.ssh/id_rsa):
Created directory '/root/.ssh'.
Your identification has been saved in /root/.ssh/id_rsa.
Your public key has been saved in /root/.ssh/id_rsa.pub.
The key fingerprint is:
SHA256:QncWUoaUWP6lLjwiXLOLWN2Z0DHPMnFHG5eGBafX/pE [email protected]
The key's randomart image is:
+---[RSA 2048]----+
|       ++++ +++. |
|      ..oo o.*o. |
|      . * + =.. .|
|     . o @ + . ..|
|      = S =    E.|
|   . o B *      o|
|    + + B .     .|
|   o o o o       |
|  . . .          |
+----[SHA256]-----+
Here I am storing my public key in customizations.txt file.
[root@node4 ~]# cd .ssh/
[root@node4 .ssh]# cat id_rsa.pub
ssh-rsa AAAAB3NzaC1yc2EAAAADAQABAAABAQDbdvsMQy46/QDGlXfzU6976b8sDD1sz/9Aa7rr6vu+eFffKGoZZWkSzvk83plp8VQgZDaODyudP80jQP82fOk6kPZ5JDIwDYZ6jIVSxWbnE5QQHQdbib3i4cJ3MZJSOpJFx/ywNcr32F8NdVCQperw+iNzT7oWcW3bwEStUIjo+aD15yF7aatLXhkbjpNQTPJub1sduikhTZY3+bplP5l/dX0anrZX5h8R3x+xufbcOoXAtlMjA8ewgbrP9T9jOh9mdKiiPjvLFjKmTd3tarehohMG4lySguWt7XEkmj5q0AodQZ0okH09EmH3X1DB3BEi+spoQO8ZTcgus+c8P8LH [email protected]
Next it is time to update our blueprint file with the customizations
file content for our custom rhel iso.
[root@node4 ~]# cat customizations.txt >> base-blueprint.toml
Verify the content once again before we push these changes to our cockpit image builder:
[root@node4 ~]# cat base-blueprint.toml
name = "base-blueprint"
description = ""
version = "0.0.5"
modules = []
groups = []

[[packages]]
name = "bash"
version = "4.4.19"

[[packages]]
name = "cockpit"
version = "180"

[[customizations.user]]
name = "deepak"
description = "testuser1"
password = "$6$PDghsIELxH5QZBfH$Eafg9.U8b0olzaz0OQVF559Gunal1LftY0buYcXlgTrJ9i9FcJgF4Yav83Tb2bB4iVzx0aHp7pJUpqiCecW1e0"
key = "ssh-rsa AAAAB3NzaC1yc2EAAAADAQABAAABAQDbdvsMQy46/QDGlXfzU6976b8sDD1sz/9Aa7rr6vu+eFffKGoZZWkSzvk83plp8VQgZDaODyudP80jQP82fOk6kPZ5JDIwDYZ6jIVSxWbnE5QQHQdbib3i4cJ3MZJSOpJFx/ywNcr32F8NdVCQperw+iNzT7oWcW3bwEStUIjo+aD15yF7aatLXhkbjpNQTPJub1sduikhTZY3+bplP5l/dX0anrZX5h8R3x+xufbcOoXAtlMjA8ewgbrP9T9jOh9mdKiiPjvLFjKmTd3tarehohMG4lySguWt7XEkmj5q0AodQZ0okH09EmH3X1DB3BEi+spoQO8ZTcgus+c8P8LH [email protected]"
home = "/home/deepak/"
shell = "/usr/bin/bash"
groups = ["users", "wheel"]

[[customizations.user]]
name = "rahul"
description = "testuser2"
password = "$6$PDghsIELxH5QZBfH$Eafg9.U8b0olzaz0OQVF559Gunal1LftY0buYcXlgTrJ9i9FcJgF4Yav83Tb2bB4iVzx0aHp7pJUpqiCecW1e0"
key = "ssh-rsa AAAAB3NzaC1yc2EAAAADAQABAAABAQDbdvsMQy46/QDGlXfzU6976b8sDD1sz/9Aa7rr6vu+eFffKGoZZWkSzvk83plp8VQgZDaODyudP80jQP82fOk6kPZ5JDIwDYZ6jIVSxWbnE5QQHQdbib3i4cJ3MZJSOpJFx/ywNcr32F8NdVCQperw+iNzT7oWcW3bwEStUIjo+aD15yF7aatLXhkbjpNQTPJub1sduikhTZY3+bplP5l/dX0anrZX5h8R3x+xufbcOoXAtlMjA8ewgbrP9T9jOh9mdKiiPjvLFjKmTd3tarehohMG4lySguWt7XEkmj5q0AodQZ0okH09EmH3X1DB3BEi+spoQO8ZTcgus+c8P8LH [email protected]"
home = "/home/rahul/"
shell = "/usr/bin/bash"
groups = ["users", "wheel"]
Next push (import) the blueprint to cockpit image builder:
[root@node4 ~]# composer-cli blueprints push base-blueprint.toml
Verify the content of the blueprint available on cockpit image builder:
[root@node4 ~]# composer-cli blueprints show base-blueprint
name = "base-blueprint"
description = ""
version = "0.0.6"
modules = []
groups = []

[[packages]]
name = "bash"
version = "4.4.19"

[[packages]]
name = "cockpit"
version = "180"

[customizations]

[[customizations.user]]
name = "deepak"
description = "testuser1"
password = "$6$PDghsIELxH5QZBfH$Eafg9.U8b0olzaz0OQVF559Gunal1LftY0buYcXlgTrJ9i9FcJgF4Yav83Tb2bB4iVzx0aHp7pJUpqiCecW1e0"
key = "ssh-rsa AAAAB3NzaC1yc2EAAAADAQABAAABAQDbdvsMQy46/QDGlXfzU6976b8sDD1sz/9Aa7rr6vu+eFffKGoZZWkSzvk83plp8VQgZDaODyudP80jQP82fOk6kPZ5JDIwDYZ6jIVSxWbnE5QQHQdbib3i4cJ3MZJSOpJFx/ywNcr32F8NdVCQperw+iNzT7oWcW3bwEStUIjo+aD15yF7aatLXhkbjpNQTPJub1sduikhTZY3+bplP5l/dX0anrZX5h8R3x+xufbcOoXAtlMjA8ewgbrP9T9jOh9mdKiiPjvLFjKmTd3tarehohMG4lySguWt7XEkmj5q0AodQZ0okH09EmH3X1DB3BEi+spoQO8ZTcgus+c8P8LH [email protected]"
home = "/home/deepak/"
shell = "/usr/bin/bash"
groups = ["users", "wheel"]

[[customizations.user]]
name = "rahul"
description = "testuser2"
password = "$6$PDghsIELxH5QZBfH$Eafg9.U8b0olzaz0OQVF559Gunal1LftY0buYcXlgTrJ9i9FcJgF4Yav83Tb2bB4iVzx0aHp7pJUpqiCecW1e0"
key = "ssh-rsa AAAAB3NzaC1yc2EAAAADAQABAAABAQDbdvsMQy46/QDGlXfzU6976b8sDD1sz/9Aa7rr6vu+eFffKGoZZWkSzvk83plp8VQgZDaODyudP80jQP82fOk6kPZ5JDIwDYZ6jIVSxWbnE5QQHQdbib3i4cJ3MZJSOpJFx/ywNcr32F8NdVCQperw+iNzT7oWcW3bwEStUIjo+aD15yF7aatLXhkbjpNQTPJub1sduikhTZY3+bplP5l/dX0anrZX5h8R3x+xufbcOoXAtlMjA8ewgbrP9T9jOh9mdKiiPjvLFjKmTd3tarehohMG4lySguWt7XEkmj5q0AodQZ0okH09EmH3X1DB3BEi+spoQO8ZTcgus+c8P8LH [email protected]"
home = "/home/rahul/"
shell = "/usr/bin/bash"
groups = ["users", "wheel"]
So we are all set to create our first image from the blueprint using cockpit image builder on our rhel 8 linux host..
Create Custom RHEL ISO with Cockpit Image Builder
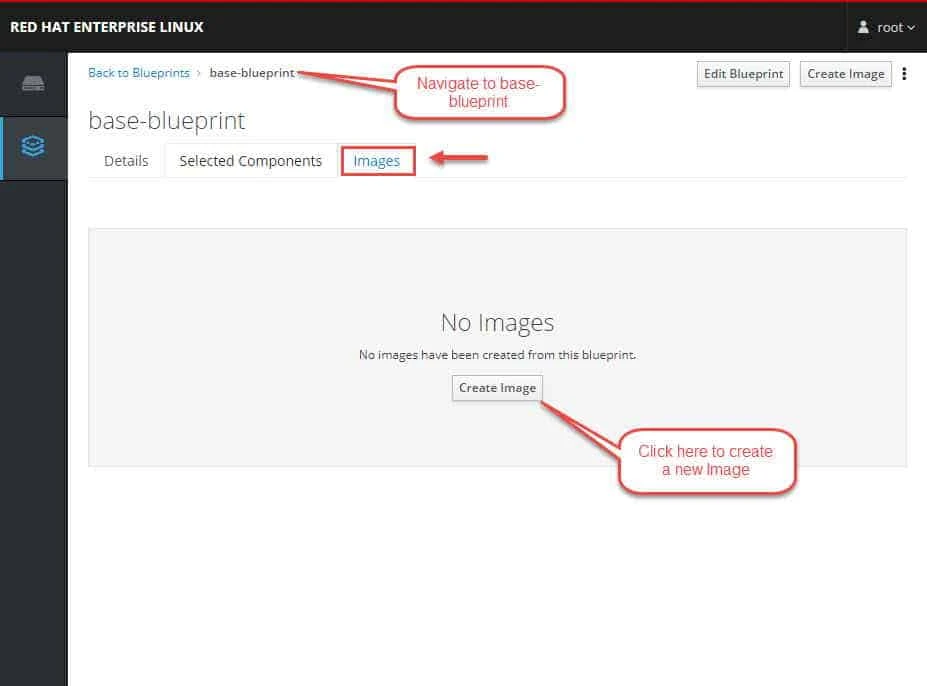
On the right side of the blueprint, press theCreate Imagebutton that belongs to the blueprint.
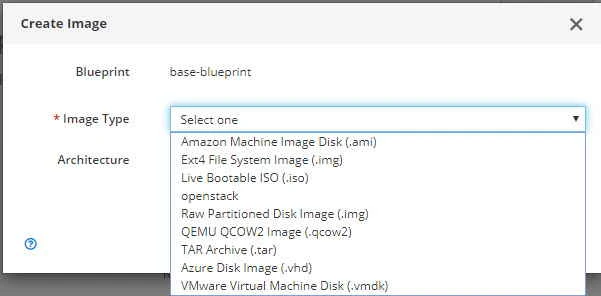
A pop-up window appears.Select the Image type and Architecture and pressCreate.
A small pop-up in the top right informs you that the image creation has been added to the queue.
Click theImagestab to switch to it. The image that is being created is listed with the statusIn Progress.
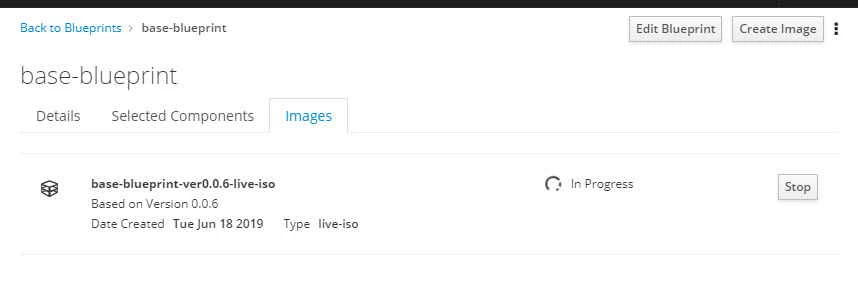
Once the image is successfully created, theStopbutton is replaced by aDownload button. Click this button to download the image to your system.
Deploy Custom RHEL ISO to VM
Now since our custom RHEL ISO is prepared using cockpit image builder, I will create a virtual machine using the live iso which we have created.
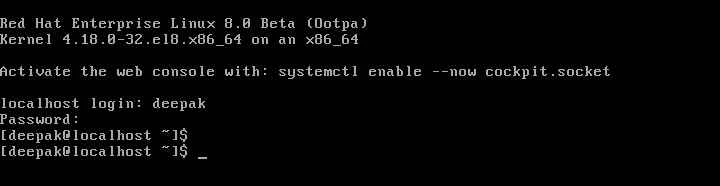
I will not be able to share the steps to create a VM as that is out of the scope of this article. Once we have booted the ISO in a VM, we will directly get a login console as shown below.

You can login here using any of the user which was created using
customizations.txt file in the blueprint. I have logged in using user
'deepak' and the password which I used to create hash password.
Similarly you can add more details to the blueprint such as add custom hostname, append entries to GRUB and create images with different architecture such as QCOW2 forOpenStack, AMI (Amazon Machine Image), VHD (Azure Disk Image) and many more.
Lastly I hope the steps from the article to create Custom RHEL ISO using Cockpit Image Builder Web Console and CLI in RHEL 8 Linux was helpful.
So, let me know your suggestions and feedback using the comment section.
