
In this article I will share the steps to configure software raid 4. I will explain this in more detail in the upcoming chapters. I have written another article with comparison and difference between various RAID types using figures including pros and cons of individual RAID types so that you can make an informed decision before choosing a RAID type for your system
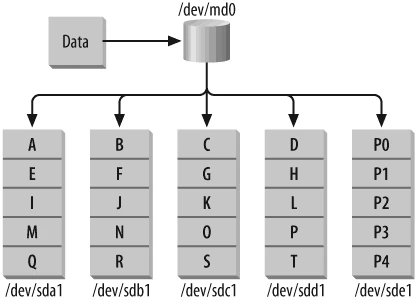
This level is very much similar to software RAID 3 apart from the feature where software RAID 4 uses block level stripping rather than byte level so software RAID 4 works similarly to striping. However, a dedicated drive is used to store parity information. Every time data is written to an array disk, an algorithm generates recovery information that is written to a specially flagged parity drive. In the event of single disk failure, the algorithm can be reversed and missing data can be automatically generated, based on the remaining data and the parity information.
What is RAID 4?
RAID-4 stripes block-sized chunks of data across each drive in the array marked as a data drive. In addition, one drive is designated as a dedicated parity drive. RAID-4 uses an exclusive OR (XOR) operation to generate checksum information that can be used for disaster recovery. Checksum information is generated during each write operation at the block level. The XOR operation uses the dedicated parity drive to store a block containing checksum information derived from the blocks on the other disks.
(N-1) * S space under RAID-4. When
using more than one parity drive, you are left with (N-P) * S space,
where P represents the total number of dedicated parity drives in
the array.
Step-by-Step Tutorial: Configure Software RAID 0 in Linux
Step-by-Step Tutorial: Configure Software RAID 1 in Linux
Step-by-Step Tutorial: Configure Software RAID 5 in Linux
Step-by-Step Tutorial: Configure Hybrid Software RAID 10 in Linux
Configure Software RAID 4
There are below certain steps which you must follow before creating software raid 4 on your Linux node. Since i have already perform ed those steps in my older article, I will share the hyperlinks here
Important Rules of Partitioning
Partitioning with fdisk
Create Software RAID 4 Array
Now since we have all the partitions with us, we will create software RAID 4 array on those partitions
[root@node1 ~]# mdadm -Cv -l4 -c64 -n3 /dev/md0 /dev/sd{b,c,d}1
Continue creating array? y
mdadm: Defaulting to version 1.2 metadata
mdadm: array /dev/md0 started.
When this array is initialised, the last member disk listed in the
command line using mdadm, becomes the parity disk which here is
/dev/sdd1. RAID 4 also supports spare disks.
Here,
-C, --create
       Create a new array.

-v, --verbose
       Be  more  verbose about what is happening.

-l, --level=
       Set RAID level.  When used with --create, options are: linear, raid0,  0,  stripe,  raid1,  1,  mirror,
       raid4,  4,  raid5,  5, raid6, 6, raid10, 10, multipath, mp, faulty, container.  Obviously some of these
       are synonymous.

-c, --chunk=
       Specify chunk size of kilobytes.

-n, --raid-devices=
       Specify  the number of active devices in the array.
Verify the software raid 4 changes
Like other arrays with redundancy, /proc/mdstat will indicate that the
initial resynchronization phase is underway. Parity RAID
resynchronization ensures that all stripes contain the correct parity
block.
[root@node1 ~]# cat /proc/mdstat
Personalities : [raid6] [raid5] [raid4]
md0 : active raid4 sdd1[3] sdc1[1] sdb1[0]
      4188160 blocks super 1.2 level 4, 64k chunk, algorithm 0 [3/2] [UU_]
      [========>............]  recovery = 40.9% (858880/2094080) finish=8.1min speed=214720K/sec

unused devices: <none>
As with software RAID 1, you don’t have to wait until the initial resynchronization is complete before you create a filesystem. But remember that until the process is finished, you won’t have data redundancy. Notice that this time, the resynchronization is slower than with the RAID 1 we created earlier. That’s because parity information must be generated for each stripe. Also, software RAID 4 has a write bottleneck caused by its dedicated parity disk. You will also notice that resynchronization for a software RAID 4 requires a lot more CPU overhead.
On my test system, these processes use about 60 percent of the CPU during the resynchronization. That compares to about 2 percent for a RAID 1 initial synchronization.
Once the resynchronization is complete, re-check the mdstat output
[root@node1 ~]# cat /proc/mdstat
Personalities : [raid6] [raid5] [raid4]
md0 : active raid4 sdd1[3] sdc1[1] sdb1[0]
      4188160 blocks super 1.2 level 4, 64k chunk, algorithm 0 [3/3] [UUU]

unused devices: <none>
Create filesystem and mount point
Once all three arrays are activated, simply build a filesystem on the
stripe/dev/md0, in this case and then mount/dev/md0on a mount
point. I have already written an article to**create a filesystem and mount point to access the filesystem**, you can follow the same article
and create your required filesystem on/dev/md0to access the software
raid 5 array.
Lastly I hope the steps from the article to configure software raid 4 on Linux was helpful. So, let me know your suggestions and feedback using the comment section.
References:
Managing RAID in Linux
