
Knowing how to use Node.js REPL is a massive step toward effective Nodejs debugging or quick code testing.
It would be best to distinguish shell from the kernel, REPL from a script file, and NodeJS from JavaScript before using the REPL effectively.
Concepts to understand before knowing how to use Node.js REPL
Shell vs kernel
The kernel and shell are the key components of an operating system. The kernel receives commands from the shell and interprets them to the hardware.
The commands are often packed under a software collection. For example,
GNU provides commands like ls, clear, and exit.
A command can be a simple built-in tool or a package to be downloaded,
controlled, and uninstalled using the package manager. A typical example
of a complex CLI tool is the node, a command you get after installing
JavaScript's runtime environment: Node.js.
Node.js vs JavaScript
Node.js has APIs like console.log()and fetch() that allow you to
inject JavaScript code into the operating system environment. For
example, JavaScript objects like Date, String, and Math can
communicate with the operating system through the Node.js APIs.
REPL vs script file
The node command consists of tools to debug and experiment with
JavaScript code. For instance, the Read, Evaluate, Print, Loop (REPL)
presents you with a shell-like environment to write expressions and get
an output instantly.
The shell reads your input. It then evaluates and prints the result on the interface. The loop continues till you exit the REPL.
The downside of the REPL mode is that your computer forgets the expressions on exiting the interface unless you save the expressions in a file. Also, REPL is not favorable for writing a massive codebase.
The Node script file comes in to solve the drawbacks of the REPL. It accommodates writing and saving multiple expressions in a file.
You can then run the entire codebase on the terminal emulator. This time
around, you mainly send commands to the operating system through the
Node's built-in process object. That is where Node.js APIs like
console.log() play a massive role in Node.js development.
Now that you understand the exact role of the REPL, let's summarize its traits before focusing on how to use Node.js REPL practically.
Characteristics of the REPL
Here is what you should about the REPL before starting to use it.
It understands any valid JavaScript code
The REPL understands any JavaScript code that can be written in a script. That ranges from handling a simple expression to a complex function.
It is an interactive shell
The Node REPL inherits typical characteristics of the shell. For example, you:
- enter a command and instantly receive an output,
- repeat previous commands using the up and down arrow keys,
- Autocomplete (some) commands by (mostly double) pressing the
Tabkey. For example, you can view all objects by double pressing theTabkey.
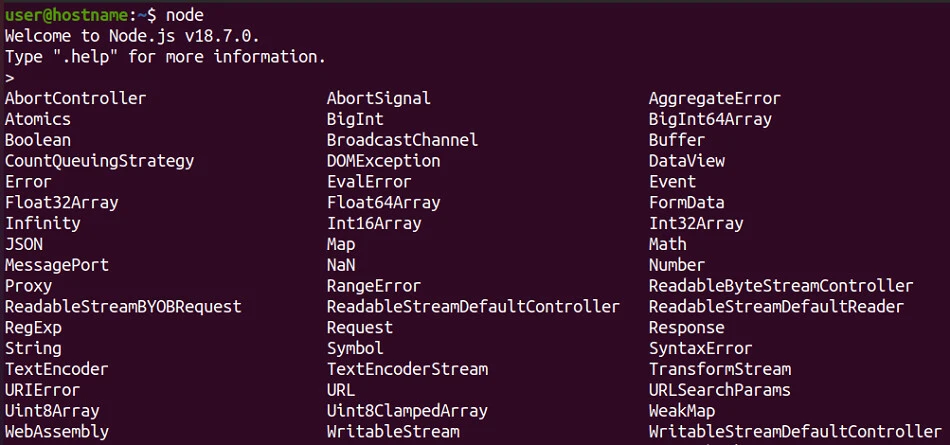
The objects beginning with capital letters are JavaScript objects, while those starting in small letters are built in Node.js properties and methods.
Likewise, you can view a module's or array's methods by typing its name
followed by a dot . and a double-press on the Tab key.
# process object's properties and methods
> process.

# JSON object's properties and methods
> JSON.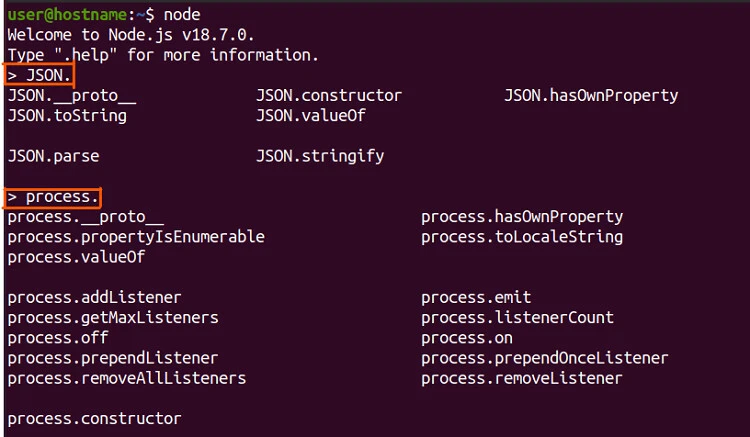
How to use Node.js REPL's special commands
Here are the ways to access, control and exit the REPL.
Enter the prompt
nodeExit the prompt
Input
# press [ctrl + c] keys twice
.exit
# press [ctrl + d ] keys
process.exit()
ctrl + c aborts further input or an expression's processing.
.exit, process.exit(), or ctrl + d terminates the Input-Output
(I/O) process.
Output
# press ctrl + c keys twice
user@hostname:~$ node
Welcome to Node.js [version].
Type ".help" for more information.
>
(To exit, press Ctrl+C again or Ctrl+D or type .exit)
>

# run the .exit command
user@hostname:~$ node
Welcome to Node.js [version].
Type ".help" for more information.
> .exit

# press ctrl+d keys
user@hostname:~$ node
Welcome to Node.js [version].
Type ".help" for more information.
>

# run process.exit() command
user@hostname:~$ node
Welcome to Node.js [version].
Type ".help" for more information.
> process.exit()
user@hostname:~$
Apart from opening or exiting the REPL mode, you can apply special
commands like .save, .load, and .editor.
You can list the commands and their roles by typing .help then
pressing the Enter key.
Input
> .helpOutput
user@hostname:~$ node
Welcome to Node.js [version].
Type ".help" for more information.
> .help
.break Sometimes you get stuck, this gets you out
.clear Alias for .break
.editor Enter editor mode
.exit Exit the REPL
.help Print this help message
.load Load JS from a file into the REPL session
.save Save all evaluated commands in this REPL session to a file
Press Ctrl+C to abort current expression, Ctrl+D to exit the REPL
>
Now that you know the basic commands to control the REPL, let's see how to apply them.
How to use Node.js REPL practically
The ways to use the NodeJS REPL range from writing a simple expression to executing a complex function or importing an entire module.
Run a simple expression
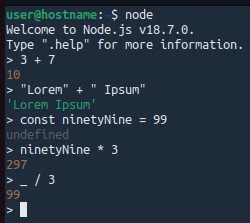
You can write simple JavaScript code on the REPL. For example, you can add integers.
> 3 + 7
> "Lorem" + " Ipsum"
The REPL immediately evaluates the output and returns it. If the
expression does not return a value, you get undefined. For example,
creating a variable without using it returns undefined.
> const ninetyNine = 99Using the variable prints the return value instead.
> ninetyNine * 3Bonus tricks
We can also use the underscore _ variable that holds the previously
returned value instead of explicitly typing the variable name.
> _ / 3Here, the underscore presents the previous return value (297) since dividing 297 by 3 produces 99.
You can also
use strict mode to have more control
of the REPL or clear the screen by pressing the ctrl + l keys.
Run functions
Assume we want to print the Lorem Ipsum string using the
console.log() API.
Input
> console.log("Lorem Ipsum")Output
The shell prints two lines: the expected output and undefined.
Lorem Ipsum
undefined
We see undefined because the function did not return a value (but
printed it).
Similarly, we can create and run a custom function.
Assume we want to get an area of a rectangle, then run the output in another function which checks whether the area is greater than 50.
Write the following lines of code line-by-line (WITHOUT copying and pasting the entire code) in the REPL.
Input
const area = (length, width) => length * width;
const largeArea = input => {
let answer = false;
if (input >= 50) {
answer = true;
}
return answer;
}
console.log(largeArea(area(3, 33)));
What did you notice?
The shell precedes subsequent parts of the largeArea() function with
the ellipsis ... till we end the function body.
Output
user@hostname:~$ node
Welcome to Node.js [version].
Type ".help" for more information.
> const area = (length, width) => length * width;
undefined
> const largeArea = input => {
... let answer = false;
... if (input >= 50) {
... answer = true;
... }
... return answer;
... }
undefined
> console.log(largeArea(area(3, 33)));
true
undefined
>
Node.js REPL is intelligent enough to notice we are writing (an incomplete) function.
Finally, we can save the work in a file and exit the REPL.
> .save answer.js
> .exit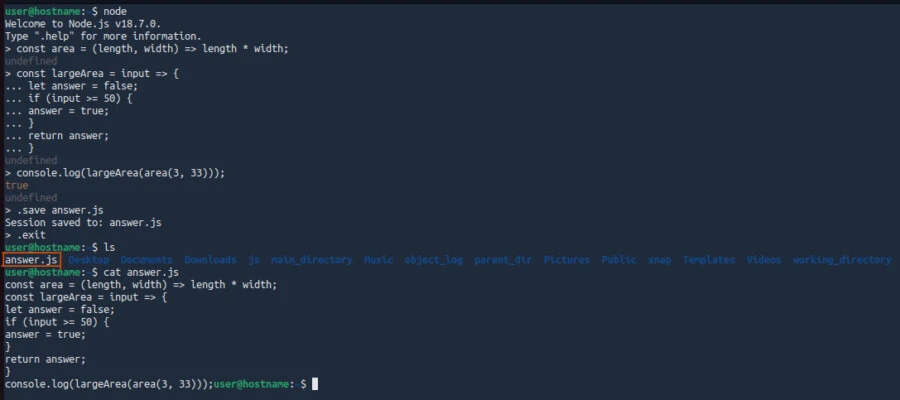
Conclusion
In this tutorial, you learned how to use Node.js REPL. The tutorial explained the working environment of the Node.js REPL and distinguished it from a typical Nodejs script.
The tutorial then walked you through special commands and shortcuts. Lastly, it showed you how to practically declare and apply variables and functions.
Related Keywords: node repl import, node.js repl commands, command to start node repl, node rep commands history
