
Steps to enable network in emergency mode. How to configure network in rescue mode using ip command. How to add route and configure network in rescue mode in RHEL 7 and 8. How to enable network to connect as ssh in linux rescue mode in CentOS 7 and 8. Learn to configure network in rescue mode or emergency mode to perform ssh in RHEL 8 and 7 or CentOS 7 and 8. Network is not enabled in linux rescue mode by default so how to enable and configure network in rescue mode. How to transfer files from one server to another server in rescue mode. How to activate SSH in linux rescue mode. Configure SSH in linux rescue mode in RHEL 7 and 8. Enable SSH access and configure network in rescue mode in CentOS 7 and 8.
I have already written a couple of articles to boot into linux rescue
mode using
RHEL/CentOS ISO DVD
How to boot a system into rescue mode using ISO DVD (RHEL / CentOS 7)
How to boot RHEL 7 / CentOS 7 to
single user runlevel or emergency mode in CentOS/RHEL 7 ?
Now assuming you have generated sosreport in linux rescue mode which you wish to transfer to some other node. For this you must configure network in rescue mode and enable SSH to be able to transfer sosreport or any other file from this server to any other server.
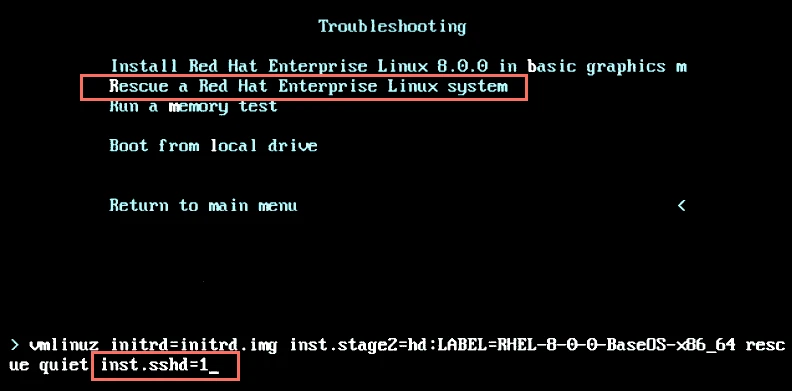
Enable SSH in Linux Rescue Mode
Once your server has booted from RHEL/CentOS 7/8 DVD, Press TAB under "Rescue a Red Hat
Enterprise Linux System". Add inst.sshd=1 as shown below to enable
SSH in Linux rescue mode
Next boot your system using the customized GRUB2 menu, verify the GRUB2 command line

Configure network in rescue mode
Use the suite of ip commands from the iproute package:
ip link will show available devices that are connected to your system.
You will need to determine which interface should be used depending upon the ip address range that is exposed to each interface. If this particular interface is in DOWN State then you must activate this link
In my case the link was already UP but for the sake of this article I will anyhow share the command to activate the link

For example, if you wanted to activate the ens3 device as in my case,
run:
# ip link set dev ens3 up

Confirm that the device is up by using ip link:
# ip link
Add an ip address to the device using below syntax
# ip addr add <ip address>/<netmask> dev <device>
For example, if you wanted to add the ip address of 10.43.138.17 with
a subnet of 255.255.255.224, which is a CIDR of 26, to device ens3
run:
# ip addr add 10.43.138.17/26 dev ens3

Validate that the right ip address was assigned by using ip a

Add a default route route as without default route your server would not be reachable from other subnet.
You can add a default route to the device using below syntax
# ip route add default via <gateway ip address>
For example, if you wanted to add the default route 10.43.138.30, run:
# ip route add default via 10.43.138.30

Next verify if the route was properly added

Now since both network and route is added, if everything is proper you should be able to ping your gateway
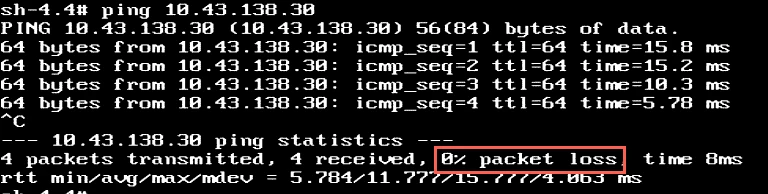
So our steps to configure network in rescue mode is complete. Now you can attempt to ssh to this node which is still in rescue mode
Log in to the managed node with ssh; the ssh command covers hostnames, users, and passwordless key setup.
[root@rhel-8 ~]# ssh 10.43.138.17
The authenticity of host '10.43.138.17 (10.43.138.17)' can't be established.
ECDSA key fingerprint is SHA256:jJYKAQoa1ZqpwJPGENKS+9M8uUGC+ahzr1K28lJWcEM.
ECDSA key fingerprint is MD5:53:5e:3a:15:77:d2:04:fa:45:ff:6e:ff:b2:11:c3:b9.
Are you sure you want to continue connecting (yes/no)? yes
Warning: Permanently added '10.43.138.17' (ECDSA) to the list of known hosts.
[anaconda root@localhost ~]#
Lastly I hope the steps from the article to configure network in rescue mode and enable SSH Access in CentOS/RHEL 7/8 in Linux was helpful. So, let me know your suggestions and feedback using the comment section.
