
This tutorial walks you through creating a 10 second timer countdown using the JavaScript timer functions. It presents an overview of the timer functions before showing you how to apply them in creating a countdown.
Let's get started with the timer functions.
Different Timer functions in JavaScript
JavaScript timer functions like setTimeout(), setInterval(), and
setImmediate() originate from the window object or Node.js global object. They
repeat or delay the execution of other functions.
For instance, setInterval() repeats the execution of another function
after the specified time (in milliseconds).
// create a function
function a() {
  console.log("Print me after every 1 minute.")
}
// execution the function after every 1000 milliseconds.
setInterval(a, 1000)The setTimeout() function delays the execution of the given function
for a minimum duration of the specified milliseconds.
// create a function
function a() {
  console.log("Print me after a delay of 3 minutes.")
}
// execute the function after a delay of 3000 milliseconds.
setTimeout(a, 3000)setImmediate() function, which is only guaranteed to work in Node.js,
is similar to using setTimeout() with 0 milliseconds.
function a() {
    console.log("You can as well use setTimeout with 0 milliseconds")
 }
setImmediate(a)We can also run an anonymous function inside the timers.
setTimeout( () => { console.log("Print me after a delay of 3 minutes.") }, 3000)Or clear the action initiated by the timer. To clear the time, we need
to access the action id returned by the timer. For example, we could
halt the continuous printing of the setInterval() function by storing
its return id and referencing the variable inside a
clearInterval()function.
// Store the setInterval()'s function id in the printId variable
const printId = setInterval(function() {
  console.log("Print me after every 1 minute.")
}, 1000)
// You have cancelled the effect of the setInterval() function. So, you won't console-log the above statement.
clearInterval(printId)Now that you understand how to use the timers, let's apply them in creating a 10 second timer countdown.
Let's explore some practical examples
Create the project structure
mkdir timer && cd timer
touch index.html style.css script.js
Open each file with your preferred code editor and insert the respective code in the examples section. I am using Vim.

Example-1: Create a 10 second timer without progress bar
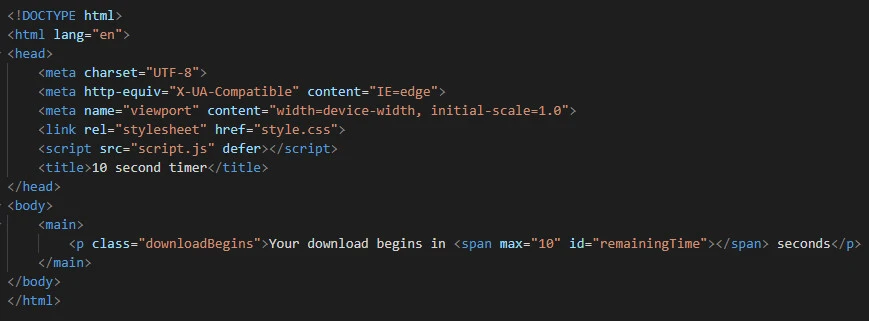
Here is my index.html content:
<!DOCTYPE html>
<html lang="en">
<head>
    <meta charset="UTF-8">
    <meta http-equiv="X-UA-Compatible" content="IE=edge">
    <meta name="viewport" content="width=device-width, initial-scale=1.0">
    <link rel="stylesheet" href="style.css">
    <script src="script.js" defer></script>
    <title>10 second timer</title>
</head>
<body>
    <main>
        <p class="downloadBegins">Your download begins in <span max="10" id="remainingTime"></span> seconds</p>
    </main>
</body>
</html>
We link the stylesheet
<link rel="stylesheet" href="style.css">and the script file
<script src="index.js" defer></script>in the head section. Using the defer keyword, we program the script
file to run after the DOM has completed loading.
The body contains the main element, which houses the interactive
paragraph. The paragraph, that contains the span of id
remainingTime, gets updated as the 10 second timer changes.
Content from my style.css:
body {
    background-color: #f7f8fc;
}
main {
    margin: 3rem auto;
    width: 50%;
    text-align: center;
}
We style the body in white color. The main element covers half the
page width, and its content sits at the center of the page.
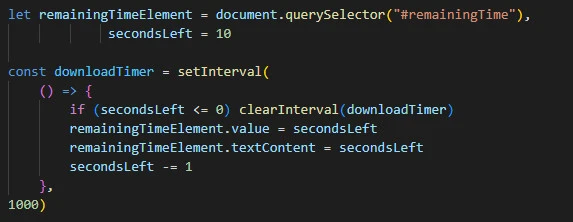
Content from my script.js:
let remainingTimeElement = document.querySelector("#remainingTime"),
             secondsLeft = 10

const downloadTimer = setInterval(
    () => {
        if (secondsLeft <= 0) clearInterval(downloadTimer)
        remainingTimeElement.value = secondsLeft
        remainingTimeElement.textContent = secondsLeft
        secondsLeft -= 1
    },
1000)
Using the document.querySelector() method, we grab the remainingTime
id and store it in theremainingTimeElement variable. We also assign
the secondsLeft timer a default value of 10.
We then update the time after every 1 second and stop counting when the
seconds left have fallen below zero (0). Otherwise, we keep decreasing
the seconds left after 1 second while updating the value stored at the
remainingTimeElement element at the script file and the DOM,
respectively.
We can view the code implementation by copying the current directory's path,
pwdopening the browser search bar and searching the copied file path after
appending the index.html file.
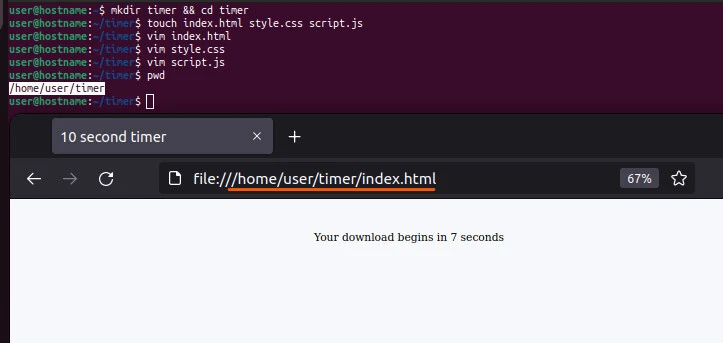
The timer starts at 10 and keeps dropping every second until the reading is zero and stops.
Mission accomplished! But, can we make the project better? Yes, we can. Let's introduce a progress bar to mimic a typical file download environment.
Example-2: Create a 10 second timer with a progress bar
Update the three files with the following content.
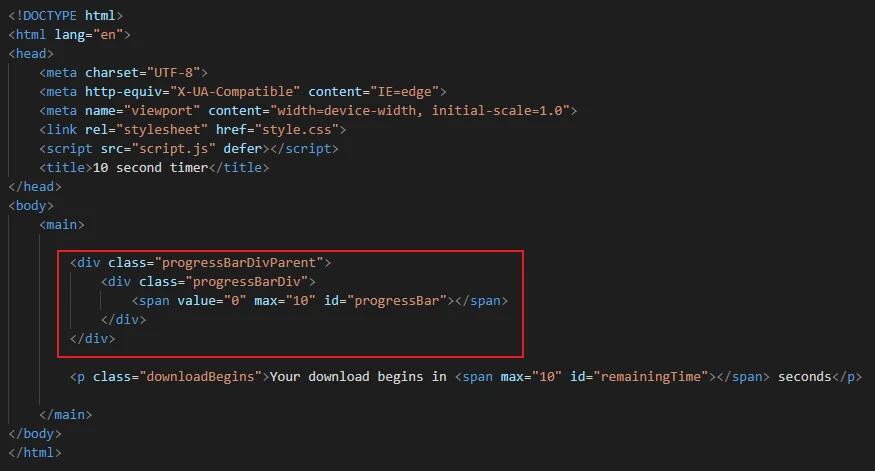
Updated index.html from previous example:
<!DOCTYPE html>
<html lang="en">
<head>
    <meta charset="UTF-8">
    <meta http-equiv="X-UA-Compatible" content="IE=edge">
    <meta name="viewport" content="width=device-width, initial-scale=1.0">
    <link rel="stylesheet" href="style.css">
    <script src="script.js" defer></script>
    <title>10 second timer</title>
</head>
<body>
    <main>

        <div class="progressBarDivParent">
            <div class="progressBarDiv">
                <span value="0" max="10" id="progressBar"></span>
            </div>
        </div>

        <p class="downloadBegins">Your download begins in <span max="10" id="remainingTime"></span> seconds</p>

    </main>
</body>
</html>
We introduce a div element with a class called progressBarDivParent.
<div class="progressBarDivParent">
  <div class="progressBarDiv">
    <span value="0" max="10" id="progressBar"></span>
  </div>
 </div>
The div houses another div of class progressBarDiv which contains
the progress bar.
My sample style.css file:
body {
    background-color: #f7f8fc;
}
main {
    margin: 3rem auto;
    width: 50%;
    text-align: center;
}
.progressBarDivParent {
    background: #fff;
    border-radius: 5px;
}
.progressBarDiv {
    background: green;
    color: #fff;
    width: 0;
}
We make the parent div white, whereas the one housing the progress bar
is green. Using JavaScript, we grow the green width to fill the white
background, thereby updating the user on the download progress.

My sample script.js file:
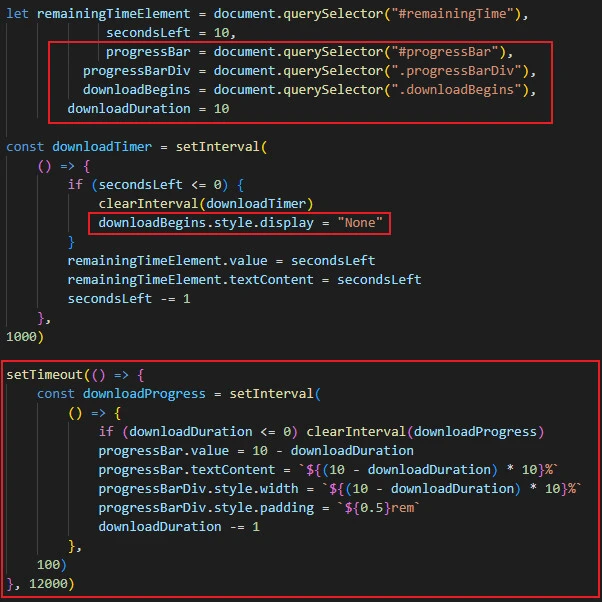
let remainingTimeElement = document.querySelector("#remainingTime"),
             secondsLeft = 10,
             progressBar = document.querySelector("#progressBar"),
          progressBarDiv = document.querySelector(".progressBarDiv"),
          downloadBegins = document.querySelector(".downloadBegins"),
        downloadDuration = 10

const downloadTimer = setInterval(
    () => {
        if (secondsLeft <= 0) {
            clearInterval(downloadTimer)
            downloadBegins.style.display = "None"
        }
        remainingTimeElement.value = secondsLeft
        remainingTimeElement.textContent = secondsLeft
        secondsLeft -= 1
    },
1000)

setTimeout(() => {
    const downloadProgress = setInterval(
        () => {
            if (downloadDuration <= 0) clearInterval(downloadProgress)
            progressBar.value = 10 - downloadDuration
            progressBar.textContent = `${(10 - downloadDuration) * 10}%`
            progressBarDiv.style.width = `${(10 - downloadDuration) * 10}%`
            progressBarDiv.style.padding = `${0.5}rem`
            downloadDuration -= 1
        },
    100)
}, 12000)
As soon as the secondsLeft value hits zero, we hide the paragraph and
show the progress bar instead. We introduce a setTimeout() function
that starts running 2 seconds after the 10 second timer countdown has
ended.
Meanwhile, we dynamically update the text content of the span element
(housing the progress bar's percentage and the progress bar's width)
until the downloadDuration's value drops to 0.
Lastly, refresh the index.html file's path on the browser.
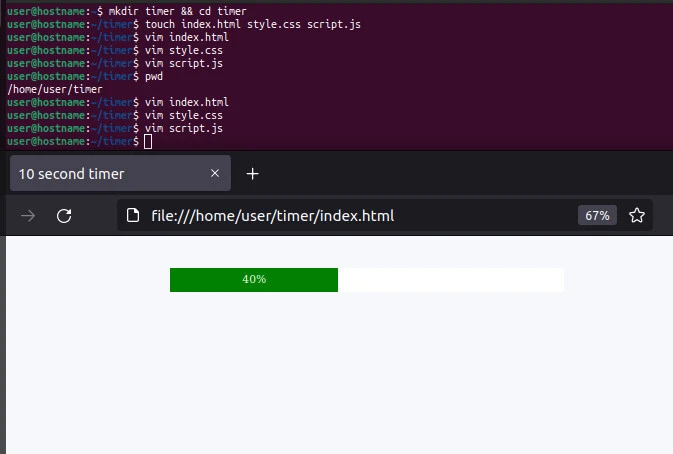
This time around, the 10 second timer countdown stops then a green progress bar fills a white background until the reading goes to 100%.
Conclusion
You can create a 10 second timer countdown in JavaScript using the
setInterval() function. As explained in this tutorial, it would be
best to distinguish the setInterval() function from other timer
functions to enable you to apply it effectively.