![Secure API Auth using Laravel Sanctum [Tutorial]](/laravel-sanctum/laravel-sanctum-800w.webp)
This how-to will walk you through Laravel Sanctum setup for API authentication with Breeze, including installation, set-up of authentication controllers and routes, API testing, and security best practices.
Laravel Sanctum, which was formerly Airlock, is a Laravel package made to handle Single Page Application (SPAs) authentication. It also supports mobile apps and simple token-based APIs. While serving these applications with API tokens for secure access, Sanctum can authenticate SPAs through Laravel's session cookies as well. To developers looking to guarantee the safety of their web apps, this makes it a versatile toolset. It’s also much simpler compared to other options out there. Despite having no OAuth capability, it can manage tokens without any complexity involved.
Steps to secure API Authentication using Laravel Sanctum
Step 1: Create a New Laravel Project
I have already installed Laravel. If you have not installed then you can refer How to Install Laravel on Ubuntu [100% Working]. First, we need to create a new Laravel project. Open your terminal and run the following command:
sudo mkdir -p /opt/projects
sudo chmod 777 /opt/projects
cd /opt/projects
composer create-project --prefer-dist laravel/laravel laravelSanctumExample
This command creates a new Laravel project named
laravelSanctumExample.
Configure .env file with your database details. I have already created
MariaDB in my earlier article when I had installed Laravel so I will use
the same data here:
DB_CONNECTION=mysql
DB_HOST=127.0.0.1
DB_PORT=3306
DB_DATABASE=my_laravel_db
DB_USERNAME=user1
DB_PASSWORD=Passw0rd
Step 2: Install Laravel Sanctum
Navigate to your project directory and install Laravel Sanctum through Composer:
cd laravelSanctumExample
composer require laravel/sanctum
Publish the Sanctum configuration file to your project:
php artisan vendor:publish --provider="Laravel\Sanctum\SanctumServiceProvider"
Add Sanctum's middleware to your api middleware group within your
app/Http/Kernel.php file:
'api' => [
    \Laravel\Sanctum\Http\Middleware\EnsureFrontendRequestsAreStateful::class,
    'throttle:api',
    \Illuminate\Routing\Middleware\SubstituteBindings::class,
],
Step 3: Install Laravel Breeze for Authentication
Ensure Laravel's user authentication is set up. If you haven't, you can use the Laravel Breeze package for a simple implementation:
composer require laravel/breeze --dev
php artisan breeze:install
php artisan migrate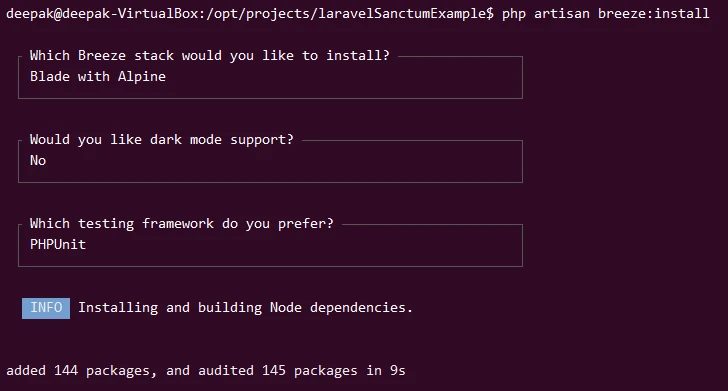
Step 4: Setting Up the Users Table
When you create a new Laravel project, it comes with a few default
migrations, one of which sets up the users table with name format
YYYY_MM_DD_HHMMSS_create_users_table.php. This table is crucial for
authentication as it stores user information, including passwords.
If this table doesn't exist for you then you can create one using:
php artisan make:migration create_users_table --create=users
In the migration file located in
database/migrations/2024_02_19_175923_create_users_table.php, define
the schema for the users table. Ensure you include a column for
passwords:
Schema::create('users', function (Blueprint $table) {
    $table->id();
    $table->string('name');
    $table->string('email')->unique();
    $table->timestamp('email_verified_at')->nullable();
    $table->string('password');
    $table->rememberToken();
    $table->timestamps();
});
After defining the schema,
perform migration using
php artisan migrate again to apply your changes.

Step 5: Create Authentication Controllers
You'll need a controller to handle authentication. Use Artisan to create one:
php artisan make:controller AuthController
Inside your app/Http/Controllers/AuthController.php, you'll define
methods for registering users, logging in, and logging out.
<?php

namespace App\Http\Controllers;

use Illuminate\Http\Request;
use App\Models\User;
use Illuminate\Support\Facades\Hash;
use Illuminate\Support\Facades\Auth;

class AuthController extends Controller
{
    // Register user
    public function register(Request $request)
    {
        $validatedData = $request->validate([
            'name' => 'required|string|max:255',
            'email' => 'required|string|email|max:255|unique:users',
            'password' => 'required|string|min:8',
        ]);

        $user = User::create([
            'name' => $validatedData['name'],
            'email' => $validatedData['email'],
            'password' => Hash::make($validatedData['password']),
        ]);

        $token = $user->createToken('auth_token')->plainTextToken;

        return response()->json([
            'access_token' => $token,
            'token_type' => 'Bearer',
        ]);
    }

    // Login user and issue a token
    public function login(Request $request)
    {
        $request->validate([
            'email' => 'required|string|email',
            'password' => 'required|string',
        ]);

        $user = User::where('email', $request->email)->first();

        if (!$user || !Hash::check($request->password, $user->password)) {
            return response()->json([
                'message' => 'The provided credentials are incorrect.'
            ], 401);
        }

        $token = $user->createToken('auth_token')->plainTextToken;

        return response()->json([
            'access_token' => $token,
            'token_type' => 'Bearer',
        ]);
    }

    // Logout user and revoke the token
    public function logout(Request $request)
    {
        // Revoke the token that was used to authenticate the current request
        $request->user()->currentAccessToken()->delete();

        return response()->json([
            'message' => 'Tokens Revoked'
        ]);
    }
}
Step 6: Define Routes for User Authentication
In routes/api.php, define routes for registering users, logging in,
and logging out:
use App\Http\Controllers\AuthController;

Route::post('/register', [AuthController::class, 'register']);
Route::post('/login', [AuthController::class, 'login']);
Route::post('/logout', [AuthController::class, 'logout'])->middleware('auth:sanctum');
Step 7: Testing User Registration and Login
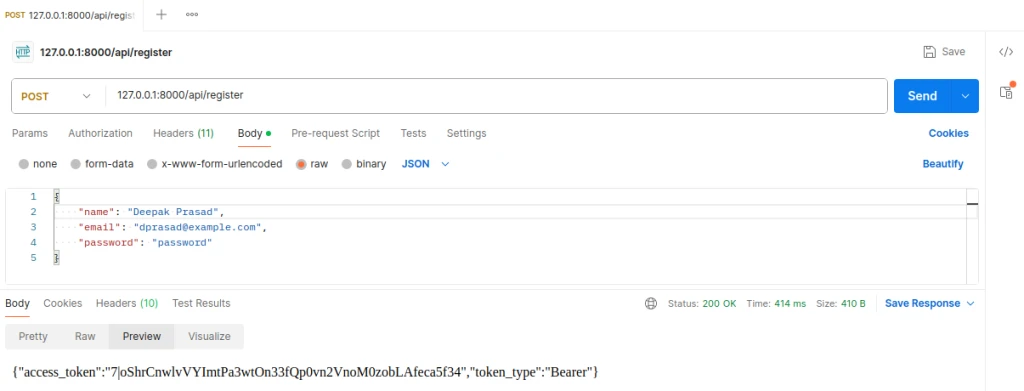
To test your API with Postman Start your Laravel development server:
php artisan serveOpen Postman and create requests for each endpoint. Your request headers in Postman or whatever tool you're using should look something like this:
Accept: application/jsonContent-Type: application/json
Register: POST /register with form data for name, email, and
password.
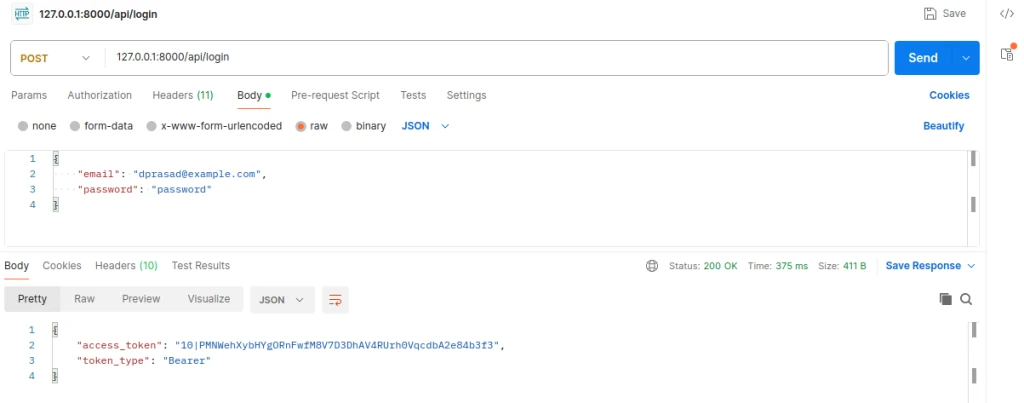
- Prepare the Login Request: In Postman or your preferred tool,
set up a new POST request to
http://127.0.0.1:8000/api/login. - Set Headers: Ensure the headers are correctly set to accept
JSON.
Content-Type: application/jsonAccept: application/json
- Provide Login Credentials: In the request body, provide the
emailandpasswordof the user you registered or another existing user in JSON format:
Step 8: Create a Test API Route to Test Secure Authentication
Here we aim to create a test API route that showcases Laravel Sanctum's
token-based authentication in action. First, we'll generate the Task
model along with its migration file:
php artisan make:model Task -m
Next, open the generated migration file in the database/migrations
directory. It will be named something like
YYYY_MM_DD_HHMMSS_create_tasks_table.php. Edit it to define the
structure of your tasks table:
<?php

use Illuminate\Database\Migrations\Migration;
use Illuminate\Database\Schema\Blueprint;
use Illuminate\Support\Facades\Schema;

class CreateTasksTable extends Migration
{
    public function up()
    {
        Schema::create('tasks', function (Blueprint $table) {
            $table->id();
            $table->foreignId('user_id')->constrained()->onDelete('cascade');
            $table->string('title');
            $table->text('description')->nullable();
            $table->timestamps();
        });
    }

    public function down()
    {
        Schema::dropIfExists('tasks');
    }
}
Run the migration to create the tasks table in your database:
php artisan migrate
Add a new route in your routes/api.php file that uses Sanctum's
middleware to protect the endpoint. This route will list all tasks for
the authenticated user:
use Illuminate\Support\Facades\Route;
use App\Http\Controllers\TaskController;

Route::middleware('auth:sanctum')->get('/tasks', [TaskController::class, 'index']);
Now, let's create a TaskController to handle the request:
php artisan make:controller TaskController
Open the newly created TaskController located at
app/Http/Controllers/TaskController.php and add the following code:
<?php

namespace App\Http\Controllers;

use Illuminate\Http\Request;
use App\Models\Task;

class TaskController extends Controller
{
    // Display a listing of the tasks for the authenticated user.
    public function index(Request $request)
    {
        $tasks = Task::where('user_id', $request->user()->id)->get();
        return response()->json($tasks);
    }
}
Next we will add some dummy task to the user we created earlier. But
first we have to enable HasMany relationship in User Model:
<?php

namespace App\Models;

// use Illuminate\Contracts\Auth\MustVerifyEmail;
use Illuminate\Database\Eloquent\Factories\HasFactory;
use Illuminate\Foundation\Auth\User as Authenticatable;
use Illuminate\Notifications\Notifiable;
use Laravel\Sanctum\HasApiTokens;
use Illuminate\Database\Eloquent\Relations\HasMany;

class User extends Authenticatable
{
    use HasApiTokens, HasFactory, Notifiable;

    /**
     * The attributes that are mass assignable.
     *
     * @var array<int, string>
     */
    protected $fillable = [
        'name',
        'email',
        'password',
    ];

    /**
     * The attributes that should be hidden for serialization.
     *
     * @var array<int, string>
     */
    protected $hidden = [
        'password',
        'remember_token',
    ];

    /**
     * The attributes that should be cast.
     *
     * @var array<string, string>
     */
    protected $casts = [
        'email_verified_at' => 'datetime',
        'password' => 'hashed',
    ];

    public function tasks(): HasMany
    {
        return $this->hasMany(Task::class);
    }
}
With this method added to the User model, Laravel will recognize the
relationship between users and tasks, allowing you to associate tasks
with users and retrieve tasks belonging to a specific user.
Now let's add some task to use Deepak Prasad using tinker:
php artisan tinker$user = \App\Models\User::find(1);
$task = new \App\Models\Task();
$task->title = "Task title";
$task->description = "Task description";
$task->user_id = $user->id;
$task->save();After adding tasks to the user, you can retry fetching the user's tasks:
$user->tasks;
Now that we have added some tasks to our user, now we can try to fetch this data:
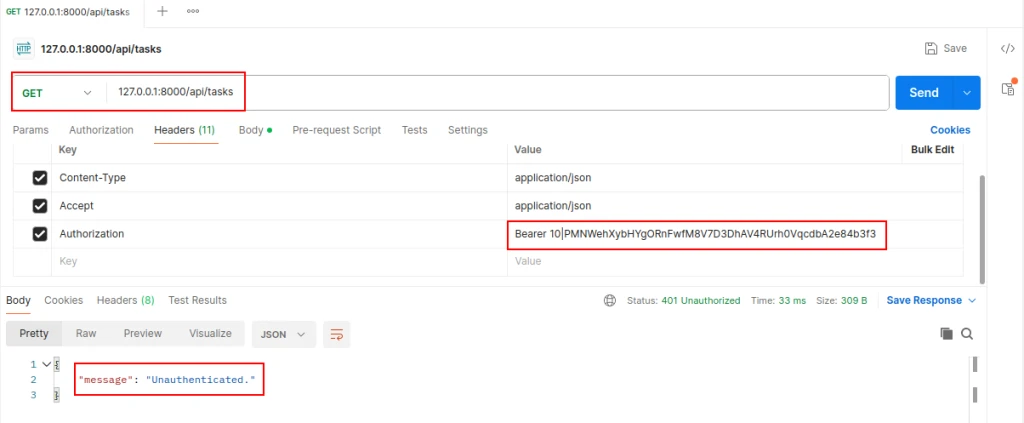
Step 9: Testing Access to Protected Routes (Tasks)
As per our setup, accessing /tasks requires authentication so we can
test accessing it with the token we have received from either
registration or login process.
- Set Up a GET Request: In Postman, set up a GET request to
http://127.0.0.1:8000/api/tasks. - Set Headers: Along with the headers to accept JSON, include the
Authorization header with the token you received.
Content-Type: application/jsonAccept: application/jsonAuthorization: Bearer <your_token_here>
- Send the Request: Execute the GET request. If the token is valid, you should receive a response with the tasks associated with the authenticated user.

Step 10: Testing Logout and Token Invalidation
The logout process will invalidate the token used for authentication, preventing further access to protected routes with that token.
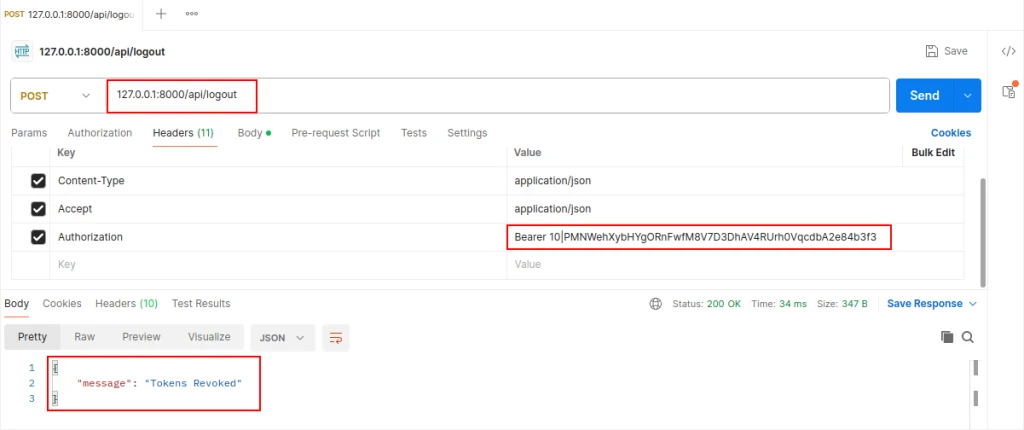
- Set Up a POST Request: In Postman, set up a POST request to
http://127.0.0.1:8000/api/logout. - Include the Authorization Header: As with accessing protected
routes, include the Authorization header with the token.
Content-Type: application/jsonAccept: application/jsonAuthorization: Bearer <your_token_here>
- Send the Request: Execute the request. You should receive a confirmation that the token was revoked.
To ensure the logout was successful and the token has been invalidated:
- Try Accessing a Protected Route Again: Use the same GET request
for
/api/taskswith the now-revoked token. - Check the Response: If the logout was successful, you should receive an unauthorized response, indicating that the token can no longer access protected routes.
Key Takeaways
In this guide, we walked through the process of setting up Laravel Sanctum for API authentication in a Laravel project. Laravel Sanctum offers a simple system with a whole lot of power for handling API token-based authentication. This is essential in ensuring that routes are protected and your application's data can only be accessed by authorized users. Here’s what we covered:
- Installation and Setup: We started by installing Laravel Sanctum via Composer and then published its configuration file to adjust our settings as needed. This part is pretty simple so even newcomers to Laravel will find it approachable.
- Middleware Configuration: Adding Sanctum’s middleware to your Laravel app will ensure that incoming requests get authenticated, thus shielding any sensitive endpoints from unwanted access.
- Authentication Controllers: I showed you how to build an
AuthControllerwhich handles user registration, login, and logout actions. This is where you’ll see how easy it becomes to generate and manage API tokens through Sanctum. - Securing Routes: When we applied the Sanctum middleware to specific routes, they became protected in the process. You’ll learn how Sanctum secures APIs by only allowing authenticated requests on those routes — which obviously strengthens your application's overall security.
