![Learn Laravel Migrations [In-Depth Tutorial]](/laravel-migrations/laravel-migrations.webp)
In Laravel Migration, we’ll help you navigate through a myriad of things. We’ll help you with the setup, creating and running migrations, managing columns and tables. Plus we’re going to throw in some advanced features like seeding data, best practices for maintaining your database schema efficiently.
Think of Laravel Migration as a version control feature for database schemas. It allows devs to modify and share an app’s database schema in a team environment easily. Instead of manually writing SQL queries, Migrations let you define relationships between tables and their data. This approach simplifies the process of creating and modifying tables. Which makes it essential for developing robust Laravel projects.
The consistency provided by Migrations across different development environments is what gives applications smooth deployments and updates. By using this feature, developers can handle their database schema evolution properly — reducing the risk of conflicts during operation. It also curbs the chances of committing errors when interacting with databases.
1. Getting started with Laravel Migration
1.1 Setting Up Laravel Project
Before setting up migrations, ensure
Laravel is installed. We will
create a separate project to demonstrate the use cases of Laravel
Migration. In my system I keep all my projects under /opt/projects but
you can choose your own path.
Open your terminal or command prompt and run the following Composer command to create a new Laravel project named "LaravelMigrationGuide":
sudo mkdir -p /opt/projects
sudo chmod 777 /opt/projects
cd /opt/projects
composer create-project --prefer-dist laravel/laravel LaravelMigrationGuide
This command will download and install a fresh Laravel application in a directory named "LaravelMigrationGuide". Once the installation is complete, you can navigate into your project directory with:
cd LaravelMigrationGuideYou'll need to configure your database settings in the .env file at
the root of your Laravel project. We have also covered this while we
were installing Laravel, so I will just
use the same values:
DB_CONNECTION=mysql
DB_HOST=127.0.0.1
DB_PORT=3306
DB_DATABASE=my_laravel_db
DB_USERNAME=user1
DB_PASSWORD=Passw0rd
1.2 Generate a Migration File
Use Laravel's Artisan command-line tool to create a migration. Migrations are PHP files that contain a class with methods to make changes to the database. For example, to create a migration for a "posts" table, you would run:
php artisan make:migration create_posts_table --create=posts
This command creates a new migration file in the database/migrations
directory. The file is named with the current date and time, ensuring
the migrations are run in the order they were created.
1.3 Writing the Migration
Open the newly created migration file i.e.
database/migrations/2024_02_17_090841_create_posts_table.php in your
favorite text editor or IDE. You'll see two methods: up and
down. The up method is used to add new tables, columns, or indexes
to the database, while the down method should reverse whatever
operations the up method performs.
Here's an example of what the up method might look like for a simple
"posts" table:
public function up()
{
    Schema::create('posts', function (Blueprint $table) {
        $table->id();
        $table->string('title');
        $table->text('body');
        $table->timestamps();
    });
}
And the corresponding down method:
public function down()
{
    Schema::dropIfExists('posts');
}
1.4 Run the Migration
Once your migration file is set up, apply the changes to your database by running:
php artisan migrateThis command runs all of your application's pending migrations, in this case, creating the "posts" table in your database.

2. Performing Different Migration Operations
In this section we will be covering adding and removing tables and columns, as well as modifying column attributes and data types.
2.1 Adding a New Table
Suppose you want to add a new table called comments to store user
comments on posts. First, generate a migration file:
php artisan make:migration create_comments_table --create=comments
Open the generated migration file in database/migrations and modify
the up method to define your table:
Schema::create('comments', function (Blueprint $table) {
    $table->id();
    $table->text('content');
    $table->unsignedBigInteger('post_id');
    $table->foreign('post_id')->references('id')->on('posts');
    $table->timestamps();
});
Apply the migration to create the table in your database:
php artisan migrate2.2 Adding a Column to an Existing Table
Now, let's say you want to add an email column to the comments
table:
Create a migration for modifying the table:
php artisan make:migration add_email_to_comments_table --table=comments
In the migration file
database/migrations/2024_02_17_092438_add_email_to_comments_table.php,
specify the column to add:
Schema::table('comments', function (Blueprint $table) {
    $table->string('email')->nullable();
});
Execute the migration to add the column:
php artisan migrate2.3 Removing a Column
If you decide that the email column is unnecessary and want to remove
it:
Create a migration for dropping the column:
php artisan make:migration remove_email_from_comments_table --table=comments
Specify the column to remove in the newly created migration file i.e.
database/migrations/2024_02_17_092642_remove_email_from_comments_table.php:
Schema::table('comments', function (Blueprint $table) {
    $table->dropColumn('email');
});
Apply the migration to remove the column:
php artisan migrate
2.4 Modifying Column Attributes
Lastly, suppose you need to change the content column in the
comments table to a VARCHAR type instead of TEXT:
Start by creating a migration for the modification:
php artisan make:migration change_content_type_in_comments_table --table=comments
In the migration file, use the change method to modify the column
type. Note that you may need to require the Doctrine DBAL package to
change column types:
composer require doctrine/dbalThen, update the migration file
database/migrations/2024_02_17_092928_change_content_type_in_comments_table.php:
Schema::table('comments', function (Blueprint $table) {
    $table->string('content', 255)->change();
});
Execute the migration to apply the change:
php artisan migrate
3. Rolling Back Migrations
The process of rolling back migrations in Laravel makes it possible for you to reverse a singular or multiple migration operations. There are moments when errors occur during the test phase of your new database schemas, and making corrections becomes vital. Good thing that Laravel offers various Artisan commands to effectively manage such rollback tasks as this.
3.1 Rolling Back the Last Migration Operation
The simplest form of rollback is to undo the last batch of migrations that were executed. You can accomplish this by running:
php artisan migrate:rollbackThis command is used to focus on the previous "batch" of migrations that were run. Laravel takes migrations it runs together, and groups them into one single batch. Whenever you execute a rollback command, all migrations in the recent batch are reversed from when they were applied.
3.2 Rolling Back Multiple Migrations
If you want to roll back more than just the last batch of migrations,
you can specify how many steps (batches) you want to go back using the
--step option. For example, to roll back the last two batches of
migrations, you would run:
php artisan migrate:rollback --step=2This command sequentially undoes the migrations in reverse order, batch
by batch, according to the number specified in the --step option.
3.3 Resetting the Database
When you need to roll back all migrations (i.e., completely reset your database schema), Laravel provides a command for that as well:
php artisan migrate:resetRunning this command will start rolling back all of your migrations done batch by batch. It will keep going until the database is in the original state it was before any of them were run. This can be extremely beneficial when you want to wipe out your database schema and start fresh while you’re in development.
3.4 Refreshing Migrations
Another useful command is migrate:refresh, which rolls back all of
your application's migrations and then re-runs them all from the
beginning. This is especially handy when you want to rebuild your entire
database:
php artisan migrate:refreshOptionally, you can combine the refresh operation with the --seed
option to reseed your database after refreshing the migrations:
php artisan migrate:refresh --seedThis is very useful for resetting your database to a known state with pre-populated data during development.
3.5 Fresh Migrations
Lastly, Laravel offers the migrate:fresh command. This command drops
all tables from the database and then executes the migration commands:
php artisan migrate:freshLike with migrate:refresh, you can also use the --seed option with
migrate:fresh to seed your database after it has been cleared and the
migrations have been re-applied.
php artisan migrate:fresh --seed3.6 Verify Migration Status
The migrate:status command provides a straightforward way to see the
migration status in your Laravel application. It lists all migrations
along with their status (whether they've been run or not):
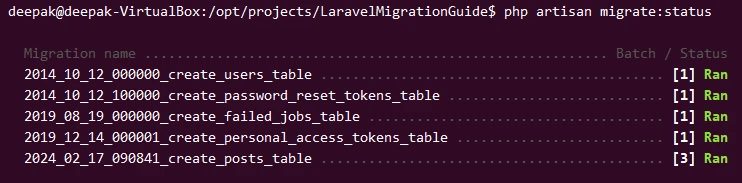
php artisan migrate:statusFor Example, here 2024_02_17_090841_create_posts_table status in Run
as we triggered migration earlier.
Now let's rollback last migration:

Verify the migration status again:
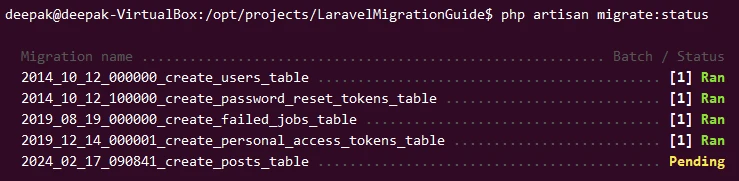
After you rolled back the database migration, you ran
php artisan migrate:status and saw create_posts_table listed as
"Pending". This indicates that the migration is no longer applied to the
database. It confirms successfully rolled back. The ‘pending’ status
means that this migration has been canceled and waiting to be rerun
again in the future if necessary.
The other migrations (create_users_table,
create_password_reset_tokens_table, create_failed_jobs_table, and
create_personal_access_tokens_table) still show as "[1] Ran" because
they were part of the initial batch of migrations and were not affected
by the rollback. Migrations from your most recent batch (in this case,
only a single one: create_posts_table) was what got rolled back.
4. Advanced Migration Features in Laravel
Laravel is really good at managing your database migrations. It’s great for even larger applications too! There are a few features that make it particularly awesome. Two of those features are called migration squashing and schema dumping.
4.1 Migration Squashing and Schema Dumping
As your Laravel application expands, the number of migrations does as well. As this happens, your migration commands and version control operations may become slower. To counteract this slow down, you can take advantage of Laravel’s optimization features: migration squashing and schema dumping.
Migration Squashing works by condensing all of your separate migration files into one SQL file. In simpler terms, it takes the data stored in each individual file and compiles it to create a comprehensive profile of your database schema based on your migrations.
To squash migrations, you can use the schema:dump command:
php artisan schema:dumpThis command creates a schema file in database/schema directory. When
you run migrations (php artisan migrate), Laravel will first check for
the schema file and apply it, followed by any migrations that were not
part of the schema dump. This significantly speeds up migration
execution, especially in fresh installations or CI/CD pipelines.
Schema Dumping: The schema:dump command also supports a --prune
option, which not only dumps the schema but also deletes all existing
migration files that are already represented in the schema dump. This
helps in keeping the migrations folder clean and manageable.
php artisan schema:dump --prune4.2 Managing Indexes, Primary, Unique, and Foreign Keys
Laravel's migration system provides an expressive syntax for defining indexes and keys on your tables, which are crucial for database performance and integrity.
Primary Keys: By default, the id() method in a migration creates
an auto-incrementing primary key column:
$table->id();Unique Keys: To ensure that each value in a column is unique, you
can use the unique() method:
$table->string('email')->unique();Foreign Keys: Laravel makes defining foreign key constraints
straightforward. First, define the column, then chain the foreign()
method with references() and on() to specify the foreign key
relationship:
$table->unsignedBigInteger('user_id');
$table->foreign('user_id')->references('id')->on('users');
Laravel also supports cascading on delete or update actions using
onDelete() and onUpdate() methods.
Indexes: Besides primary and unique keys, you might want to index
other columns for faster query performance. You can do so by using the
index() method:
$table->string('name')->index();Laravel supports various types of indexes, including simple, composite, and full-text indexes, allowing you to optimize query performance based on your specific use cases.
5. Summary
Mastering migrations in Laravel is a must if you want to make managing your database schema changes easier. It’ll help you collaborate across any development environment smoothly. With it, you can automate schema updates, which makes both deployment and testing faster. The expressive syntax of its schema definitions also improves how readable and manageable your projects are. When you get more comfortable with the tool, there’s advanced features like migration squashing and schema dumping that’ll help optimize performance even more. Plus, there's support for indexes and keys built right into it too. That helps avoid performance problems and keep your database intact when working on big applications. Developers who’ve worked with Laravel already know this – understanding migrations is one of the first things to do when picking up the framework. So start learning now if you’re serious about building feature-rich systems that scale as they grow.
You can further read Laravel Migrations for more information.
