Our goal here is to provide you with the complete set of steps that’ll guide you through the whole installation process for Laravel on Ubuntu. We will also talk about web server setup using Apache, PHP including its extensions, database systems such as MariaDB and Composer for PHP dependencies.
Laravel is a well-known PHP framework which rose to fame because of its elegant syntax that makes it easier for developers to read and write code. The platform itself is fully loaded with features and tools which makes developing web applications much faster compared to traditional methods. On the other hand, Ubuntu is one of the leading Linux distributions in terms of popularity due to its stability when hosting web applications. Combined together, Laravel on Ubuntu can give developers an effective environment for creating sophisticated web apps without any issues.
Steps to install Laravel on Ubuntu
Before installing Laravel, ensure your Ubuntu server is ready with the necessary components:
- Ubuntu 20.04 LTS or later is recommended for its long-term support and stability.
- Apache/Nginx: A web server to serve your Laravel application. This guide will focus on Apache.
- PHP 7.4 or higher, along with required extensions (
php-xml,php-mbstring,php-json, and more). - Composer: PHP dependency manager, essential for installing Laravel.
- MariaDB/MySQL: A database system supported by Laravel.
1. Install Apache Web Server
Laravel applications can run on both Apache and Nginx web servers. These are the two most popular web servers for deploying PHP applications. In this tutorial we will use Apache four our example. Update your package manager and install Apache.
sudo apt update
sudo apt install apache2
After installation, ensure Apache is running:
Control the running service with systemctl start, stop, or restart; see the systemctl command for try-restart and dependency behavior.
sudo systemctl start apache2
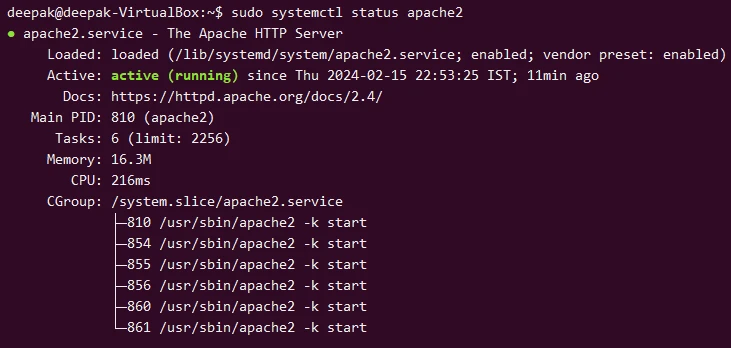
sudo systemctl enable apache2Verify the status of apache2 service:
2. Install PHP and Required Extensions
To run Laravel, you need PHP. The framework’s documentation will tell you exactly which version of PHP is required for your Laravel version so that it works well with necessary PHP extensions. What you can do is install PHP and the common extensions used by Laravel with the code below:
sudo apt install php php-cli php-fpm php-json php-common php-mysql php-zip php-gd php-mbstring php-curl php-xml php-pear php-bcmathThis command installs PHP along with several extensions that Laravel applications commonly use.
Check the php version:
php -v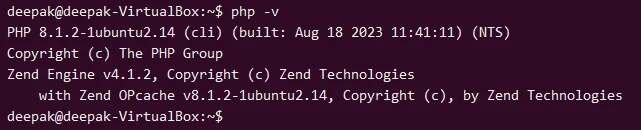
3. Install MariaDB Database
Laravel supports various database systems, including MySQL and MariaDB, which are the most commonly used with PHP applications. We will use MariaDB for our demonstration:
sudo apt update
sudo apt install mariadb-server
Secure your MariaDB installation with:
sudo mysql_secure_installationFollow the prompts to secure your database server.
4. Creating a Database and User for Laravel
Access the MariaDB shell as the root user. Enter the root password you set during the security script process when prompted.
sudo mysql -u root -pCreate Database: Replace my_laravel_db with the name you wish to
give your Laravel project's database.
CREATE DATABASE my_laravel_db CHARACTER SET utf8mb4 COLLATE utf8mb4_unicode_ci;Create a User: Replace user1 and Passw0rd with your chosen
database username and password. It's important to use a strong password.
GRANT ALL ON my_laravel_db.* TO 'user1'@'localhost' IDENTIFIED BY 'Passw0rd';
FLUSH PRIVILEGES;Exit: Once you've set up your database and user, you can exit the MariaDB shell.
EXIT;5. Install Composer
Composer serves as a crucial part of Laravel development. It’s the go-to dependency manager for PHP, and will help you keep your project libraries in check while also allowing your project to autoload classes. You can’t beat that with a stick!
We will need curl utility to download required files to install composer:
sudo apt install curl php-cli php-mbstring git unzipDownload and install composer:
Fetch the remote file over HTTPS with curl as shown below; the curl command lists common download and redirect flags.
curl -sS https://getcomposer.org/installer | php
sudo mv composer.phar /usr/local/bin/composer
sudo chmod +x /usr/local/bin/composer
To make sure Composer was installed successfully, run:
composer --version
6. Create Laravel Project
Use Composer to create a new Laravel project named myLaravelApp. I
will create it inside ~/projects directory of my home folder.
sudo mkdir /opt/projects
sudo chmod 777 /opt/projects
cd /opt/projects/
composer create-project --prefer-dist laravel/laravel myLaravelApp
Set the necessary permissions:
sudo chmod -R 755 /opt/projects/myLaravelApp
sudo chmod -R 777 /opt/projects/myLaravelApp/storage /opt/projects/myLaravelApp/bootstrap/cache
7. Configuring Apache to Serve Your Laravel App
Create a new Apache configuration file for your Laravel app. Replace
myLaravelApp with the name of your project and use the actual path to
your project directory. First, open a new configuration file using a
text editor like vim:
sudo vim /etc/apache2/sites-available/myLaravelApp.confAdd the following content to the file, modifying paths as necessary
to point to your Laravel app's public directory. This example assumes
your Laravel app is located at
/home/deepak/projects/myLaravelApp/public. Replace example.com with
your actual domain or IP address.
<VirtualHost *:80>
    ServerName yourdomain.com
    ServerAdmin webmaster@localhost
    DocumentRoot /opt/projects/myLaravelApp/public

    <Directory /opt/projects/myLaravelApp/public>
        Options Indexes FollowSymLinks
        AllowOverride All
        Require all granted
    </Directory>

    ErrorLog ${APACHE_LOG_DIR}/error.log
    CustomLog ${APACHE_LOG_DIR}/access.log combined
</VirtualHost>
Disable the default site configuration, if necessary, and enable your new site:
sudo a2dissite 000-default.conf
sudo a2ensite myLaravelApp.conf
Enable Apache's mod_rewrite module to allow the .htaccess file's
rules in your Laravel app to be recognized and used by Apache:
sudo a2enmod rewriteRestart Apache to apply the changes:
sudo systemctl restart apache2For any errors you can check /var/log/apache2/error.log
8. Configuring Database Connections
The .env file in Laravel is where you can define environment variables
for your application. Laravel uses these variables for various
configurations, with database settings being one of the most critical.
The Laravel framework comes with a .env.example file which you can
copy to create a .env file if it doesn't already exist:
cp .env.example .envTo configure your Laravel application to use a MariaDB database, you
will need to adjust the following environment variables within the
.env file:
DB_CONNECTION: This is the database connection driver. For MariaDB, you can usemysqlsince MariaDB is a drop-in replacement for MySQL.DB_HOST: The hostname of your database server. This is typicallylocalhostif your database is running on the same server as your Laravel application.DB_PORT: The port on which your database server is running. The default MySQL/MariaDB port is3306.DB_DATABASE: The name of the database you want to use with your Laravel application.DB_USERNAME: The username of the database user that has access to the specified database.DB_PASSWORD: The password for the database user.
Here is an example of what your database configuration might look like for a MariaDB database:
DB_CONNECTION=mysql
DB_HOST=127.0.0.1
DB_PORT=3306
DB_DATABASE=my_laravel_db
DB_USERNAME=user1
DB_PASSWORD=Passw0rd
After configuring your .env file, there are a couple more steps you
need to ensure your Laravel application can communicate with your
MariaDB database:
Open a terminal and navigate to the root directory of your Laravel application.
Generate Application Key: Laravel requires an application key for encryption purposes. If you haven't already, generate one using the following artisan command:
cd myLaravelApp/
php artisan key:generate
This command will generate a new application key and automatically
update your .env file with it, setting the APP_KEY value.
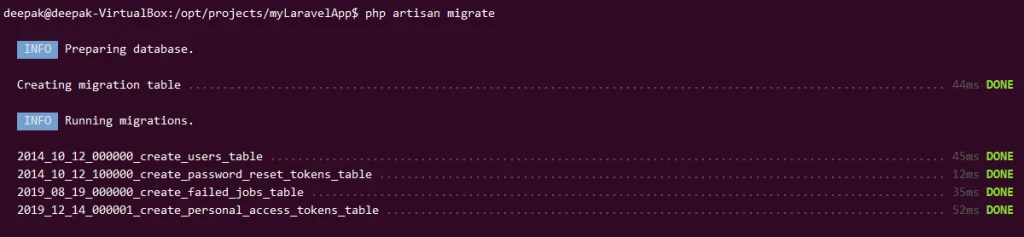
APP_KEY=base64:co9V3TuvMV1ozWtZw1SCR7ZEL7r4tpq2AFM7bXZE6Ec=Run Migrations: Laravel uses migrations to manage your database
schema. Once your .env file is configured, you can run your migrations
to set up your database tables:
php artisan migrateThis command will create the necessary tables in your MariaDB database
based on the migrations found in your Laravel project's
database/migrations directory.
Apply permission for local user
Ownership changes in this section use chown command syntax.
sudo chown -R ${whoami}:${whoami} /opt/projects/myLaravelApp/9. Configure Firewall
MariaDB will accept connection on port 3306. Now in our example we are accessing the Laravel application within localhost so it doesn't make sense to configure firewall. But for remote access you must allow port 3306 in your firewall.
If you are using ufw command firewall then execute following commands to apply the rule and verify the status:
sudo ufw allow 3306
sudo ufw enable
sudo ufw status
If you are using firewalld then execute following commands. You can
read more at
30+ firewalld command examples [Rules Cheat Sheet]
sudo firewall-cmd --zone=public --add-port=3306/tcp --permanent
sudo firewall-cmd --reload
sudo firewall-cmd --list-all
10. Testing Laravel Installation
If you've used Laravel's built-in development server, you should be able
to access the Laravel welcome page by navigating
tohttp://127.0.0.1:8000in your web browser.
php artisan serve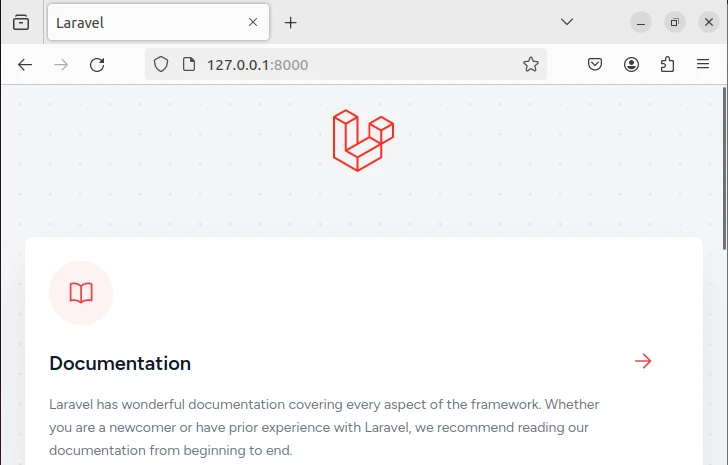
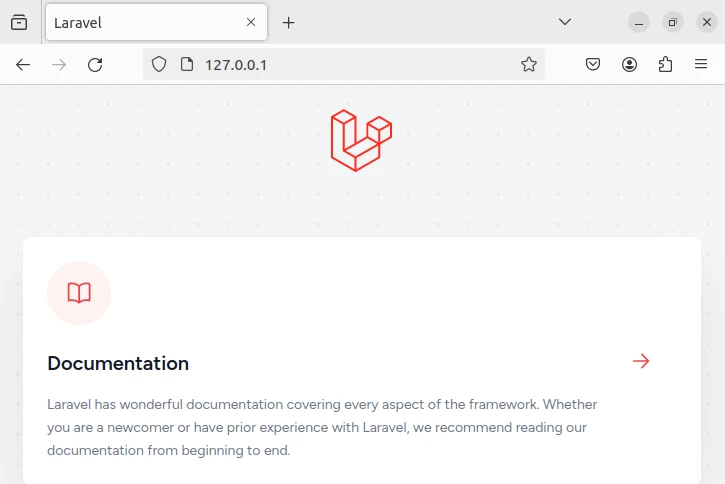
If you've configured Apache or Nginx, visit the configured domain or IP
address where your Laravel application is located. For any error you can
refer /var/log/apache2/error.log
That's it. You have successfully installed Laravel on Ubuntu.
You can go through the official Laravel documentation to learn more about Laravel.
