Get ready to get your hands dirty with Laravel Authentication. Brace yourself, because this tutorial’s going to explore creating a secure admin login in a Laravel app. We’ll walk you through the process of setting up databases, safeguarding routes, and making user sessions, so take a deep breath and let's dive in. We’ll be using Laravel Breeze and custom authentication to keep things simple yet effective for managing admin access.
Who would’ve thought that authentication could be such a powerhouse? But it is — especially when it comes to securing applications like yours. By its core functionality, Laravel managed to bundle everything you need for registering users, logging them in and managing them after they’re inside your system. It’s designed with quick customization in mind too; it even supports extension should your needs grow serious about security (which is always good). Trust us on this one: Setting up authentication will be an easy breeze with Laravel.
1. Setup Laravel Environment
Before you start to learn about Laravel Authentication, make sure you have the environment setup as explained under How to Install Laravel on Ubuntu [100% Working]
2. Setting up Laravel Authentication
2.1 Install Node.js using NVM
nvm is a useful tool that lets you manage multiple Node.js versions on
a single machine, allowing you to easily switch between versions for
different projects. Here's how you can install it:
Open your terminal and run the following command to download using
curl and install nvm:
curl -o- https://raw.githubusercontent.com/nvm-sh/nvm/v0.39.1/install.sh | bashClose and reopen your terminal to start using nvm.
Verify that nvm is installed by typing:
nvm --versionAfter installing nvm, if the command nvm --version is not recognized
immediately, it's typically because the current shell session hasn't
been refreshed with the updates made to .bashrc or .bash_profile by
the nvm installation script. If you are unclear about these files then
refer Where to set environment variables in Linux? [SOLVED]
To start using nvm immediately without reopening your terminal, you can source the nvm script manually by running:
export NVM_DIR="$HOME/.nvm"
[ -s "$NVM_DIR/nvm.sh" ] && \. "$NVM_DIR/nvm.sh"  # This loads nvm
[ -s "$NVM_DIR/bash_completion" ] && \. "$NVM_DIR/bash_completion"  # This loads nvm bash_completion
This set of commands temporarily updates your current shell session with the necessary environment variables and functions to use nvm.
For these changes to take effect permanently in all future terminal sessions, you should close and reopen your terminal, or you can start a new shell instance in your current terminal window:
exec $SHELLOnce your shell is reloaded or a new instance is started, you can verify that nvm is properly installed by running:
nvm --version
To install the latest version of Node.js, run:
nvm install nodeVerify the version
node -v
After installation, you can switch to the installed version using:
nvm use node2.2 Create a New Laravel Project
Before anything else, make sure you have Composer installed on your system. This is an essential PHP package manager for Laravel — among other things. Open up a command prompt or terminal window and put in this command to create a brand new Laravel project.
sudo mkdir -p /opt/projects
sudo chmod 777 /opt/projects
cd /opt/projects
composer create-project --prefer-dist laravel/laravel laravelAuthDemo
This command creates a new Laravel project named laravelAuthDemo.
2.3 Install Laravel Breeze
Navigate to your project directory and install Laravel Breeze. Breeze provides a simple authentication scaffolding, including login, registration, email verification, and password reset.
cd laravelAuthDemo
composer require laravel/breeze --dev
php artisan breeze:install
After installing Breeze, you need to compile the assets using Node.js:
npm install
npm run dev
This step compiles your CSS and JavaScript assets, making sure your application's front end has all the necessary styles and scripts for the authentication pages created by Breeze.
Stop it with Ctrl + C if it doesn't exit by itself after compiling
your assets.
2.4 Migrating the Database
Before you can use the authentication system, you need to set up the
database. We had already done this
when we installed Laravel in the earlier article. Laravel uses migrations to manage the database
schema. Make sure you have a database created for your project and
update the .env file with your database credentials:
DB_CONNECTION=mysql
DB_HOST=127.0.0.1
DB_PORT=3306
DB_DATABASE=my_laravel_db
DB_USERNAME=user1
DB_PASSWORD=Passw0rd
2.5 Running the Project
Start the Laravel development server:
php artisan serveThis command will start a development server at http://localhost:8000,
where you can access your new Laravel project with Breeze
authentication.
2.6 Testing Authentication
To test the authentication, you can manually register a new user and log
in using the web interface at http://localhost:8000/register.
For automated testing, Laravel comes with PHPUnit, and Breeze publishes authentication tests you can use out of the box. To run these tests, simply execute:
php artisan testThis command will run tests including user registration, login, and password reset, verifying that your authentication is working as expected.
PASS  Tests\Unit\ExampleTest
  ✓ that true is true                                                                                                                                                                              0.01s

   PASS  Tests\Feature\Auth\AuthenticationTest
  ✓ login screen can be rendered                                                                                                                                                                   0.41s
  ✓ users can authenticate using the login screen                                                                                                                                                  0.08s
  ✓ users can not authenticate with invalid password                                                                                                                                               0.23s
  ✓ users can logout                                                                                                                                                                               0.02s

   PASS  Tests\Feature\Auth\EmailVerificationTest
  ✓ email verification screen can be rendered                                                                                                                                                      0.03s
  ✓ email can be verified                                                                                                                                                                          0.03s
  ✓ email is not verified with invalid hash                                                                                                                                                        0.02s

   PASS  Tests\Feature\Auth\PasswordConfirmationTest
  ✓ confirm password screen can be rendered                                                                                                                                                        0.04s
  ✓ password can be confirmed                                                                                                                                                                      0.03s
  ✓ password is not confirmed with invalid password                                                                                                                                                0.21s

   PASS  Tests\Feature\Auth\PasswordResetTest
  ✓ reset password link screen can be rendered                                                                                                                                                     0.03s
  ✓ reset password link can be requested                                                                                                                                                           0.05s
  ✓ reset password screen can be rendered                                                                                                                                                          0.03s
  ✓ password can be reset with valid token                                                                                                                                                         0.03s

   PASS  Tests\Feature\Auth\PasswordUpdateTest
  ✓ password can be updated                                                                                                                                                                        0.03s
  ✓ correct password must be provided to update password                                                                                                                                           0.02s

   PASS  Tests\Feature\Auth\RegistrationTest
  ✓ registration screen can be rendered                                                                                                                                                            0.02s
  ✓ new users can register                                                                                                                                                                         0.02s

   PASS  Tests\Feature\ExampleTest
  ✓ the application returns a successful response                                                                                                                                                  0.02s

   PASS  Tests\Feature\ProfileTest
  ✓ profile page is displayed                                                                                                                                                                      0.07s
  ✓ profile information can be updated                                                                                                                                                             0.02s
  ✓ email verification status is unchanged when the email address is unchanged                                                                                                                     0.02s
  ✓ user can delete their account                                                                                                                                                                  0.01s
  ✓ correct password must be provided to delete account                                                                                                                                            0.01s

  Tests:    25 passed (59 assertions)
  Duration: 1.60s
If you want to add custom tests, you can create new test cases in the
tests/Feature directory. Here's an example of a simple test case for
user registration as tests/Feature/AuthenticationTest.php:
<?php

namespace Tests\Feature;

use App\Models\User;
use Illuminate\Foundation\Testing\RefreshDatabase;
use Tests\TestCase;

class AuthenticationTest extends TestCase
{
    use RefreshDatabase;

    public function test_user_registration()
    {
        $response = $this->post('/register', [
            'name' => 'Test User',
            'email' => '[email protected]',
            'password' => 'password',
            'password_confirmation' => 'password',
        ]);

        $this->assertAuthenticated();
        $response->assertRedirect('/home');
    }
}
To run this specific test, use the following command:
php artisan test --filter AuthenticationTest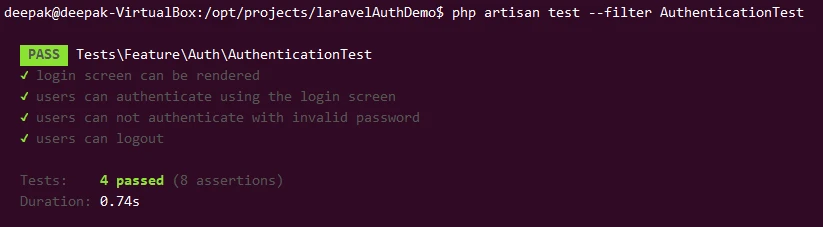
During this test case, the user is made right at the beginning of the
test. When the post method is called with /register, that's when it's
created. It basically simulates a user submitting and filling out a
registration form. Laravel’s testing environment does this by making a
POST request to the registration route with all of the required data.
Once that happens, I use assertAuthenticated method to determine
whether or not it worked. If they're authenticated after registering,
then it means that everything went as planned and was successful in
creating and logging in the user.
This process happens in a temporary, in-memory database by default,
thanks to the use RefreshDatabase trait included in the test class.
This trait ensures that your database is reset to its initial state
before each test, preventing tests from interfering with each other and
allowing you to work with a clean database every time.
2.7 Register a New User
Navigate to http://localhost:8000/register. This is the default route
provided by Breeze for user registration. Fill in the required
information (name, email, password) and submit the form to create a new
user account.

2.8 Login
After registering, you can log in by navigating to
http://localhost:8000/login. Use the credentials you just created.
Successful login will redirect you to the /dashboard route, as set up
by Breeze.

3. Implementing Custom Admin Authentication in Laravel
To put a custom admin authentication system in Laravel is a bit of work. You have to make a separate authentication guard, and define a user provider. Then you set up all the routes, controllers, views that go along with it. Finally, you’ll want to check that your database is supporting this new user system as well. This section will guide you through all the steps so you can get an admin login system running smoothly on your site. We’ll be using Laravel Breeze for initial uses and scaffolding before extending it for the admin users.
3.1 Create the Admin Model and Migration
Generate the Admin Model and Migration:
php artisan make:migration create_admins_table --create=adminsThis command creates a new migration file for your admins table in the
database/migrations directory. The name of the file will be prefixed
with a timestamp followed by _create_admins_table.php.

Open the newly created migration file in your preferred text editor or
IDE. It will be located in database/migrations and named similarly to
YYYY_MM_DD_HHMMSS_create_admins_table.php, where YYYY_MM_DD_HHMMSS
is the timestamp of when you created the migration.
Edit the file to define the admins table structure. Here's an example
based on the previous explanation:
Schema::create('admins', function (Blueprint $table) {
    $table->id();
    $table->string('name');
    $table->string('email')->unique();
    $table->timestamp('email_verified_at')->nullable();
    $table->string('password');
    $table->rememberToken();
    $table->timestamps();
});
After editing the migration file, you can apply the migration by running the following command in your terminal:
php artisan migrateThis command updates your database to include the admins table as
defined in your migration.

3.2 Configure Auth Providers
Providers define how users are retrieved from persistent storage, such
as adatabase or an external API. They are responsible for getting user
data based on the user's credentials or identifier. Laravel ships with a
few built-in providers, such as theusersprovider which retrieves
user data using Eloquent, Laravel's built-in ORM.
Edit config/auth.php to Add a Provider for Admins:
'providers' => [
    'users' => [
        'driver' => 'eloquent',
        'model' => App\Models\User::class,
    ],
    'admins' => [ // Our custom provider
        'driver' => 'eloquent',
        'model' => App\Models\Admin::class,
    ],
],
3.3 Configure Auth Guards
Guards are the guardians of user authentication state. They’re like
superheroes, deciding how users can verify themselves — by session or
tokens — and managing things like login, logout, and the all-important
authentication check. There’s a few built-in guards in Laravel that you
might already be familiar with: web (session-based) and api
(token-based). But if you have custom needs for your app, it’s super
easy to create your own guard.
Add a Custom Guard for Admins in config/auth.php:
'guards' => [
    'web' => [
        'driver' => 'session',
        'provider' => 'users',
    ],
    'admin' => [ // Our custom guard
        'driver' => 'session',
        'provider' => 'admins',
    ],
],
3.4 Create Admin Login Controller
Generate Controller:
php artisan make:controller Auth/AdminLoginController
In AdminLoginController.php, you'll need to implement methods for
showing the login form and handling the login attempt. Use Laravel's
Auth facade to attempt logging in with the admin guard.
<?php

namespace App\Http\Controllers\Auth;

use App\Http\Controllers\Controller;
use Illuminate\Http\Request;
use Illuminate\Support\Facades\Auth;

class AdminLoginController extends Controller
{
    public function showLoginForm()
    {
        return view('admin.login');
    }

    public function login(Request $request)
    {
        // Validate the form data
        $this->validate($request, [
            'email' => 'required|email',
            'password' => 'required|min:6'
        ]);

        // Attempt to log the user in
        if (Auth::guard('admin')->attempt(['email' => $request->email, 'password' => $request->password], $request->remember)) {
            // if successful, then redirect to their intended location
            return redirect()->intended(route('admin.dashboard'));
        }

        // if unsuccessful, then redirect back to the login with the form data
        return redirect()->back()->withInput($request->only('email', 'remember'));
    }
}
3.5 Set Up Routes for Admin Authentication
In routes/web.php, add routes for admin authentication:
Route::prefix('admin')->group(function () {
    Route::get('/login', [App\Http\Controllers\Auth\AdminLoginController::class, 'showLoginForm'])->name('admin.login');
    Route::post('/login', [App\Http\Controllers\Auth\AdminLoginController::class, 'login'])->name('admin.login.submit');
    Route::get('/', function () {
        return view('admin.dashboard');
    })->name('admin.dashboard')->middleware('auth:admin');

    // Admin logout route
    Route::post('/logout', function () {
        Auth::guard('admin')->logout();
        return redirect('/admin/login');
    })->name('admin.logout');

});
3.6 Create Views for Admin Login and Dashboard
First, create a directory within resources/views to hold your admin
views for better organization. You might name this directory admin.
mkdir resources/views/adminCreate the Login View: Inside the resources/views/admin directory,
create a new Blade file named login.blade.php. This file will contain
the HTML form for your admin login page.
{{-- resources/views/admin/login.blade.php --}}

<!DOCTYPE html>
<html lang="en">
<head>
    <meta charset="UTF-8">
    <meta name="viewport" content="width=device-width, initial-scale=1.0">
    <title>Admin Login</title>
</head>
<body>
    <div class="container">
        <h1>Admin Login</h1>
        <form method="POST" action="{{ route('admin.login.submit') }}">
            @csrf
            <div>
                <label for="email">Email:</label>
                <input type="email" name="email" required autofocus>
            </div>
            <div>
                <label for="password">Password:</label>
                <input type="password" name="password" required>
            </div>
            <div>
                <button type="submit">Login</button>
            </div>
        </form>
    </div>
</body>
</html>
Create the Dashboard View: Inside the resources/views/admin
directory, create another Blade file named dashboard.blade.php. This
file will serve as the landing page for admins after they log in.
{{-- resources/views/admin/dashboard.blade.php --}}

<!DOCTYPE html>
<html lang="en">
<head>
    <meta charset="UTF-8">
    <meta name="viewport" content="width=device-width, initial-scale=1.0">
    <title>Admin Dashboard</title>
</head>
<body>
    <div class="container">
        <h1>Welcome to the Admin Dashboard</h1>
        <p>This is a secure area of the application.</p>
        <form method="POST" action="{{ route('logout') }}">
            @csrf
            <button type="submit">Logout</button>
        </form>
    </div>
</body>
</html>
3.7 Access admin login page
After following these steps, start your Laravel server and try accessing
http://localhost:8000/admin/login
php artisan serve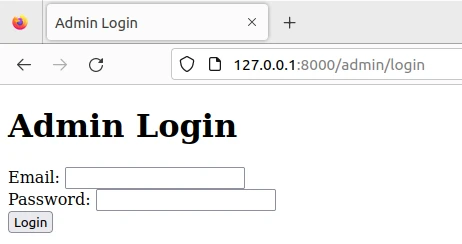
3.8 Testing Admin Login
Create an Admin Account: Before you can test the login, you need an
admin account in your database. You can manually insert an admin record
into your admins table via a database tool like phpMyAdmin, or use
Laravel's tinker to do this more conveniently. Here's how you can create
an admin user using Laravel Tinker:
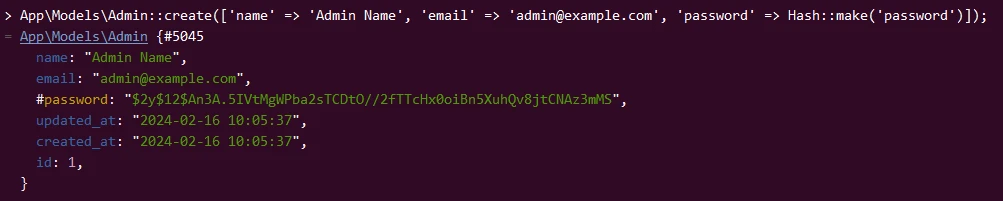
php artisan tinkerThen, inside the tinker shell, run:
App\Models\Admin::create(['name' => 'Admin Name', 'email' => '[email protected]', 'password' => Hash::make('password')]);Replace 'Admin Name', '[email protected]', and 'password' with
your desired admin name, email, and password.
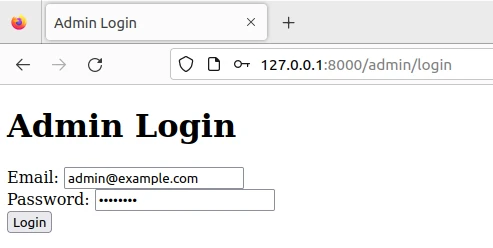
Log In as Admin: Go to http://localhost:8000/admin/login in your
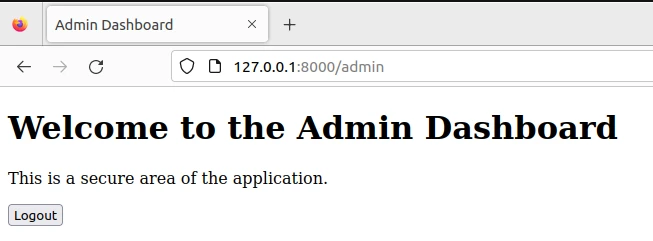
web browser, and log in using the admin credentials you just created.
Once you click on Login you will be redirected to Admin Dashboard
4. What all we Learned?
Obviously, you’ve logged into the admin dashboard. This means that your admin login in Laravel has been set up correctly. If we’re going to get a little more specific, here’s what else we learned:
- Authentication - Your login system for admins is fully functioning, with all of the necessary components like models, controllers, and views.
- Proper database setup - You were able to confirm that your database is fully equipped to handle admin info and functions properly alongside your Admin model. Password security is also being taken care of.
- Effective management of sessions - Once you logged in and reached the admin dashboard, it was clear that Laravel knows how to manage sessions well enough to keep users logged in.
- The security measures work - Using middleware as a way to protect the admin dashboard route ensures only admins are allowed inside once they’ve already logged in. This means that your security setup is perfectly effective.
- Custom Guard - Logging in using the admin guard helps prove that different login systems can be used within one app for various types of users.
- Good connection between front-end and back-end processes - The login process links together both front-end and back-end tasks without any issues (such as forms with database checks).
- Solid knowledge on Laravel – Setting this all up means you understand key concepts behinds Laravel like ORM, migrations, routing...and so much more!
