![Steps to create RESTFul API in Laravel [100% Working]](/create-restful-api-in-laravel/create-restful-api-in-laravel.webp)
Welcome to this comprehensive guide on how to create RESTFul API in Laravel 8. As the demand for API-driven applications continues to grow, it is essential for developers to have a solid understanding of how to build RESTful APIs that are efficient, scalable, and maintainable. Laravel, one of the most popular PHP frameworks, provides powerful tools and features to simplify the process of creating API REST.
In this article, we will explore the process of creating a RESTful API using Laravel 8, diving into the core components and best practices to ensure the development of a robust and secure API. From setting up the development environment to defining routes, controllers, and middleware, we will cover every aspect of creating API REST in Laravel 8 to provide you with a solid foundation for your projects.
Whether you are a seasoned Laravel developer looking to expand your skills or a newcomer to the world of API development, this guide will serve as an invaluable resource for building API REST with Laravel 8. So let's get started and learn how to create powerful and efficient RESTful APIs using Laravel 8!
Pre-requisites
We need a SQL Database to setup our development environment.
Update the package index:
sudo apt update
Install the MySQL server package:
sudo apt install mysql-server
Once the installation is complete, run the security script to configure your MySQL installation:
sudo mysql_secure_installation
This script will ask you a series of questions about your desired security settings. For a development environment, you can keep the default settings, but for a production environment, it is recommended to follow the security best practices.
Start the MySQL service:
Control the running service with systemctl start, stop, or restart; see the systemctl command for try-restart and dependency behavior.
sudo systemctl start mysql
Enable the MySQL service to automatically start when your system boots:
sudo systemctl enable mysql
Now, MySQL should be running on your system. You can verify the status of the MySQL service by running:
sudo systemctl status mysql
If the service is running, you should see an output similar to:
$ sudo systemctl status mysql
● mysql.service - MySQL Community Server
     Loaded: loaded (/lib/systemd/system/mysql.service; enabled; vendor preset: enabled)
     Active: active (running) since Sun 2023-04-30 15:08:30 IST; 7min ago
    Process: 5649 ExecStartPre=/usr/share/mysql/mysql-systemd-start pre (code=exited, status=0/SUCCESS)
After ensuring that MySQL is running, you can try connecting to the MySQL server using the mysql -u root -p command again. If you still encounter issues, please make sure that your MySQL root user has the correct password set.
Step-1: Setup development environment
Create a new Laravel 8 project named rest_api:
composer create-project laravel/laravel="8.*" rest_api
Navigate into the newly created rest_api project directory:
cd rest_api
Open the project in Visual Studio Code—on Ubuntu see install VS Code on Ubuntu if code is not installed yet:
code .
Create a new MySQL database for the application using your preferred
tool (e.g., phpMyAdmin, MySQL Workbench, or command line). Note down the
database name, username, and password. og in to the MySQL server using
the mysql command and your MySQL root user's credentials:
mysql -u root -p
Create a new database using the following SQL command:
CREATE DATABASE your_database_name;
Create a new user and set a password for the user:
CREATE USER 'your_database_username'@'localhost' IDENTIFIED BY 'your_database_password';Grant all privileges for the new user on the newly created database:
GRANT ALL PRIVILEGES ON your_database_name.* TO 'your_database_username'@'localhost';
Apply the changes by flushing the privileges:
FLUSH PRIVILEGES;
Exit the MySQL command line:
EXIT;
We have created rest_api project, navigated into it and opened it with
Visual Studio Code. Now create a database for the application as defined
in the .env file.
DB_CONNECTION=mysql
DB_HOST=127.0.0.1
DB_PORT=3306
DB_DATABASE=<your database name>
DB_USERNAME=<your databse username>
DB_PASSWORD=<your database password>
Here's what each line of the code does:
DB_CONNECTION=mysql: This sets the database driver to MySQL. Laravel supports a variety of database drivers including MySQL, PostgreSQL, SQLite, and SQL Server.DB_HOST=127.0.0.1: This sets the database host to the local machine, which is identified by the IP address "127.0.0.1". If your database is hosted on a different server, you would replace this IP address with the hostname or IP address of the server.DB_PORT=3306: This sets the database port to 3306, which is the default port for MySQL. If your MySQL server is running on a different port, you would replace this value with the appropriate port number.DB_DATABASE=<your database name>: This sets the name of the database that you want to connect to. You would replace<your database name>with the name of your database.DB_USERNAME=<your database username>: This sets the username that you want to use to connect to the database. You would replace<your database username>with your actual database username.DB_PASSWORD=<your database password>: This sets the password that you want to use to connect to the database. You would replace<your database password>with your actual database password.

Step-2: Make model and migration
php artisan make:model Post -mcrWe create the Post model with controllers and conventional methods.
Output
steve@alila:~/rest_api$ php artisan make:model Post -mcr
Model created successfully.
Created Migration: 2023_04_17_074105_create_posts_table
Controller created successfully.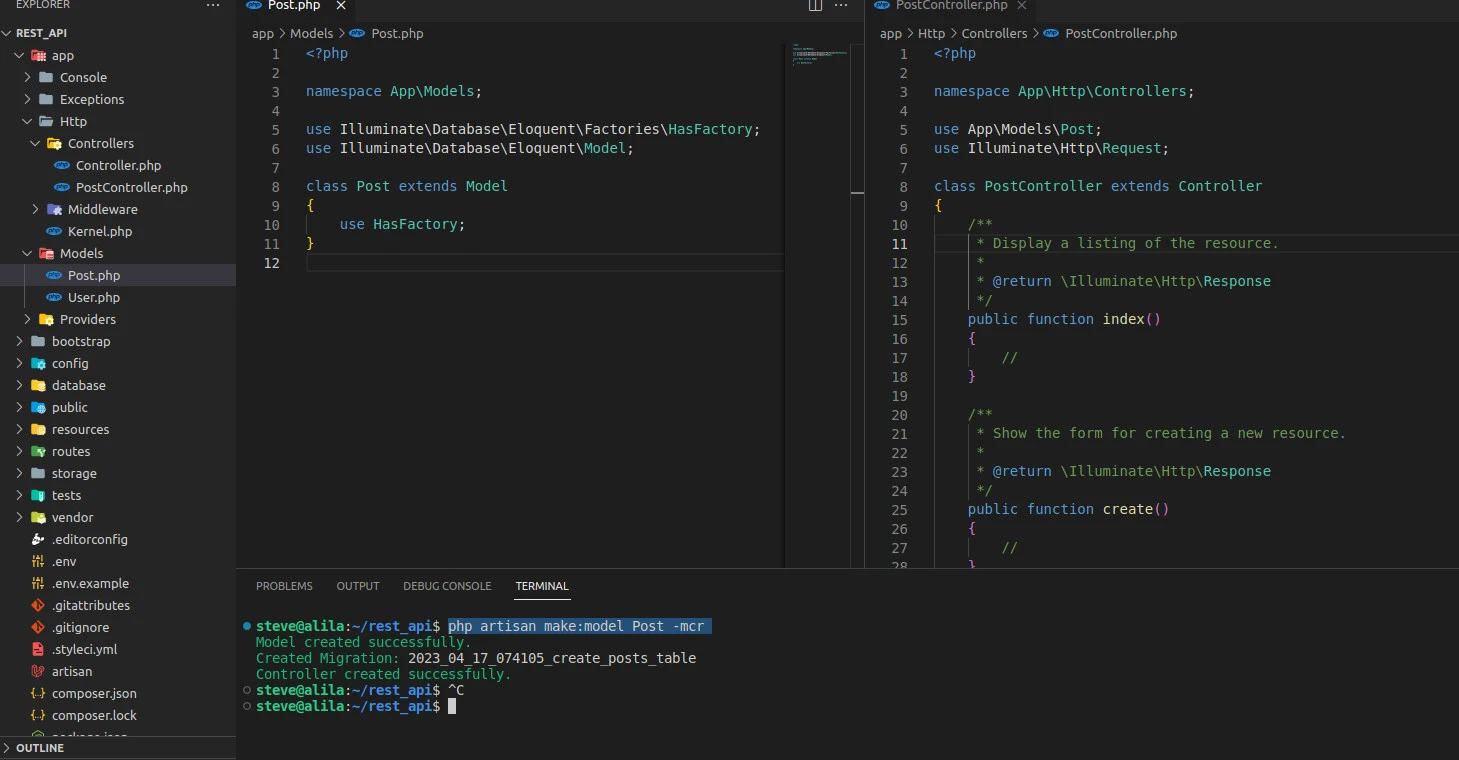
The model, found in app/Models/Post.php, is a blueprint for a post. It
defines the attributes and methods of a post. You can create custom
methods inside the model like user which relates a post to its
creator.
public function user() {
  return $this->belongsTo(User::class);
}
The m in mcr stands for migration. Migration file, found in
database/migrations/<creation_date>_create_posts_table.php, defines
the database column and the data type of the column.
<?php

...
    public function up()
    {
        Schema::create('posts', function (Blueprint $table) {
            $table->id();
            $table->string('title');
            $table->text('body');
            $table->timestamps();
        });
    }
...
The up method creates the id, title, body, and timestamps
(created_at and updated_at) columns in the posts table.
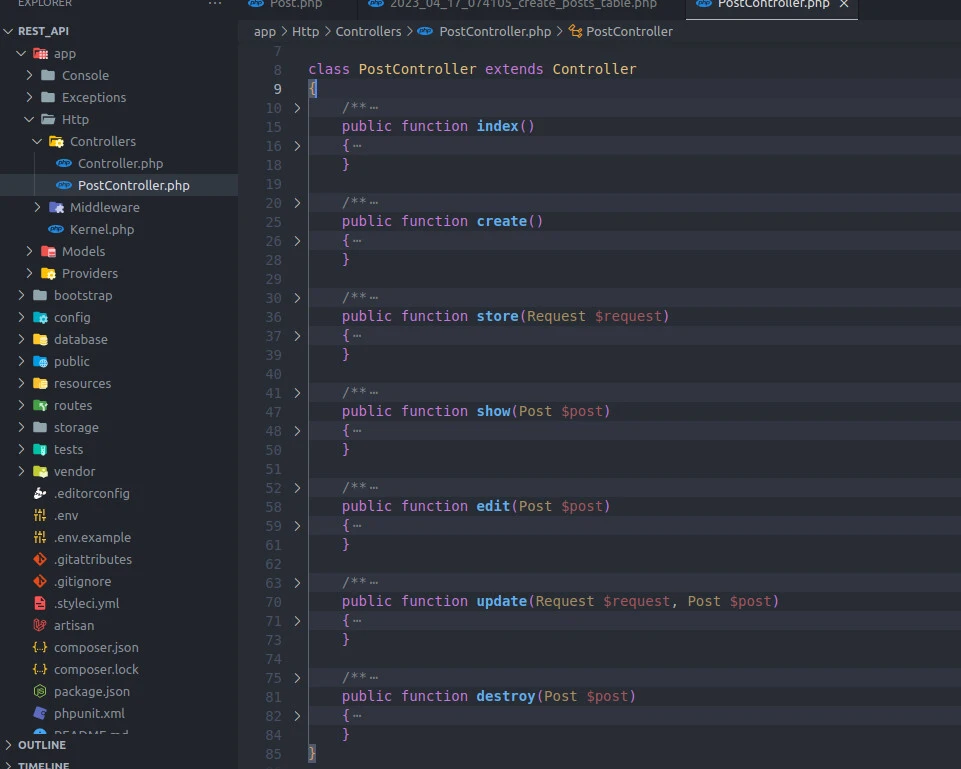
c stands for controllers whereas r represent resources. Resources
include the seven controller methods, defined in the
app/Http/Controllers/PostController.php file.
index: GET to the home page.
create: GET to the create page.
store: POST the details for saving to the database.
show: GET the details a single record.
edit: GET to the edit page.
update: PUT or PATCH details of a single record.
destroy: DELETE the record.
Since we will not get a view, we don't need the create and edit
functions. We could avoid creating them by adding the --api flag to
the artisan command.
php artisan make:model Post -mcr --apiLet's update the database with new records before proceeding to handle rest API. Run the migrate command.
php artisan migrate
Now that we have set up project requirements, let me show you how to create api rest laravel 8.
Step-3: Set up controllers
In Laravel 8, API routes are defined in the routes/api.php file.
Navigate to the routes/api.php and create the routes.
<?php
use App\Http\Controllers\PostController;
use Illuminate\Support\Facades\Route;
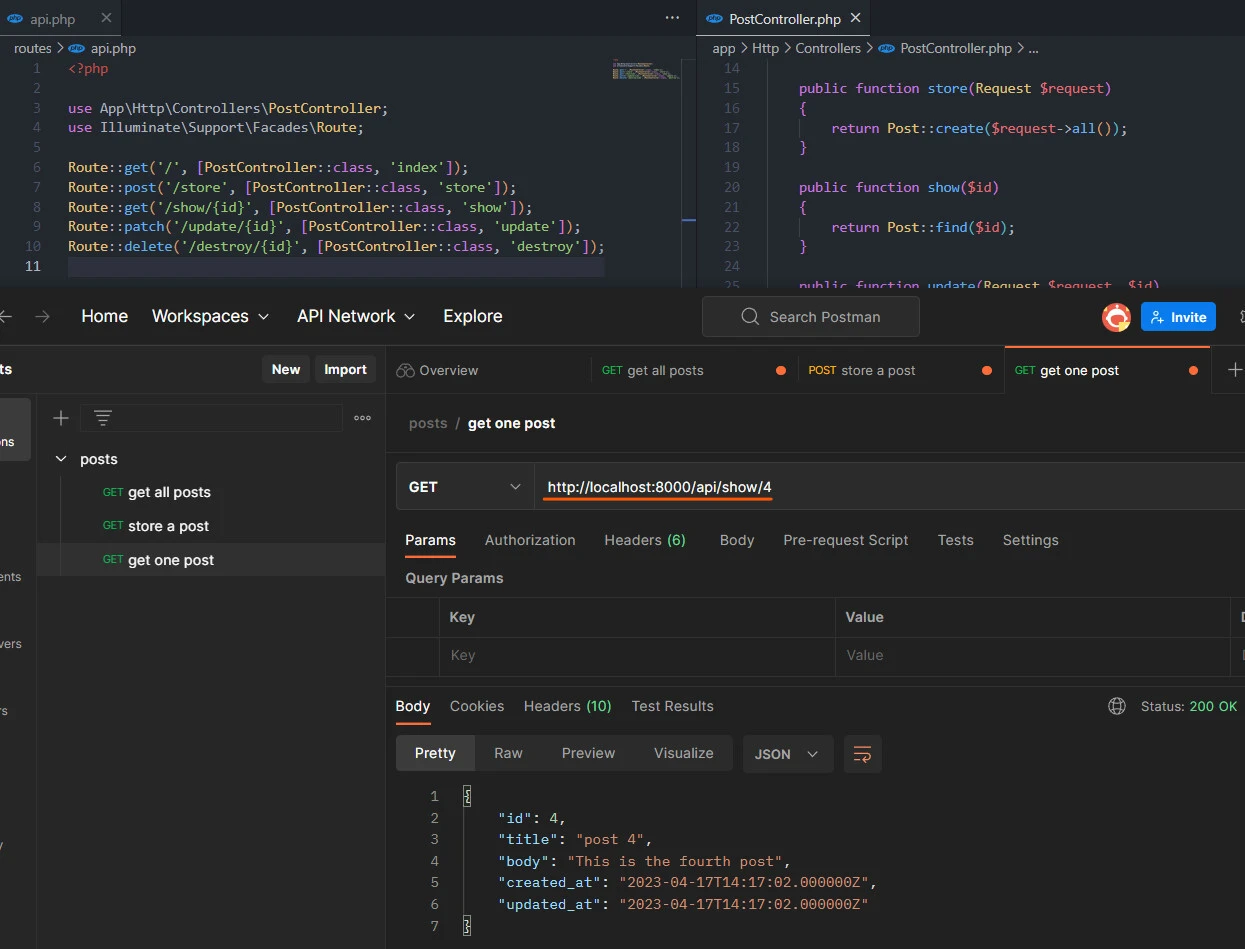
Route::get('/', [PostController::class, 'index']);
Route::post('/store', [PostController::class, 'store']);
Route::get('/show/{id}', [PostController::class, 'show']);
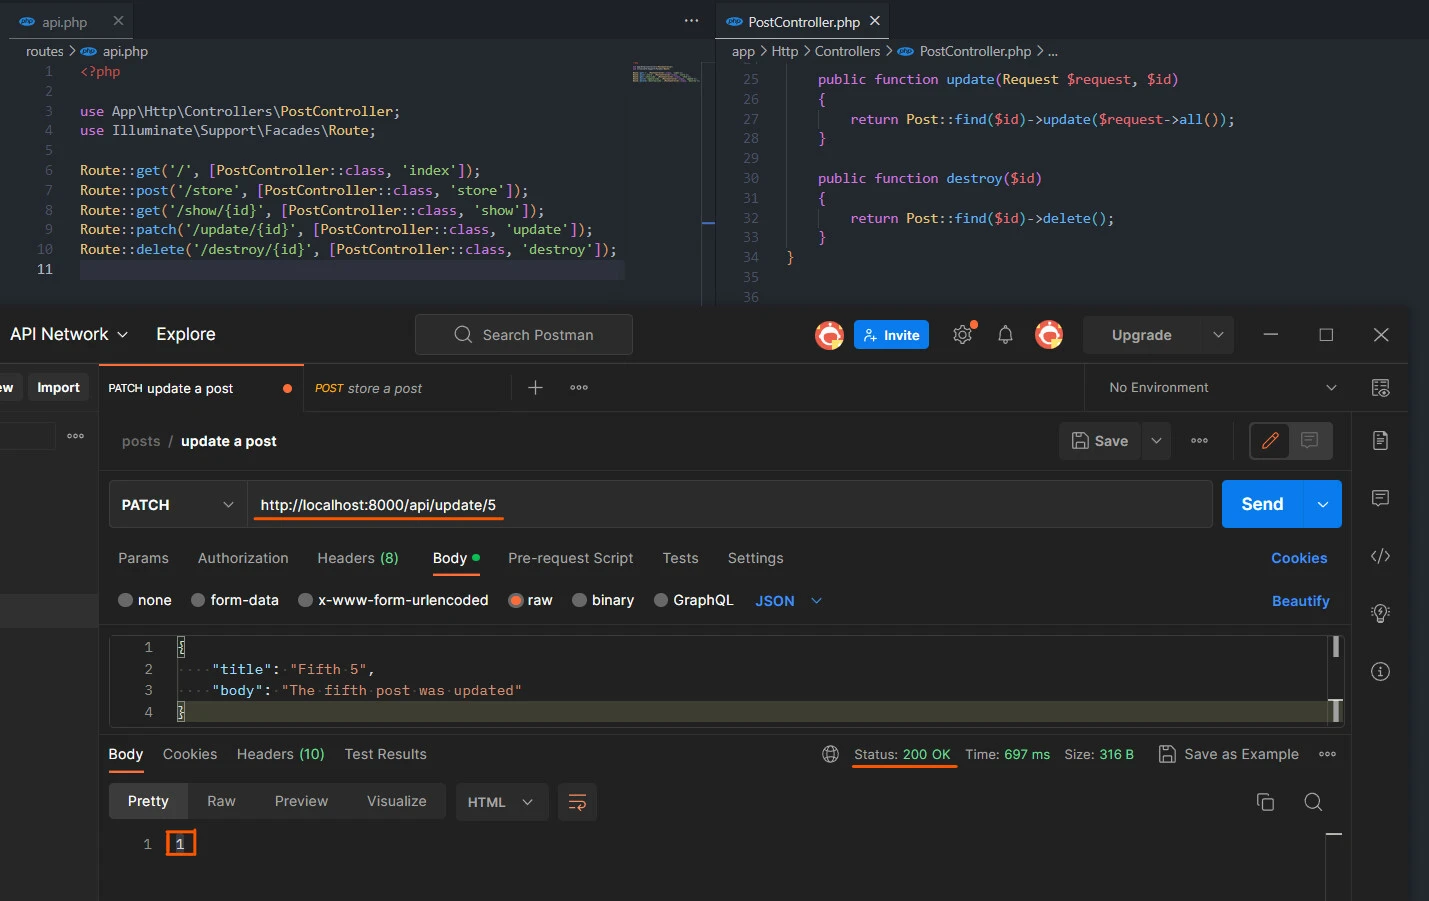
Route::patch('/update/{id}', [PostController::class, 'update']);
Route::delete('/destroy/{id}', [PostController::class, 'destroy']);We link the API endpoints with the controller defining the action.
<?php
namespace App\Http\Controllers;
use App\Models\Post;
use Illuminate\Http\Request;
class PostController extends Controller
{
public function index()
{
return Post::all();
}
public function store(Request $request)
{
return Post::create($request->all());
}
public function show($id)
{
return Post::find($id);
}
public function update(Request $request, $id)
{
return Post::find($id)->update($request->all());
}
public function destroy($id)
{
return Post::find($id)->delete();
}
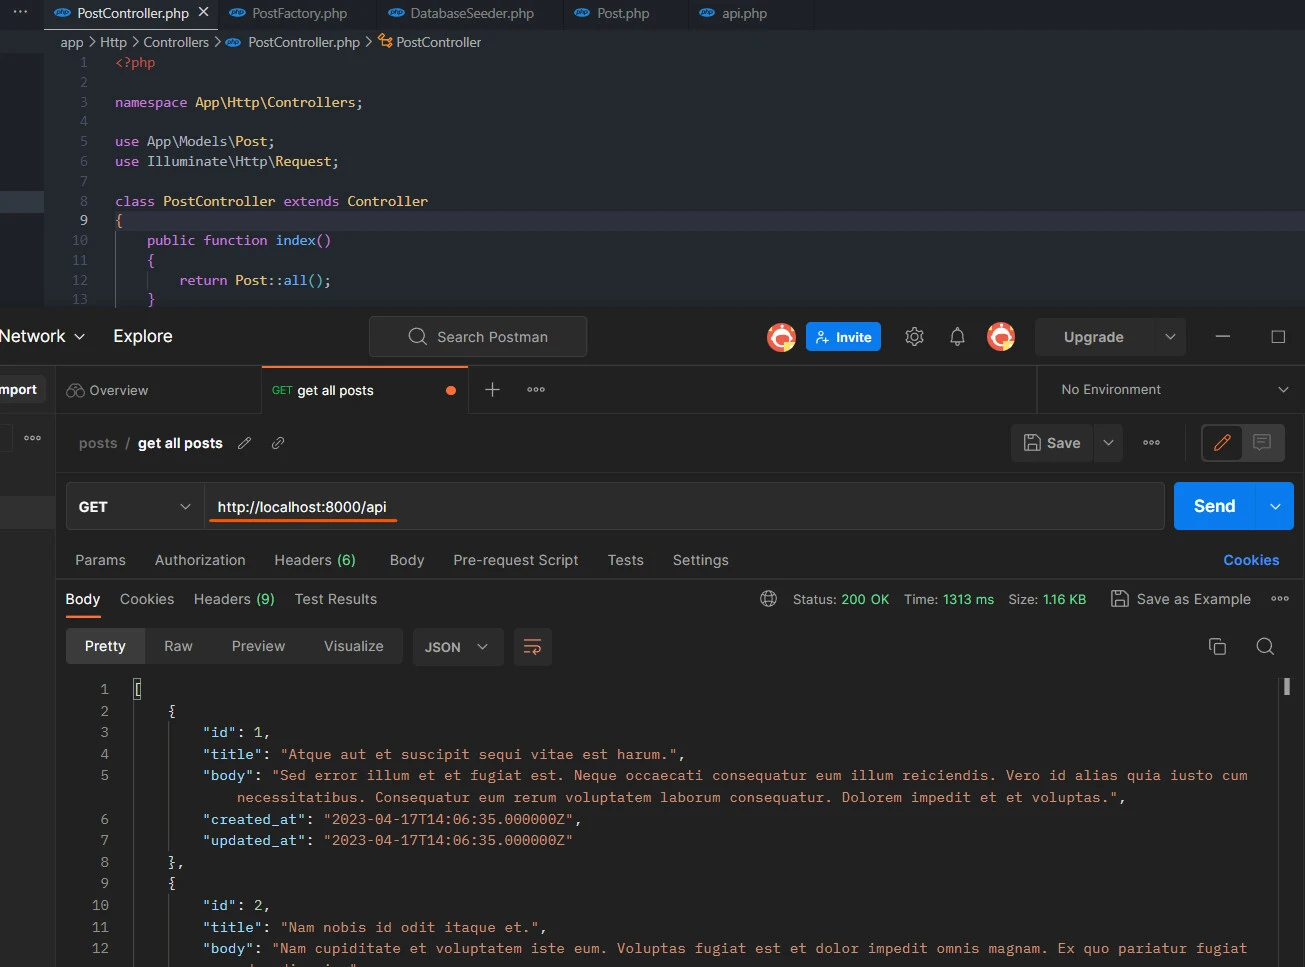
}Step-4: Validate Laravel REST API using Postman
The slash / endpoint triggers the PostController class' index
method, returning all posts. From http://127.0.0.1:8000/api URL, let's
test the API endpoint
using Postman.
The /store endpoint creates a post using the create method.

The create method does mass assignment of values to the post record.
Note that mass assignment is disabled by default. To enable it, create
fillable array with required details in the Post model in
app/Models/Post.php.
<?php

namespace App\Models;

use Illuminate\Database\Eloquent\Factories\HasFactory;
use Illuminate\Database\Eloquent\Model;

class Post extends Model
{
    use HasFactory;

    protected $fillable = ['title', 'body'];
}
The show method returns a matching post's details.
The update method patches the post details and returns the updated
post. The method returns 1 for a Boolean value of true and 200 HTTP
status response.
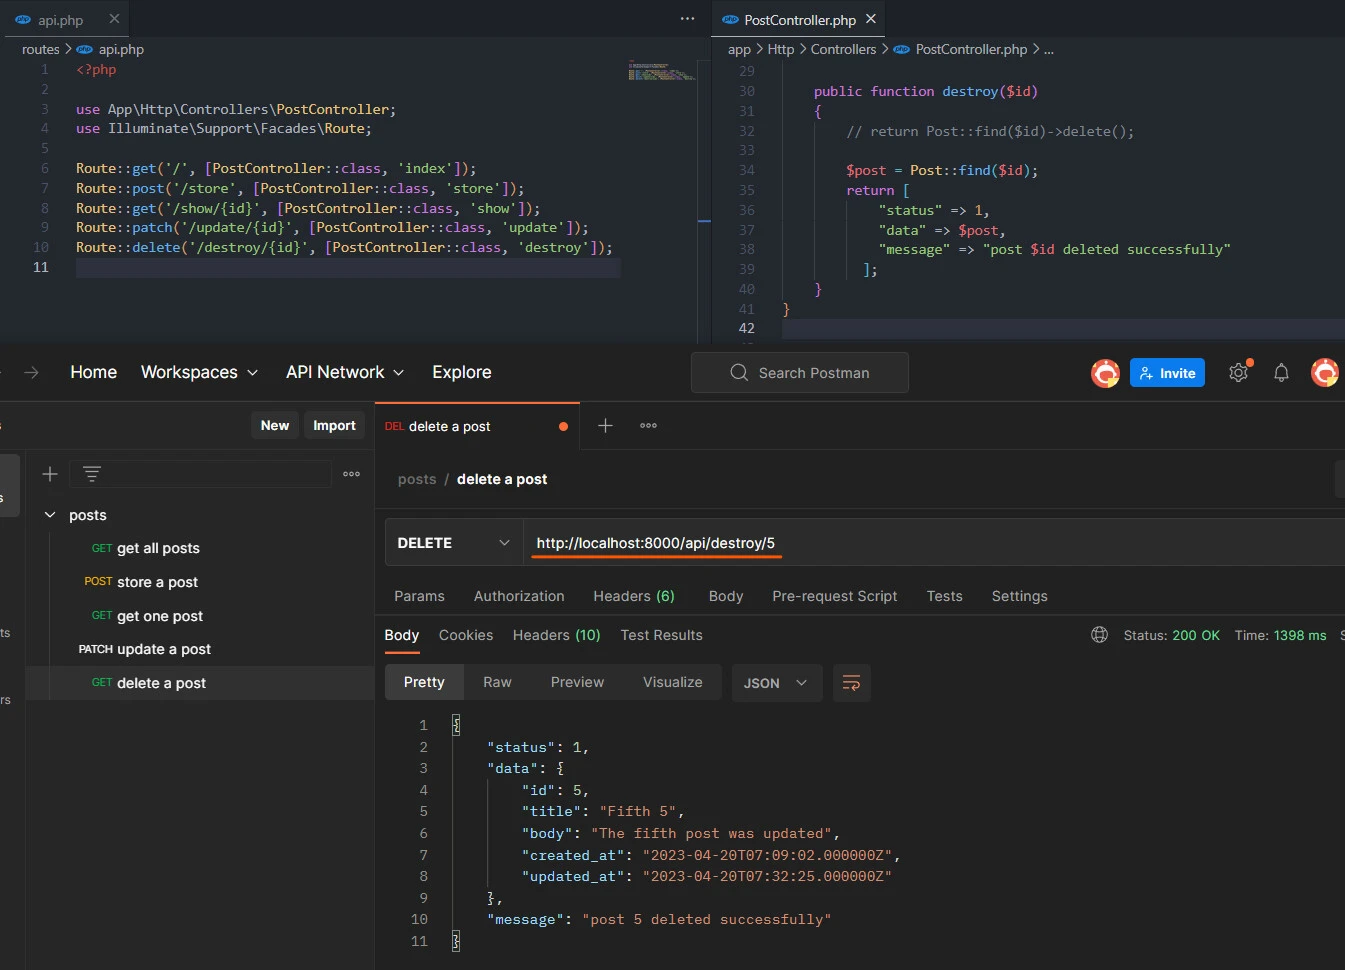
Lastly, the destroy method removes the post from the database and
sends 1 for true Boolean with a 200 HTTP status response. We could
also return a detailed message.
return [
  "status" => 1,
  "data" => $post,
  "message" => "post $post->id deleted successfully"
];
Conclusion
Building a RESTful API with Laravel 8 is a straightforward process. By following the steps outlined in this blog post, you can create a powerful API that communicates seamlessly with other applications.
We started by installing Laravel 8 and setting up our environment to begin building the API. Next, we created the necessary models and migrations to define the database structure. Finally, we set up controllers to handle HTTP requests and route them to the appropriate actions.
With Laravel 8's built-in features and excellent documentation, creating a RESTful API has never been easier. Now that you have a solid foundation for your API, you can continue to build and expand it to meet your application's needs.
