Azure Backup allows organizations to protect on-premises servers and workloads by securely storing backup data in Azure. Using the Microsoft Azure Recovery Services (MARS) Agent, administrators can back up files, folders, and system state directly to a Recovery Services Vault without maintaining complex on-premises backup infrastructure.
The MARS agent provides a simple way to configure scheduled backups, manage retention policies, and restore data when needed, making it an effective solution for hybrid cloud backup strategies.
Azure Backup MARS Agent Quick Reference Table
Azure Backup components reference
| Component | Description |
|---|---|
| Azure Backup | Cloud-based backup service that protects on-premises and Azure workloads |
| Recovery Services Vault | Azure resource used to store and manage backup data and recovery points |
| MARS Agent | Backup agent installed on on-premises Windows servers to send backup data to Azure |
| Backup Policy | Configuration that defines backup frequency and retention period |
| Recovery Point | A specific point-in-time backup from which data can be restored |
Backup policy parameters reference
| Parameter | Description |
|---|---|
| Backup Schedule | Defines how often backups run (daily, weekly, etc.) |
| Retention Policy | Determines how long backups are stored in Azure |
| Backup Time | Specific time when backup jobs are triggered |
| Data Source | Files, folders, volumes, or system state selected for backup |
| Network Throttling | Limits bandwidth usage during backup operations |
Common backup status codes
| Status | Meaning |
|---|---|
| Completed | Backup job finished successfully |
| CompletedWithWarnings | Backup completed but with minor issues |
| Failed | Backup job failed and requires troubleshooting |
| InProgress | Backup operation is currently running |
| Cancelled | Backup job was manually cancelled |
MARS Agent configuration options
| Configuration Option | Description |
|---|---|
| Encryption Passphrase | Password used to encrypt backup data before sending to Azure |
| Proxy Configuration | Allows agent to communicate through corporate proxy servers |
| Bandwidth Throttling | Controls network usage during backup operations |
| Backup Scheduling | Defines automated backup times |
| Recovery Settings | Controls restore locations and recovery behavior |
What is Azure Backup MARS Agent
What is Microsoft Azure Recovery Services (MARS) Agent
The Microsoft Azure Recovery Services (MARS) Agent, also called the Azure Backup Agent, is a lightweight backup client used to protect on-premises Windows servers and files by sending backup data directly to Azure. It enables administrators to securely back up files, folders, and system state without deploying traditional backup infrastructure.
The agent integrates with Azure Recovery Services Vault, allowing organizations to manage backups, retention policies, and recovery points centrally from the Azure Portal.
How Azure Backup Works for On-Premises Servers
Azure Backup uses the MARS agent installed on a local server to capture selected data such as files, folders, or system state. The agent encrypts the data locally and securely transfers it to an Azure Recovery Services Vault over the internet.
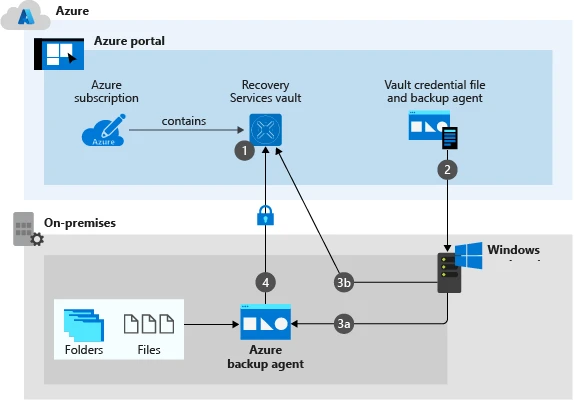
Backup jobs run based on configured schedules and retention policies, while Azure handles storage, scalability, and recovery point management. Administrators can restore data directly from Azure whenever needed.
Components of Azure Backup Architecture
Azure Backup for on-premises workloads consists of several core components that work together to provide secure and scalable backup services.
| Component | Role |
|---|---|
| MARS Agent | Installed on on-premises server to perform backup and recovery operations |
| Recovery Services Vault | Azure resource used to store backup data and manage recovery points |
| Backup Policy | Defines backup schedule and retention settings |
| Azure Portal | Interface used to configure, monitor, and manage backups |
| Recovery Points | Point-in-time copies of backed up data stored in Azure |
Supported Backup Workloads with MARS Agent
The MARS agent is designed primarily for file-level and system state backups from Windows machines.
Supported workloads include:
- Files and folders on Windows servers
- System State backups
- Application configuration data
- File server backups
- Backup of selected directories or drives
However, the MARS agent does not support Linux servers, databases like SQL Server directly, or full VM backups, which require other Azure Backup solutions.
Azure Backup Architecture for On-Premises Servers
Azure Backup architecture explained
Azure Backup follows a hybrid cloud architecture where data from on-premises environments is securely transmitted to Azure storage. The MARS agent installed on the local server performs backup operations and sends encrypted data to a Recovery Services Vault.
This architecture eliminates the need for traditional tape backups or on-premises backup servers while providing high durability and scalability through Azure cloud storage.
How Recovery Services Vault stores backups
A Recovery Services Vault acts as the central storage and management component for Azure Backup. When the MARS agent performs a backup, the data is securely uploaded and stored inside the vault.
The vault manages:
- Backup policies
- Recovery points
- Backup job status
- Retention policies
- Restore operations
Administrators can view and manage all backup resources directly through the Azure Portal.
Data flow between On-Premises Server and Azure Vault
The data transfer process between the local server and Azure occurs in a secure and structured manner.
- The MARS agent scans configured files or folders.
- Data is compressed and encrypted locally.
- Encrypted data is transmitted securely to Azure using HTTPS.
- Azure stores the backup in a Recovery Services Vault.
- Recovery points are created and maintained according to retention policy.
This process ensures data integrity and secure transmission over the internet.
Encryption and security in Azure Backup
Azure Backup uses strong encryption to protect data both in transit and at rest.
Security mechanisms include:
- Passphrase-based encryption configured during server registration
- AES 256-bit encryption before data leaves the local machine
- Secure HTTPS communication with Azure
- Role-based access control in Azure Portal
- Soft delete protection to prevent accidental data loss
Because encryption occurs before data is sent to Azure, Microsoft does not have access to the encryption key.
Azure Backup MARS Agent Requirements
Supported operating systems for MARS Agent
The Azure MARS agent supports various Windows-based operating systems.
Common supported platforms include:
- Windows Server 2012 and later
- Windows Server 2016
- Windows Server 2019
- Windows Server 2022
- Windows 10 and Windows 11
Linux servers are not supported with the MARS agent and require alternative Azure backup solutions.
Network requirements for Azure Backup
To allow backup data transfer between the on-premises server and Azure, the system must have reliable internet connectivity.
Key network requirements include:
- Stable internet connection
- Access to Azure Backup service endpoints
- Ability to communicate over HTTPS
- Optional proxy configuration if the organization uses a proxy server
Required ports and firewall rules
Azure Backup communicates with Azure services through secure internet protocols.
| Port | Protocol | Purpose |
|---|---|---|
| 443 | HTTPS | Secure communication between MARS Agent and Azure Backup service |
Ensure firewall rules allow outbound traffic to Azure services so that backup jobs can complete successfully.
Azure subscription and Recovery Services Vault prerequisites
Before installing the MARS agent, the following Azure resources must be prepared:
- Active Azure subscription
- Resource group in Azure
- Recovery Services Vault created in the desired region
- Backup configuration enabled for the vault
Once the vault is created, the MARS agent installer and vault credentials file can be downloaded from the Azure Portal.
Download and Install Azure MARS Agent
Download Microsoft Azure Recovery Services Agent
The Azure MARS agent installer can be downloaded directly from the Recovery Services Vault in the Azure Portal.
Steps:
- Open Azure Portal
- Navigate to Recovery Services Vault
- Select Backup
- Choose On-Premises Server
- Download the MARS Agent installer
- Download the Vault Credentials file
These credentials allow the on-premises server to securely register with Azure.
Install Azure Backup MARS Agent on Windows Server
After downloading the installer, the agent can be installed on the on-premises server.
Typical installation steps:
- Run MARSAgentInstaller.exe
- Follow the installation wizard
- Choose installation and cache locations
- Complete the installation process
- Launch the Microsoft Azure Recovery Services Agent console
Once installed, the server must be registered with the Azure Recovery Services Vault.
Register server with Azure Recovery Services Vault
Server registration establishes trust between the on-premises machine and Azure.
Registration process:
- Open the MARS Agent console
- Select Register Server
- Browse and select the downloaded Vault Credentials file
- Authenticate with Azure services
- Configure encryption passphrase
After successful registration, the server becomes available for backup configuration.
Configure passphrase for backup encryption
During registration, administrators must create a strong encryption passphrase.
This passphrase:
- Encrypts backup data before it is sent to Azure
- Is required to restore backup data
- Is not stored by Microsoft
It is important to store the passphrase securely, because backups cannot be restored without it.
Configure Azure Backup for On-Premises Server
Configure backup policy using MARS Agent
After registering the server with the Recovery Services Vault, the next step is to configure a backup policy using the MARS Agent console. The backup policy determines what data will be backed up, how often backups run, and how long recovery points are retained.
Steps to configure a backup policy:
- Open Microsoft Azure Recovery Services (MARS) Agent
- Click Schedule Backup
- Start the Backup Schedule Wizard
- Define the data source and schedule
- Configure retention policies
- Review and complete the configuration
Once completed, the server will automatically run backups according to the defined schedule.
Select files and folders for backup
The MARS Agent allows administrators to select specific files, folders, or entire drives for backup. This flexibility helps reduce storage costs by backing up only critical data.
Typical selections include:
- Application data directories
- User home folders
- Shared file server directories
- Configuration files
- System State
During the configuration wizard:
- Click Add Items
- Browse the local filesystem
- Select files or folders to protect
- Confirm the selection
Avoid selecting temporary or cache directories to reduce unnecessary backup data.
Configure backup schedule and retention policy
Azure Backup allows administrators to configure daily or weekly backup schedules along with flexible retention settings.
Common configuration options include:
| Setting | Description |
|---|---|
| Backup frequency | Daily or weekly backups |
| Backup time | Time when the backup job starts |
| Retention days | Number of days backups are kept |
| Long-term retention | Weekly, monthly, or yearly retention |
Example configuration:
- Daily backup at 9:00 PM
- Retain backups for 30 days
Retention policies ensure organizations can restore data from multiple historical recovery points.
Configure bandwidth throttling for backups
In environments with limited network bandwidth, the MARS Agent supports network throttling to control how much bandwidth is used during backup operations.
Bandwidth throttling helps prevent backup jobs from impacting production traffic.
Configuration steps:
- Open the MARS Agent console
- Navigate to Change Properties
- Select Throttling
- Define bandwidth limits for work hours and non-work hours
Example configuration:
| Time Period | Bandwidth Limit |
|---|---|
| Work hours | 2 Mbps |
| Non-work hours | Unlimited |
This ensures backups run efficiently without affecting other network applications.
Perform First Backup using Azure MARS Agent
Run initial backup manually
After configuring the backup policy, administrators can run the first backup manually to verify the configuration.
Steps:
- Open the MARS Agent console
- Click Back Up Now
- Select the configured backup policy
- Start the backup job
The agent will scan the selected files and begin uploading encrypted data to the Azure Recovery Services Vault.
Verify backup job status
Once the backup job starts, administrators should verify that the operation completes successfully.
The job status can be viewed directly within the MARS Agent console.
Common job states include:
| Status | Meaning |
|---|---|
| In Progress | Backup job currently running |
| Completed | Backup finished successfully |
| Completed With Warnings | Backup finished but with minor issues |
| Failed | Backup operation failed |
If the job fails, logs can be checked for troubleshooting.
Check backup logs and reports
Azure Backup maintains detailed logs that help administrators diagnose issues or confirm successful backup operations.
Logs typically contain:
- Backup start time
- Backup completion status
- Files processed
- Errors encountered
Log files are stored locally on the server and can also be viewed through the Azure Portal for additional insights.
Monitor backup status in Azure Portal
Backup operations can also be monitored from the Azure Portal.
Steps:
- Open Recovery Services Vault
- Select Backup Items
- Choose the registered server
- View Backup Jobs
The portal displays:
- Latest backup time
- Recovery points
- Job history
- Backup health status
This centralized view helps administrators monitor multiple servers from one dashboard.
Restore Data from Azure Backup
Restore files and folders from Azure Backup
Azure Backup allows administrators to restore backed-up data from any available recovery point.
Restoration can be initiated from the MARS Agent console or the Azure Portal.
Basic restore steps:
- Open the MARS Agent console
- Click Recover Data
- Select the server and recovery point
- Choose files or folders to restore
- Start the restore process
The agent retrieves the encrypted backup from Azure and restores it locally.
Restore data to original location
In many scenarios, administrators want to restore files to their original location.
When selecting restore options:
- Choose Original Location
- Existing files may be overwritten depending on settings
- Permissions and attributes are preserved
This method is useful when restoring accidentally deleted or modified files.
Restore data to alternate location
Azure Backup also supports restoring data to a different directory or server location.
This option is commonly used when:
- Recovering files for testing
- Performing forensic analysis
- Avoiding overwriting existing files
Steps:
- Choose Alternate Location
- Select a target directory
- Restore the selected files
This method allows safer recovery without impacting production data.
Restore previous file versions
Because Azure Backup maintains multiple recovery points, administrators can restore earlier versions of files.
Typical use cases include:
- Recovering files after ransomware attacks
- Restoring accidentally modified data
- Rolling back configuration files
Administrators simply select the desired recovery point date during the restore process.
Monitor Azure Backup Jobs
View backup job status in Azure Portal
Azure provides a centralized dashboard for monitoring backup operations.
Steps to view job status:
- Navigate to Recovery Services Vault
- Select Backup Jobs
- Filter by workload or time period
The dashboard shows:
- Job status
- Backup duration
- Success or failure messages
Monitor backup health and alerts
Azure Backup integrates with Azure Monitor and alerting systems to provide proactive notifications.
Administrators can configure alerts for:
- Backup failures
- Missed backup schedules
- Storage capacity warnings
- Recovery errors
Alerts can be sent through email, Azure Monitor alerts, or integrated monitoring tools.
Track recovery points
Recovery points represent the historical versions of backed-up data stored in Azure.
Administrators can view recovery points by:
- Opening Recovery Services Vault
- Selecting Backup Items
- Choosing the protected server
The portal displays available recovery points along with backup timestamps and retention details.
Configure backup notifications
Backup notifications help administrators stay informed about backup activity.
Notification options include:
| Notification Type | Purpose |
|---|---|
| Email alerts | Notify administrators of backup failures |
| Azure Monitor alerts | Automated monitoring integration |
| Job completion alerts | Notify when backup jobs complete |
These alerts improve operational visibility and ensure backup jobs run reliably.
Troubleshoot Azure Backup MARS Agent Issues
| Symptom | Likely cause | Fix |
|---|---|---|
| MARS Agent cannot connect to Azure | Internet outage, firewall blocking HTTPS, or wrong proxy | Allow outbound port 443 to Azure Backup endpoints; verify proxy settings in the MARS Agent console |
| Backup jobs fail in MARS Agent | Low disk space, corrupted files, bad policy, or network drop | Review job logs in the MARS console; free disk space; re-run after fixing the reported file or network error |
| Recovery Services Vault authentication errors | Expired or invalid vault credentials file | Download new vault credentials from Azure Portal, re-register the server, and verify subscription permissions |
| Backup stuck or very slow | Large dataset, bandwidth limits, or heavy disk I/O | Enable bandwidth throttling, schedule off-peak runs, or exclude unnecessary paths from the policy |
| Firewall or proxy blocks Azure Backup | Corporate proxy not configured on the agent | MARS Agent console → Change Properties → Proxy Settings; allow outbound connections to Azure Backup URLs |
Azure Backup Security and Encryption
Encryption used by Azure Backup
Azure Backup protects data using strong encryption mechanisms to ensure data security both during transmission and while stored in the cloud. When using the MARS Agent, data is encrypted before it leaves the on-premises server, ensuring that only encrypted data is transmitted over the network.
Key security features include:
- AES 256-bit encryption applied locally before data transfer
- Secure HTTPS communication (TLS) between the server and Azure
- Encrypted storage within the Recovery Services Vault
- Access control using Azure role-based access control (RBAC)
Because encryption occurs locally, even Microsoft cannot access the encrypted backup data.
Role of passphrase in MARS backup
During server registration with the Recovery Services Vault, administrators must configure a secure encryption passphrase. This passphrase is used to encrypt backup data before it is sent to Azure.
Important characteristics of the passphrase:
- Required to restore backup data
- Not stored by Microsoft
- Must be securely saved by administrators
- Protects backup data from unauthorized access
If the passphrase is lost, the encrypted backup data cannot be restored, making secure storage of the passphrase critical.
Protecting backup data from ransomware
Azure Backup includes multiple security mechanisms to protect backup data from ransomware attacks or accidental deletion.
Security protections include:
- Encryption before transmission
- Immutable recovery points
- Backup isolation within the Recovery Services Vault
- Backup alerts for suspicious activities
These protections ensure that attackers cannot easily modify or delete stored backup data.
Soft delete protection in Azure Backup
Azure Backup provides a Soft Delete feature that protects backup data even if it is accidentally deleted.
When Soft Delete is enabled:
- Deleted backup data is retained for 14 days
- Administrators can recover deleted backups during this period
- Protection helps prevent accidental or malicious deletion
Soft Delete significantly improves data protection and recovery capabilities.
Azure Backup Performance Optimization
Reduce backup window time
Backup window time refers to the duration required for a backup job to complete. Large datasets or limited bandwidth can increase backup duration.
To reduce backup window time:
- Backup only critical directories
- Exclude temporary or cache files
- Schedule backups during low system activity
- Use efficient retention policies
Reducing the backup scope improves backup performance and reduces storage consumption.
Configure bandwidth throttling
Bandwidth throttling allows administrators to limit how much network bandwidth the MARS Agent can use during backup operations.
This feature helps prevent backup traffic from affecting production workloads.
Typical configuration options include:
| Time Period | Bandwidth Limit |
|---|---|
| Work hours | Limited bandwidth |
| Non-work hours | Full bandwidth |
Administrators can configure throttling settings directly from the MARS Agent properties.
Optimize backup schedules
Backup schedules should align with the organization's operational requirements to minimize system impact.
Best scheduling practices include:
- Running backups during off-peak hours
- Avoiding overlap with heavy workloads
- Scheduling incremental backups frequently
- Using appropriate retention policies
Proper scheduling ensures reliable backups without impacting server performance.
Handling large data backups
When backing up large datasets, administrators should carefully plan backup configuration to maintain efficiency.
Strategies for handling large backups include:
- Splitting backup workloads across multiple schedules
- Excluding unnecessary directories
- Monitoring backup performance regularly
- Ensuring adequate internet bandwidth
Efficient configuration prevents slow backup operations and improves overall reliability.
Azure Backup MARS Agent Limitations
Workloads not supported by MARS Agent
The MARS Agent primarily supports file-level backups from Windows servers and does not protect all workload types.
Unsupported workloads include:
- Linux servers
- Full virtual machine backups
- Databases such as SQL Server (when requiring application-consistent backups)
- Kubernetes or container workloads
These workloads require alternative Azure backup solutions such as Azure VM Backup or Azure Backup Server.
File size and backup limitations
Azure Backup using the MARS Agent has several practical limitations regarding data protection.
Typical limitations include:
- Backup designed primarily for file and folder level protection
- Very large datasets may require extended backup time
- System resources may affect backup performance
Administrators should carefully select backup targets to ensure efficient backup operations.
Backup frequency limits
Backup schedules using the MARS Agent support scheduled backups but do not allow continuous data protection.
Typical scheduling options include:
- Daily backups
- Weekly backups
Frequent incremental backups help maintain updated recovery points without excessive storage consumption.
Differences between VM Backup and MARS Agent
Azure provides different backup methods depending on workload type.
| Feature | MARS Agent | Azure VM Backup |
|---|---|---|
| Backup type | File and folder | Full virtual machine |
| Deployment | Installed on server | Integrated with Azure VM |
| Use case | On-premises server backup | Azure virtual machines |
| Restore scope | File-level restore | Full VM or disk restore |
Choosing the correct backup solution ensures optimal protection and recovery capabilities.
Azure Backup Agent vs Other Backup Methods
Azure Backup MARS Agent vs Azure VM Backup
Azure provides different backup methods depending on where workloads run.
| Feature | MARS Agent | Azure VM Backup |
|---|---|---|
| Deployment location | On-premises servers | Azure virtual machines |
| Backup scope | Files and folders | Entire VM |
| Backup management | MARS Agent console | Azure Portal |
| Use case | Hybrid backup | Cloud workload protection |
Both methods can be used together in hybrid environments.
Azure Backup vs Azure Site Recovery
Although both services are related to data protection, they serve different purposes.
| Service | Purpose |
|---|---|
| Azure Backup | Protects and restores data from backups |
| Azure Site Recovery | Provides disaster recovery and failover capabilities |
Azure Backup focuses on data protection, while Site Recovery focuses on business continuity.
Azure Backup vs traditional on-prem backup solutions
Traditional backup solutions rely on local storage such as tapes or backup servers, while Azure Backup uses cloud storage.
Advantages of Azure Backup include:
- No hardware maintenance
- Scalable storage capacity
- Centralized management
- Built-in redundancy and durability
These benefits make Azure Backup a reliable and scalable solution for modern hybrid infrastructure.
Frequently Asked Questions
1. What is Azure MARS Agent?
2. What is Azure Recovery Services Vault?
3. Can Azure Backup protect on-premises servers?
4. Where is Azure Backup data stored?
5. Is Azure Backup secure?
Summary
Azure Backup provides a reliable and scalable way to protect on-premises servers by storing backup data securely in the Azure cloud. Using the Microsoft Azure Recovery Services (MARS) Agent, administrators can back up files, folders, and system state from Windows servers directly to a Recovery Services Vault without deploying complex backup infrastructure.
In this tutorial, we covered the Azure Backup architecture, installation of the MARS Agent, configuration of backup policies, monitoring backup jobs, restoring data, and implementing security best practices. Azure Backup helps organizations build a hybrid cloud backup strategy with strong encryption, centralized management, and flexible retention policies.