
Introduction - Deploy Flask with Nginx using Gunicorn+Nginx
In this article we will to go through the process of deploying a flask app on a Linux server. We will use gunicorn as a WSGI server to communicate with our flask app, and Nginx as a proxy server between the gunicorn server and the client.
We need gunicorn between flask and nginx because the flask development server although good for debugging is weak and will not stand in production, so we need gunicorn as a wsgi server to communicate with flask. For a database-backed app, pair this deployment guide with Flask SQLAlchemy. This article assumes that you already have a Linux server.
Lab Environment
- OS: Ubuntu 20.04.1
- Python version: 3.8.10
- Flask version: 2.0.1
- Gunicorn version: 20.1.0
- Nginx version: 1.18.0
Step-1: Install pre-requisite packages
Making sure python3 is installed
Firstly, we need to make sure that python3 is installed on the Linux, run the following command to test if python exists:
$ python3 --version
Python 3.8.10
Ubuntu 20.04 pins an older python3 in apt; for a newer interpreter beside the system default, see install latest Python on Ubuntu.
However, if python is not installed, you can install it using the following commands:
Update the repository
$ sudo apt update
Install python
$ sudo apt install python3.9
Making sure pip3 is installed
Now we need to make sure that pip (python's package manager) is installed. Run the following command:
$ pip3 --version
pip20.3.4from/usr/lib/python3.9/site-packages/pip(python3.9)
If pip3 is not installed then you can install the same using this command:
$ sudo apt install python-pip
Step-2: Create Python Virtual Environment
Before installing any of the packages that we are going to use, we need to create a python virtual environment to keep different versions of packages separated.
We will create a separate directory to store our project files:
deepak@ubuntu:~$ mkdir flask-gunicorn
Move to the directory that contains your project and create a virtual
environment named menv (or any name):
deepak@ubuntu:~$ cd flask-gunicorn/

deepak@ubuntu:~/flask-gunicorn$ python3 -m venv menv
The above command will create a directory named menv/ that contains
everything related to the virtual environment including the binary file
that activates the virtual environment, to activate menvvirtual
environment run the following command:
deepak@ubuntu:~/flask-gunicorn$ source ./menv/bin/activate
(menv) deepak@ubuntu:~/flask-gunicorn$
menv/lib/python-version/site-packages
Step-3: Install flask and gunicorn packages
Once the virtual environment is activated, we are ready to install the packages that we need (list them in a requirements.txt file when you share the project):
(menv) deepak@ubuntu:~/flask-gunicorn$ pip3 install flask gunicorn
Step-4: Setup Flask Web Application
4.1: Create HTML template files
By default
flask looks for the template files in the templates directory, so we need to
create a templates directory in the same directory as our application:
(menv) deepak@ubuntu:~/flask-gunicorn$ mkdir templates
(menv) deepak@ubuntu:~/flask-gunicorn$ cd templates/
Here is index.html template that our flask web app will return:
<!DOCTYPE html>
<html lang="en">
<head>
    <meta charset="UTF-8">
    <meta http-equiv="X-UA-Compatible" content="IE=edge">
    <meta name="viewport" content="width=device-width, initial-scale=1.0">
    <title>Hello</title>
</head>
<body>
    <h2>Hello world!</h2>
</body>
</html>
4.2: Create a basic python web app
As an example of a flask app, we are going to use a simple app that
returns an HTML template that contains "Hello world!", we will call
it my_app.py here is the app.
In order to display HTML files using flask, we will the
render_template() function, it only takes the name of the HTML file
and the variable that you would like to pass to the template engine
from flask import Flask, render_template

app = Flask(__name__)

@app.route("/")
def main():
    return render_template("index.html")

if __name__ == "__main__":
app.run()Here we created an instance of this class called app and give it the
special variable __name__ as an argument. You need this because flask
sets up the static folder paths behind the scenes. We used the route()
decorator to specify the URL that should launch our function.
Finally we used an if statement to see whether our module is imported
by another application or is it ran directly, in case the module is ran
directly and the flask development server will run on port 5000.
4.3: Start the Python web application
To start the python web application, just execute my_app.py using
python binary as shown below:
(menv) deepak@ubuntu:~/flask-gunicorn$ python3 my_app.py
 * Serving Flask app 'my_app' (lazy loading)
 * Environment: production
   WARNING: This is a development server. Do not use it in a production deployment.
   Use a production WSGI server instead.
 * Debug mode: off
 * Running on http://127.0.0.1:5000/ (Press CTRL+C to quit)
 * Restarting with stat
 * Debugger is active!
 * Debugger PIN: 136-149-786
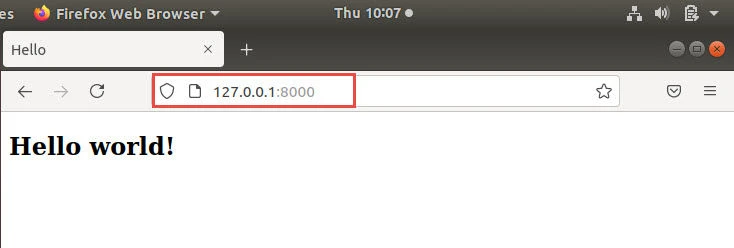
Access 127.0.0.1:5000 on your browser of the same Linux server and you
should be able to get Hello World message.

Simple Flask Web Application
Hit Ctrl+C on your terminal to exit the web application once you are
finished.
Step-5: Configure Gunicorn
Now that our basic web app is up and running, we will continue to configure Gunicorn. Using our Flask application from earlier, we can get it up and running using just a few steps
5.1: Create WSGi Entry Point
First, we need to create a python file that will be used as an entry
point to our application by gunicorn, we will name it wsgi.py:
from my_app import app

if __name__ == "__main__":
app.run()This is our directory structure right now, yours can be different:
.
├── my_app.py
├── menv
│ └── ....
├── templates
│ └── index.html
└── wsgi.py
5.2: Access Flask web app using Gunicorn
Gunicorn offers a lot of command line options (flags) which can be used
to tune the performance of the server to match your needs, the most
commonly used options are -w to specify the number of workers that the
server will use and --bind which specify the interface and port to
which the server should bind (0.0.0.0 will be your server's public IP
address)
Now we can test the gunicorn server and see whether it can run the flask
app, use the following command to start the gunicorn server with 4
workers -w (You can increase or decrease the number of workers
depending on your server's specs), we also need to specify the interface
and the port to which the server should bind using the --bind command
line option:
(menv) deepak@ubuntu:~/flask-gunicorn$ gunicorn -w 4 --bind 0.0.0.0:8000 wsgi:app
The above --bindoption took
If you see a similar output, then your server is running ():
[2021-07-27 16:41:56 +0200] [10837] [INFO] Starting gunicorn 20.1.0
[2021-07-27 16:41:56 +0200] [10837] [INFO] Listening at: http://0.0.0.0:8000 (10837)
[2021-07-27 16:41:56 +0200] [10837] [INFO] Using worker: sync
[2021-07-27 16:41:56 +0200] [10839] [INFO] Booting worker with pid: 10839
[2021-07-27 16:41:56 +0200] [10840] [INFO] Booting worker with pid: 10840
[2021-07-27 16:41:56 +0200] [10841] [INFO] Booting worker with pid: 10841
[2021-07-27 16:41:56 +0200] [10842] [INFO] Booting worker with pid: 10842
As seen in the above output, the gunicorn server is listening on port
8000 of the localhost, and 4 workers have started each with a different
process Id (PID). If you visit 127.0.0.1:8000/, you will see the root
directory of your website (same as we say with python web app on port
5000 earlier:
Flask Application with Gunicorn
5.3: Use Gunicorn as systemd service
Now we need to turn gunicorn into a service, so that it starts when the server boots automatically and if it fails for some reason, it gets restarted by systemd.
Firstly, let's exit from the virtual environment using the deactivate
command.
(menv) deepak@ubuntu:~/flask-gunicorn$ deactivate
deepak@ubuntu:~/flask-gunicorn$
Then let's create a service called, I will call it my-server.service,
you can call it whatever you want but make sure to add .service to the
end.Following is the content I have added for my-server.service. You
can replace the User, Environment and ExecStart values based on
your environment:
deepak@ubuntu:~/flask-gunicorn$ sudo cat /etc/systemd/system/my-server.service
[Unit]
Description=Flask Web Application Server using Gunicorn
After=network.target

[Service]
User=deepak
Group=www-data
WorkingDirectory=/home/deepak/flask-gunicorn
Environment="PATH=/home/deepak/flask-gunicorn/myenv/bin"
ExecStart=/bin/bash -c 'source /home/deepak/flask-gunicorn/menv/bin/activate; gunicorn -w 3 --bind unix:/tmp/my-server/ipc.sock wsgi:app'
Restart=always

[Install]
WantedBy=multi-user.target
Here,
- This systemd service will be started after the
networkservice is UP while booting up - The service will be launched by the user specified by the
Userdirective (meaning that the service will get the UID of this user) and the same applies to theGroupdirective, we chosewww-databecause this is the group used by nginx, so the communication between gunicorn and Nginx will be easier. WorkingDirectorydirective refers to the directory in which the flask app is located.Environmentdirective specifies the virtual environment path which we are using for our web appExecStartcontains the command that will be used to launch the service, in this case we used bash command to activate the virtual environment and launch the gunicorn with 3 workers,- We are binding our gunicorn server to
unix:/tmp/my-server/ipc.sock, this simply is a socket in the server that gunicorn uses for interpersonal communication (IPC), nginx will use this socket to communicate with gunicorn, it is created when the command is launched and removed when the process is killed for any reason and it is different every time, this is why we placed it in the/tmpdirectory.
Before starting the service we need to first create a
my-server/directory inside /tmp:
deepak@ubuntu:~/flask-gunicorn$ mkdir /tmp/my-server
You can name the directory and gunicron IPC file any name you want. Now let's enable and start the service. This command will enable the service to be automatically restarted after reboot and will also start the service for the current session:
Enable or disable the unit at boot with systemctl enable; the systemctl command documents enable --now, symlinks under /etc/systemd/system, and masks.
deepak@ubuntu:~/flask-gunicorn$ sudo systemctl enable my-server --now
Check the status of your service and make sure it is in active and
Running state with no errors:
deepak@ubuntu:~/flask-gunicorn$ sudo systemctl status my-server.service
● my-server.service - Flask Web Application Server using Gunicorn
   Loaded: loaded (/etc/systemd/system/my-server.service; disabled; vendor preset: enabled)
   Active: active (running) since Thu 2021-07-29 11:36:27 IST; 1min 22s ago
 Main PID: 4692 (bash)
    Tasks: 5 (limit: 4662)
   CGroup: /system.slice/my-server.service
           ├─4692 /bin/bash -c source /home/deepak/flask-gunicorn/menv/bin/activate; gunicorn -w 3 --bind unix:/tmp/my-server/ipc.sock wsgi:app
           ├─4693 /home/deepak/flask-gunicorn/menv/bin/python3 /home/deepak/flask-gunicorn/menv/bin/gunicorn -w 3 --bind unix:/tmp/my-server/ipc.sock wsgi:app
           ├─4695 /home/deepak/flask-gunicorn/menv/bin/python3 /home/deepak/flask-gunicorn/menv/bin/gunicorn -w 3 --bind unix:/tmp/my-server/ipc.sock wsgi:app
           ├─4696 /home/deepak/flask-gunicorn/menv/bin/python3 /home/deepak/flask-gunicorn/menv/bin/gunicorn -w 3 --bind unix:/tmp/my-server/ipc.sock wsgi:app
           └─4697 /home/deepak/flask-gunicorn/menv/bin/python3 /home/deepak/flask-gunicorn/menv/bin/gunicorn -w 3 --bind unix:/tmp/my-server/ipc.sock wsgi:app

Jul 29 11:36:27 ubuntu systemd[1]: Started Flask Web Application Server using Gunicorn.
Jul 29 11:36:27 ubuntu bash[4692]: [2021-07-29 11:36:27 +0530] [4693] [INFO] Starting gunicorn 20.1.0
Jul 29 11:36:27 ubuntu bash[4692]: [2021-07-29 11:36:27 +0530] [4693] [INFO] Listening at: unix:/tmp/my-server/ipc.sock (4693)
Jul 29 11:36:27 ubuntu bash[4692]: [2021-07-29 11:36:27 +0530] [4693] [INFO] Using worker: sync
Jul 29 11:36:27 ubuntu bash[4692]: [2021-07-29 11:36:27 +0530] [4695] [INFO] Booting worker with pid: 4695
Jul 29 11:36:27 ubuntu bash[4692]: [2021-07-29 11:36:27 +0530] [4696] [INFO] Booting worker with pid: 4696
Jul 29 11:36:27 ubuntu bash[4692]: [2021-07-29 11:36:27 +0530] [4697] [INFO] Booting worker with pid: 4697
journalctl -u my-server.service and press Ctrl+G to go to the end of
the log output. Now check for any error messages and try to fix them
before going to the next step.
5.4: Configure Gunicorn as Supervisor
You may also choose to use supervisor instead of systemd daemon to monitor and start the gunicorn service.
You can install supervisor via default package manager:
$ sudo apt install supervisor
OR via pip
$ python3 -m pip install supervisor supervisord-dependent-startup
Next configure /etc/supervisord.conf:
[supervisord]
nodaemon=true
pidfile = /tmp/supervisord.pid
logfile = /tmp/supervisord.log
logfile_maxbytes = 10MB
logfile_backups=10
loglevel = debug

[unix_http_server]
file = /tmp/supervisor.sock

[supervisorctl]
serverurl = unix:///tmp/supervisor.sock

[rpcinterface:supervisor]
supervisor.rpcinterface_factory = supervisor.rpcinterface:make_main_rpcinterface

[include]
files = /etc/supervisord.d/*.conf
We will store our gunicorn service file inside /etc/supervisord.d/.
Following is the content of my gunicorn.conf file:
[program:flask_catalog]
command=/bin/bash -c 'source /home/deepak/flask-gunicorn/menv/bin/activate; gunicorn -w 3 --bind unix:/tmp/my-server/ipc.sock wsgi:app'
directory=/home/deepak/flask-gunicorn
user=deepak
group=www-data
autostart=true
autorestart=true
stdout_logfile=/tmp/app.log
stderr_logfile=/tmp/error.log
After the setup is complete, run supervisord by using the following command:
$ supervisord
Check the status of all the available services using:
$ supervisorctl status
Step-6: Configuring Nginx
6.1: Install nginx package
Let's start by installing nginx:
deepak@ubuntu:~/flask-gunicorn$ sudo apt install nginx
6.2: Configure nginx
Then navigate to the nginx directory:
deepak@ubuntu:~/flask-gunicorn$ cd /etc/nginx/
This directory contains all the files related to nginx, we need to create a configuration file that will make nginx act as a proxy for our flask app.
The main configuration file is the one named nginx.conf, by
convention, this file is not touched by developers or sys-admins, new
configuration files are created in the sites-available/ directory and
then sym-linked to the /sites-enabled/ directory.
Let's create a new file in the sites-available/directory:
deepak@ubuntu:~/flask-gunicorn$ cd /etc/nginx/

deepak@ubuntu:/etc/nginx$ sudo cat sites-available/my-server
server {
    listen 80;

    location / {
        include proxy_params;
        proxy_pass http://unix:/tmp/my-server/ipc.sock;
    }
}
Next run the sudo nginx -t to make sure that the syntax of the
configuration file is ok,
deepak@ubuntu:/etc/nginx$ sudo nginx -t
nginx: the configuration file /etc/nginx/nginx.conf syntax is ok
nginx: configuration file /etc/nginx/nginx.conf test is successful
Once the syntax check passes, create a symbolic link of this file into
sites-enabled directory:
deepak@ubuntu:/etc/nginx$ sudo ln -s /etc/nginx/sites-available/my-server /etc/nginx/sites-enabled/

deepak@ubuntu:/etc/nginx$ sudo ls -l  /etc/nginx/sites-enabled/
total 0
lrwxrwxrwx 1 root root 34 Jul 29 10:56 default -> /etc/nginx/sites-available/default
lrwxrwxrwx 1 root root 36 Jul 29 11:05 my-server -> /etc/nginx/sites-available/my-server
If everything is fine run sudo nginx -s reload for the configuration
file to take place:
deepak@ubuntu:/etc/nginx$ sudo nginx -s reload
The above configurations instructs nginx to listen on port 80 and proxy all the connections to the socket that we created earlier, so that gunicorn can read from the socket and allows our flask app to respond, then gunicorn takes the response from the flask app and writes it to the socket so that nginx can read from the socket and return the response to the user.
6.3: Verify nginx proxy request
If you visited your IP address http://your-ip-address you will get a
respond.
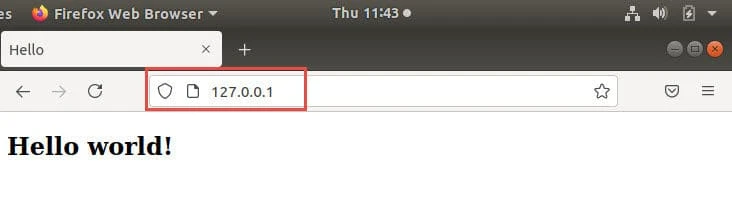
Flask Application with Gunicorn and Nginx (Loopback Address)
6.4: Use FQDN with nginx server
We can also add a domain name which can be easily done using the
server_name directive. Just add another line to the
sites-available/my-server config file:
server {
    listen 80;
    server_name server.example.com;

    location / {
        include proxy_params;
        proxy_pass http://unix:/tmp/my-server/ipc.sock;
    }
}
Here I am using a custom FQDN name, I have added the same into my hosts file for DNS lookup. You may also configure your own DNS server to perform the lookup:
deepak@ubuntu:/etc/nginx$ cat /etc/hosts
...
192.168.0.188  server.example.com
Now reload the config file
deepak@ubuntu:/etc/nginx$ sudo nginx -s reload
and try to access your domain name using any browser:

Flask Application with Gunicorn and Nginx (Server Name)
Troubleshooting
| Symptom | Likely cause | Fix |
|---|---|---|
| systemd service fails to start | Bad unit file or missing virtualenv path | sudo journalctl -u SERVICE for the exact error; fix paths in the unit file |
| Gunicorn worker errors | Supervisor misconfiguration or app crash | Check stderr_logfile and stdout_logfile in the supervisord program stanza |
| Nginx returns 502 or static files only | Upstream socket mismatch or proxy error | Read /var/log/nginx/error.log and /var/log/nginx/access.log; confirm proxy_pass matches the Gunicorn bind address |
Summary
In this article, we went through the process of deploying a flask app using gunicorn and nginx. This setup allows us to utilize the concurrency of gunicorn and nginx and also facilitates the scaling process in case of an expansion.
